どんな記事?
深層学習のモデリングであれやこれや試してみたいけど、どうやって実装したらいいかわからん人向けに
割と自由度が高く、程よく抽象化されている枠組みとしてのkerasのfunctional APIを使って
sequentialでは難しいseq2seqをなるべくシンプルに実装してみる
目次
この記事のモチベーション
一通り学習はできた、だけど、学習時のデータのフローと推論時のデータのフローがちょっと違う。
どうやったら学習で得たパラメータを活かして推論できるの?
という疑問にお答えする。
推論に必要なこと
まずは学習が済んで一旦保存したモデルをロードしましょう。
推論時はデータのフローが異なるので、学習時とは異なる計算グラフを持つモデルを定義する必要があります。
また、一つ前の単語から次の単語を予測させる処理を実現するため
定義したモデルをループの中で関数のように使って、順次推論します。
推論の実装
モデルのロード
h5ファイルなどに保存されたモデルは次のようにロードできます。
model = keras.models.load_model(filepath)
なお、pickleは非推奨らしいです。
計算グラフの定義
エンコーダー
エンコーダーは学習時と同一のものをそのまま流用できます。
# define encoder
encoder_model = Model(inputs=model.input[0], #encoder_input
                      outputs=model.get_layer('lstm_1').output[1:]) #enconder lstm hidden state
そのまま流用できる場合、このようにModelの途中のアウトプットを取り出してくることが可能です。
デコーダー
デコーダーはちょっとだけコードが長くなってしまった。
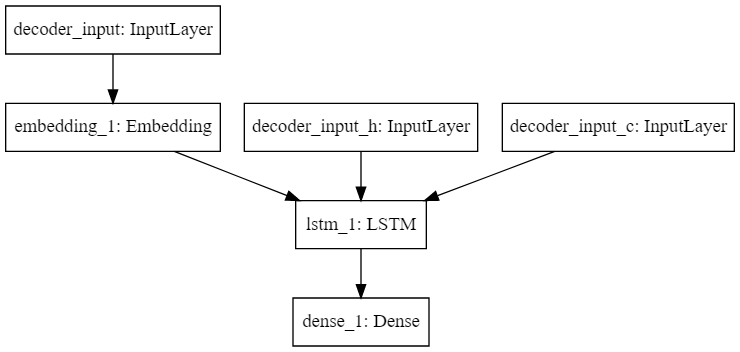
デコーダーでやるべきことは1つ前の単語のEmbedding(teacher forcingのため)、LSTM、Denseの3つです。
Embedding、LSTM、Denseはそれぞれ学習時に重みを得ていますので、その値を流用します。
また、LSTMに入力すべき隠れ層の記憶は常にエンコーダー出力と同一ではなく、1つ前の単語を推論した後の記憶になりますので、学習時から書き換えが必要です。
実装例は以下
from keras.layers import Input, LSTM, Dense, Embedding
# define decoder
embedding_dim = 256
units = 1024
vocab_tar_size = model.get_layer('dense_1').weights[1].shape.as_list()[0]

decoder_word_input = Input(shape=(1,),name='decoder_input')
decoder_input_embedding = Embedding(input_dim=vocab_tar_size,
                                    output_dim=embedding_dim,
                                    weights=model.get_layer('embedding_2').get_weights())(decoder_word_input)


decoder_state_input_h = Input(shape=(units,), name='decoder_input_h')
decoder_state_input_c = Input(shape=(units,), name='decoder_input_c')
decoder_states_inputs = [decoder_state_input_h, decoder_state_input_c]

decoder_lstm = LSTM(units,
                    return_sequences=False,
                    return_state=True,
                    weights=model.get_layer('lstm_2').get_weights())
decoder_output, state_h, state_c = decoder_lstm(decoder_input_embedding,
                                                initial_state=decoder_states_inputs)

decoder_states = [state_h, state_c]

decoder_dense = Dense(vocab_tar_size,
                      activation='softmax',
                      weights=model.get_layer('dense_1').get_weights())
decoder_output = decoder_dense(decoder_output)

decoder_model = Model(inputs=[decoder_word_input] + decoder_states_inputs,
                      outputs=[decoder_output] + decoder_states)
学習時と異なるところは
- 各レイヤーに
weightsオプションを設定している。設定すべき値はmodel.get_layer(<layer name>).get_weights()で取得できる。 -
Inputのshapeが1。 -
LSTMのreturn_sequences=Trueオプションを入れて、各ステップごとのLSTM出力を得ている -
LSTMの隠れ層の記憶が新たにInputレイヤーとして加わっている -
Modelクラスのインスタンスdecoder_modelのoutputとして隠れ層の記憶が追加されている
生成されたモデルの確認
SVG(model_to_dot(decoder_model).create(prog='dot', format='svg'))
翻訳を行う関数の定義
入力単語IDを出力単語IDに変換
実際に単語IDの列を入力して翻訳後の単語IDを得ます。
実行することは
- エンコーダーよる、隠れ層の記憶へのエンコード
- エンコーダーから得た記憶と開始トークンを使った最初の単語の予測
- 1つ前の単語と1つ前の隠れ層の記憶を使った次単語の予測
- 予測結果の出力
です。実装例は以下。(バッチ処理できるように書いていますが、本質ではないです)
def decode_sequence(input_seq, targ_lang, max_length_targ):
    # Encode the input as state vectors.
    states_value = encoder_model.predict(input_seq)
    vocab_tar_size = np.array(list(targ_lang.index_word.keys())).max()
    inp_batch_size = len(input_seq)
    # Generate empty target sequence of length 1.
    target_seq = np.zeros((inp_batch_size, 1))
    # Populate the first character of target sequence with the start character.
    target_seq[:, 0] = targ_lang.word_index['<start>']

    # Sampling loop for a batch of sequences
    decoded_sentence = np.zeros((inp_batch_size, max_length_targ))

    for i in range(max_length_targ):
        output_tokens, h, c = decoder_model.predict([target_seq] + states_value)

        # Sample a token
        sampled_token_index = np.argmax(output_tokens,axis=1) #array of size [inp_batch_size, 1]

        decoded_sentence[:,i] = sampled_token_index

        # Update the target sequence (of length 1).
        target_seq = np.zeros((inp_batch_size, 1))
        target_seq[:, 0] = sampled_token_index

        # Update states
        states_value = [h, c]

    return decoded_sentence
Modelクラスのインスタンスはpredictメソッドを持ちます。
predictメソッドに入力を渡すと、定義した計算グラフに従って計算を行い、出力を得られます。
まずはencoder_model.predictを使って入力を隠れ層の記憶へのエンコードしています。
サイズが[batch_size,1]であるtarget_seqを1つ前の単語だとして、隠れ層の記憶とともにdecoder_model.predictを使って次の単語と次に入力すべき隠れ層の記憶を得ています。
得られた単語は順次argmaxをとり、
出力がサイズ[batch_size,max_length_targ]になるようなdecoded_sentenceに格納していきます。
このループを出力単語列の最大長と同じ回数だけ実行し、decoded_sentenceを出力します。
出力例
array([[  15.,   33.,    5.,   27.,  121.,    9.,  482.,    6.,    8.,
           4.,    3.,    0.,    0.,    0.,    0.,    0.,    0.,    0.]])
出力単語IDを単語に変換
予めkeras.preprocessing.text.Tokenizerによって単語IDと単語の変換則が得られているので
ndarrayの各成分の変換則を作用させればいいわけです。
pythonの関数をndarrayのすべての成分に作用させるには、np.vectorizeを使うとループなしで書けます
実装例は以下
# decoded_sentenseのword_indexを単語に変換し、開始・終了トークンを取り除く
def seq2sentence(seq,lang):
    def index2lang(idx, lang):
        try:
            return lang.index_word[idx]
        except KeyError:
            return ''
    langseq2sentence = np.vectorize(lambda x: index2lang(x,lang),otypes=[str])
    sentences = langseq2sentence(seq)
    sentences = [' '.join(list(sentence)) for sentence in sentences]
    sentences = [sentence.lstrip('<start>').strip(' ').strip('<end>') for sentence in sentences]
    return sentences
一応例外処理を入れておいた。
最後に無駄なスペースと開始・終了トークンを取り除いて完成です。
参考
前処理部分は下記
アテンションを用いたニューラル機械翻訳
https://www.tensorflow.org/tutorials/text/nmt_with_attention
学習・推論部分のコードのベースは下記
Sequence to sequence example in Keras (character-level).
https://keras.io/examples/lstm_seq2seq/
学習に使ったデータは下記
https://github.com/odashi/small_parallel_enja
本記事のコードが入ってるリポジトリ
https://github.com/nagiton/simple_NMT

