はじめに
この記事は OpenCV Advent Calendar 2017 の 20日目の記事です。
(12/20 PM 追記)
- SHARP 公式さんから言及をいただきました、ありがとうございます!
オーナーさんによるロボホンのアプリ実装例 → 万年アドベントカレンダーを実装した(OpenCV+Deep Neural Network+RoBoHoN) https://t.co/HmoOC2Rvps
— SHARP シャープ株式会社 (@SHARP_JP) 2017年12月20日
アドベントカレンダーを開け続けたい
今年初めて、我が家にリアル・アドベントカレンダーが導入されて、毎日たのしく開けています。
X'mas が近付き、のこり日数も少なくなってきて、懸念される「家族のアドベントカレンダー・ロス」の解決策として、開け続けられる万年アドベントカレンダーを実装しました。
ロボホンがカレンダーを開ける
モバイル型ロボット電話 RoBoHoN は Android がベースです。
SHARP公式から、SDKもリリースされており、オーナーは自分でアプリ実装をすることができます。
実装時、Android のベース機能に加えて、SDKを通じて、RoBoHoN 独自のVoiceUIや、ID指定でのモーション振り付けなどが利用できます。
今回、カレンダーの外装として、ロボホンを利用します。
| ロボホンハードウェアスペック1 |
|---|
| OS Android 5.0.2 |
| CPU Qualcomm Snapdragon 400 processor 1.2GHz (クアッドコア) |
| メモリ ROM 16GB RAM 2GB |
| ディスプレイ 約 2.0インチ QVGA (240*320 画素 ) |
| カメラ 約 800万画素 CMOS (3264*2448画素) |
開けたカレンダーの中に画像(OpenCV, ディープラーニング)
万年カレンダーの中には、画像を用意したいと思います。
ロボホン本体の中には、ユーザーがロボホンのカメラ機能で撮り貯めた写真が保存されています。
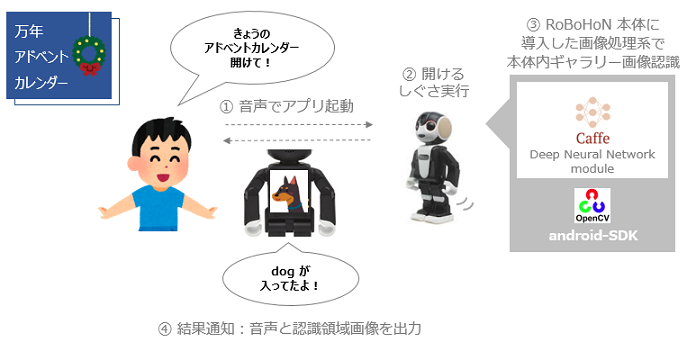
日々溜まっていくこれら写真の中から、飛行機・車・犬… など物体を動的に認識して切り抜いた画像を、「きょうのカレンダーの中身」として表示します。

この動的な画像作成に、今年2017年8月にOpenCVメインリポジトリに昇格した dnn(Deep Neural Network)2モジュールを利用します。
これまで、別々に導入設定・利用の必要があった Caffe、TensorFlow など DeepLearningフレームワークが、依存関係なくOpenCVに包含されるようになったもので、今回のような生成済モデルを利用するだけのアプリケーション実装において、とくに有難いリリースだとおもいました!
公式のこちらのチュートリアルを参考に、ロボホンに ”軽量で、モバイル端末でもリアルタイムで快適に動作”3 する MobileNets による Single Shot Multibox Detector(SSD)モデルを載せていきます。
[OpenCV] How to run deep networks on Android device {#tutorial_dnn_android}
https://github.com/opencv/opencv/blob/7e680bd9ff27ef4661dc14fe5f9071ba52883f24/doc/tutorials/dnn/dnn_android/dnn_android.markdown
(上記の実装)
https://github.com/opencv/opencv/tree/master/samples/android/mobilenet-objdetect
環境
Windows 7 SP1
Android Studio 2.3.1
RoBoHoN_SDK 1.3.0
RoBoHon端末ビルド番号 02.01.00
OpenCV 3.3.1
ロボホンに OpenCV-android-sdk を導入する
下記などを参考に導入していきます。
[OpenCV] How to run deep networks on Android device
https://docs.opencv.org/trunk/d0/d6c/tutorial_dnn_android.html
今回のハマりどころは、build.gradle のバージョン廻り設定で、エラーが出たらそのあたりを中心に確認しました。
(openCVLibrary 側の設定値を、ロボホン(version 21)に揃えます )
(Project) >
app > build.gradle
openCVLibrary331 > build.gradle
compileSdkVersion 14
buildToolsVersion "25.0.0"
minSdkVersion 8

↓

compileSdkVersion 21
buildToolsVersion "25.0.2"
minSdkVersion 21
ロボホンに実装(応答)
起動と同時に、カレンダーを開けるモーション実行→(画像認識)→認識結果応答の流れでシナリオを実装します。
- RoBoHonシナリオ関連定義類
/**
    *  advent calendar シーン、accost、通知設定
    */
public static final String SCN_CALL = PACKAGE + ".scn.call";
public static final String SCN_RES = PACKAGE + ".scn.res";

public static final String ACC_CALL = ScenarioDefinitions.PACKAGE + ".acst.call";
public static final String ACC_RES = ScenarioDefinitions.PACKAGE + ".acst.res";

public static final String FUNC_CALL = "adv_call";

/**
    * memory_pを指定するタグ
    */
public static final String MEM_P_RES = ScenarioDefinitions.TAG_MEMORY_PERMANENT + ScenarioDefinitions.PACKAGE + ".res";
- HVML(ユーザーからの呼びかけで起動、モーション、認識結果応答)
<?xml version="1.0" ?>
<hvml version="2.0">
    <head>
        <producer>com.dev.zdev.opencv</producer>
        <description>アドベントカレンダーのホーム起動シナリオ</description>
        <scene value="home" />
        <version value="1.0" />
        <situation priority="78" topic_id="start" trigger="user-word">${Local:WORD_APPLICATION} eq
            アドベントカレンダー
        </situation>
        <situation priority="78" topic_id="start" trigger="user-word">
            ${Local:WORD_APPLICATION_FREEWORD} eq アドベントカレンダーあけて
        </situation>
    </head>
    <body>
        <topic id="start" listen="false">
            <action index="1">
                <speech>${resolver:speech_ok(${resolver:ok_id})}</speech>
                <behavior id="${resolver:motion_ok(${resolver:ok_id})}" type="normal" />
                <control function="start_activity" target="home">
                    <data key="package_name" value="com.dev.zdev.opencv" />
                    <data key="class_name" value="com.dev.zdev.opencv.MainActivity" />
                </control>
            </action>
        </topic>
    </body>
</hvml>
<?xml version="1.0" ?>
<hvml version="2.0">
    <head>
        <producer>com.dev.zdev.opencv</producer>
        <description>advent calendar オープンコール</description>
        <scene value="com.dev.zdev.opencv.scn.call" />
        <version value="1.0" />
        <accost priority="75" topic_id="call" word="com.dev.zdev.opencv.acst.call" />
    </head>
    <body>
        <topic id="call" listen="false">
            <action index="1">
                <speech>カレンダーを開けるよ…</speech>
                <behavior id="0x060030" type="normal"><wait ms="300"/></behavior>
            </action>
            <action index="2">
                <control function="adv_call" target="com.dev.zdev.opencv"/>
            </action>
        </topic>
    </body>
</hvml>
<?xml version="1.0" ?>
<hvml version="2.0">
    <head>
        <producer>com.dev.zdev.opencv</producer>
        <description>advent calendar 結果通知</description>
        <scene value="com.dev.zdev.opencv.scn.res" />
        <version value="1.0" />
        <accost priority="75" topic_id="res" word="com.dev.zdev.opencv.acst.res" />
    </head>
    <body>
        <topic id="res" listen="false">
            <action index="1">
                <speech>${memory_p:com.dev.zdev.opencv.res}が入ってたね!</speech>
                <behavior id="assign" type="normal" />
            </action>
        </topic>
    </body>
</hvml>
ロボホンに実装(画像認識・生成)
下記チュートリアルを参考に実装していきます。
[OpenCV] How to run deep networks on Android device
https://docs.opencv.org/trunk/d0/d6c/tutorial_dnn_android.html
- 画像認識モデル入手
[opencv] dnn downloadmodel > MobileNet-SSD : MobileNetSSD_deploy.prototxt(29KB), MobileNetSSD_deploy.caffemodel(22MB)
https://github.com/opencv/opencv_extra/blob/master/testdata/dnn/download_models.py
このモデルはVOC0712のラベル、下記を識別するものです。
background, aeroplane, bicycle, bird, boat,
bottle, bus, car, cat, chair,
cow, diningtable, dog, horse,
motorbike, person, pottedplant,
sheep, sofa, train, tvmonitor
- ロボホン挙動と画像認識タスクの接合部分
    @Override
    public void onExecCommand(String command, List<VoiceUIVariable> variables) {
        Log.v(TAG, "onExecCommand() : " + command);
        switch (command) {
            case ScenarioDefinitions.FUNC_CALL:
                // 1. 扉を開けるモーションと発声のコールバックで画像認識タスクキック
                hascall =true;
                final String res = getImagelabel();
                // 2. 認識結果:画像ラベル(ex. aeroplain など)を発声用メモリ、および画面タイトルバーにセット
                Log.v(TAG, "onExecCommand: RoBoHoN:" + res);
                int ret = VoiceUIVariableUtil.setVariableData(mVoiceUIManager, ScenarioDefinitions.MEM_P_RES, res);
                VoiceUIManagerUtil.stopSpeech();
                mHandler.post(new Runnable() {
                    @Override
                    public void run() {
                        if(!isFinishing()) {
                            setTitle(res);
                        }
                    }
                });
                // 3. 認識結果:RoBoHon 結果発話キック
                if (mVoiceUIManager != null) {
                    VoiceUIVariableListHelper helper = new VoiceUIVariableListHelper().addAccost(ScenarioDefinitions.ACC_RES);
                    VoiceUIManagerUtil.updateAppInfo(mVoiceUIManager, helper.getVariableList(), true);
                }
                break;
            case ScenarioDefinitions.FUNC_END_APP:
                finish();
                break;
            default:
                break;
        }
    }
- 画像認識タスクメイン処理(チュートリアルからの改変部分)
private String getImagelabel(){

    String path = getImagePath(); // ローカルギャラリーから画像パス取得
	// test path (sample image)
    // path = "/storage/emulated/0/PRIVATE/SHARP/CM/Samples/Arashiyama_robohon.jpg";
    final ResImage resImage = createContent(BitmapFactory.decodeFile(path)); // 認識実行

    // 認識結果画像をImageViewへセット
    mHandler.post(new Runnable() {
        @Override
        public void run() {
            if(!isFinishing()) {
                ((ImageView)findViewById(R.id.imageView)).setImageBitmap(resImage.bitmapImg);
            }
        }
    });
    // 認識結果ラベル文字列を発声等のために返却
    return resImage.label;
}
class ResImage {
    String label;
    Bitmap bitmapImg;
}
private ResImage createContent(Bitmap original_img) {

    final int IN_WIDTH = 300;
    final int IN_HEIGHT = 300;
    final float WH_RATIO = (float)IN_WIDTH / IN_HEIGHT;
    final double IN_SCALE_FACTOR = 0.007843;
    final double MEAN_VAL = 127.5;
    final double THRESHOLD = 0.2;

    try {
        Loadnetwork(getApplicationContext());
    }catch (Exception ex) {
        Log.e("load model", ex.getMessage());
    }

    Mat img = new Mat();
    Utils.bitmapToMat(original_img.copy(Bitmap.Config.ARGB_8888, true), img);
    Imgproc.cvtColor(img, img, Imgproc.COLOR_RGBA2RGB);

    // Forward image through network.
    Size sz = new Size(IN_WIDTH, IN_HEIGHT);
    Scalar sc = new Scalar(MEAN_VAL, MEAN_VAL, MEAN_VAL);
    Mat blob = Dnn.blobFromImage(img, IN_SCALE_FACTOR, sz, sc, false, false);

    net.setInput(blob);
    Mat detections = net.forward();
    int cols = img.cols();
    int rows = img.rows();
    Size cropSize;
    if ((float)cols / rows > WH_RATIO) {
        cropSize = new Size(rows * WH_RATIO, rows);
    } else {
        cropSize = new Size(cols, cols / WH_RATIO);
    }

    int y1 = (int)(rows - cropSize.height) / 2;
    int y2 = (int)(y1 + cropSize.height);
    int x1 = (int)(cols - cropSize.width) / 2;
    int x2 = (int)(x1 + cropSize.width);

    Mat subFrame = img.submat(y1, y2, x1, x2);
    cols = subFrame.cols();
    rows = subFrame.rows();
    detections = detections.reshape(1, (int)detections.total() / 7);

    ResImage res_img = new ResImage();

    for (int i = 0; i < detections.rows(); ++i) {
        double confidence = detections.get(i, 2)[0];
        if (confidence > THRESHOLD) {
            // 認識確度が設定閾値以上のものをひとつだけ処理
            int classId = (int)detections.get(i, 1)[0];
            int xLeftBottom = (int)(detections.get(i, 3)[0] * cols);
            int yLeftBottom = (int)(detections.get(i, 4)[0] * rows);
            int xRightTop   = (int)(detections.get(i, 5)[0] * cols);
            int yRightTop   = (int)(detections.get(i, 6)[0] * rows);

            Mat dstimg = subFrame.submat(yLeftBottom, yRightTop, xLeftBottom, xRightTop);
            res_img.bitmapImg = Bitmap.createBitmap(dstimg.width(), dstimg.height(), Bitmap.Config.ARGB_8888);
            Utils.matToBitmap(dstimg, res_img.bitmapImg);

            res_img.label = classNames[classId];
            break;
        }
    }

    return res_img;
};
動作の様子
[qiita] 万年アドベントカレンダーを実装した(OpenCV+Deep Neural Network+RoBoHoN)の実行動画です / ロボホンが「きょうのカレンダーコンテンツ」に選んでくれたのは、実家の犬でした ! pic.twitter.com/7yHvIoYt2J
— n_u (@ln_ulln_ul) 2017年12月19日
まとめ
- OpenCVとdnnモジュール
作成済モデルの利用フェーズでは、REST API 化するのが定番だったので、今回、通信廻り実装不要の周辺も確かめられて大変よかったです!
モバイル以外の環境へも、いろいろ載せて確かめていきたいと思います。
- アプリコンセプト
ロボホンの「扉を開ける」モーションには、PPAP や、次元刀 や、ロボホンアプリの ロボ釣り など、モーションひとつで異世界にコネクトするイメージを載せたい…と念じながらシナリオ実装していました。
また、ユーザーがカメラのシャッターを切る瞬間にはそれぞれの理由があって、その瞬間のストックを活用して、日々を楽しく彩るアプリができたらいいな、と思っていたので、実装できてよかったです。
-
RoBoHoN SDK 内ドキュメント 0301_SR01MW_System_Overview_V01_00_01 ↩
-
https://github.com/opencv/opencv/wiki/Deep-Learning-in-OpenCV ↩
-
https://developers-jp.googleblog.com/2017/07/supercharge-your-computer-vision-models.html ↩