こんにちは。
ALJの江口と申します。
本格的にProxmoxを使う場合は起動ドライブもRAIDを組まれると思います。
Proxmoxで起動ドライブにRAIDを使った場合の大まかな雰囲気についてご紹介したいと思います。
今回はZFSミラーでProxmoxをインストールし、ディスク障害が発生した場合の復旧手順も実施してみます。
以下の記事は、現時点での最新のProxmox Virtual Environment 8.1.10を用いて説明しています。
この記事は新規インストールを前提としており、旧環境では以下の通りに行かない可能性があるのでご注意ください。
テスト環境の準備
ProxmoxはネステッドVMが可能なので、Proxmox上にProxmoxをインストールしました。
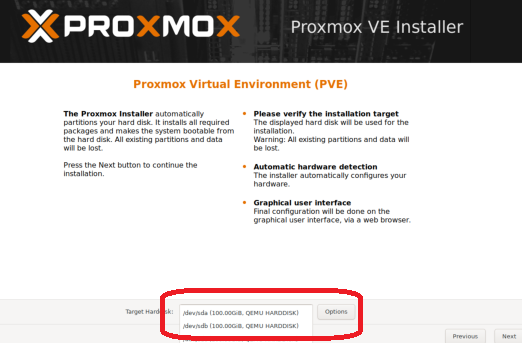
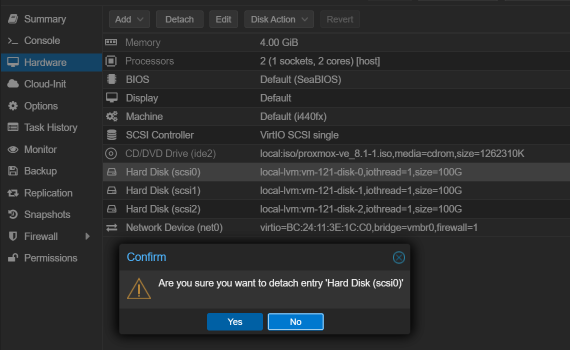
ディスクは3本(scsi0~scsi2)アタッチしました。
インストール
いつも通りインストールします。Target Harddiskにディスクが3本見えていると思いますので、右の「Option」を押します。
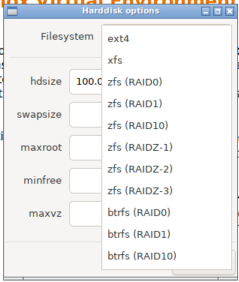
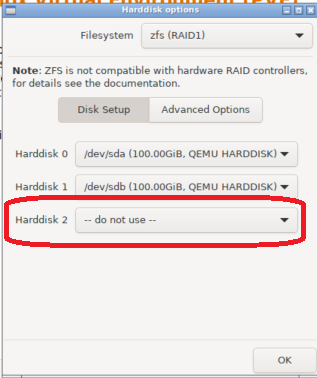
オプションの画面で今回はzfs(RAID1)を選択しました。
ミラーでインストールするので、3本目は「do not use」に変更します。
あとは通常通りインストールします。
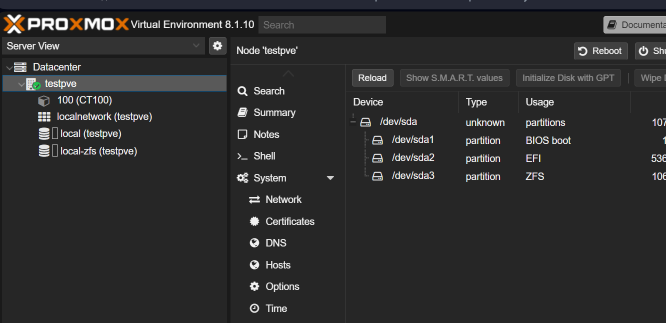
起動後、以下のように2本が使用されていることが確認できます。
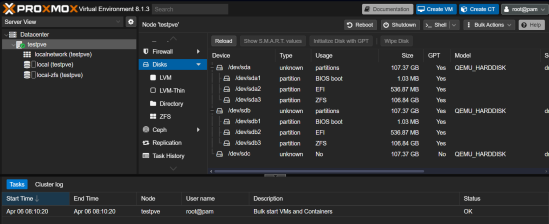
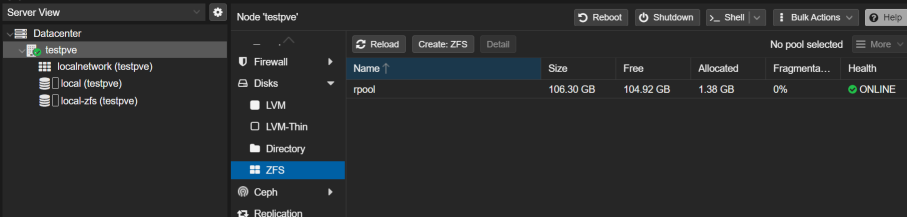
zfsにrpoolというプール名で作成されました。Healthも緑のチェックが付いてます。
起動できたら、以下の作業をしておきます。
- Proxmoxのリポジトリ修正
- Proxmoxのアップデート
- 試験的にlxcインスタンス作成
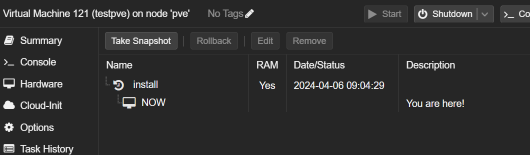
この辺で、念のためスナップショットを取得しておきます。
ここまでは、起動ディスク以外は、普通にProxmoxを使う方法なので詳細は割愛しました。
障害ディスクの交換のテスト
起動ディスクをRAIDにしたので、障害テストを実施してみます。
Disk0をデタッチする
デタッチは起動状態ではできないので、Proxmoxをシャットダウンして行いました。
再起動すると・・・ミラーのはずなのに起動できません。
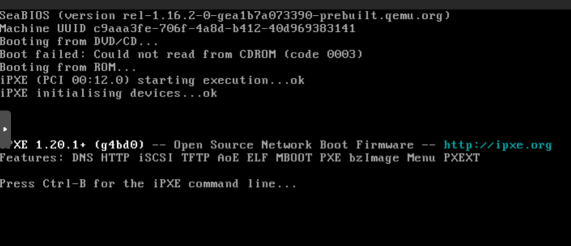
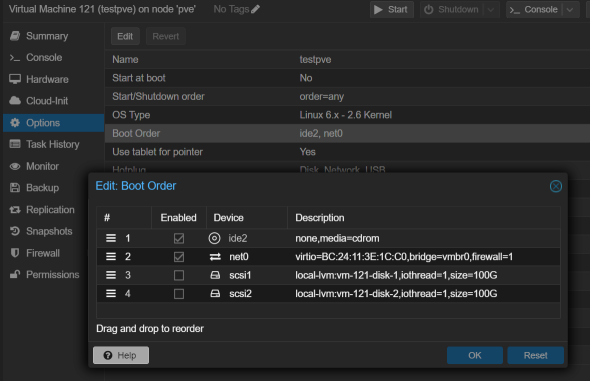
確認してみたところ、BIOSの起動シーケンスで、残りの1本を指定する必要がありました。簡単なことですが、気が付かないと焦ります。
無事、起動し、ディスクが1本減ったことが確認できました。
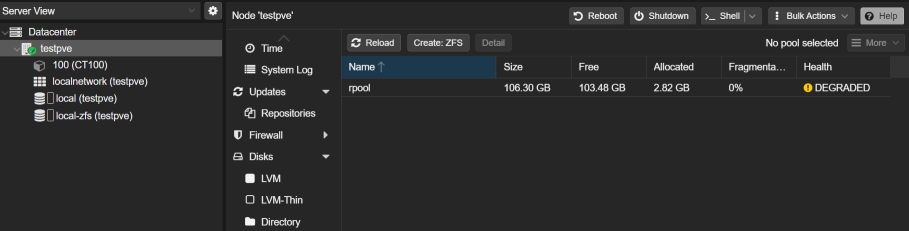
ZFSの状態を見ると、DEGRADEDになっていることがわかります。
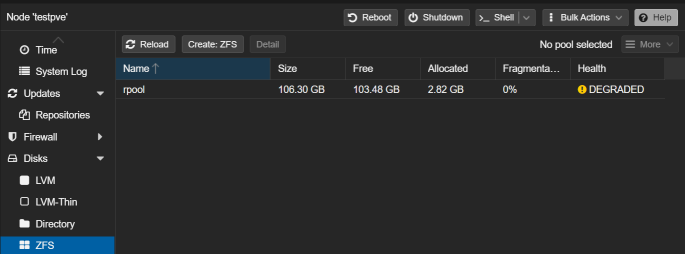
rpoolのステータスは以下のようになりました。
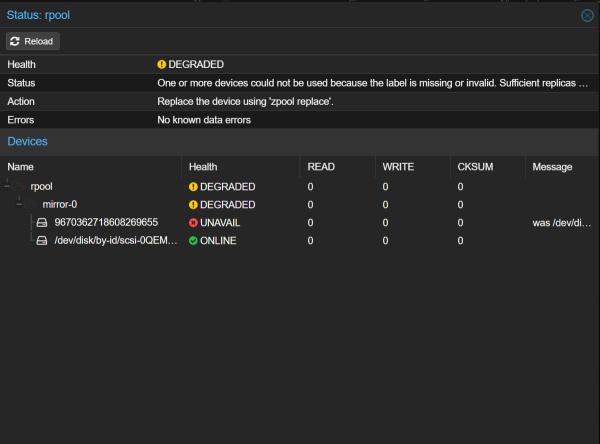
しかし、Summaryには変化がありません。ZFSのHealthを確認しないと状態が分からないようです。この点は改善してほしいですね。
障害ディスクの交換
GUIでは障害は確認できますが、その後の復旧作業はコマンドラインで実施する必要があるようです。画面にはzpool replaceしろと出ていますが、操作できるボタンがありません。
ディスクの交換については、公式のドキュメントを参考に進めました。
zfs_administration
以下に、実施した作業をご紹介します。
状態の確認
zpool list および zpool status をたたいて、現状を確認します。
root@testpve:~# zpool list
NAME    SIZE  ALLOC   FREE  CKPOINT  EXPANDSZ   FRAG    CAP  DEDUP    HEALTH  ALTROOT
rpool    99G  2.63G  96.4G        -         -     0%     2%  1.00x  DEGRADED  -


root@testpve:~# zpool list -v
NAME                                             SIZE  ALLOC   FREE  CKPOINT  EXPANDSZ   FRAG    CAP  DEDUP    HEALTH  ALTROOT
rpool                                             99G  2.63G  96.4G        -         -     0%     2%  1.00x  DEGRADED  -
  mirror-0                                        99G  2.63G  96.4G        -         -     0%  2.65%      -  DEGRADED
    9670362718608269655                             -      -      -        -         -      -      -      -   UNAVAIL
    scsi-0QEMU_QEMU_HARDDISK_drive-scsi1-part3  99.5G      -      -        -         -      -      -      -    ONLINE

root@testpve:~# zpool status -v rpool
  pool: rpool
 state: DEGRADED
status: One or more devices could not be used because the label is missing or
        invalid.  Sufficient replicas exist for the pool to continue
        functioning in a degraded state.
action: Replace the device using 'zpool replace'.
   see: https://openzfs.github.io/openzfs-docs/msg/ZFS-8000-4J
config:

        NAME                                            STATE     READ WRITE CKSUM
        rpool                                           DEGRADED     0     0     0
          mirror-0                                      DEGRADED     0     0     0
            9670362718608269655                         UNAVAIL      0     0     0  was /dev/disk/by-id/scsi-0QEMU_QEMU_HARDDISK_drive-scsi0-part3
            scsi-0QEMU_QEMU_HARDDISK_drive-scsi1-part3  ONLINE       0     0     0

errors: No known data errors
壊れたデバイス名が、/dev/disk/by-id/scsi-0QEMU_QEMU_HARDDISK_drive-scsi0-part3であることが確認できます。リプレースの時に使用します。
パーテション情報の書き込み
追加したディスク(今回はあらかじめ3本目として入れていた)は、まっさらなので、生きてるディスクからパーテション情報をコピーします。
root@testpve:~# sgdisk /dev/sda -R /dev/sdb
The operation has completed successfully.
GUIDの書き込み
パーティション情報を書き込んだら、GUIDを書き込みます。
root@testpve:~# sgdisk -G /dev/sdb
The operation has completed successfully.
公式マニュアルにはありませんが、パーテションをいじったら、自分はここで再起動します。
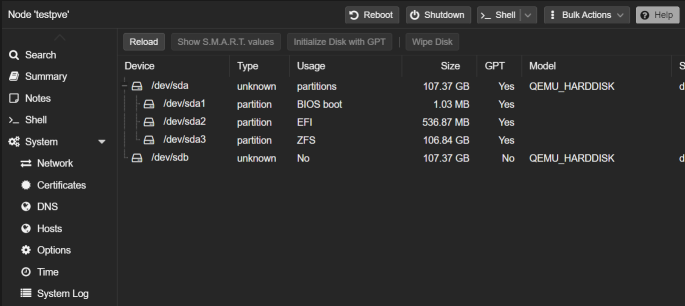
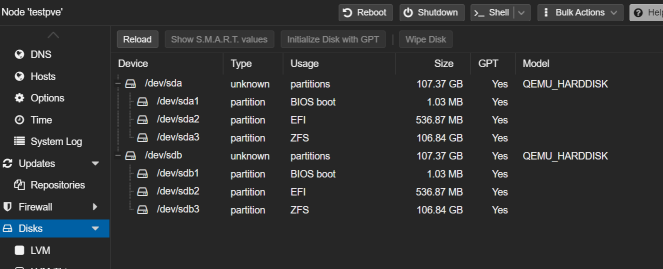
再起動後、状態をGUIで確認します。まっさらだったディスクが、パーテションの状態が同じになったことが確認できます。
追加したディスクをZFSに加えます
まずは状態を確認します。
root@testpve:~# zpool status
  pool: rpool
 state: DEGRADED
status: One or more devices could not be used because the label is missing or
        invalid.  Sufficient replicas exist for the pool to continue
        functioning in a degraded state.
action: Replace the device using 'zpool replace'.
   see: https://openzfs.github.io/openzfs-docs/msg/ZFS-8000-4J
config:

        NAME                                            STATE     READ WRITE CKSUM
        rpool                                           DEGRADED     0     0     0
          mirror-0                                      DEGRADED     0     0     0
            9670362718608269655                         UNAVAIL      0     0     0  was /dev/disk/by-id/scsi-0QEMU_QEMU_HARDDISK_drive-scsi0-part3
            scsi-0QEMU_QEMU_HARDDISK_drive-scsi1-part3  ONLINE       0     0     0

errors: No known data errors

root@testpve:~# ls /dev/disk/by-id -ahl
total 0
drwxr-xr-x 2 root root 220 Apr  6 09:52 .
drwxr-xr-x 8 root root 160 Apr  6 09:52 ..
lrwxrwxrwx 1 root root   9 Apr  6 09:52 ata-QEMU_DVD-ROM_QM00003 -> ../../sr0
lrwxrwxrwx 1 root root   9 Apr  6 09:52 scsi-0QEMU_QEMU_HARDDISK_drive-scsi1 -> ../../sda
lrwxrwxrwx 1 root root  10 Apr  6 09:52 scsi-0QEMU_QEMU_HARDDISK_drive-scsi1-part1 -> ../../sda1
lrwxrwxrwx 1 root root  10 Apr  6 09:52 scsi-0QEMU_QEMU_HARDDISK_drive-scsi1-part2 -> ../../sda2
lrwxrwxrwx 1 root root  10 Apr  6 09:52 scsi-0QEMU_QEMU_HARDDISK_drive-scsi1-part3 -> ../../sda3
lrwxrwxrwx 1 root root   9 Apr  6 09:52 scsi-0QEMU_QEMU_HARDDISK_drive-scsi2 -> ../../sdb
lrwxrwxrwx 1 root root  10 Apr  6 09:52 scsi-0QEMU_QEMU_HARDDISK_drive-scsi2-part1 -> ../../sdb1
lrwxrwxrwx 1 root root  10 Apr  6 09:52 scsi-0QEMU_QEMU_HARDDISK_drive-scsi2-part2 -> ../../sdb2
lrwxrwxrwx 1 root root  10 Apr  6 09:52 scsi-0QEMU_QEMU_HARDDISK_drive-scsi2-part3 -> ../../sdb3
zpool replaceで障害ディスクを入れ替えます。交換前のデバイス名は先ほど確認したものを入力します。
root@testpve:~# zpool replace -f rpool /dev/disk/by-id/scsi-0QEMU_QEMU_HARDDISK_drive-scsi0-part3 scsi-0QEMU_QEMU_HARDDISK_drive-scsi2-part3
今回は、ディスクが小さいので一瞬で終わりましたが、規模が大きい場合はリビルドに時間がかかります。
リビルドの状況は以下のコマンドで確認できます。
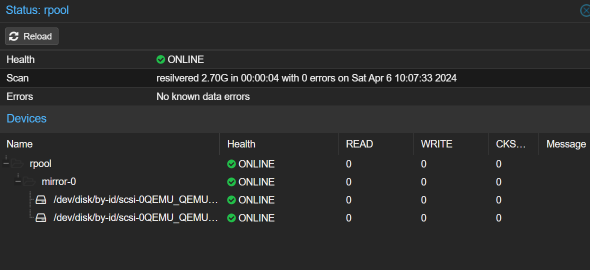
※今回は瞬時に終わったので、ONLINE状態になってます。
root@testpve:~# zpool status -v
  pool: rpool
 state: ONLINE
  scan: resilvered 2.70G in 00:00:04 with 0 errors on Sat Apr  6 10:07:33 2024
config:

        NAME                                            STATE     READ WRITE CKSUM
        rpool                                           ONLINE       0     0     0
          mirror-0                                      ONLINE       0     0     0
            scsi-0QEMU_QEMU_HARDDISK_drive-scsi2-part3  ONLINE       0     0     0
            scsi-0QEMU_QEMU_HARDDISK_drive-scsi1-part3  ONLINE       0     0     0

errors: No known data errors
ブートローダーの書き込み
公式にある通り、以下のコマンドを実行してブートローダーを書き込みます。
# proxmox-boot-tool format <new disk's ESP>
# proxmox-boot-tool init <new disk's ESP> [grub]
実際の結果は以下の通りです。今回はgrubなので、grubをスイッチに入れます。
root@testpve:~# proxmox-boot-tool format /dev/sdb2
UUID="" SIZE="536870912" FSTYPE="" PARTTYPE="c12a7328-f81f-11d2-ba4b-00a0c93ec93b" PKNAME="sdb" MOUNTPOINT=""
Formatting '/dev/sdb2' as vfat..
mkfs.fat 4.2 (2021-01-31)
Done.

root@testpve:~# proxmox-boot-tool init /dev/sdb2 grub
Re-executing '/usr/sbin/proxmox-boot-tool' in new private mount namespace..
UUID="E11B-A063" SIZE="536870912" FSTYPE="vfat" PARTTYPE="c12a7328-f81f-11d2-ba4b-00a0c93ec93b" PKNAME="sdb" MOUNTPOINT=""
Mounting '/dev/sdb2' on '/var/tmp/espmounts/E11B-A063'.
Installing grub i386-pc target..
Installing for i386-pc platform.
Installation finished. No error reported.
Unmounting '/dev/sdb2'.
Adding '/dev/sdb2' to list of synced ESPs..
Refreshing kernels and initrds..
Running hook script 'proxmox-auto-removal'..
Running hook script 'zz-proxmox-boot'..
WARN: /dev/disk/by-uuid/43B9-9D5A does not exist - clean '/etc/kernel/proxmox-boot-uuids'! - skipping
Copying and configuring kernels on /dev/disk/by-uuid/43BA-1874
        Copying kernel 6.5.11-4-pve
        Copying kernel 6.5.13-3-pve
Generating grub configuration file ...
Found linux image: /boot/vmlinuz-6.5.13-3-pve
Found initrd image: /boot/initrd.img-6.5.13-3-pve
Found linux image: /boot/vmlinuz-6.5.11-4-pve
Found initrd image: /boot/initrd.img-6.5.11-4-pve
done
Copying and configuring kernels on /dev/disk/by-uuid/E11B-A063
        Copying kernel 6.5.11-4-pve
        Copying kernel 6.5.13-3-pve
Generating grub configuration file ...
Found linux image: /boot/vmlinuz-6.5.13-3-pve
Found initrd image: /boot/initrd.img-6.5.13-3-pve
Found linux image: /boot/vmlinuz-6.5.11-4-pve
Found initrd image: /boot/initrd.img-6.5.11-4-pve
done
警告(WARN)が出てます。
不明なUUIDがあるから( clean '/etc/kernel/proxmox-boot-uuids )しろと出てます。障害ディスクのUUIDは不要なので削除します。
root@testpve:~# cat /etc/kernel/proxmox-boot-uuids
1401-DFFF
43B9-9D5A
43BA-1874

root@testpve:~# vi /etc/kernel/proxmox-boot-uuids
※viで不要な行を削除した

root@testpve:~# cat /etc/kernel/proxmox-boot-uuids
1401-DFFF
43BA-1874
念のため、ここでまたリブートしました。
復旧後の状態確認
リブートがちゃんとできたことを確認し、zfsのstatusを見ると状態が普及できていることが確認できました。
追加したディスクで起動できるか確認
先ほどと同様、Proxmoxをシャットダウンし、Disk1を除去し、先ほどアタッチしたディスクで起動してみます。
DEGRADED状態ですが、ちゃんと起動できました。
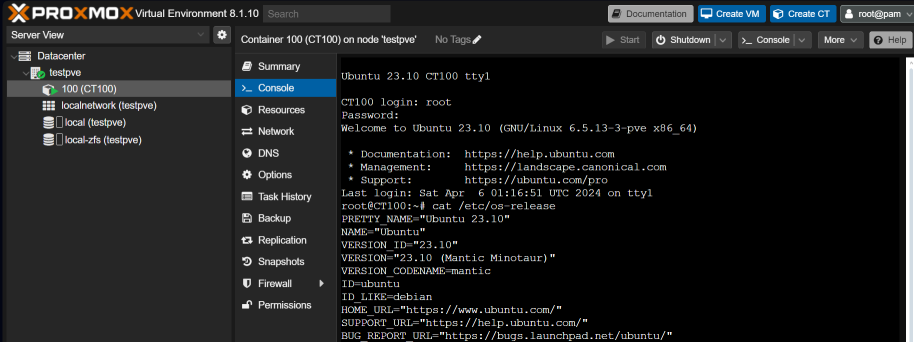
テストで作成したlxcも問題ないようです。
ProxmoxをZFSミラーにインストールし、1本を交換するテストを実施してみました。
スナップショットを取得しているので、失敗しても最初に戻って繰り返しテストできます。まだ復旧作業をしたことがなければ是非試してみてください。
Backupは別に必用です
今回は、RAIDの1本が壊れたことを想定してテストしました。
Linuxではパーテーション情報がコピーできるので、生きているディスクがある場合は情報を取得できますが、全て壊れた場合は、パーテーション情報も失われますので、失われたら困る場合はパーテーション情報を別の場所にバックアップする必要がありますのでご注意ください。