#はじめに
電子工作作品の制御によく使っているラズパイですが、似たような実験環境を頻繁に作っているので、設定内容やダウンロード先など、いつも繰り返し作業している、基本的な手順をまとめました。
##ここで想定するラズパイの使い方
- 手元のLAN環境に常時接続して、パソコン側からラズパイのssh/共有フォルダで開発
- (極力)ヘッドレスで使う
- GPIO、I2C、SPIなどで、電子工作の作品の制御に活用する
##概要
- Raspbianのインストールと基本設定
- NTPの設定
- sambaの設定
- ハードウェア制御に必要なパッケージのインストール
1.SDカードの準備
使い方に合わせて、容量とCLASSを選択します。
| 実験環境の使い方 | SDカードの容量 | 補足 |
|---|---|---|
| GUI・デスクトップ環境を使う | 8GB以上 | 通常版をインストール |
| CUI・デスクトップ環境を使わない | 2GB以上 | Lite版をインストール |
| (おまけ)Windows 10 IoT Coreを使う場合 | 8GB以上 | 初回起動に失敗するので、必ずCLASS10を使用のこと |
| (おまけ)音声認識Juliusを使う場合 | 元の容量+4GB以上 |
基本的には、SDカードは安価なCLASS4でも良いのですが、書き込み速度はやはりCLASS10が圧倒的に良いですので、予算が許すなら、CLASS10を使用してください。
#2. Raspbianのインストール
##ダウンロード先
| 用途 | SDカードの必要容量 | ダウンロード先 |
|---|---|---|
| 通常版 | 4GB以上 | http://ftp.jaist.ac.jp/pub/raspberrypi/raspbian/images/ |
| Lite版 | 2GB以上 | http://ftp.jaist.ac.jp/pub/raspberrypi/raspbian_lite/images/ |
| Full版 | 5GB以上 | http://ftp.jaist.ac.jp/pub/raspberrypi/raspbian_full/images/ |
当方、CUIで使うことが殆どなので、Lite版の使用を前提に、説明を進めます。
##ディスクイメージの書き込み
Raspberry Pi Imagerを使用します。
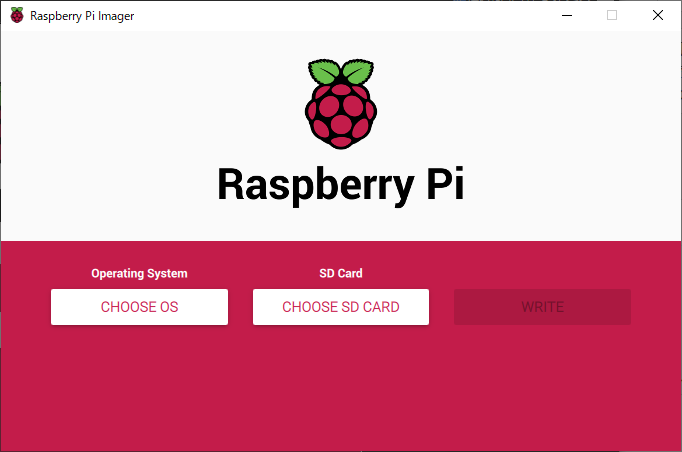
- 書き込み先のSDカードをパソコンに接続します。
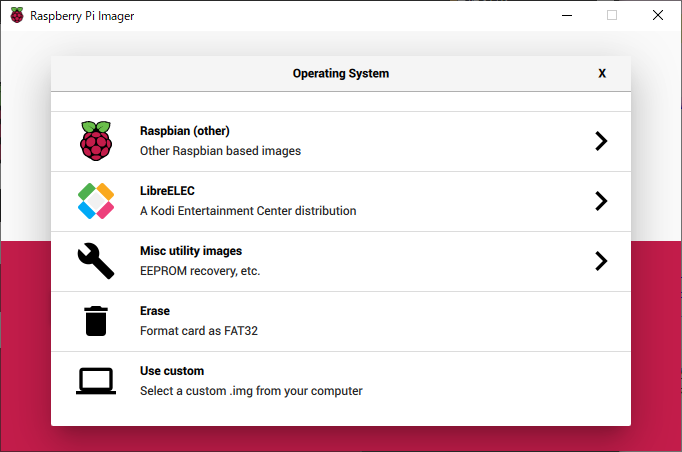
- 「CHOOSE OS」をクリックして、書き込むOSイメージを選択。
- ここでは、先にダウンロードしておいたイメージファイルを使うので、「Use Custom」を選択します。
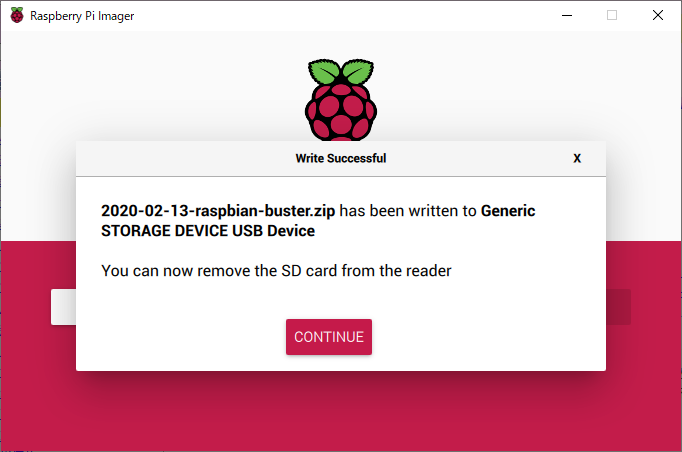
- ダウンロードしておいたイメージファイル(例:
2020-02-13-raspbian-buster.zip)を指定します。 - 「CHOOSE SD CARD」をクリックして、書き込み先のSDカードのドライブを選択します。
- 「WRITE」ボタンを押します。
3.Raspbian立ち上げ前の操作
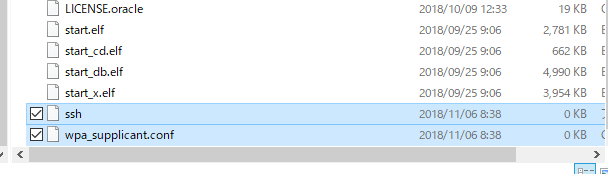
(1)SSHと無線LANを有効にする
SDカードのルートディレクトリに、エクスプローラから、以下の2つの空のファイルを新規に作成します。1
-
sshSSHサーバを有効にします。 -
wpa_supplicant.conf無線LANを有効にして指定のSSIDに接続します。
(2)無線LANの設定
上記で作成したファイルに、下記の通り書き込みます。
複数のアクセスポイントが有る場合は、network={...以降を複数記述します。
country=JP
ctrl_interface=DIR=/var/run/wpa_supplicant GROUP=netdev
update_config=1
network={
    ssid="SSID名その1"
    psk="暗号化キーその1"
    priority=1
}
network={
    ssid="SSID名その2"
    psk="暗号化キーその2"
    scan_ssid=1
    priority=0
}
| 項目 | 意味 | 書き方例 |
|---|---|---|
| scan_ssid | ステルスSSIDに接続するときは=1 | scan_ssid=1 |
| priority | 接続先の優先順位(値が大きい方が優先される) | priority=0 |
(Appendix)USB OTGの設定
Raspberry Pi ZERO を使用する場合、USBケーブル経由でネットワーク接続するOTGを使うことが出来ます。参考2
(3)Raspbian立ち上げ
SDカードを、RaspberryPiに差し込んで立ち上げます。
初回だけは、有線LANに接続して、更にディスプレイに繋いでおいた方が、無難です。(無線が繋がらなくてハマる・IPアドレスが分からなくてハマる・・・を避ける事ができるので・・・)
ネットワーク内でのRaspberryPiの探し方、参考
TWSNMPマネージャというソフトが便利です。
ネットワーク内のパソコンの列挙や、生死の追跡などがグラフィカルに出来ます。
詳しくは、リンク先を参考にしてください。
4.Raspbian立ち上げ後の操作
- パスワードの変更:
passwd - ラスパイの設定
- NTPの設定
- sambaの設定
(1)ラスパイの設定 raspi-config
$ sudo raspi-config
| メインメニュー | サブメニュー | 設定値 |
|---|---|---|
| 4 Localisation Options | I1 Change Locale | |
| Locales to be generated: | [*] en_GB.UTF-8 UTF-8 | |
| [*] ja_JP.UTF-8 UTF-8 | ||
| Default locale for the system environment: | C.UTF-8 | |
| I2 Change Timezone | Asia tokyo | |
| I3 Change Keyboard Layout | Japanese - Japanese(OADG 109A)3 | |
| 5 Interfacing Options | P4 SPI | Yes |
| P5 I2C | Yes | |
| P6 Serial | Yes | |
| 7 Advanced Options | A1 Expand Filesystem | 実行する |
| 8 Update | 実行する |
(2)インストール済パッケージを一通りアップデート
下記のコマンド実行します。数分~30分程度は掛かります。
$ sudo apt update && sudo apt upgrade -y
(3)NTPの設定
- NTPサーバの状態を確認します4
pi@raspberrypi:~ $ timedatectl status
               Local time: Mon 2019-12-02 19:55:25 JST
           Universal time: Mon 2019-12-02 10:55:25 UTC
                 RTC time: n/a
                Time zone: Asia/Tokyo (JST, +0900)
System clock synchronized: yes
              NTP service: active
          RTC in local TZ: no
- もし、”System clock synchronized” が "no" の場合は、下記コマンドで有効化します。
$ sudo timedatectl set-ntp true
- 設定ファイルを編集します。
~ $ cd /etc/systemd/
/etc/systemd $ sudo cp -p timesyncd.conf timesyncd.conf.org #設定ファイルのオリジナルをバックアップ
/etc/systemd $ sudo nano timesyncd.conf
- NTPサーバの指定先は以下のいずれかを使います
[Time]
NTP=ntp.jst.mfeed.ad.jp
FallbackNTP= ntp.nict.jp ntp.ring.gr.jp
- 設定反映前の状態です
「2.debian.pool.ntp.org」というNTPサーバを参照しています。
また。、冒頭に「Warning: The unit file, source configuration file or drop-ins of systemd-timesyncd.service changed on disk. Run 'systemctl daemon-reload' to reload units.」も出ています。
/etc/systemd $ systemctl status systemd-timesyncd
Warning: The unit file, source configuration file or drop-ins of systemd-timesyncd.service changed o
● systemd-timesyncd.service - Network Time Synchronization
   Loaded: loaded (/lib/systemd/system/systemd-timesyncd.service; enabled; vendor preset: enabled)
  Drop-In: /lib/systemd/system/systemd-timesyncd.service.d
           mqdisable-with-time-daemon.conf
   Active: active (running) since Mon 2019-09-02 17:17:05 JST; 54min ago
     Docs: man:systemd-timesyncd.service(8)
 Main PID: 271 (systemd-timesyn)
   Status: "Synchronized to time server for the first time 203.178.135.73:123 (2.debian.pool.ntp.org
    Tasks: 2 (limit: 2077)
   Memory: 3.0M
   CGroup: /system.slice/systemd-timesyncd.service
           mq271 /lib/systemd/systemd-timesyncd

Sep 02 17:17:04 raspiap systemd[1]: Starting Network Time Synchronization...
Sep 02 17:17:05 raspiap systemd[1]: Started Network Time Synchronization.
Sep 02 18:02:46 raspiap systemd-timesyncd[271]: Synchronized to time server for the first time 203.1
- 設定を反映する為、NTPを再起動します
/etc/systemd $ sudo systemctl daemon-reload
/etc/systemd $ sudo systemctl restart systemd-timesyncd
/etc/systemd $ systemctl status systemd-timesyncd
systemctl status systemd-timesyncd
● systemd-timesyncd.service - Network Time Synchronization
   Loaded: loaded (/lib/systemd/system/systemd-timesyncd.service; enabled; vendor preset: enabled)
  Drop-In: /lib/systemd/system/systemd-timesyncd.service.d
           mqdisable-with-time-daemon.conf
   Active: active (running) since Mon 2019-09-02 18:14:37 JST; 5s ago
     Docs: man:systemd-timesyncd.service(8)
 Main PID: 724 (systemd-timesyn)
   Status: "Connecting to time server 133.243.237.36:123 (ntp.ring.gr.jp)."
    Tasks: 2 (limit: 2077)
   Memory: 944.0K
   CGroup: /system.slice/systemd-timesyncd.service
           mq724 /lib/systemd/systemd-timesyncd

Sep 02 18:14:37 raspiap systemd[1]: Starting Network Time Synchronization...
Sep 02 18:14:37 raspiap systemd[1]: Started Network Time Synchronization.
「ntp.ring.gr.jp」というNTPサーバを参照していることが確認できました。
(4)sambaの設定
- インストールから設定まで
$ sudo apt install samba -y
$ cd /etc/samba
/etc/samba $ sudo cp -p smb.conf smb.conf.org   #設定ファイルのオリジナルをバックアップ
/etc/samba $ sudo nano smb.conf
- (28行目付近)
# Change this to the workgroup/NT-domain name your Samba server will part of
   workgroup = WORKGROUP     #ワークグループは必要に応じて書き換え
- (185行目付近)
- 下記の例では
browseable = noとしてるので、ホームディレクトリは「見えない」が正しいです。なのでアクセスするときはエクスプローラから\\raspberrypi\piまでアドレスを直入力すると、ホームディレクトリに入れます。 -
browseable = yesとすると、エクスプローラから\\raspberrypiでホームディレクトリが見えるようになります。 -
unix extensions = no、wide links = yesは、シンボリックリンクしたディレクトリの中に入っていけるオプションです。5
- 下記の例では
#======================= Share Definitions =======================

[homes]
   comment = Home Directories
   browseable = no

# By default, the home directories are exported read-only. Change the
# next parameter to 'no' if you want to be able to write to them.
   read only = no        #ここを YES→NO に書き換える

# File creation mask is set to 0700 for security reasons. If you want to
# create files with group=rw permissions, set next parameter to 0775.
   create mask = 0755    #ここを 0700→0755 に書き換える

# Directory creation mask is set to 0700 for security reasons. If you want to
# create dirs. with group=rw permissions, set next parameter to 0775.
   directory mask = 0700

#ここを追記する
unix extensions = no
wide links = yes
- (210行目付近)
このあたりの記述は、特に使わないので、全てコメントアウトする
# Un-comment the following and create the netlogon directory for Domain Logons
# (you need to configure Samba to act as a domain controller too.)
;[netlogon]
;   comment = Network Logon Service
;   path = /home/samba/netlogon
;   guest ok = yes
;   read only = yes

# Un-comment the following and create the profiles directory to store
# users profiles (see the "logon path" option above)
# (you need to configure Samba to act as a domain controller too.)
# The path below should be writable by all users so that their
# profile directory may be created the first time they log on
;[profiles]
;   comment = Users profiles
;   path = /home/samba/profiles
;   guest ok = no
;   browseable = no
;   create mask = 0600
;   directory mask = 0700

;[printers]
;   comment = All Printers
;   browseable = no
;   path = /var/spool/samba
;   printable = yes
;   guest ok = no
;   read only = yes
;   create mask = 0700

# Windows clients look for this share name as a source of downloadable
# printer drivers
;[print$]
;   comment = Printer Drivers
;   path = /var/lib/samba/printers
;   browseable = yes
;   read only = yes
;   guest ok = no
# Uncomment to allow remote administration of Windows print drivers.
# You may need to replace 'lpadmin' with the name of the group your
# admin users are members of.
# Please note that you also need to set appropriate Unix permissions
# to the drivers directory for these users to have write rights in it
;   write list = root, @lpadmin
- ユーザの追加
pdbeditコマンドを使って、ユーザを追加します。
ユーザ「pi」と同じパスワードを入力しておきます。
$ sudo pdbedit -a pi
new password: ********
retype new password: *******
Unix username:        pi
NT username:
Account Flags:        [U          ]
User SID:             ***
Primary Group SID:    ***
Full Name:
Home Directory:       \\raspberrypi\pi
HomeDir Drive:
Logon Script:
Profile Path:         \\raspberrypi\pi\profile
Domain:               RASPBERRYPI
Account desc:
Workstations:
Munged dial:
Logon time:           0
Logoff time:          never
Kickoff time:         never
Password last set:    Tue, 06 Nov 2018 10:59:45 JST
Password can change:  Tue, 06 Nov 2018 10:59:45 JST
Password must change: never
Last bad password   : 0
Bad password count  : 0
Logon hours         : FFFFFFFFFFFFFFFFFFFFFFFFFFFFFFFFFFFFFFFFFF
sambaのパスワードをリセットする場合は下記のようにします。
$ sudo pdbedit -a -u pi
new password:
retype new password:
- sambaを再起動
$ sudo systemctl restart smbd
$ systemctl status smbd
● smbd.service - Samba SMB Daemon
   Loaded: loaded (/lib/systemd/system/smbd.service; enabled; vendor preset: enabled)
   Active: active (running) since Mon 2019-09-02 18:22:09 JST; 15s ago
     Docs: man:smbd(8)
           man:samba(7)
           man:smb.conf(5)
  Process: 2000 ExecStartPre=/usr/share/samba/update-apparmor-samba-profile (code=exited, status=0/SUCCESS)
 Main PID: 2001 (smbd)
   Status: "smbd: ready to serve connections..."
    Tasks: 4 (limit: 2077)
   Memory: 4.5M
   CGroup: /system.slice/smbd.service
           tq2001 /usr/sbin/smbd --foreground --no-process-group
           tq2004 /usr/sbin/smbd --foreground --no-process-group
           tq2005 /usr/sbin/smbd --foreground --no-process-group
           mq2006 /usr/sbin/smbd --foreground --no-process-group

Sep 02 18:22:09 raspiap systemd[1]: Starting Samba SMB Daemon...
Sep 02 18:22:09 raspiap systemd[1]: Started Samba SMB Daemon.
- Windowsから共有フォルダにアクセスしてみる

認証画面が出るので、ユーザ名「pi」を指定します。
こんな感じで読み書きできればOKです。
(5)ダウンロード先を国内ミラーサーバに変更
$ cd /etc/apt/
/etc/apt/ $ ls -la
total 40
drwxr-xr-x  6 root root 4096 Feb 13 09:16 .
drwxr-xr-x 84 root root 4096 Feb 13 09:11 ..
drwxr-xr-x  2 root root 4096 Nov 13 23:02 apt.conf.d
-rw-r--r--  1 root root  104 Nov 13 22:21 listchanges.conf
drwxr-xr-x  2 root root 4096 Sep 14  2017 preferences.d
-rw-r--r--  1 root root  499 Feb 13 09:16 sources.list
drwxr-xr-x  2 root root 4096 Nov 13 23:02 sources.list.d
-rw-r--r--  1 root root 2416 Nov 13 22:06 trusted.gpg
drwxr-xr-x  2 root root 4096 Sep 14  2017 trusted.gpg.d
/etc/apt/ $ sudo cp -p sources.list sources.list.org   #設定ファイルのオリジナルをバックアップ
/etc/apt/ $ sudo nano sources.list
deb http://ftp.jaist.ac.jp/raspbian/ buster main contrib non-free rpi
deb http://ftp.tsukuba.wide.ad.jp/Linux/raspbian/raspbian/ buster main contrib non-free rpi
deb http://ftp.yz.yamagata-u.ac.jp/pub/linux/raspbian/raspbian/ buster main contrib non-free rpi
deb http://raspbian.raspberrypi.org/raspbian/ buster main contrib non-free rpi
# Uncomment line below then 'apt-get update' to enable 'apt-get source'
#deb-src http://raspbian.raspberrypi.org/raspbian/ stretch main contrib non-free rpi
(6)SDカードへの書き込み頻度の最小化
- swapの廃止6
#サービスを停止
$ sudo systemctl stop dphys-swapfile.service
$ sudo systemctl disable dphys-swapfile.service
#スワップファイルを削除
$ sudo rm /var/swap
- 頻度の高い書き込み先をメモリに移す7
4.その他開発に必要なパッケージのインストール
(1)git
~ $ sudo apt install git -y
(2)emacs
~ $ sudo apt install emacs -y
(3)python関連
~ $ sudo apt install python3-pip -y
(4)リモートデスクトップ
~ $ sudo apt install xrdp -y
~ $ sudo service xrdp restart
(5)VSCode
こちら8を参考にします。
# . <( wget -O - https://code.headmelted.com/installers/apt.sh )
これを実行すると、速攻でターミナルが落とされてインストールできなかった(ssh経由、ローカルターミナル共に)ので、別のやり方をまとめました。
5.ハードウェア制御に必要なパッケージのインストール
(1)GPIO
- インストール9
~ $ sudo apt install wiringpi -y
~ $ sudo apt install python3-rpi.gpio -y
- I/Oの状態を表示
~ $ gpio readall
 +-----+-----+---------+------+---+---Pi B+--+---+------+---------+-----+-----+
 | BCM | wPi |   Name  | Mode | V | Physical | V | Mode | Name    | wPi | BCM |
 +-----+-----+---------+------+---+----++----+---+------+---------+-----+-----+
 |     |     |    3.3v |      |   |  1 || 2  |   |      | 5v      |     |     |
 |   2 |   8 |   SDA.1 | ALT0 | 1 |  3 || 4  |   |      | 5v      |     |     |
 |   3 |   9 |   SCL.1 | ALT0 | 1 |  5 || 6  |   |      | 0v      |     |     |
 |   4 |   7 | GPIO. 7 |   IN | 1 |  7 || 8  | 1 | ALT0 | TxD     | 15  | 14  |
 |     |     |      0v |      |   |  9 || 10 | 1 | ALT0 | RxD     | 16  | 15  |
 |  17 |   0 | GPIO. 0 |   IN | 0 | 11 || 12 | 0 | IN   | GPIO. 1 | 1   | 18  |
 |  27 |   2 | GPIO. 2 |   IN | 0 | 13 || 14 |   |      | 0v      |     |     |
 |  22 |   3 | GPIO. 3 |   IN | 0 | 15 || 16 | 0 | IN   | GPIO. 4 | 4   | 23  |
 |     |     |    3.3v |      |   | 17 || 18 | 0 | IN   | GPIO. 5 | 5   | 24  |
 |  10 |  12 |    MOSI | ALT0 | 0 | 19 || 20 |   |      | 0v      |     |     |
 |   9 |  13 |    MISO | ALT0 | 0 | 21 || 22 | 0 | IN   | GPIO. 6 | 6   | 25  |
 |  11 |  14 |    SCLK | ALT0 | 0 | 23 || 24 | 1 | OUT  | CE0     | 10  | 8   |
 |     |     |      0v |      |   | 25 || 26 | 1 | OUT  | CE1     | 11  | 7   |
 |   0 |  30 |   SDA.0 |   IN | 1 | 27 || 28 | 1 | IN   | SCL.0   | 31  | 1   |
 |   5 |  21 | GPIO.21 |   IN | 1 | 29 || 30 |   |      | 0v      |     |     |
 |   6 |  22 | GPIO.22 |   IN | 1 | 31 || 32 | 0 | IN   | GPIO.26 | 26  | 12  |
 |  13 |  23 | GPIO.23 |   IN | 0 | 33 || 34 |   |      | 0v      |     |     |
 |  19 |  24 | GPIO.24 |   IN | 0 | 35 || 36 | 0 | IN   | GPIO.27 | 27  | 16  |
 |  26 |  25 | GPIO.25 |   IN | 0 | 37 || 38 | 0 | IN   | GPIO.28 | 28  | 20  |
 |     |     |      0v |      |   | 39 || 40 | 0 | IN   | GPIO.29 | 29  | 21  |
 +-----+-----+---------+------+---+----++----+---+------+---------+-----+-----+
 | BCM | wPi |   Name  | Mode | V | Physical | V | Mode | Name    | wPi | BCM |
 +-----+-----+---------+------+---+---Pi B+--+---+------+---------+-----+-----+
出力テスト
~ $ gpio -g mode 6 out ; gpio -g mode 13 out ; gpio -g mode 19 out ; gpio -g mode 26 out
~ $ gpio -g write 6 1 ; gpio -g write 13 1 ; gpio -g write 19 1 ; gpio -g write 26 1
~ $ gpio -g write 6 0 ; gpio -g write 13 0 ; gpio -g write 19 0 ; gpio -g write 26 0
Raspberry Pi 4 でGPIOコマンドを使う
Raspberry Pi 4では、gpioコマンドを実行すると、下記のメッセージが出て正常に動作できません。
~ $ gpio readall
Oops - unable to determine board type... model: 17
参考10に従って、対策済パッケージをインストールします。
~ $ cd ~/Downloads
~/Downloads $ wget https://project-downloads.drogon.net/wiringpi-latest.deb
--2020-02-05 13:34:12--  https://project-downloads.drogon.net/wiringpi-latest.deb
・・・(省略)・・・
wiringpi-latest.deb                    100%[============================================================================>]  51.04K   106KB/s    in 0.5s

2020-02-05 13:34:18 (106 KB/s) - ‘wiringpi-latest.deb’ saved [52260/52260]

pi@few-kin05:~/Downloads $ sudo dpkg -i wiringpi-latest.deb
(Reading database ... 148424 files and directories currently installed.)
Preparing to unpack wiringpi-latest.deb ...
Unpacking wiringpi (2.52) over (2.50) ...
Setting up wiringpi (2.52) ...
Processing triggers for man-db (2.8.5-2) ...
動作確認
pi@few-kin05:~/Downloads $ gpio -v
gpio version: 2.52
Copyright (c) 2012-2018 Gordon Henderson
This is free software with ABSOLUTELY NO WARRANTY.
For details type: gpio -warranty

Raspberry Pi Details:
  Type: Pi 4B, Revision: 02, Memory: 2048MB, Maker: Sony
  * Device tree is enabled.
  *--> Raspberry Pi 4 Model B Rev 1.2
  * This Raspberry Pi supports user-level GPIO access.
(2)I2C
- インストール11
~ $ sudo apt install i2c-tools -y
~ $ sudo apt install python3-smbus -y
- I2Cの接続状態の表示
~ $ sudo i2cdetect -r -y 1
     0  1  2  3  4  5  6  7  8  9  a  b  c  d  e  f
00:          -- -- -- -- -- -- -- -- -- -- -- -- --
10: -- -- -- -- -- -- -- -- -- -- -- -- -- -- -- --
20: -- -- -- -- -- -- -- -- -- -- -- -- -- -- -- --
30: -- -- -- -- -- -- -- -- -- -- -- -- -- -- -- --
40: -- -- -- -- -- -- -- -- -- -- -- -- -- -- -- --
50: -- -- -- -- -- -- -- -- -- -- -- -- -- -- -- --
60: -- -- -- -- -- -- -- -- -- -- -- -- -- -- -- --
70: -- -- -- -- -- -- -- --
(3)Serial
~ $ sudo apt install python3-serial -y
#5.定期的なメンテナンス
##(1)パッケージのアップデート
$ sudo apt update && sudo apt upgrade -y
###Sambaのバージョンが上がったとき
smb.confの書き換えをするかどうか、聞かれます。
keep the local version currently installedを選んで、そのまま流用しても良いですし、install the package maintainer's version を選んで、もう一度修正しても良いです。
   lqqqqqqqqqqqqqqqqqqqqqqqqqqqqqqqqqqqqqqqqqu Samba server and utilities tqqqqqqqqqqqqqqqqqqqqqqqqqqqqqqqqqqqqqqqqqk
   x A new version (/run/samba/upgrades/smb.conf) of configuration file /etc/samba/smb.conf is available, but the   x
   x version installed currently has been locally modified.                                                         x
   x                                                                                                                x
   x What do you want to do about modified configuration file smb.conf?                                             x
   x                                                                                                                x
   x                           install the package maintainer's version                                             x
   x                           keep the local version currently installed                                           x
   x                           show the differences between the versions                                            x
   x                           show a side-by-side difference between the versions                                  x
   x                           show a 3-way difference between available versions                                   x
   x                           do a 3-way merge between available versions (experimental)                           x
   x                           start a new shell to examine the situation                                           x
   x                                                                                                                x
   x                                                                                                                x
   x                                                     <Ok>                                                       x
   x                                                                                                                x
   mqqqqqqqqqqqqqqqqqqqqqqqqqqqqqqqqqqqqqqqqqqqqqqqqqqqqqqqqqqqqqqqqqqqqqqqqqqqqqqqqqqqqqqqqqqqqqqqqqqqqqqqqqqqqqqqqj
##(2)最新のリリースにアップグレード
$ sudo apt-get update && sudo apt-get -y dist-upgrade && sudo apt-get -y autoremove && sudo apt-get autoclean
便利ではありますが、色々トラブルの原因になる事が有りますので、注意して使用して下さい。
#6.その他補足資料
##(1)無線LANが繋がらない
"Buster"になってから外付けの無線LANドングル(例:ELECOM WDC-150SU2など)からWifiに繋がらなくなりました。
###状況
- lsusbにはドングルが出てくる
- ifconfigでもwlan0が出てくるが、DOWNのまま
- wpa_supplicant.confも設定済
- sudo ifdown wlan0 を実行すると、「ifup: unknown interface wlan0」
下記のように設定する事で、繋がるようになります。12
~ $ cd /etc/network/
~ $ sudo cp -p interfaces interfaces.org
~ $ nano interfaces
interfaces ファイルに、「allow-hotplug wlan0」以降の3行を追記します。
# interfaces(5) file used by ifup(8) and ifdown(8)

# Please note that this file is written to be used with dhcpcd
# For static IP, consult /etc/dhcpcd.conf and 'man dhcpcd.conf'

# Include files from /etc/network/interfaces.d:
source-directory /etc/network/interfaces.d

allow-hotplug wlan0
iface wlan0 inet manual
    wpa-conf /etc/wpa_supplicant/wpa_supplicant.conf
再起動したら、繋がるようになります。
##(2)apt upgradeが出来ない
長く使ってると、突然apt upgradeが出来なくなってしまいました。
下記に処置方法をまとめました。
Raspbianでapt upgradeするとmissing final newlineが出た
以上。
-
参考:https://qiita.com/nori-dev-akg/items/a8361e728a66a8c3bdba#ssh ↩
-
参考:https://qiita.com/sukinasaki/items/426068d6e87169fa3d88 ↩
-
参考:https://www.コンフレッジ.com/raspberry-piraspbian%E3%81%AEntp%E3%82%B5%E3%83%BC%E3%83%90%E8%A8%AD%E5%AE%9A/ ↩
-
参考:https://www.angelcurio.com/raspberrypi/?Raspberry%20Pi/%E5%90%84%E7%A8%AE%E8%A8%AD%E5%AE%9A/swap%E3%83%95%E3%82%A1%E3%82%A4%E3%83%AB%E3%81%AE%E5%BB%83%E6%AD%A2 ↩
-
参考:https://www.angelcurio.com/raspberrypi/?cmd=read&page=Raspberry%20Pi%2F%E5%90%84%E7%A8%AE%E8%A8%AD%E5%AE%9A%2Flog%2Ctmp%E3%81%AE%E3%82%AA%E3%83%B3%E3%83%A1%E3%83%A2%E3%83%AA%28tmpfs%29%E5%8C%96 ↩
-
参考:http://wiringpi.com/wiringpi-updated-to-2-52-for-the-raspberry-pi-4b/ ↩
-
参考:https://hatobus.hatenablog.jp/entry/2017/08/02/215135 ,https://hatobus.hatenablog.jp/entry/2017/08/02/215135 ↩
-
参考: https://saitetutan.hatenablog.jp/entry/2018/05/01/010428 ↩