1.はじめに
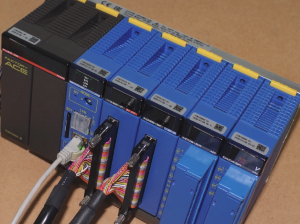
横河電機の「リアルタイムOSコントローラ(e-RT3)」での、入出力モジュールの制御について、公式マニュアル1のサンプルプログラムを補足する内容でまとめてみました。

リアルタイムOSコントローラ e-RT3 関連記事
| 第1回 | セットアップ編 |
| 第2回(今回) | 入出力ユニット編 (PythonとC言語から制御) |
| 第3回 | Elixirから制御編 |
| 第4回 | ROS2から制御編 |
| 第5回 | Rustから制御編 |
| 第6回 | Goから制御編 |
2.Python版
e-RT3用のライブラリを間接的に使いながら制御します。
(1)入力モジュールXD
# !/usr/bin/env /usr/bin/python3
# -*- coding: utf-8 -*-

import ctypes

def xd_read():
    """
    読み込み関数
    """
    # ライブラリ読み込み
    libc = ctypes.cdll.LoadLibrary("/usr/local/lib/libm3.so.1")

    # pythonの変数をint型に変換
    # ユニット番号
    # ベースユニットが複数あるときは、この数値が変わる
    c_unit = ctypes.c_int(0)
    # スロット番号
    # XDはスロット3に設置
    c_slot = ctypes.c_int(3)
    # リレー番号
    # 1番から読み込み。ブロック読み込みの場合は1, 17, 33, (16n+1)・・・を指定
    c_pos = ctypes.c_int(1)
    # 読み出しブロック数(1ブロック16点)
    # 今回使用のものは32点までコネクタ有りなので
    # 2ブロック32点読み込み
    c_num = ctypes.c_int(2)

    # 読み出しデータ格納バッファ用の
    # 要素数4のshort型の配列
    # (XDユニットは最大64点まで対応、今回使用のものは32点までコネクタ有り)
    short_arr = ctypes.c_uint16 * 4
    # 配列を作成
    c_data = short_arr()

    # ライブラリ関数呼び出し
    libc.readM3InRelay(c_unit, c_slot, c_pos, c_num, c_data)
    # 読み込み結果を返す
    return (c_data[0], c_data[1])

if __name__ == '__main__':
    """
    メイン
    """
    print("--- read sample ---")

    # XD読み込み
    (lower, upper) = xd_read()

    # 32~17番と、16~1番のXDの値をバイナリ表示
    print( f"lower: {bin(upper)}, upper: {bin(lower)}" )
実行
watchコマンドを使って、定期的(ここでは1秒間隔)にXDの状態を読み込みます。
$ watch -n 1 ./xd_read16.py
Every 1.0s: ./xd_read16.py                                ert3u: Mon Aug 10 22:48:40 2020
--- read sample ---
lower: 0b1111, upper: 0b11

(Ctrl-Cで終了)
上記の時の、スイッチ入力の状態
| ONの入力点 | バイナリ表記 |
|---|---|
| 1, 2, 3, 4 | 0b1111 |
| 17, 18 | 0b0011 |
(2)出力モジュールYD
# !/usr/bin/env /usr/bin/python3
# -*- coding: utf-8 -*-

import ctypes
import time


def yd_write(upper, lower):
    """
    書き込み関数
    """

    # ライブラリ読み込み
    libc = ctypes.cdll.LoadLibrary("/usr/local/lib/libm3.so.1")

    # pythonの変数をint型に変換
    # ユニット
    c_unit = ctypes.c_int(0)
    # スロット
    # YDはスロット2に設置
    c_slot = ctypes.c_int(2)
    # リレー番号
    # ブロック読み込みの場合は1, 17, 33, (16n+1)・・・を指定
    c_pos = ctypes.c_int(1)
    # 書き込みブロック数(1ブロック16点)
    c_num = ctypes.c_int(2)
    # 書き込みデータ格納バッファ用のshort型配列を作る
    # 要素数4のshort型の配列
    short_arr = ctypes.c_uint16 * 4
    # 32 x 2 点分の書き込みデータ作成
    data = [lower, upper]
    c_data = short_arr(*data)
    # 32 x 2 点分のマスクデータ作成
    mask = [0xffff, 0xffff]
    c_mask = short_arr(*mask)

    # ライブラリ関数呼び出し
    libc.writeM3OutRelay(c_unit, c_slot, c_pos, c_num, c_data, c_mask)


if __name__ == '__main__':
    """
    メイン
    """
    print("--- write sample ---")
    while True:
        try:
            # YD書き込み
            yd_write(0xf00f, 0x00f0)
            # スリープ
            time.sleep(0.5)
            yd_write(0x00f0, 0x0f00)
            time.sleep(0.5)
            yd_write(0x0f00, 0xf00f)
            time.sleep(0.5)
        except KeyboardInterrupt:
            break
        except:
            pass

    # 消灯
    yd_write(0x0000, 0x0000)
実行
$ ./yd_write16.py
--- write sample ---

(Ctrl-Cで終了)
上記の時の、YD出力の状態
LEDが縦4つ点灯して、右側に流れていきます。

3.C言語版
公式マニュアルには、(APIのリファレンスはありますが)Lチカ確認できる様なC言語のサンプルがなかったので、こちら2を参考にしました。
/**
 * @file readwrite.c
 * @author myasu (https://qiita.com/myasu/)
 * @brief m3 Read / Write Sample
 * @version 0.1
 * @date 2020-08-10
 *
 * @copyright Copyright (c) 2020
 *
 */

# include <stdio.h>
# include <unistd.h>
# include <errno.h>

# include <ert3/m3lib.h>

/**
 * @brief XDの読み込み
 *
 * @return int 0:成功、-1:失敗
 */
int xd_read(void)
{
    //読み出しデータ格納バッファ
    unsigned short data[4];

    //ライブラリ関数呼び出し
    //ユニット番号、スロット番号、開始リレー番号、読み込みブロック数(2=32点)
    int ret = readM3InRelay(0, 3, 1, 2, data);

    if(ret == 0)
        printf("lower: %x, upper: %x\r\n", data[0], data[1]);
    else
        //エラーの時、エラーコードを表示
        printf("error: %d\r\n", errno);

    return ret;
}

/**
 * @brief YDに書き込み
 *
 * @param arg_data 書き込みデータ4byte分
 * @return int 0:成功、-1:失敗
 */
int yd_write(unsigned int arg_data)
{
    //書き込みデータ
    unsigned short data[4];
    //書き込みマスク
    unsigned short mask[4];

    //引数のデータを上位・下位に分解
    data[0] = 0xffff & (arg_data);
    data[1] = 0xffff & (arg_data >> 16);
    // 32 x 2 点分のマスクデータ作成
    mask[0] = 0xffff;
    mask[1] = 0xffff;

    //ライブラリ関数呼び出し
    //ユニット番号、スロット番号、開始リレー番号、書き込みブロック数(2=64点)
    int ret = writeM3OutRelay(0, 2, 1, 2, data, mask);

    if(ret == 0){}
    else
        //エラーの時、エラーコードを表示
        printf("error: %d\r\n", errno);

    return ret;
}

int main(void)
{
    printf("--- read / write sample ---\r\n");

    while(1)
    {
        //XD読み込み
        xd_read();
        //YD書き込み
        yd_write(0x0f00f00f);
        //スリープ
        usleep(0.3 * 1000 * 1000);
        yd_write(0xf00f00f0);
        usleep(0.3 * 1000 * 1000);
        yd_write(0x00f00f00);
        usleep(0.3 * 1000 * 1000);
    }

    return 0;
}
Makefile
e-RT3のライブラリとヘッダファイルは、それぞれ下記にあります。
| ヘッダファイル | /usr/local/include/ert3 |
| ライブラリ | /usr/local/lib |
# ヘッダファイル
$ ls /usr/local/include/ert3/ -la
total 84
drwxr-xr-x 2 root root  4096 Mar 17 17:55 .
drwxr-xr-x 3 root root  4096 Mar 17 17:55 ..
-rw-r--r-- 1 root root  4555 Mar 17 17:55 ert3dgc.h
-rwxr-xr-x 1 root root  8952 Mar  5  2019 m3cpu.h
-rwxr-xr-x 1 root root  4317 Mar  5  2019 m3dev.h
-rwxr-xr-x 1 root root  4828 Mar  5  2019 m3flnet.h
-rwxr-xr-x 1 root root 10804 Mar  5  2019 m3io.h
-rwxr-xr-x 1 root root  8822 Mar  5  2019 m3lib.h
-rwxr-xr-x 1 root root  1261 Mar  5  2019 m3mcom.h
-rwxr-xr-x 1 root root  2115 Mar  5  2019 m3ras.h
-rwxr-xr-x 1 root root  2613 Mar  5  2019 m3sysctl.h
-rwxr-xr-x 1 root root  1506 Mar  5  2019 m3wdt.h

# ライブラリ
$ ls /usr/local/lib -la
total 700
drwxr-xr-x  4 root root    4096 Aug  7 14:34 .
drwxr-xr-x 10 root root    4096 Aug  7 14:34 ..
lrwxrwxrwx  1 root root      19 Mar 21 19:29 libert3dgc.so -> libert3dgc.so.1.1.1
lrwxrwxrwx  1 root root      19 Mar 21 19:29 libert3dgc.so.1 -> libert3dgc.so.1.1.1
-rw-r--r--  1 root root  662644 Mar 17 17:50 libert3dgc.so.1.1.1
lrwxrwxrwx  1 root root      14 Mar  5  2019 libm3.so -> libm3.so.1.0.1
lrwxrwxrwx  1 root root      14 Mar  5  2019 libm3.so.1 -> libm3.so.1.0.1
-rw-r--r--  1 root root   36348 Mar  5  2019 libm3.so.1.0.1
drwxrwsr-x  4 root staff   4096 Aug  7 08:31 python2.7
drwxr-xr-x  3 root root    4096 Mar 17 18:13 python3.6
コンパイルのオプションと、リンカのオプション(libm3.so→-lm3)にそれぞれ追記します。
CC          = gcc
CFLAGS      = -O4 -Wall -I/usr/local/include
DEST        = /usr/local/bin
LDFLAGS     = -L/usr/local/lib
LIBS        = -lm -lm3
OBJS        = readwrite.o
PROGRAM     = readwrite

all:        $(PROGRAM)

$(PROGRAM): $(OBJS)
            $(CC) $(OBJS) $(CFLAGS) $(LDFLAGS) $(LIBS) -o $(PROGRAM)

clean:;     rm -f *.o *~ $(PROGRAM)

install:    $(PROGRAM)
            install -s $(PROGRAM) $(DEST)
実行
実行の様子は、Python版と同じです。
$ make
gcc -O4 -Wall -I/usr/local/include   -c -o readwrite.o readwrite.c
gcc readwrite.o -O4 -Wall -I/usr/local/include -L/usr/local/lib -lm -lm3 -o readwrite

$ ./readwrite
--- read / write sample ---
lower: 0, upper: 0
lower: 0, upper: 0
lower: f, upper: 3
lower: f, upper: 3

(Ctrl-Cで終了)
4.おわりに
見た目はPLCですが、Raspberry PiやJetsonの感覚で、カンタンにIOを制御することが出来ました。
実際のアプリは別の記事で紹介します。(作成中)
次回
ROS2を使ってみます。(作成中)

