1.はじめに
横河電機の「リアルタイムOSコントローラ(e-RT3)」の初期のセットアップについてまとめてみました。
公式マニュアル1 が良く出来てるので基本的にはマニュアル通りで良いのですが、その他セットアップ中に気づいた、補足的な内容を残します。
OSが Ubuntu 18.04 LTS (32bit版)なので、Debian系に慣れていれば普段通りの使い方が出来て使いやすい印象です。
今回は、ROS2、Docker、Elixirのインストールまで試してみました。
リアルタイムOSコントローラ e-RT3 関連記事
| 第1回(今回) | セットアップ編 |
| 第2回 | 入出力ユニット編 (PythonとC言語から制御) |
| 第3回 | Elixirから制御編 |
| 第4回 | ROS2から制御編 |
| 第5回 | Rustから制御編 |
| 第6回 | Goから制御編 |
2.組立から立ち上げまで
(1)SDカードにディスクイメージを書き込み
サポートページからダウンロードします。
(ユーザ登録が必要です)
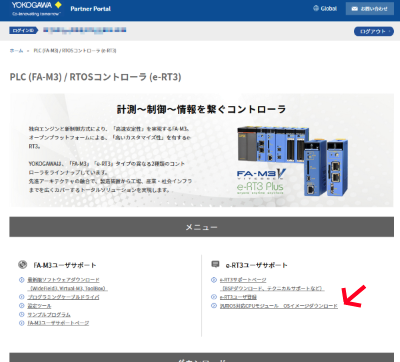
ディスクイメージを書き込んだら、CPU本体のSDカードスロットに差し込みます。
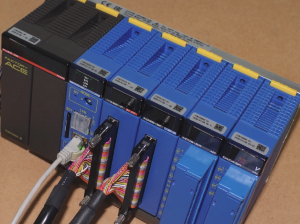
(2)ベースユニットに各ユニットを取り付け
いわゆるブロック形のPLCなので、ベースユニットに各ユニットを取り付けます。
CPUはスロット1に付けてください。

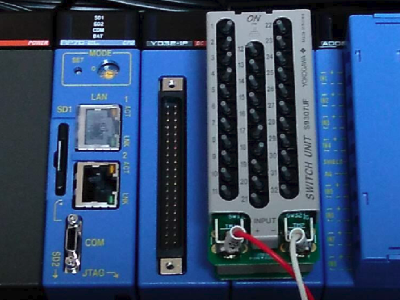
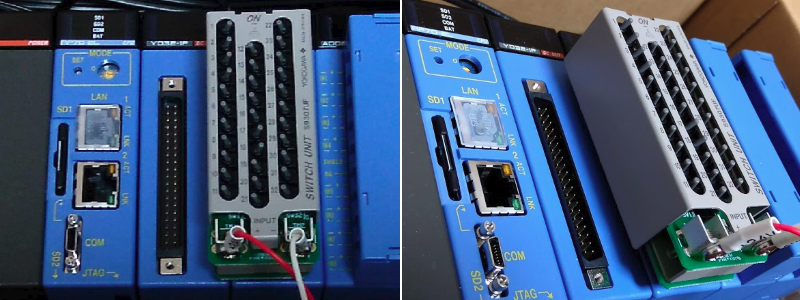
(3)スイッチユニット
入力テスト用スイッチ(灰色のスイッチが並んだ治具)は、XDのユニットに取り付けます。
INPUTには、24Vの電源をつなぎます。
(4)電源ユニットに、ACプラグを取り付け
こんな感じで、ACプラグを取り付けます。
(きちんとφ3.5の丸圧着端子を使ってね!)
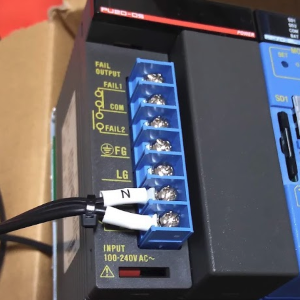
ここまで出来たら、電源を入れて起動します。
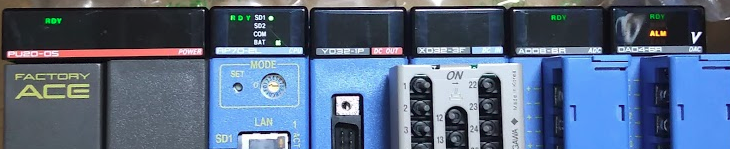
一番右のDAコンバータのユニットの、ALMとERRのランプが交互に点滅しますが、DA出力用の外部電源を繋げると、正常に戻ります。
(5)コンソール
シリアルコンソールと、LAN経由SSHのどちらでも使用できます。
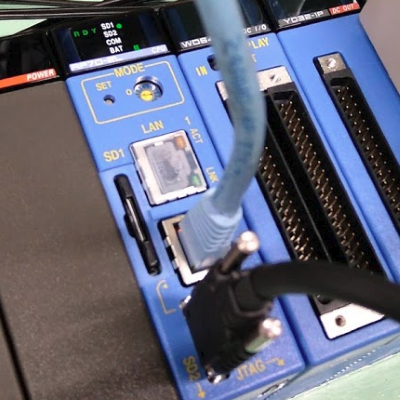
初回の立ち上げは、シリアル接続でつないで、一通り安定したらLAN接続にするのが良いかと思います。
①シリアル接続
純正のシリアル通信ケーブルは、D-SUB9ピンの端子がオスになっています。
そのため、パソコン側のUSB-シリアル変換ケーブル(こちらもD-SUB9ピン・オスのはず)と接続するには、両端がD-SUB9ピンメスのクロスケーブルが別途必要になります。
e-RT3側ケーブル---(D-SUB9ピン・オス/ /メス)---クロスケーブル---(メス/ /D-SUB9ピン・オス)---PC側ケーブル
②LAN接続
LAN1ポートは固定IPアドレス、LAN2ポートはDHCPが有効になっています。
2.立ち上げ後の設定
中身は普通のUbuntu18.04です。
最低限必要な設定と、ソフトウェアをインストールします。
(1)初期設定
# タイムゾーンを日本に指定
$ sudo timedatectl set-timezone Asia/Tokyo

# ロケールを英語に指定する場合
$ sudo update-locale en_US.UTF-8

# ロケールを日本語に指定する場合
$ sudo apt-get install language-pack-ja
$ sudo update-locale LANG=ja_JP.UTF-8

# デフォルトのパスワードから変更
$ passwd

# ホスト名を変更(任意)
$ sudo hostnamectl set-hostname ert3u
# ホスト名を追加(sudoを使う時のエラー`sudo: unable to resolve host`対策)
$ sudo sh -c 'echo 127.0.1.1 $(hostname) >> /etc/hosts'
# 有効にするため再起動
$ sudo reboot
(2)モジュールの設定
今回はこういう順番で配置してます。
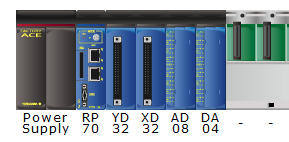
左から、電源・CPU・XD・YD・・・という並びにしたかったのですが、XDユニットの入力テスト用スイッチ(灰色のスイッチが並んだ治具)を取り付けると、CPUの正面に干渉して使えないので、XDとYDを入れ替えてます。
そのため、ユニットの並び順と設定をしているert3io.confファイルの内容も変わってしまうので、下記のように設定を修正しています。
cd /usr/local/etc/ert3/
sudo cp -p ert3io.conf ert3io.conf.org
sudo nano ert3io.conf
"slot":の番号の所を、XDとYDで入れ替えてます。
{
"Conf2_xd32":
{
  #               ↓ここ
  "unit":0,"slot":3,"modid":"XD32",
  "X01-X16":{"sampling":"1ms"},
  "X17-X32":{"sampling":"1ms"}
},
"Conf1_yd32":
{
  #               ↓ここ
  "unit":0,"slot":2,"modid":"YD32",
  "Y01-Y16":{"fail":"reset"},
  "Y17-Y32":{"fail":"reset"}
},
(・・・以降省略)
{
"Conf1_xd32":
{
  "unit":0,"slot":2,"modid":"XD32",
  "X01-X16":{"sampling":"1ms"},
  "X17-X32":{"sampling":"1ms"}
},
"Conf2_yd32":
{
  "unit":0,"slot":3,"modid":"YD32",
  "Y01-Y16":{"fail":"reset"},
  "Y17-Y32":{"fail":"reset"}
},
(・・・以降省略)
修正したら、指定のサービスをsystemdで再起動するか、e-RT3自体を再起動します。
$ sudo systemctl restart ert3ioconfd
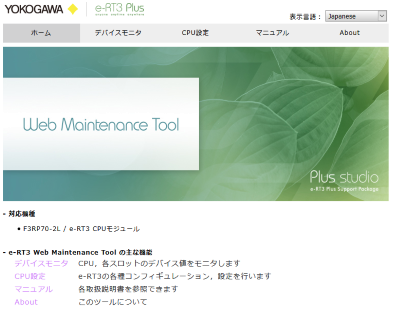
(3)Webモニターの確認
ブラウザで、e-RT3にアクセスすると、下記の管理画面が見られます。
アドレス例)http://192.168.0.10/
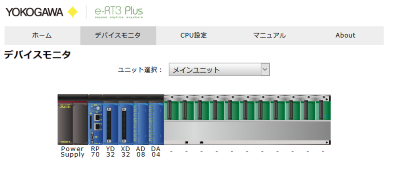
デバイスモニタ
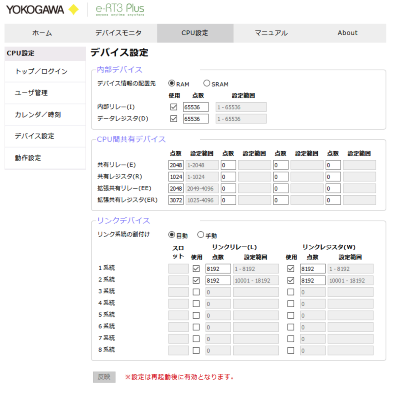
デバイス設定(の一部)
※詳しくは、「e-RT3 Linux 対応CPU モジュール Web メンテナンスツール説明書 IM 34M06M52-23」を参照してください。
3.ソフトウェアの追加インストール
開発や運用に必要なソフトウェアをインストールします。
おおむね、こちらの資料を参考にしています。
※RaspberryPiに関係するソフトウェアは必要ありません。
(1)NTP
現状の動作確認
$ timedatectl status
                      Local time: Tue 2020-08-11 11:15:25 JST
                  Universal time: Tue 2020-08-11 02:15:25 UTC
                        RTC time: Tue 2020-08-11 02:15:26
                       Time zone: Asia/Tokyo (JST, +0900)
       System clock synchronized: yes
systemd-timesyncd.service active: yes
                 RTC in local TZ: no
NTPを国内のサーバに向けます。
$ cd /etc/systemd/
# オリジナルをバックアップ
$ sudo cp -p timesyncd.conf timesyncd.conf.org

# 現在のステータスを確認
# NTPのサーバは ntp.ubuntu.com に向いています
$ systemctl status systemd-timesyncd
● systemd-timesyncd.service - Network Time Synchronization
   Loaded: loaded (/lib/systemd/system/systemd-timesyncd.service; enabled; vendor preset: enabled)
   Active: active (running) since Tue 2020-08-11 09:38:42 JST; 1h 37min ago
     Docs: man:systemd-timesyncd.service(8)
 Main PID: 940 (systemd-timesyn)
   Status: "Synchronized to time server 91.189.94.4:123 (ntp.ubuntu.com)."
    Tasks: 2 (limit: 2366)
   CGroup: /system.slice/systemd-timesyncd.service
           └─940 /lib/systemd/systemd-timesyncd

Warning: Journal has been rotated since unit was started. Log output is incomplete or unavailable.

# 設定を編集
$ sudo nano timesyncd.conf
timesyncd.confに、NTPの参照先を追記します。
#  This file is part of systemd.
#
#  systemd is free software; you can redistribute it and/or modify it
#  under the terms of the GNU Lesser General Public License as published by
#  the Free Software Foundation; either version 2.1 of the License, or
#  (at your option) any later version.
#
# Entries in this file show the compile time defaults.
# You can change settings by editing this file.
# Defaults can be restored by simply deleting this file.
#
# See timesyncd.conf(5) for details.

[Time]
NTP=ntp.nict.jp
FallbackNTP=ntp.jst.mfeed.ad.jp ntp.ring.gr.jp ntp.ubuntu.com
# NTP=
# FallbackNTP=ntp.ubuntu.com
# RootDistanceMaxSec=5
# PollIntervalMinSec=32
# PollIntervalMaxSec=2048
設定を反映します。
# 再読み込みと設定の反映
$ sudo systemctl daemon-reload
$ sudo systemctl restart systemd-timesyncd

# 現在のステータスを確認
# NTPのサーバは ntp.nict.jp に向いています
$ systemctl status systemd-timesyncd
● systemd-timesyncd.service - Network Time Synchronization
   Loaded: loaded (/lib/systemd/system/systemd-timesyncd.service; enabled; vendor preset: enabled)
   Active: active (running) since Tue 2020-08-11 11:16:37 JST; 10s ago
     Docs: man:systemd-timesyncd.service(8)
 Main PID: 5704 (systemd-timesyn)
   Status: "Synchronized to time server 133.243.238.243:123 (ntp.nict.jp)."
    Tasks: 2 (limit: 2366)
   CGroup: /system.slice/systemd-timesyncd.service
           └─5704 /lib/systemd/systemd-timesyncd
(2)samba
$ sudo apt update
$ sudo apt install samba
$ sudo apt install nano

$ cd /etc/samba/
$ sudo cp -p smb.conf smb.conf.org
$ sudo nano smb.conf
smb.confの修正箇所は、[homes]のエントリーのところです。
(・・・省略)
# ======================= Share Definitions =======================

# Un-comment the following (and tweak the other settings below to suit)
# to enable the default home directory shares. This will share each
# user's home directory as \\server\username
[homes]
   comment = Home Directories
   browseable = yes

# By default, the home directories are exported read-only. Change the
# next parameter to 'no' if you want to be able to write to them.
   read only = no

# File creation mask is set to 0700 for security reasons. If you want to
# create files with group=rw permissions, set next parameter to 0775.
   create mask = 0755

# Directory creation mask is set to 0700 for security reasons. If you want to
# create dirs. with group=rw permissions, set next parameter to 0775.
   directory mask = 0755

(省略・・・)
その他の設定です。
# sambaのユーザ登録
$ sudo pdbedit -a ert3

# sambaを再起動
$ sudo systemctl restart smbd
これで、Windowsのエクスプローラから、アドレス\\ホスト名\ert3に入ると、共有フォルダとして扱う事ができます。
(3)ROS2
公式のマニュアル2 通りでインストール出来ます。
# 事前に必要なパッケージをインストール
$ sudo apt install curl gnupg2 lsb-release

# ROS用のsources.listを追加
$ curl -s https://raw.githubusercontent.com/ros/rosdistro/master/ros.asc | sudo apt-key add -
$ sudo sh -c 'echo "deb [arch=$(dpkg --print-architecture)] http://packages.ros.org/ros2/ubuntu $(lsb_release -cs) main" > /etc/apt/sources.list.d/ros2-latest.list'

# アップデートとインストール
# "eloquent"を選びました
$ sudo apt update
$ sudo apt install ros-eloquent-desktop
# 補完機能を有効にするためにインストール
$ sudo apt install python3-argcomplete
# colconをインストール
$ sudo apt install python3-colcon-common-extensions

# 環境変数を読み込み
$ source /opt/ros/eloquent/setup.bash
# とりあえず実行
$ ros2
usage: ros2 [-h] Call `ros2 <command> -h` for more detailed usage. ...

ros2 is an extensible command-line tool for ROS 2.
(・・・省略)
(2020/12/20追記)
ROS2からIOユニットを制御してみました。
(4)Elixir
Erlang Solutionの公式にはarmhfパッケージが提供されていませんでしたので、asdfを使ってインストールします。
試しに、armhfが提供されているRaspbianのパッケージで試してみました。インストール自体は可能ですが、実行時にライブラリncursesなどの依存関係がおかしな事になってしまって、erlangが立ち上がりませんでした・・・
インストールの手順は、こちらのページ3を参考にしています。
# ビルドに必要なパッケージをインストール
$ sudo apt install build-essential git wget libssl-dev libreadline-dev libncurses5-dev zlib1g-dev m4 curl wx-common libwxgtk3.0-dev autoconf
$ sudo apt-get install libxml2-utils xsltproc fop unixodbc unixodbc-bin unixodbc-dev
# 更に追加
$ sudo apt install build-essential autoconf m4 libncurses5-dev libwxgtk3.0-dev libgl1-mesa-dev libglu1-mesa-dev libpng-dev libssh-dev unixodbc-dev xsltproc fop

# ホームディレクトリに移動して、asdfのインストール準備
$ cd
$ git clone https://github.com/asdf-vm/asdf.git ~/.asdf
$ echo '. $HOME/.asdf/asdf.sh' >> ~/.bashrc
$ echo '. $HOME/.asdf/completions/asdf.bash' >> ~/.bashrc

# それぞれのプラグインを追加
$ asdf plugin-add erlang
$ asdf plugin-add elixir

# それぞれビルド。必要に応じてバージョンを指定
# ealangのビルドは気長に待ってください・・・
$ asdf install erlang 22.0.7
$ asdf install elixir 1.9.1-otp-22

# グローバルバージョンを指定
$ asdf global erlang 22.0.7
$ asdf global elixir 1.9.1-otp-22

# iex環境でのヒストリーを残すようにします
$ echo 'export ERL_AFLAGS="-kernel shell_history enabled"' >> ~/.bashrc
Erlangの動作確認
$ erl
Erlang/OTP 22 [erts-10.4.4] [source] [smp:2:2] [ds:2:2:10] [async-threads:1] [hipe]

Eshell V10.4.4  (abort with ^G)
1>
Elixirの動作確認
$ iex
Erlang/OTP 22 [erts-10.4.4] [source] [smp:2:2] [ds:2:2:10] [async-threads:1] [hipe]

Interactive Elixir (1.9.1) - press Ctrl+C to exit (type h() ENTER for help)
iex(1)>
(2020/11/26追記)
ElixirからIOユニットを制御してみました。
(5)Docker
公式マニュアル4の手順通りに進めます。
アーキテクチャは、armhfに書き換えてください。(公式マニュアルをそのままコピペするとamd64になっています)
# 下準備
$ sudo apt install apt-transport-https ca-certificates curl gnupg-agent software-properties-common
$ curl -fsSL https://download.docker.com/linux/ubuntu/gpg | sudo apt-key add -
$ sudo add-apt-repository "deb [arch=armhf] https://download.docker.com/linux/ubuntu $(lsb_release -cs) stable"

# インストール
$ sudo apt install docker-ce docker-ce-cli containerd.io

# バージョン確認
$ docker -v
Docker version 19.03.12, build 48a6621

# ユーザert3をdockerグループに追加。(sudoなしで実行できる様にするため)
$ sudo usermod -aG docker ert3
一旦ログオフ、再度ログインして、hello-worldコンテナを試してみます。
$ docker run --rm hello-world

Unable to find image 'hello-world:latest' locally
latest: Pulling from library/hello-world
4ee5c797bcd7: Pull complete
Digest: sha256:49a1c8800c94df04e9658809b006fd8a686cab8028d33cfba2cc049724254202
Status: Downloaded newer image for hello-world:latest

Hello from Docker!
This message shows that your installation appears to be working correctly.

(省略・・・)
実行出来ました。
4.その他の設定
(1)自動アップデートを無効化
どうしても無効化したいときに、下記の操作を行ってください。(参考)5
unattended-upgradesのインストール
$ sudo apt install -y unattended-upgrades
Reading package lists... Done
Building dependency tree
Reading state information... Done
unattended-upgrades is already the newest version (1.1ubuntu1.18.04.14).
unattended-upgrades set to manually installed.
0 upgraded, 0 newly installed, 0 to remove and 28 not upgraded.
unattended-upgradesの再設定
$ sudo dpkg-reconfigure -p low unattended-upgrades
下記の画面が出たら、Noを選択します。
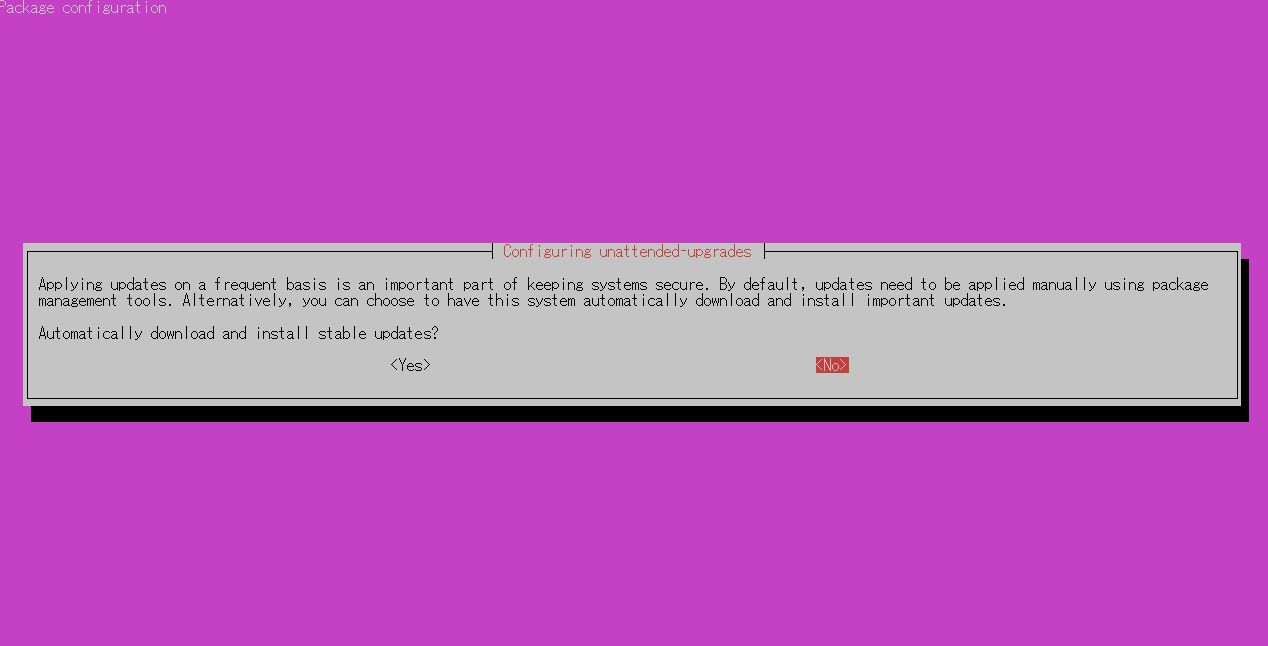
Replacing config file /etc/apt/apt.conf.d/20auto-upgrades with new version
$
これで自動アップデートを無効化しました。
(2)内蔵SDカードスロットを使う
e-RT3下部にはフタが付いていて、中にはバックアップ用のバッテリーと、内蔵SDカードスロットが入っています。
| 記号 | 配置場所 | デバイス名 |
|---|---|---|
| SD1 | 正面 | /dev/mtdblock1 |
| SD2 | 下部フタの内側 | /dev/mtdblock2 |
両方のSDカードに起動ドライブが入っていた場合、SD2(内部側)が優先されて起動します。
例えば、下記の様な使い分けをする事ができます。
- 起動ドライブ:内蔵
- ログ収集用ドライブ:正面
正面側SD1のドライブは、下記の例に従って、マウント・アンマウントします。
一覧の表示
$ lsblk -f
NAME        FSTYPE LABEL       UUID        MOUNTPOINT
mtdblock0
mtdblock1
mmcblk1
tqmmcblk1p1 vfat               ****
mqmmcblk1p2 ext4   ROOT20045   ****        /
mmcblk0
mqmmcblk0p1 vfat   hogesd      ****        /media
マウント・アンマウント
# vfatフォーマットのSDカードをマウント
$ sudo mount /dev/mmcblk0p1 /media --types=vfat --options=rw
# アンマウント
$ sudo unmount /media
5.端子台への接続
入力ユニットXD、出力ユニットYDには、それぞれコネクタが付いています。
このままでは信号の入出力がし難いので、市販の端子台ユニットを接続します。
ここでは、東洋技研製・インターフェース端子台シリーズを使用しています。
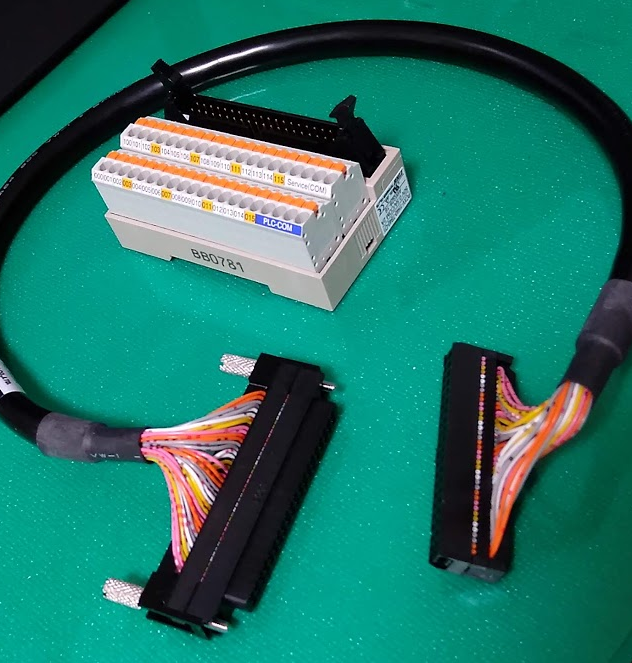
- スプリングロック式(写真):https://www.togi.co.jp/series/interface/211/
- ネジ式:https://www.togi.co.jp/series/interface/201/
|ユニット|スプリングロック式|ネジ式|
|:--|:--|:--|:--|
|XD(入力用)|PCXV-1H40-TB40-O1|PCA7-1H40-TB34-O1|
|YD(出力用)|PCXV-1H40-TB40-O3|PCA7-1H40-TB34-O3|
|ケーブル(共通)|KB40N-4F1H-<長さ>MB](https://www.togi.co.jp/product/harness-cable/2728/)|[KB34N-4F1H-<長さ>MB|
6.おわりに
Raspberry PiやJetsonの感覚で、カンタンに立ち上げることが出来ました。
実際のアプリは別の記事で紹介します。(作成中)
e-RTの使用例
どんな所で使われているか調べてみました。
(見つけ次第追加していきます)
次回
次は入出力ユニットの動作確認プログラムを作ってみます。次の記事
参考資料
-
https://index.ros.org/doc/ros2/Installation/Crystal/Linux-Install-Binary/ ↩
-
https://gist.github.com/rubencaro/6a28138a40e629b06470 , https://thinkingelixir.com/install-elixir-using-asdf/ , https://qiita.com/MzRyuKa/items/8762ea006ca446e6e422 ↩
-
https://linux.just4fun.biz/?Ubuntu/%E8%87%AA%E5%8B%95%E3%82%A2%E3%83%83%E3%83%97%E3%83%87%E3%83%BC%E3%83%88%E3%82%92%E6%9C%89%E5%8A%B9%E3%83%BB%E7%84%A1%E5%8A%B9%E3%81%AB%E3%81%99%E3%82%8B%E6%89%8B%E9%A0%86 ↩