← 前回:① 導入
→ 次回:③環境構築(2)Ansible編
導入編からの続きです。CloudFormation を用いて AWS のサーバ・ネットワーク構築を行います。
まずは動作確認が出来れば良いので、インスタンスタイプはすべて t3.micro、シングル構成で構築します。
本記事では、構築方法を先に、その後で各コードの解説をしていきます。
AWS構成
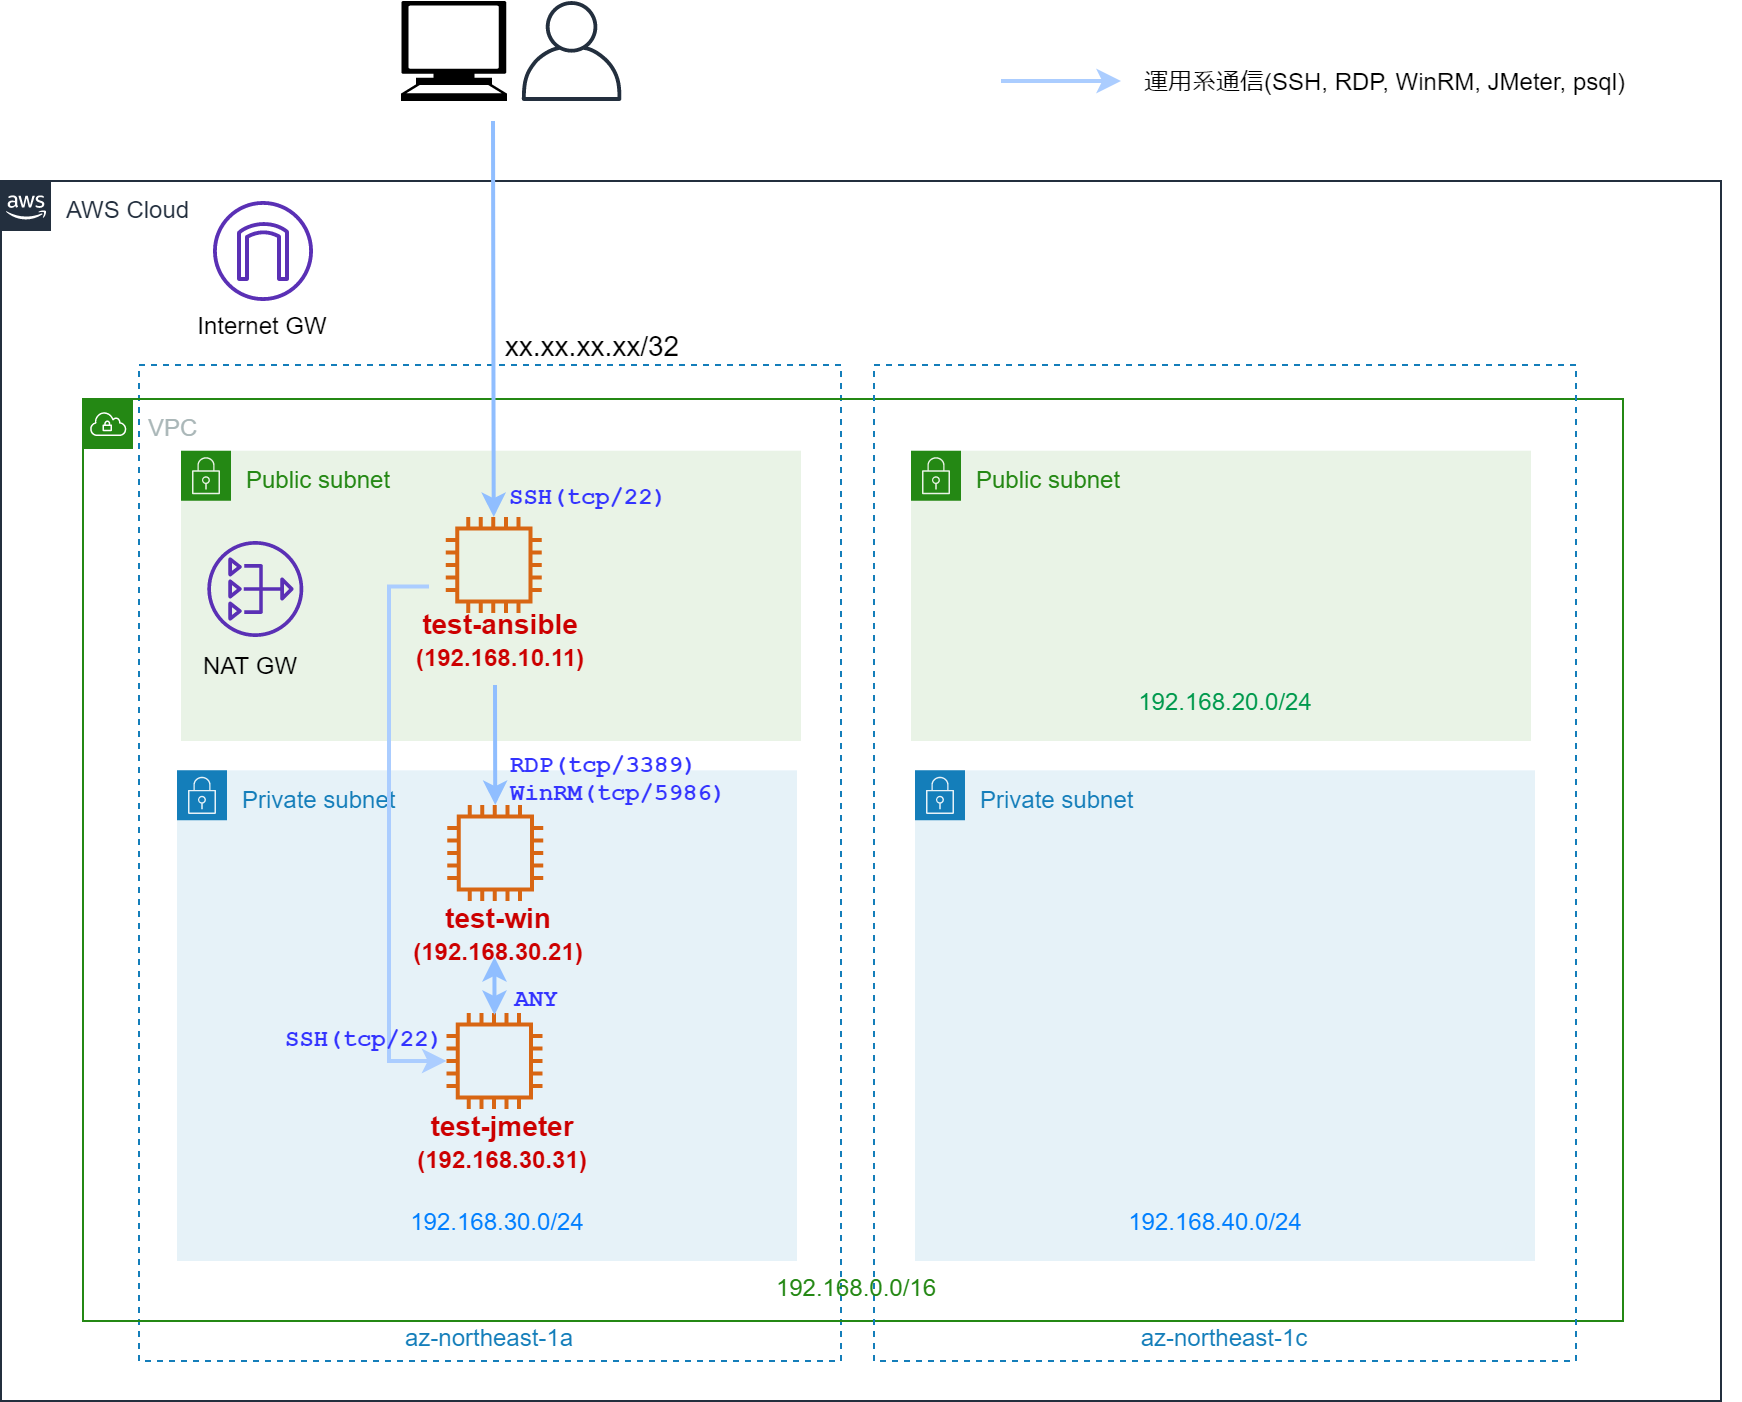
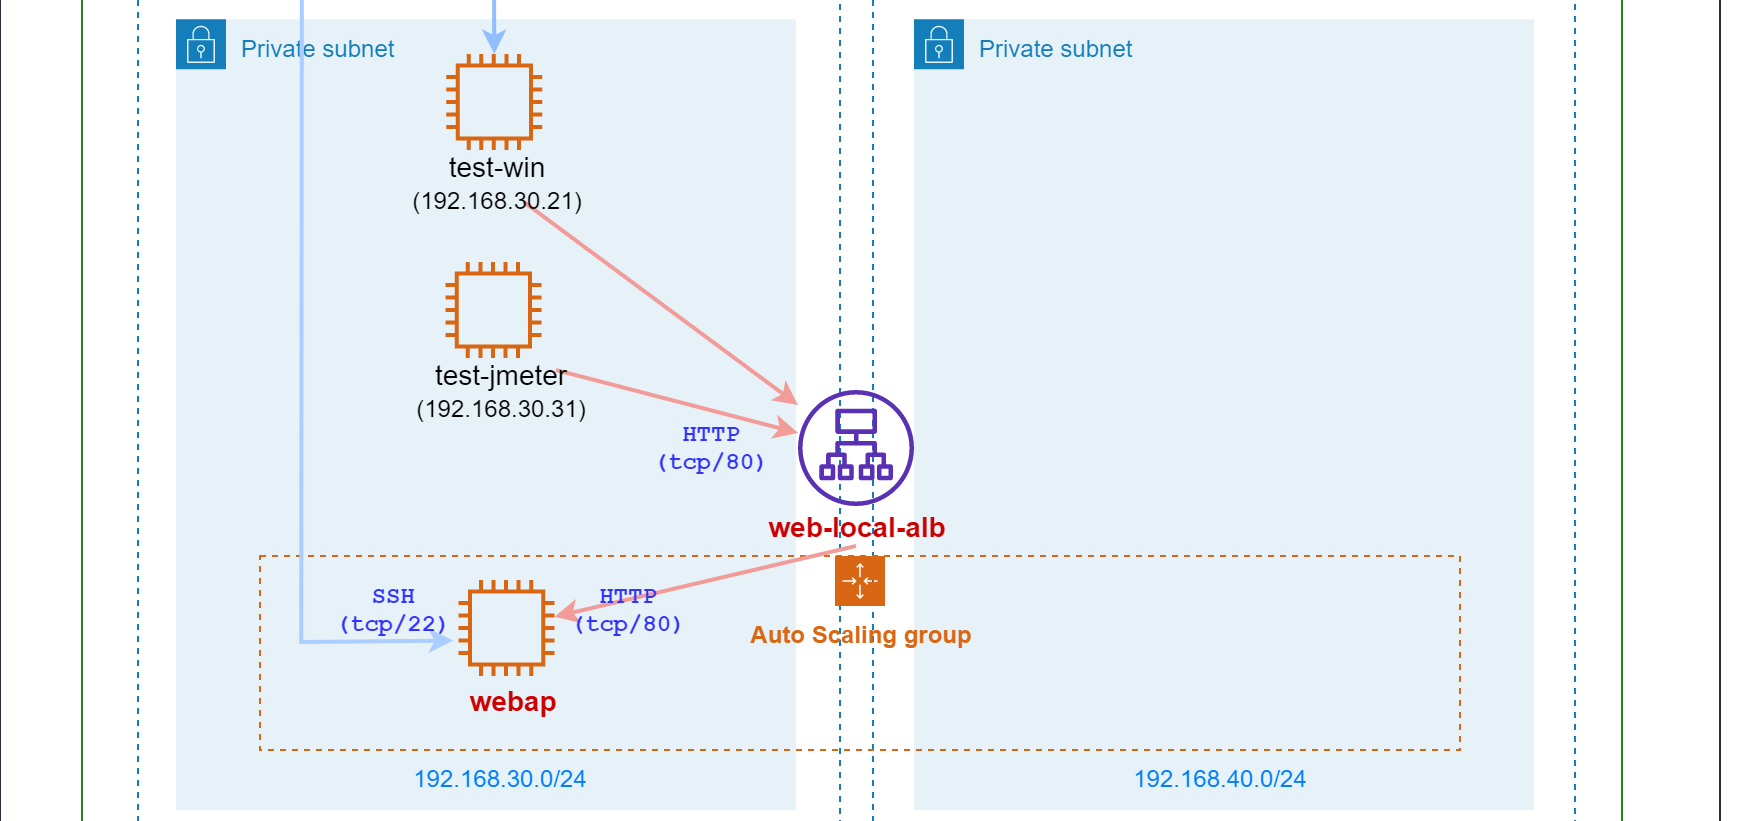
システム概要図
まずは本システムのおさらいです。

- 本システムは、構成管理兼踏み台、負荷掛け、Web3層の3つのパートからなります。
- AWSの構成管理には CloudFormation を、各サーバの MW の管理には Ansible を使用します。
- Webアプリへの負荷掛けは JMeter サーバ/クライアントを通して行います。
- Webサーバには Apache と Tomcat、APは TERASOLUNAサンプルアプリケーションを使用します。
- DBエンジンは PostgreSQL を採用します。
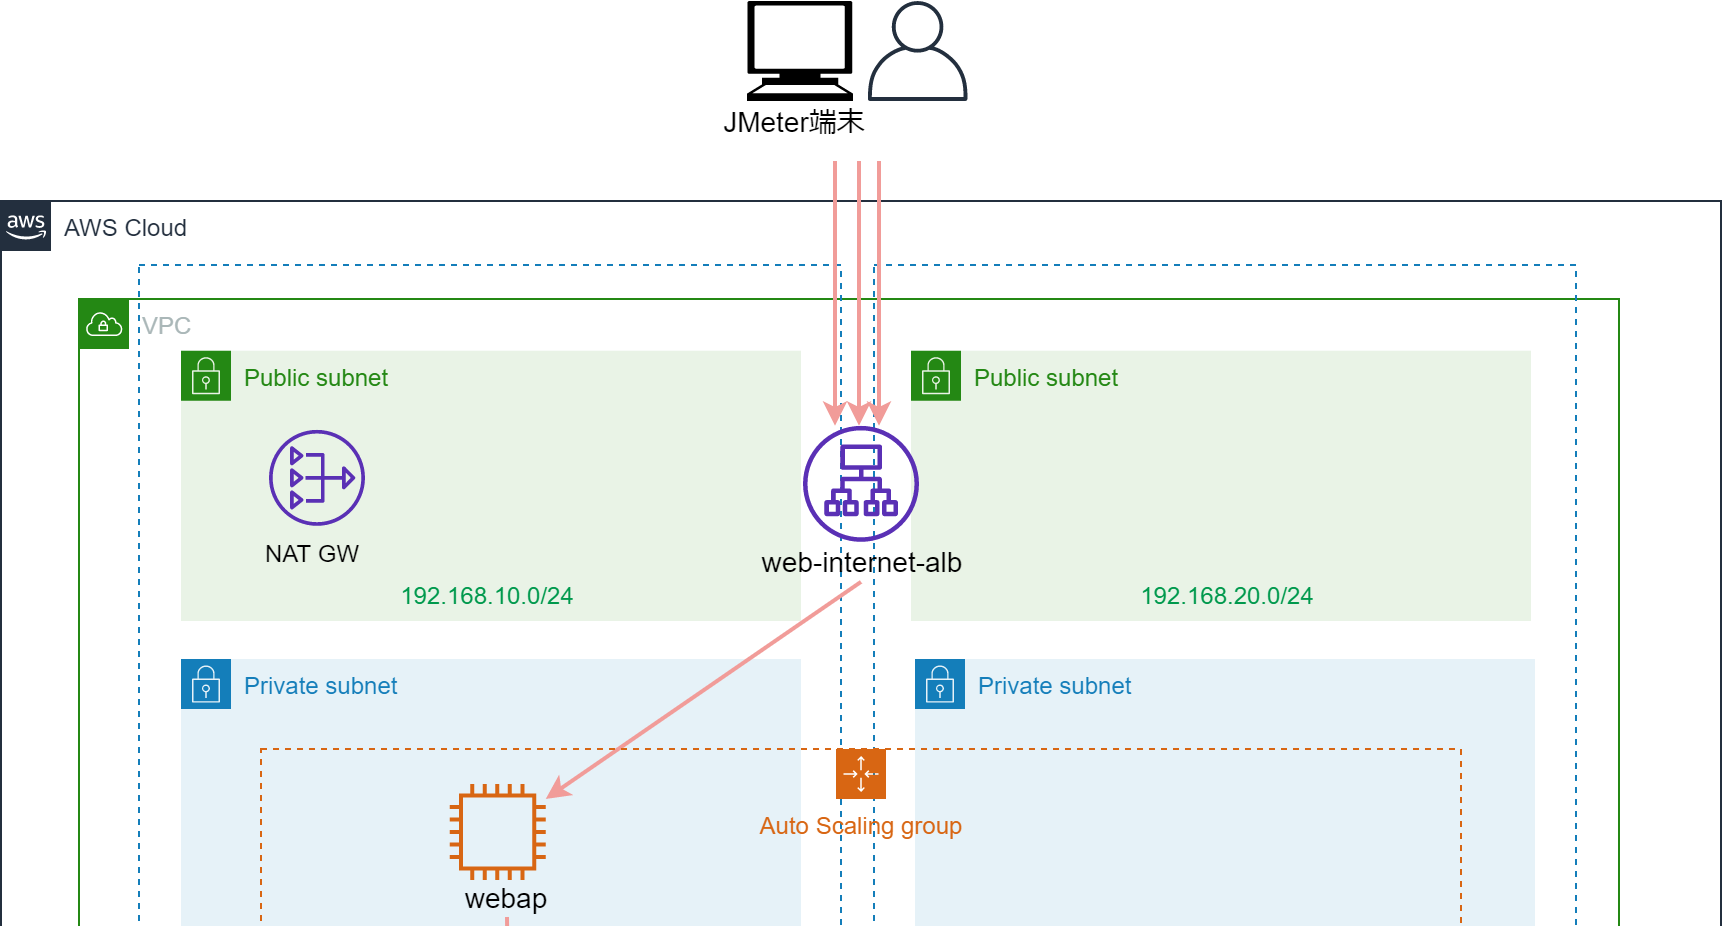
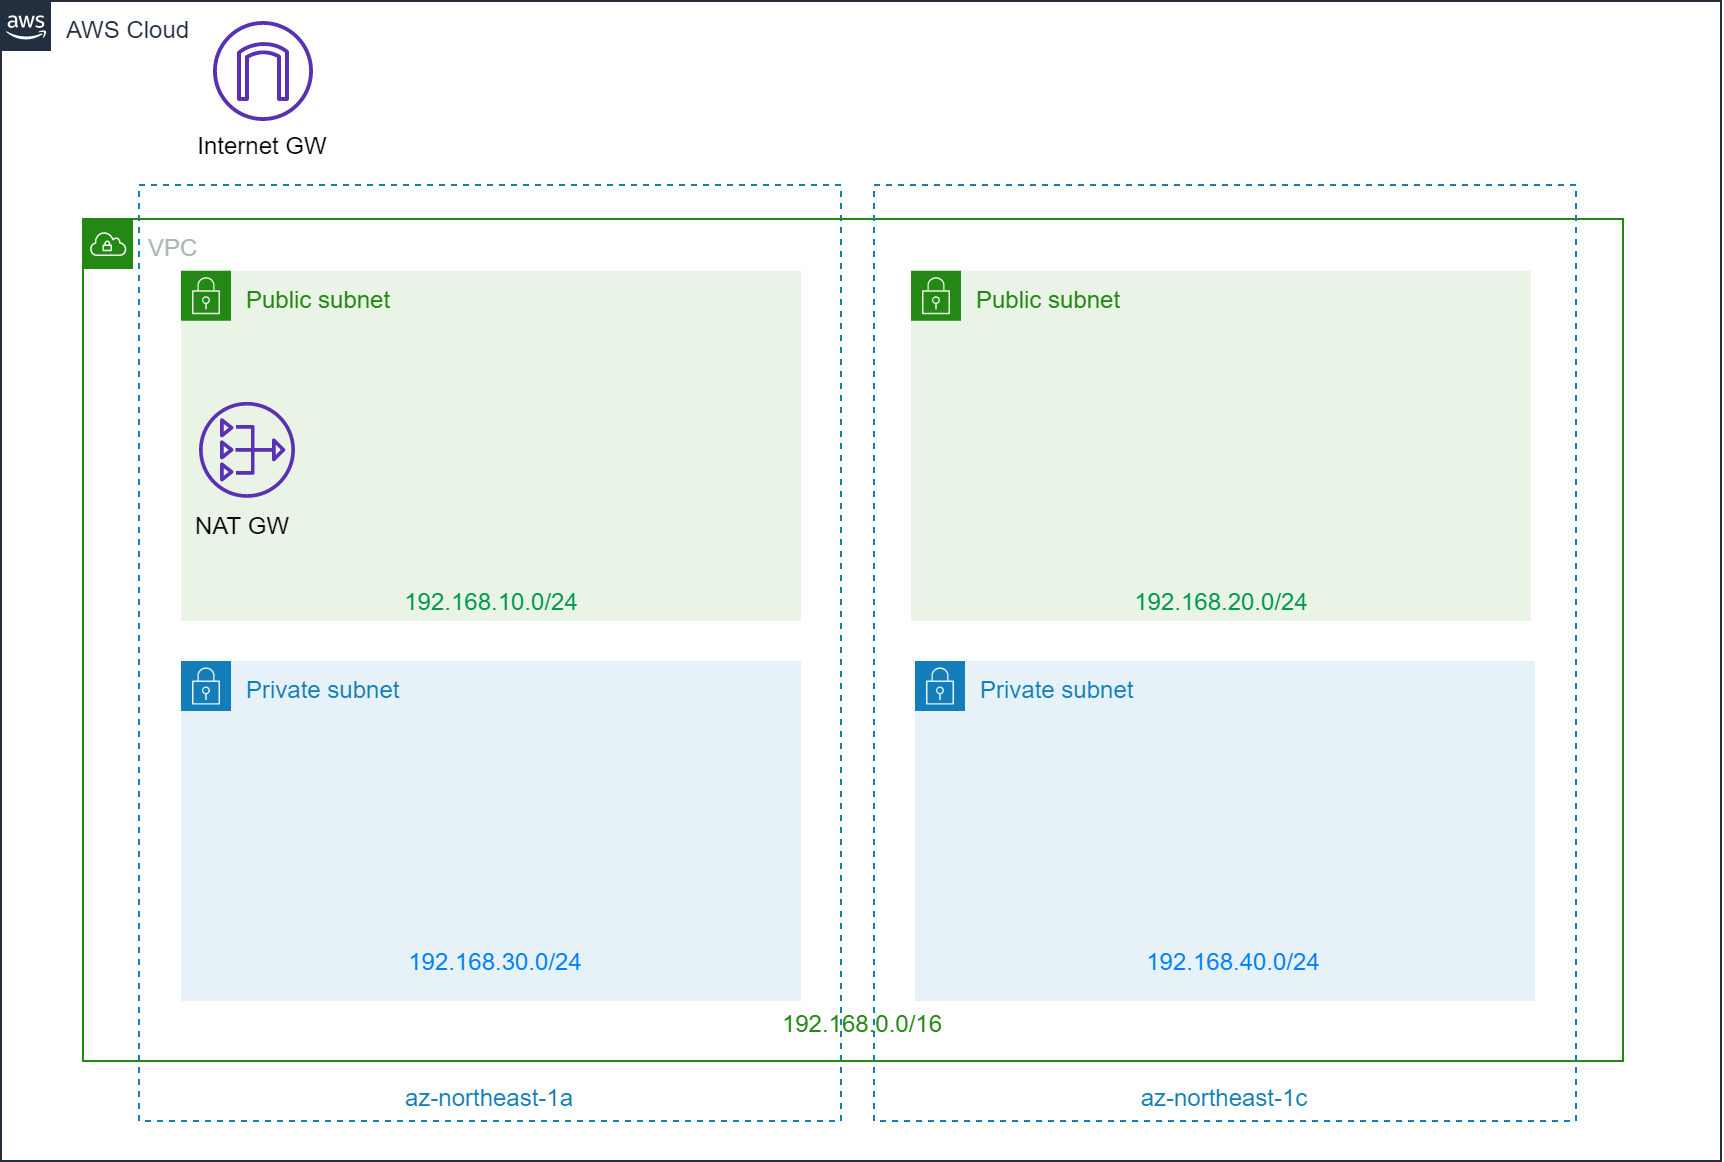
AWS構成図
AWS 構成図は以下となります。

内部 ELB を使う理由
一般公開する Web サイトではインターネット向け ALB を採用しますが(下図)、本システムでは内部 ALB を使用します。
理由として、インターネット向け ALB を使用し、作業用PCから大量のアクセスをする場合、 作業用PC側のネットワーク回線がボトルネックとなるからです。
しかし、実際のWebサイトは複数の端末からアクセスされるため、ネットワーク回線がボトルネックになることはありません。
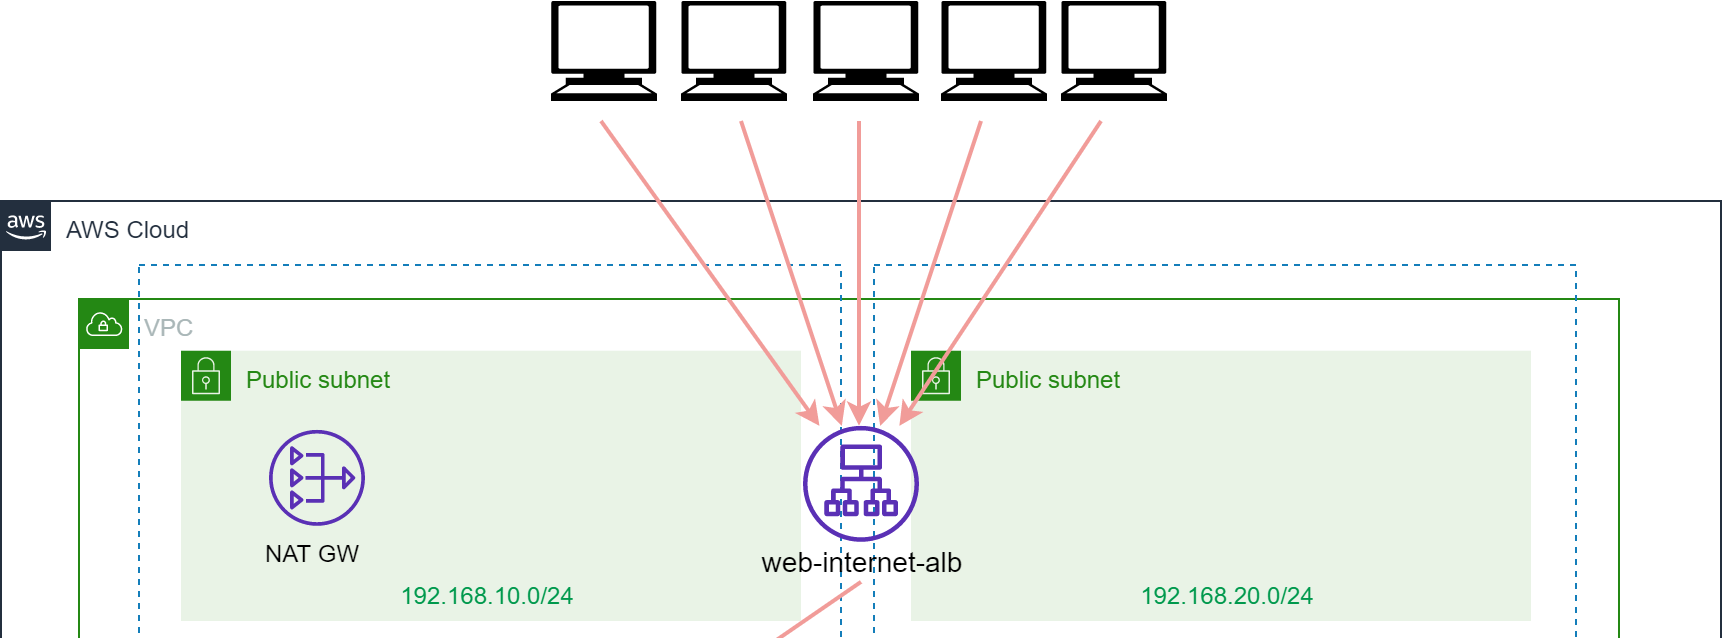
性能試験では、AWS内に JMeterサーバを導入し、かつ内部 ALB を使用することで回線のボトルネックが起きないようにします。
構築方法
AWSコンソールで Administrator アカウントを使用して構築していきます。
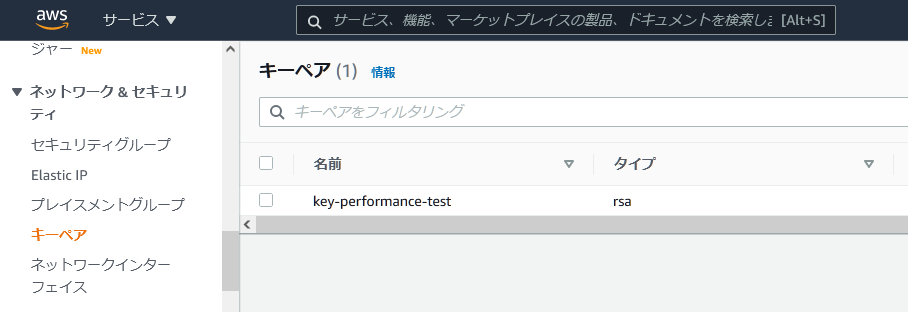
鍵作成
EC2 コンソールからキーペアを作成していきます。
形式は pem で、名前は「key-performance-test」で作成してください。
CloudFormation のスタック作成
github リポジトリに CloudFormation のコードを公開しています。まずはこちらを clone してください。
01_AWS_Cfn フォルダ中に yaml ファイルが入っています。構成は以下の通り。各 yaml ファイルのコード詳細は後述します。
| ファイル名 | スタック名 | リソース |
|---|---|---|
| 01_cloudformation-network.yaml | performance-test-VPC | VPC/サブネット/GW/ルートテーブル |
| 02_cloudformation-IAMRole.yaml | performance-test-IAMRole | EC2用IAMロール |
| 03_cloudformation-TestEC2.yaml | performance-test-TestEC2 | 構成管理サーバ/JMterクライアント/JMeterサーバ |
| 04_cloudformation-WebAPEC2.yaml | performance-test-WebAP | WebAPサーバ起動設定/ASG/内部ELB |
| 05_cloudformation-RDS.yaml | performance-test-RDS | RDSインスタンス |
| 06_cloudformation-DNS.yaml | performance-test-DNS | WebAP用Aレコード/DB用CNAMEレコード |
AWSコンソールの CloudFormation サービスで順番にスタックを作成していきましょう。手順は以下を参考にしてください。
ただし、スタック「performance-test-TestEC2」では、パラメータ「FromIPSegment」が未定になっています。
これは作業PCのグローバルIPアドレス(ルータ、プロキシサーバ等のアドレス)を指定してください。
家庭用ルータの場合はIPアドレスがこまめに変更されるので、スタックも要更新です。

ログイン確認
各サーバにログインできるか確認してください。
(筆者は TeraTerm で接続します。セッションマネージャでも可)
構成管理サーバ
TeraTerm で 構成管理サーバに接続して下さい。
IPアドレスは構成管理サーバのパブリックIPアドレス、鍵は key-performance-test.pem です。
ログインが確認出来たら、サーバの ~/.ssh フォルダに key-performance-test.pem を転送します。
転送後、鍵のパーミッションを 600 に設定してください。

この鍵を用いて、構成管理から JMeterサーバ、WebAPサーバに接続します。
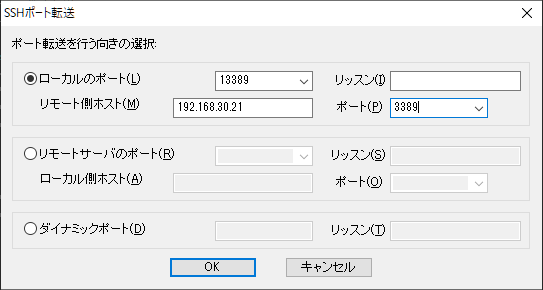
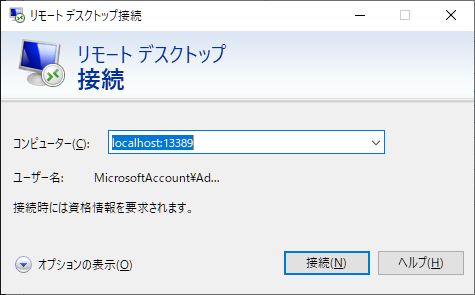
JMeter クライアント
まずは Windows ログインのためのパスワードを取得してください。
TereTerm で構成管理サーバに接続したままポート転送を設定し、JMeter クライアントに RDP 接続できるようにします。
手順は以下を参考にしてください。
TeraTerm SSH転送設定
RDP 接続
JMeter サーバ
構成管理サーバから JMeter サーバに SSH 接続してください。
$ ssh -i .ssh/key-performance-test.pem 192.168.30.31
WebAPサーバ
同様に構成管理サーバから WebAP サーバに SSH 接続してください。
$ ssh -i .ssh/key-performance-test.pem [WebAPサーバのIPアドレス]
DB サーバ
構成管理サーバから psql コマンドでデータベースにログインできます。
$ psql -h db.tourreserve.local -U postgres -d tourreserve
Password for user postgres: P0stgres
tourreserve=> \q
ここまで出来たら構築は完了です。
以降は、各 CloudFormation コードの解説になります。
CloudFormation 解説
AWS リソースの設計方針と、CloudFormation コードを記載しています。
※コードは長くなるので折りたたんでいます。適宜クリックして展開してください。
VPC 関連
まずは、VPC、サブネット、インターネットGWと NAT-GW、ルートテーブルを作成しています。
CloudFormation コード(クリックして展開)
---
  AWSTemplateFormatVersion: '2010-09-09'
  Description: 'VPC/Subnet/RTB/IGW/NAT-GW'

  # ------------------------
  # パラメータ定義:VPC/サブネットのNWセグメント
  # ------------------------
  Parameters:
  # VPCセグメント
    VpcBlock:
      Type: String
      Default: 192.168.0.0/16

  # 各サブネットのセグメント
    PublicSubnet01Block:
      Type: String
      Default: 192.168.10.0/24
    PublicSubnet02Block:
      Type: String
      Default: 192.168.20.0/24
    PrivateSubnet01Block:
      Type: String
      Default: 192.168.30.0/24
    PrivateSubnet02Block:
      Type: String
      Default: 192.168.40.0/24


  Resources:
  # ------------------------
  # VPC定義
  # ------------------------
    VPC:
      Type: AWS::EC2::VPC
      Properties:
        CidrBlock:  !Ref VpcBlock
        EnableDnsHostnames: true
        EnableDnsSupport: true
        Tags:
        - Key: Name
          Value: !Sub '${AWS::StackName}'

  # ------------------------
  # サブネット定義
  # ------------------------
    # AZ-Aパブリックサブネット
    PublicSubnet01:
      Type: AWS::EC2::Subnet
      Metadata:
        Comment: PublicSubnet01
      Properties:
        AvailabilityZone:
          Fn::Select:
          - '0'
          - Fn::GetAZs:
              Ref: AWS::Region
        CidrBlock:
          Ref: PublicSubnet01Block
        VpcId:
          Ref: VPC
        Tags:
        - Key: Name
          Value: !Sub "${AWS::StackName}-PublicSubnet01"

    # AZ-Cパブリックサブネット
    PublicSubnet02:
      Type: AWS::EC2::Subnet
      Metadata:
        Comment: PublicSubnet02
      Properties:
        AvailabilityZone:
          Fn::Select:
          - '1'
          - Fn::GetAZs:
              Ref: AWS::Region
        CidrBlock:
          Ref: PublicSubnet02Block
        VpcId:
          Ref: VPC
        Tags:
        - Key: Name
          Value: !Sub "${AWS::StackName}-PublicSubnet02"

    # AZ-Aプライベートサブネット
    PrivateSubnet01:
      Type: AWS::EC2::Subnet
      Metadata:
        Comment: PrivateSubnet01
      Properties:
        AvailabilityZone:
          Fn::Select:
          - '0'
          - Fn::GetAZs:
              Ref: AWS::Region
        CidrBlock:
          Ref: PrivateSubnet01Block
        VpcId:
          Ref: VPC
        Tags:
        - Key: Name
          Value: !Sub "${AWS::StackName}-PrivateSubnet01"

    # AZ-Cプライベートサブネット
    PrivateSubnet02:
      Type: AWS::EC2::Subnet
      Metadata:
        Comment: PrivateSubnet02
      Properties:
        AvailabilityZone:
          Fn::Select:
          - '1'
          - Fn::GetAZs:
              Ref: AWS::Region
        CidrBlock:
          Ref: PrivateSubnet02Block
        VpcId:
          Ref: VPC
        Tags:
        - Key: Name
          Value: !Sub "${AWS::StackName}-PrivateSubnet02"

  # ------------------------
  # インターネットGW/NAT-GW定義
  # ------------------------
    # インターネットGW
    InternetGateway:
      Type: "AWS::EC2::InternetGateway"
      Properties:
        Tags:
        - Key: Name
          Value: !Sub "${AWS::StackName}"

    # インターネットGWをVPCにアタッチ
    VPCGatewayAttachment:
      Type: "AWS::EC2::VPCGatewayAttachment"
      Properties:
        InternetGatewayId: !Ref InternetGateway
        VpcId: !Ref VPC

    # NAT-GW用のEIP
    NatGatewayEIP:
      Type: 'AWS::EC2::EIP'
      Properties:
        Domain: vpc

    # NAT-GW
    NatGateway:
      DependsOn:
      - NatGatewayEIP
      - PublicSubnet01
      Type: AWS::EC2::NatGateway
      Properties:
        AllocationId: !GetAtt 'NatGatewayEIP.AllocationId'
        SubnetId: !Ref PublicSubnet01
        Tags:
        - Key: Name
          Value: !Sub '${AWS::StackName}-NATGW-AZ-A'

  # ------------------------
  # 各サブネットのルートテーブル定義
  # ------------------------
    # パブリックルートテーブル定義
    PublicRouteTable:
      Type: AWS::EC2::RouteTable
      Properties:
        VpcId: !Ref VPC
        Tags:
        - Key: Name
          Value: PublicSubnets
        - Key: Network
          Value: Public

    # パブリックRTBのルーティング情報
    PublicRoute:
      DependsOn: VPCGatewayAttachment
      Type: AWS::EC2::Route
      Properties:
        RouteTableId: !Ref PublicRouteTable
        DestinationCidrBlock: 0.0.0.0/0
        GatewayId: !Ref InternetGateway

    # プライベートルートテーブル定義
    PrivateRouteTable:
      Type: AWS::EC2::RouteTable
      Properties:
        VpcId: !Ref VPC
        Tags:
        - Key: Name
          Value: PrivateSubnets
        - Key: Network
          Value: Private

    # プライベートRTBのルーティング情報
    PrivateRoute:
      DependsOn:
      - NatGateway
      Type: AWS::EC2::Route
      Properties:
        RouteTableId: !Ref PrivateRouteTable
        DestinationCidrBlock: 0.0.0.0/0
        NatGatewayId: !Ref NatGateway

    # 各ルートテーブルをサブネットにアタッチ
    PublicSubnet01RouteTableAssociation:
      Type: AWS::EC2::SubnetRouteTableAssociation
      Properties:
        SubnetId: !Ref PublicSubnet01
        RouteTableId: !Ref PublicRouteTable

    PublicSubnet02RouteTableAssociation:
      Type: AWS::EC2::SubnetRouteTableAssociation
      Properties:
        SubnetId: !Ref PublicSubnet02
        RouteTableId: !Ref PublicRouteTable

    PrivateSubnet01RouteTableAssociation:
      Type: AWS::EC2::SubnetRouteTableAssociation
      Properties:
        SubnetId: !Ref PrivateSubnet01
        RouteTableId: !Ref PrivateRouteTable

    PrivateSubnet02RouteTableAssociation:
      Type: AWS::EC2::SubnetRouteTableAssociation
      Properties:
        SubnetId: !Ref PrivateSubnet02
        RouteTableId: !Ref PrivateRouteTable

  # ------------------------
  # リソースID出力
  # ------------------------
  Outputs:
    # VPCのID
    VPCID:
      Description: The VPC Id
      Value: !Ref VPC
      Export:
        Name: VPCID

    # パブリックサブネットのID
    PublicSubnetIDs:
      Description: Public Subnet IDs in the VPC
      Value: !Join [ ",", [ !Ref PublicSubnet01, !Ref PublicSubnet02 ] ]
      Export:
        Name: PublicSubnetIDs

    # プライベートサブネットのID
    PrivateSubnetIDs:
      Description: Private Subnet IDs in the VPC
      Value: !Join [ ",", [ !Ref PrivateSubnet01, !Ref PrivateSubnet02 ] ]
      Export:
        Name: PrivateSubnetIDs
ここら辺はいろいろな記事で取り上げられているので、特筆すべき項目はありません。
ちょっとした工夫として、スタックの出力で複数サブネットのIDをカンマ区切りの文字列で出力しています。
# パブリックサブネットのID
PublicSubnetIDs:
  Description: Public Subnet IDs in the VPC
  # 2つのサブネットをカンマ区切りで文字列結合
  # subnet-xx,subnet-yy の形で出力される
  Value: !Join [ ",", [ !Ref PublicSubnet01, !Ref PublicSubnet02 ] ]
  Export:
    Name: PublicSubnetIDs
こうすることで、のちのスタックで AZ-A/AZ-C それぞれのサブネットをインデックスで指定できます。
# AZ-A のパブリックサブネットを指定したい場合、
# まずカンマで文字列分割しリスト形式に。
# その後インデックス0(一番目)のサブネットを指定している
SubnetId: !Select [0, !Split [",", !ImportValue PublicSubnetIDs]]
IAM ロール
EC2 インスタンスにアタッチする IAM ロールを作成します。
本当は試験用 EC2 と WebAP用EC2 でポリシーを分けるべきですが、簡単のためにすべて同じポリシーを使用します。
| ポリシー名 | 用途 |
|---|---|
| AmazonSSMManagedInstanceCore | セッションマネージャで各 Linux インスタンスに接続可とするため |
| CloudWatchAgentServerPolicy | 各サーバのメモリ監視で cloudwatch-agent を使用するため |
| AmazonEC2FullAccess | 構成管理サーバから各サーバのプロビジョニングをするため |
| AmazonRDSFullAccess | 構成管理サーバから RDS に接続するため |
CloudFormation コード(クリックして展開)
---
  AWSTemplateFormatVersion: '2010-09-09'
  Description: 'IAM role for EC2'

  Resources:
    EC2IAMRole:
      Type: "AWS::IAM::Role"
      Properties:
        AssumeRolePolicyDocument:
          Statement:
            -
              Effect: "Allow"
              Principal:
                Service:
                  - "ec2.amazonaws.com"
              Action:
                - "sts:AssumeRole"
        Path: "/"
        RoleName: 'EC2IAMRole'
        ManagedPolicyArns:
        - arn:aws:iam::aws:policy/AmazonSSMManagedInstanceCore
        - arn:aws:iam::aws:policy/CloudWatchAgentServerPolicy
        - arn:aws:iam::aws:policy/AmazonEC2FullAccess
        - arn:aws:iam::aws:policy/AmazonRDSFullAccess

  Outputs:
    EC2IAMRole:
      Value: !Ref EC2IAMRole
      Export:
        Name: EC2IAMRole
試験用 EC2
構成管理サーバ、JMeterクライアント、JMeterサーバを作成していきます。
インスタンス起動の際、ユーザデータにより必要なパッケージのインストールを行います。
また、各サーバのセキュリティグループを作成し、通信許可設定を行います。
| サーバ | インスタンス名 | OS | ユーザデータ内容 | 接続元 |
|---|---|---|---|---|
| 構成管理サーバ | test-ansible | Amazon Linux 2 | git,ansible,psql等のインストール | 作業用PC |
| JMeterクライアント | test-win | Windows Server 2019 | ansibleからWinRM経由で操作可とするための設定 | 構成管理サーバ, JMeterサーバ |
| JMeterサーバ | test-jmeter | Amazon Linux 2 | - | 構成管理サーバ, JMeterクライアント |
CloudFormation コード(クリックして展開)
---
  AWSTemplateFormatVersion: '2010-09-09'
  Description: 'TestEC2/SG/Key'

  Parameters:
  # ------------------------
  # 構成管理サーバ用パラメータ
  # ------------------------
    TestAnsiblePrivateIP:
      Type: String
      Default: 192.168.10.11
    TestAnsibleImageID:
      Type: AWS::SSM::Parameter::Value<String>
      Default: /aws/service/ami-amazon-linux-latest/amzn2-ami-hvm-x86_64-gp2
    TestAnsibleInstanceType:
      Type: String
      Default: t3.micro
    TestAnsibleKeyName:
      Type: "AWS::EC2::KeyPair::KeyName"
      Default: "key-performance-test"
    FromIPSegment:
      Type: String
      Default: XXX.XXX.XXX.XXX/32
  # ------------------------
  # JMeterクライアント用パラメータ
  # ------------------------
    TestWinPrivateIP:
      Type: String
      Default: 192.168.30.21
    TestWinImageID:
      Type: AWS::SSM::Parameter::Value<String>
      Default: /aws/service/ami-windows-latest/Windows_Server-2019-Japanese-Full-Base
    TestWinInstanceType:
      Type: String
      Default: t3.micro
  # ------------------------
  # JMeterサーバ用パラメータ
  # ------------------------
    TestJemeterPrivateIP:
      Type: String
      Default: 192.168.30.31
    TestJemeterImageID:
      Type: AWS::SSM::Parameter::Value<String>
      Default: /aws/service/ami-amazon-linux-latest/amzn2-ami-hvm-x86_64-gp2
    TestJemeterInstanceType:
      Type: String
      Default: t3.micro
    TestJemeterKeyName:
      Type: "AWS::EC2::KeyPair::KeyName"
      Default: "key-performance-test"


  Resources:
  # ------------------------
  # 構成管理サーバ
  # ------------------------
    # セキュリティグループ
    TestAnsibleSG:
      Type: AWS::EC2::SecurityGroup
      Properties:
        GroupName: sg_testansible
        GroupDescription: "SG for TestAnsible"
        VpcId: !ImportValue VPCID
        # 作業用PCからの通信を許可
        SecurityGroupIngress:
          - IpProtocol: tcp
            FromPort: 22
            ToPort: 22
            CidrIp: !Ref FromIPSegment

    # IAMロールからインスタンスプロファイルの設定
    TestAnsibleIAMInstanceProfile:
      Type: "AWS::IAM::InstanceProfile"
      Properties:
        Path: "/"
        Roles:
        - !ImportValue EC2IAMRole

    # インスタンス設定
    TestAnsibleInstance:
      Type: AWS::EC2::Instance
      Properties:
        # 基本設定
        ImageId: !Ref TestAnsibleImageID
        KeyName: !Ref TestAnsibleKeyName
        InstanceType: !Ref TestAnsibleInstanceType
        # ネットワーク設定
        NetworkInterfaces:
          - AssociatePublicIpAddress: "true"
            DeviceIndex: "0"
            SubnetId: !Select [0, !Split [",", !ImportValue PublicSubnetIDs]]
            PrivateIpAddress: !Ref TestAnsiblePrivateIP
            GroupSet:
              - !Ref TestAnsibleSG
        # EBS設定
        BlockDeviceMappings:
        - DeviceName: /dev/sda1
          Ebs:
            VolumeType: gp2
            VolumeSize: 8
            DeleteOnTermination: true
        # IAMロールをインスタンスにアタッチ
        IamInstanceProfile: !Ref TestAnsibleIAMInstanceProfile
        # ユーザデータの設定(必要パッケージのインストール)
        UserData:
          Fn::Base64: |
            #!/bin/bash
            sudo yum install -y git
            sudo amazon-linux-extras install -y python3.8
            sudo pip3.8 install --upgrade pip
            /usr/local/bin/pip3.8 install ansible
            /usr/local/bin/pip3.8 install boto3 botocore
            /usr/local/bin/pip3.8 install pywinrm
            sudo yum -y install postgresql.x86_64
            source .bash_profile
        # タグ設定
        Tags:
            - Key: Name
              Value: test-ansible
            - Key: Application
              Value: ansible


  # ------------------------
  # TestWindows用リソース
  # ------------------------
    # セキュリティグループ
    TestWinSG:
      Type: AWS::EC2::SecurityGroup
      Properties:
        GroupName: sg_testwin
        GroupDescription: "SG for TestWin"
        VpcId: !ImportValue VPCID
        SecurityGroupIngress:
          # 構成管理サーバからの通信を許可
          - IpProtocol: tcp
            FromPort: 3389
            ToPort: 3389
            SourceSecurityGroupId: !Ref TestAnsibleSG
          - IpProtocol: tcp
            FromPort: 5986
            ToPort: 5986
            SourceSecurityGroupId: !Ref TestAnsibleSG

    TestWinSecurityGroupIngress:
      Type: AWS::EC2::SecurityGroupIngress
      Properties:
        # JMeterサーバからの通信を許可
        GroupId: !Ref TestWinSG
        IpProtocol: -1
        SourceSecurityGroupId: !Ref TestJemeterSG

    # IAMロールからインスタンスプロファイルの設定
    TestWinIAMInstanceProfile:
      Type: "AWS::IAM::InstanceProfile"
      Properties:
        Path: "/"
        Roles:
        - !ImportValue EC2IAMRole

    # インスタンス設定
    TestWinInstance:
      Type: AWS::EC2::Instance
      Properties:
        # 基本設定
        ImageId: !Ref TestWinImageID
        KeyName: !Ref TestAnsibleKeyName
        InstanceType: !Ref TestWinInstanceType
        # ネットワーク設定
        NetworkInterfaces:
          - DeviceIndex: "0"
            SubnetId: !Select [0, !Split [",", !ImportValue PrivateSubnetIDs]]
            PrivateIpAddress: !Ref TestWinPrivateIP
            GroupSet:
              - !Ref TestWinSG
        # EBS設定
        BlockDeviceMappings:
        - DeviceName: /dev/sda1
          Ebs:
            VolumeType: gp2
            VolumeSize: 30
            DeleteOnTermination: true
        # IAMロールをインスタンスにアタッチ
        IamInstanceProfile: !Ref TestWinIAMInstanceProfile
        # ユーザデータの設定(AnsibleからWinRMでリモート操作の許可)
        UserData:
          Fn::Base64: |
            <powershell>
            $url = "https://raw.githubusercontent.com/ansible/ansible/devel/examples/scripts/ConfigureRemotingForAnsible.ps1"
            $file = "$env:temp\ConfigureRemotingForAnsible.ps1"
            (New-Object -TypeName System.Net.WebClient).DownloadFile($url, $file)
            powershell.exe -ExecutionPolicy ByPass -File $file
            </powershell>
        # タグ設定
        Tags:
            - Key: Name
              Value: test-win
            - Key: Application
              Value: windows


  # ------------------------
  # TestJemeter用リソース
  # ------------------------
    # セキュリティグループ
    TestJemeterSG:
      Type: AWS::EC2::SecurityGroup
      Properties:
        GroupName: sg_testjemeter
        GroupDescription: "SG for TestJemeter"
        VpcId: !ImportValue VPCID
        SecurityGroupIngress:
          # 構成管理サーバからの接続許可
          - IpProtocol: tcp
            FromPort: 22
            ToPort: 22
            SourceSecurityGroupId: !Ref TestAnsibleSG
          # JMeterクライアントからの接続許可
          - IpProtocol: -1
            SourceSecurityGroupId: !Ref TestWinSG

    # IAMロールからインスタンスプロファイルの設定
    TestJemeterIAMInstanceProfile:
      Type: "AWS::IAM::InstanceProfile"
      Properties:
        Path: "/"
        Roles:
        - !ImportValue EC2IAMRole

    # インスタンス設定
    TestJemeterInstance:
      Type: AWS::EC2::Instance
      Properties:
        # 基本設定
        ImageId: !Ref TestJemeterImageID
        KeyName: !Ref TestJemeterKeyName
        InstanceType: !Ref TestJemeterInstanceType
        # ネットワーク設定
        NetworkInterfaces:
          - DeviceIndex: "0"
            SubnetId: !Select [0, !Split [",", !ImportValue PrivateSubnetIDs]]
            PrivateIpAddress: !Ref TestJemeterPrivateIP
            GroupSet:
              - !Ref TestJemeterSG
        # EBS設定
        BlockDeviceMappings:
        - DeviceName: /dev/sda1
          Ebs:
            VolumeType: gp2
            VolumeSize: 8
            DeleteOnTermination: true
        # IAMロールをインスタンスにアタッチ
        IamInstanceProfile: !Ref TestJemeterIAMInstanceProfile
        # タグ設定
        Tags:
            - Key: Name
              Value: test-jmeter
            - Key: Application
              Value: jmeter-server

  # ------------------------
  # リソースID出力
  # ------------------------
  Outputs:
    TestAnsibleSG:
      Value: !Ref TestAnsibleSG
      Export:
        Name: TestAnsibleSG
    TestWinSG:
      Value: !Ref TestWinSG
      Export:
        Name: TestWinSG
    TestJemeterSG:
      Value: !Ref TestJemeterSG
      Export:
        Name: TestJemeterSG
ユーザデータの内容については、次章の Ansible の回で解説していきます。
SG(セキュリティグループ)について。JMeter クライアントと JMeter サーバは相互通信を行います。
そのため、お互いの SG に対向の SG を記述する必要がありますが、循環参照となるため設定できません。
# JMeterクライアント用セキュリティグループ
TestWinSG:
  Type: AWS::EC2::SecurityGroup
  Properties:
    GroupName: sg_testwin
    GroupDescription: "SG for TestWin"
    VpcId: !ImportValue VPCID
    SecurityGroupIngress:
      # JMeterサーバからの接続許可
      - IpProtocol: -1
        SourceSecurityGroupId: !Ref TestJemeterSG

# JMeterサーバ用セキュリティグループ
TestJemeterSG:
  Type: AWS::EC2::SecurityGroup
  Properties:
    GroupName: sg_testjemeter
    GroupDescription: "SG for TestJemeter"
    VpcId: !ImportValue VPCID
    SecurityGroupIngress:
      # JMeterクライアントからの接続許可
      # 循環参照のエラーとなる
      - IpProtocol: -1
        SourceSecurityGroupId: !Ref TestWinSG
テンプレート検証を行うと、以下のエラーが発生します。
Circular dependency between resources: [TestJemeterSG, TestWinSG]
これを回避するために、JMeterクライアント用 SG のリソースではインバウンド設定を書かず、
のちに インバウンド用のSecurityGroupIngress のリソースを作成し SG に追加します。
# JMeterクライアント用セキュリティグループ
TestWinSG:
  Type: AWS::EC2::SecurityGroup
  Properties:
    GroupName: sg_testwin
    GroupDescription: "SG for TestWin"
    VpcId: !ImportValue VPCID

# SG Ingress
TestWinSecurityGroupIngress:
  Type: AWS::EC2::SecurityGroupIngress
  Properties:
    # JMeterサーバからの通信を許可
    GroupId: !Ref TestWinSG
    IpProtocol: -1
    SourceSecurityGroupId: !Ref TestJemeterSG

# JMeterサーバ用セキュリティグループ
TestJemeterSG:
  Type: AWS::EC2::SecurityGroup
  Properties:
    GroupName: sg_testjemeter
    GroupDescription: "SG for TestJemeter"
    VpcId: !ImportValue VPCID
    SecurityGroupIngress:
      # JMeterクライアントからの接続許可
      - IpProtocol: -1
        SourceSecurityGroupId: !Ref TestWinSG
WebAPサーバ、内部ELB
いよいよ WebAPサーバと ELB を作成します。
WebAPサーバは EC2インスタンスの起動設定と ASG(AutoScalingGroup)の組合せで作成していきます。
| サーバ | インスタンス名 | OS | 台数(希望/最小/最大) | 接続元 |
|---|---|---|---|---|
| WebAPサーバ | webap | Amazon Linux 2 | 1/1/1 | 内部ELB, 構成管理サーバ |
また、ASG を ELB のターゲットグループに登録し、通信リクエストが WebAP に振分けられるようにします。
CloudFormation コード(クリックして展開)
---
  AWSTemplateFormatVersion: '2010-09-09'
  Description: 'WebAP EC2/ASG'

  # ------------------------
  # WebAPサーバ用パラメータ
  # ------------------------
  Parameters:
    EC2ImageID:
      Type: AWS::SSM::Parameter::Value<String>
      Default: /aws/service/ami-amazon-linux-latest/amzn2-ami-hvm-x86_64-gp2
    KeyName:
      Type: "AWS::EC2::KeyPair::KeyName"
      Default: "key-performance-test"
    EC2InstanceType:
      Type: String
      Default: t3.micro
    NumberOfServers:
      Type: String
      Default: 1

  Resources:
  # ------------------------
  # Web/APサーバ用
  # ------------------------
    # セキュリティグループ
    WebAPEC2SG:
      Type: AWS::EC2::SecurityGroup
      Properties:
        GroupName: sg_webap
        GroupDescription: "SG for WebAPEC2"
        VpcId: !ImportValue VPCID
        SecurityGroupIngress:
          # 内部ELBからの接続許可
          - IpProtocol: tcp
            FromPort: 80
            ToPort: 80
            SourceSecurityGroupId: !Ref WebAPLocalALBSG
          # 構成管理サーバからの接続許可
          - IpProtocol: tcp
            FromPort: 22
            ToPort: 22
            SourceSecurityGroupId: !ImportValue TestAnsibleSG

    # IAMロールからインスタンスプロファイルの設定
    WebAPEC2IAMInstanceProfile:
      Type: "AWS::IAM::InstanceProfile"
      Properties:
        Path: "/"
        Roles:
        - !ImportValue EC2IAMRole

    # EC2インスタンス起動設定
    WebAPLaunchTemplate:
      Type: AWS::EC2::LaunchTemplate
      Properties:
        LaunchTemplateName: WebAPLaunchTemplate
        LaunchTemplateData:
          # 基本設定
          ImageId: !Ref EC2ImageID
          KeyName: !Ref KeyName
          InstanceType: !Ref EC2InstanceType
          # ネットワーク設定
          NetworkInterfaces:
          - AssociatePublicIpAddress: "false"
            DeviceIndex: "0"
            Groups:
              - !Ref WebAPEC2SG
          # IAMロールをインスタンスにアタッチ
          IamInstanceProfile:
            Arn: !GetAtt
              - WebAPEC2IAMInstanceProfile
              - Arn
          # 拡張モニタリングを有効化
          Monitoring:
            Enabled: true
          # タグ設定
          TagSpecifications:
          - ResourceType: instance
            Tags:
            - Key: Name
              Value: webap-launchsetting

    # ASG
    WebAPAutoScalingGroup:
      Type: AWS::AutoScaling::AutoScalingGroup
      Properties:
        AutoScalingGroupName: WebAPAutoScalingGroup
        # サブネット設定(AZ-A/AZ-Cのプライベートサブネット)
        VPCZoneIdentifier:
          - !Select [0, !Split [",", !ImportValue PrivateSubnetIDs]]
          - !Select [1, !Split [",", !ImportValue PrivateSubnetIDs]]
        # EC2起動設定を指定
        LaunchTemplate:
          LaunchTemplateId: !Ref WebAPLaunchTemplate
          Version: !GetAtt WebAPLaunchTemplate.LatestVersionNumber
        # 内部ELBのターゲットグループに登録
        TargetGroupARNs:
          - !Ref WebAPLocalTargetGroup
        # サーバ台数設定(1台)
        DesiredCapacity: !Ref NumberOfServers
        MaxSize: !Ref NumberOfServers
        MinSize: !Ref NumberOfServers
        # タグ設定
        Tags:
          - Key: Name
            Value: webap
            PropagateAtLaunch: true
          - Key: Application
            Value: tour-reservation
            PropagateAtLaunch: true

  # ------------------------
  # 内部ELB
  # ------------------------

    # セキュリティグループ
    WebAPLocalALBSG:
      Type: AWS::EC2::SecurityGroup
      Properties:
        GroupName: sg_webapalb-local
        GroupDescription: "SG for WebAPLocalALB"
        VpcId: !ImportValue VPCID
        SecurityGroupIngress:
          # JMeterクライアントからの通信許可
          - IpProtocol: tcp
            FromPort: 80
            ToPort: 80
            SourceSecurityGroupId: !ImportValue  TestWinSG
          # JMeterサーバからの通信許可
          - IpProtocol: tcp
            FromPort: 80
            ToPort: 80
            SourceSecurityGroupId: !ImportValue  TestJemeterSG

    # ターゲットグループ
    WebAPLocalTargetGroup:
      Type: "AWS::ElasticLoadBalancingV2::TargetGroup"
      Properties:
        VpcId: !ImportValue VPCID
        Name: WebAPLocalTargetGroup
        # 振分け先ポート(HTTP:80)
        Protocol: HTTP
        Port: 80
        # ヘルスチェック設定
        HealthCheckProtocol: HTTP
        HealthCheckPath: "/"
        HealthCheckPort: "traffic-port"
        HealthyThresholdCount: 5
        UnhealthyThresholdCount: 2
        HealthCheckTimeoutSeconds: 5
        HealthCheckIntervalSeconds: 10
        Matcher:
          HttpCode: 200
        Tags:
          - Key: Name

    # 内部ELB
    WebAPLocalALB:
      Type: "AWS::ElasticLoadBalancingV2::LoadBalancer"
      Properties:
        Name: WebAPLocalALB
        Tags:
          - Key: Name
            Value: webapelb-local
        Scheme: "internal"
        LoadBalancerAttributes:
          - Key: "deletion_protection.enabled"
            Value: false
          - Key: "idle_timeout.timeout_seconds"
            Value: 60
        SecurityGroups:
          - !Ref WebAPLocalALBSG
        Subnets:
          - !Select [0, !Split [",", !ImportValue PrivateSubnetIDs]]
          - !Select [1, !Split [",", !ImportValue PrivateSubnetIDs]]

    # ELBリスナー設定
    WebAPLocalALBListener:
      Type: "AWS::ElasticLoadBalancingV2::Listener"
      Properties:
        DefaultActions:
          # ターゲットグループ設定
          - TargetGroupArn: !Ref WebAPLocalTargetGroup
            Type: forward
        LoadBalancerArn: !Ref WebAPLocalALB
        # 受付ポート(HTTP:80)
        Port: 80
        Protocol: HTTP

  # ------------------------
  # リソースID出力
  # ------------------------
  Outputs:
    WebAPEC2SG:
      Value: !Ref WebAPEC2SG
      Export:
        Name: WebAPEC2SG
    WebAPLocalALBID:
      Value: !GetAtt WebAPLocalALB.CanonicalHostedZoneID
      Export:
        Name: WebAPLocalALBID
    WebAPLocalALBDNS:
      Value: !GetAtt WebAPLocalALB.DNSName
      Export:
        Name: WebAPLocalALBDNS
こちらはコードを読めば大体分かるかと。
DB サーバ
次はDB サーバです。RDS で構築していきます。
TERASOLUNA アプリケーションで使うデータベースも作成します。
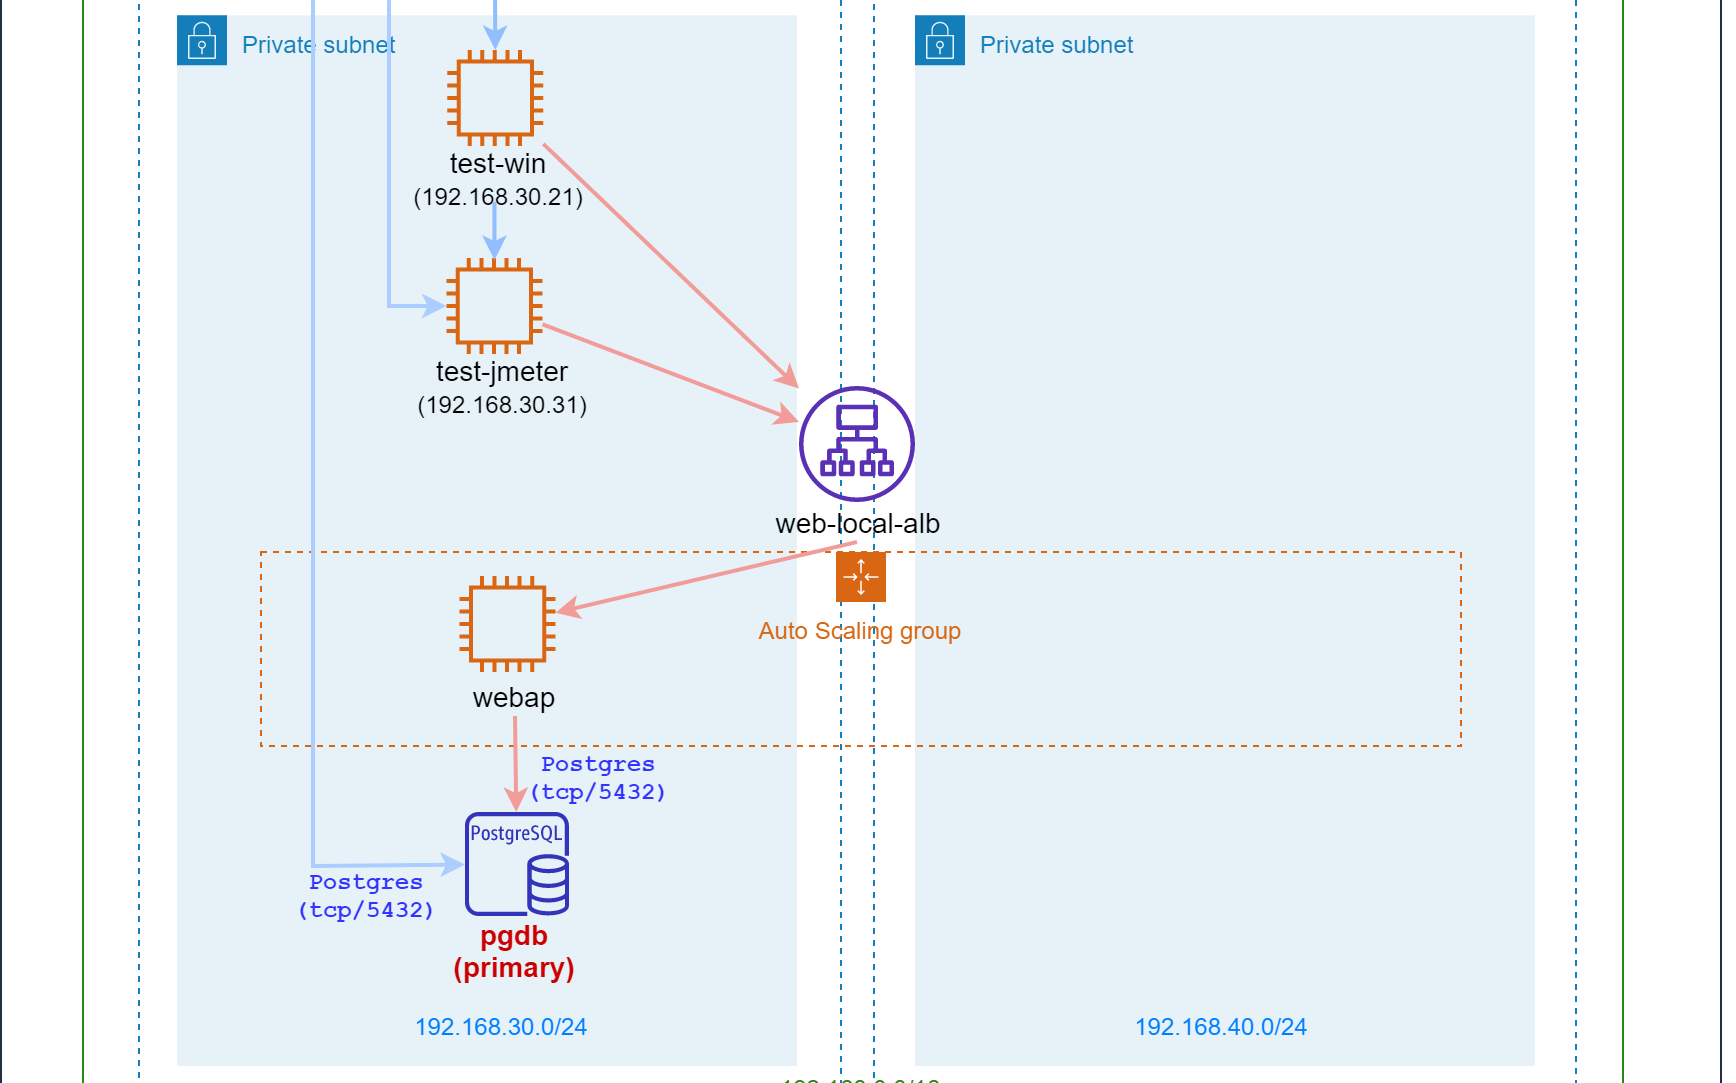
| パラメータ | 値 |
|---|---|
| インスタンス名 | pgdb |
| PostgreSQLバージョン | 12.8 |
| データベース | tourreserve |
| DBユーザ名 | postgres |
| DBユーザパスワード | P0stgres |
CloudFormation コード(クリックして展開)
---
  AWSTemplateFormatVersion: '2010-09-09'
  Description: 'DB (RDS/SG)'

  # ----------------
  # DBパラメータ設定
  # ----------------
  Parameters:
    # インスタンスID
    DBInstanceID:
      Type: String
      Default: db
    # データベース名
    DatabaseName:
      Type: String
      Default: tourreserve
    # PostgreSQLバージョン
    RDSEngineVersion:
      Type: String
      Default: 12.8
    # インスタンスタイプ
    RDSInstanceType:
      Type: String
      Default: db.t3.micro
    # ストレージサイズ
    DBAllocatedStorage:
      Type: String
      Default: 20
    # ストレージタイプ
    DBStorageType:
      Type: String
      Default: "gp2"
    # マルチAZを有効化するか
    isMultiAZ:
      Type: String
      Default: false
    # DBユーザ名
    DBUserName:
      Type: String
      Default: postgres
    # DBユーザパスワード
    DBUserPassword:
      NoEcho: true
      Type: String
      Default: P0stgres


  Resources:

    # DBパラメータグループ
    DBParameterGroup:
      Type: "AWS::RDS::DBParameterGroup"
      Properties:
        Family: postgres12
        Description: DB Parameter Group

    # DBを配置するサブネットグループ
    DBSubnetGroup:
      Type: AWS::RDS::DBSubnetGroup
      Properties:
        DBSubnetGroupDescription: Subnet for DB instance
        SubnetIds:
          - !Select [0, !Split [",", !ImportValue PrivateSubnetIDs]]
          - !Select [1, !Split [",", !ImportValue PrivateSubnetIDs]]

    # セキュリティグループ
    DBSG:
      Type: AWS::EC2::SecurityGroup
      Properties:
        GroupDescription: SG for DB instance
        VpcId: !ImportValue VPCID
        SecurityGroupIngress:
          # WebAPサーバからの通信許可
          - IpProtocol: tcp
            FromPort: 5432
            ToPort: 5432
            SourceSecurityGroupId: !ImportValue WebAPEC2SG
          # 構成管理サーバからの通信許可
          - IpProtocol: tcp
            FromPort: 5432
            ToPort: 5432
            SourceSecurityGroupId: !ImportValue TestAnsibleSG

    # DBサーバ
    DB:
      Type: AWS::RDS::DBInstance
      Properties:
        # インスタンス設定
        DBInstanceIdentifier: !Ref DBInstanceID
        DBName: !Ref DatabaseName
        Engine: postgres
        EngineVersion: !Ref RDSEngineVersion
        MultiAZ: !Ref isMultiAZ
        DBInstanceClass: !Ref RDSInstanceType
        AllocatedStorage: !Ref DBAllocatedStorage
        StorageType: !Ref DBStorageType
        MasterUsername: !Ref DBUserName
        MasterUserPassword: !Ref DBUserPassword
        # パラメータグループ
        DBParameterGroupName: !Ref DBParameterGroup
        # セキュリティグループ
        VPCSecurityGroups:
          - !Ref DBSG
        # サブネットグループ
        DBSubnetGroupName: !Ref DBSubnetGroup
        # タグ設定
        Tags:
          - Key: Name
            Value: pgdb

  # ----------------
  # パラメータ出力
  # ----------------
  Outputs:
    DBInstanceID:
      Value: !Ref DB
      Export:
        Name: DBInstanceID

    DBInstanceEndpoint:
      Value: !GetAtt DB.Endpoint.Address
      Export:
        Name: DBInstanceEndpoint
DNS 設定
VPC 内のみ有効なプライベートホストゾーン「tourreserve.com」を作成します。
また、ホストゾーン内に以下の DNS レコードを作成します。

| FQDN | レコード区分 | 名前解決先 |
|---|---|---|
| local.www.tourreserve.com | Aレコード | 内部ELBエンドポイント |
| local.db.tourreserve.com | CNAMEレコード | DBエンドポイント |
CloudFormation コード(クリックして展開)
---
  AWSTemplateFormatVersion: '2010-09-09'
  Description: 'DNS'

  # ----------------
  # DNSパラメータ設定
  # ----------------
  Parameters:
    PrivateHostedZoneName:
      Type: String
      Default: tourreserve.com

  Resources:
    # プライベートホストゾーン設定
    PrivateHostedZone:
      Type: AWS::Route53::HostedZone
      Properties:
        Name:
          !Ref PrivateHostedZoneName
        VPCs:
          - VPCId:
              !ImportValue VPCID
            VPCRegion:
              Fn::Sub: "${AWS::Region}"

    # 内部ELB用Aレコード
    LocalELBDNSRecordSet:
      DependsOn: PrivateHostedZone
      Type: AWS::Route53::RecordSet
      Properties:
        HostedZoneId: !Ref PrivateHostedZone
        Name: !Sub local.www.${PrivateHostedZoneName}
        Type: A
        AliasTarget:
          HostedZoneId: !ImportValue WebAPLocalALBID
          DNSName: !ImportValue WebAPLocalALBDNS

    # DB用CNAMEレコード
    DBDNSRecordSet:
      DependsOn: PrivateHostedZone
      Type: AWS::Route53::RecordSet
      Properties:
        HostedZoneId: !Ref PrivateHostedZone
        Name: !Sub local.db.${PrivateHostedZoneName}
        Type: CNAME
        TTL: '300'
        ResourceRecords:
        - !ImportValue DBInstanceEndpoint
おわりに
これで CloudFormation での構築は完了です。
次回は Ansible で各サーバをプロビジョニングしていきます。