1:目的と概要
OAuth2で認証後、Google APIを利用するwebアプリのサンプルです。
スプレッドシートのアクセス権限に「リンクを知っている全員に変更」を与えられないような場合でも、アプリが「許可されている本人」になり替わって書き込みを行うことができます。
処理の流れ
- 最初に(スプレッドシートに書き込みできる人で)、Googleへログインを行います
- Passportと、ミドルウェアPassport-google-oauth2を利用
- ログイン時「スプレッドシートに対し、Webアプリが書き込み」してよいか?許可を求められます
- 許可すると「Webアプリ」はログインした人になり替わって、スプレッドシートに書き込みを行うことができるようになります
- 画面で指定したスプレッドシートへデータを書き込みます
2:Google APIを使用するための事前設定
アプリの登録と、認証情報を作成して「クライアントID」「クライアントシークレット」を取得します
- Google Cloud Platformでプロジェクトを作成
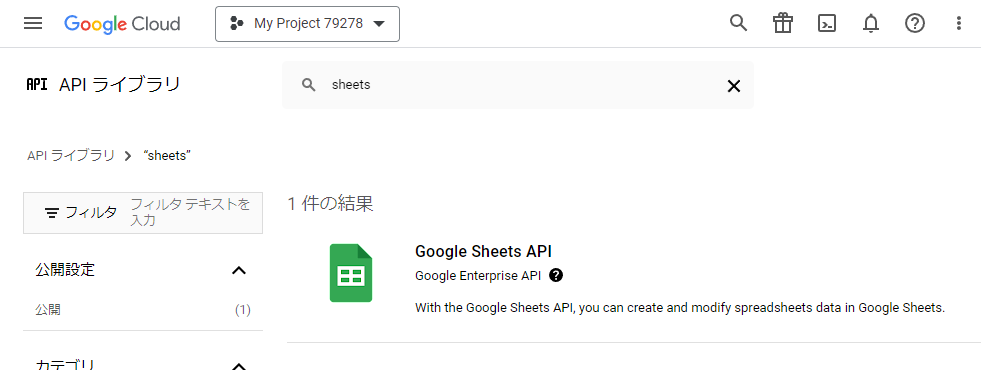
- プロジェクトで使用するAPIを有効化
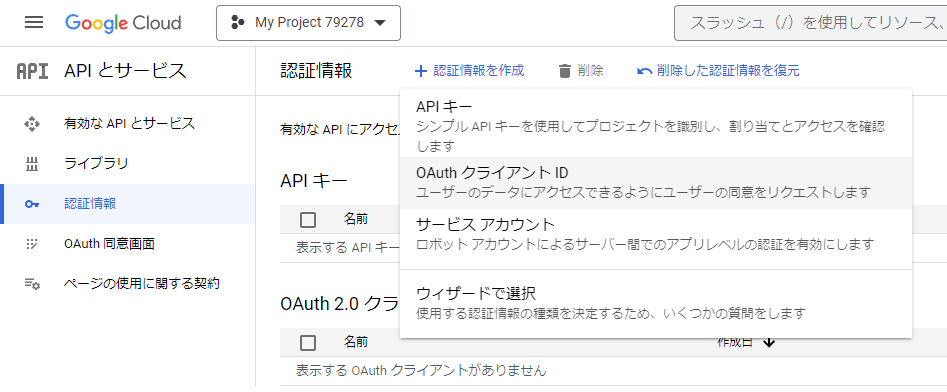
- APIへのアクセスに必要な認証情報を作成
Google Cloud Platformでプロジェクトを作成
-
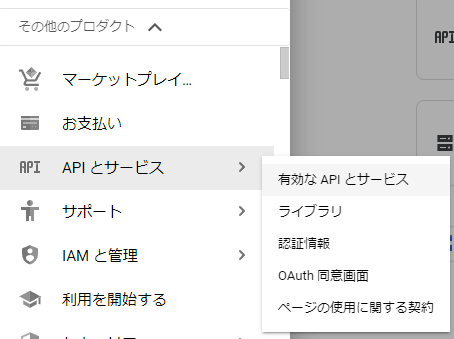
GCPダッシュボードへアクセスして、「
プロジェクトの選択」をクリック ⇒ 「新しいプロジェクト」をクリックする

プロジェクトで使用するAPIを有効化
APIへのアクセスに必要な認証情報を作成
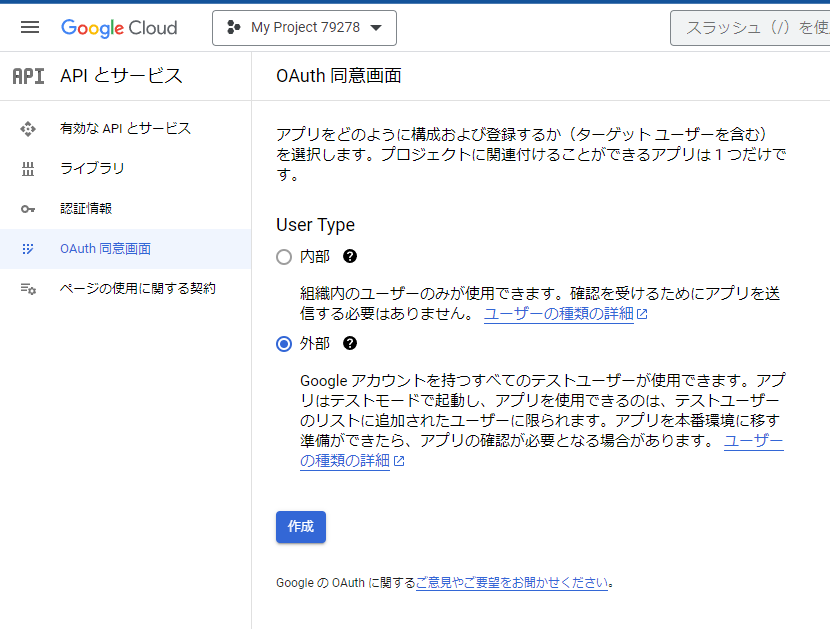
OAuth同意画面の登録
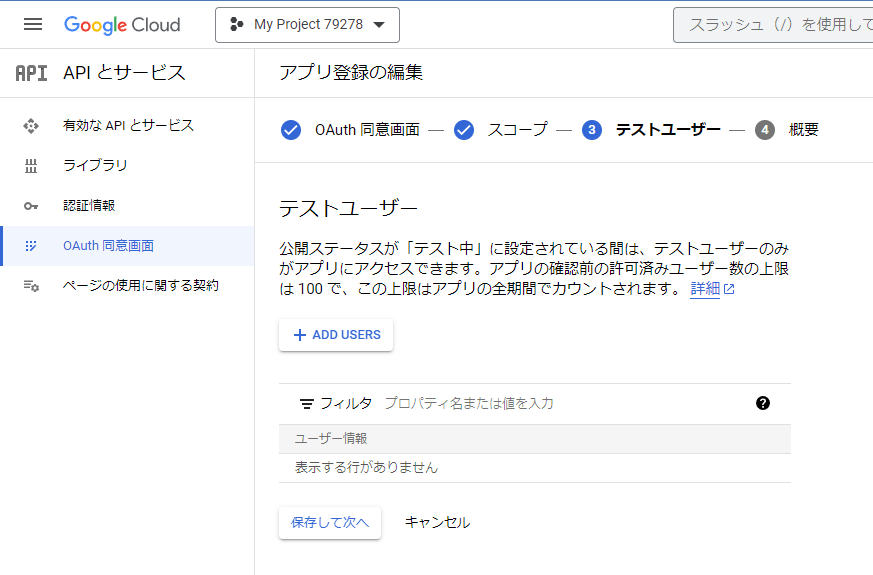
※後でテスト用ユーザーを追加します(追加したユーザーだけ許可される)
-
OAuth同意画面を入力する
-
フィルタに「
sheet」と入力して検索を行い、範囲が「auth/spreadsheets」となっている行にチェックを入れて「更新」する

-
元の「
スコープの設定画面」へ戻り、「保存して次へ」をクリック
認証情報を作成する
-
AuthクライアントIDの作成 は下記を入力
-
アプリケーションの種類:ウェブアプリケーション
-
名前:任意の名前
-
承認済みのリダイレクトURI:http://localhost:3000/auth/google/callback

※ローカルPC上のnode.jsで動作確認を行うため「localhost」を指定する
-
-
OAuthクライアントID確認画面
参考ページ
Google Spreadsheet をサービスアカウントに共有せずにGoogle Spreadsheet APIから読みだす方法
.envファイルに取得したクライアント情報をセットしておきます
APP_PORT=3000
GOOGLE_CLIENT_ID=`クライアントID`
GOOGLE_CLIENT_SECRET=`クライアントシークレット`
3:利用モジュールのインストール
node.js + ExpressでWebアプリを作成します
- 必要なモジュールをインストールします
npm init -y
npm i dotenv ejs express express-session passport passport-google-oauth googleapis
| パッケージ | 内容 |
|---|---|
| dotenv | 環境変数をファイルから読み込むためのツール |
| ejs | expressで利用するテンプレートエンジン |
| express | node.jsのウェブ用フレームワーク |
| express-session | セッションを管理するためのミドルウェア |
| passport | 認証ミドルウェア |
| passport-google-oauth | Googleを使用して認証するためのストラテジー |
| googleapis | Google API クライアント |
4:Express設定
ルートフォルダにindex.jsファイルを作成し、Webサーバを作成します
- 認証情報の保持にセッションを利用するため
express-sessionを読み込む
// index.js
/* *******************************************************************
 * Express設定
 * ・passport.jsでuserを保持するためsessionを利用
 * ******************************************************************/
require('dotenv').config();
const express = require('express');
const app = express();
const session = require('express-session');

app.set('view engine', 'ejs');
// formからのデータ受け取り
app.use(express.urlencoded({ extended: true }));

app.use(
  session({
    resave: false,
    saveUninitialized: true,
    secret: 'SECRET',
  })
);

const port = process.env.APP_PORT || 3000;
app.listen(port, () => console.log('App listening on port ' + port));
5:Passport設定
ログアウト用の処理と、ログイン後のユーザー情報の保存・復元処理を記載します(上記のコードに追記)
/* *******************************************************************
 * Passport設定
 * ・Strategyはpassport-google-oauthを利用
 * ******************************************************************/
const passport = require('passport');

app.use(passport.initialize());
app.use(passport.session());

// ログアウト
app.get('/logout', (req, res, next) => {
  req.logout((err) => {
    if (err) {
      return next(err);
    }
    res.redirect('/');
  });
});

app.get('/error', (req, res) => res.send('error logging in'));

// ユーザー情報をsessionに保存
passport.serializeUser((user, done) => {
  console.log(user);
  done(null, user);
});

// セッションからユーザー情報の復元(req.user)
passport.deserializeUser((obj, done) => {
  done(null, obj);
});
6:Google OAuth2設定
Passportにストラテジー(GoogleのOAuth2)をセットします(上記のコードに追記)
- 事前設定で取得した「
クライアントID」と「クライアントシークレット」をセットします - スプレッドシートを操作できるようにするため、事前設定で有効化した「https://www.googleapis.com/auth/spreadsheets 」を指定します(scopeの指定)
※.envファイル
/* *******************************************************************
 * Google OAuth2 認証設定
 * ・Google Developer Consoleで認証情報を作成しておく
 *   参考URL https://qiita.com/7032/items/50fc96b6e8c9ac90c32f
 * ・作成した認証情報のclientIdと、clientSecretを環境変数にセットしておくこと
 * ******************************************************************/
const GoogleStrategy = require('passport-google-oauth').OAuth2Strategy;
const { GOOGLE_CLIENT_ID, GOOGLE_CLIENT_SECRET } = process.env;
passport.use(
  new GoogleStrategy(
    {
      clientID: GOOGLE_CLIENT_ID,
      clientSecret: GOOGLE_CLIENT_SECRET,
      callbackURL: `http://localhost:${port}/auth/google/callback`,
    },
    (accessToken, refreshToken, profile, done) => {
      // Verify Function (ユーザー存在チェック等を行う)
      //  問題がなければユーザー情報callbackに渡すことでreq.userに格納される
      return done(null, { ...profile, accessToken, refreshToken });
    }
  )
);

// 認証
// ・スプレッドシートを読み書きするためのscopeを指定
app.get(
  '/auth/google',
  passport.authenticate('google', {
    scope: ['profile', 'email', 'https://www.googleapis.com/auth/spreadsheets'],
    accessType: 'offline',
    prompt: 'consent',
  })
);

// 認証後のcallback
app.get(
  '/auth/google/callback',
  passport.authenticate('google', { failureRedirect: '/error' }),
  (req, res) => {
    // 認証成功時
    res.redirect('/');
  }
);
7:Google API (Sheets) 利用サンプル
指定されたスプレッドシートに追記するサンプルです(上記のコードに追記)
詳細はコメントを参照
/* *******************************************************************
 * Google API (Sheets) 利用サンプル
 * ・書き込み先スプレッドシート(URL)を入力する画面を表示する
 * ・OAuth2認証で取得したaccessToken, refreshTokenを使いSheetに書き込みを行う
 * ******************************************************************/
// メインページ(スプレッドシートURL、書き込みデータ入力画面)を表示(GET)
app.get('/', (req, res) =>
  res.render('pages/sheet', {
    error_message: '',
    sheetURL: '',
    insertValue: '',
    user: req.user,
  })
);

const { google } = require('googleapis');

// OAuth2Clientを初期化
const oAuth2Client = new google.auth.OAuth2({
  clientId: process.env.GOOGLE_CLIENT_ID,
  clientSecret: process.env.GOOGLE_CLIENT_SECRET,
});

// 指定されたスプレッドシートにデータを追記する(POST)
app.post('/', async (req, res) => {
  // フォーム入力値
  const { sheetURL, insertValue, redirectToSheet } = req.body;

  // スプレッドシートIDを抜き出す
  const match = sheetURL.match(/spreadsheets\/d\/([0-9a-zA-Z\-_]+)/);
  if (!match) {
    res.render('pages/sheet', {
      ...req.body,
      user: req.user,
      error_message: 'URLが無効です',
    });
    return;
  }
  const spreadsheetId = match[1];

  // ログイン時に取得したトークンをセット
  oAuth2Client.setCredentials({
    refresh_token: req.user.refreshToken,
    access_token: req.user.accessToken,
  });

  // API経由でスプレッドシートへ書き込み
  const sheets = google.sheets({ version: 'v4', auth: oAuth2Client });
  const param = {
    spreadsheetId: spreadsheetId,
    range: 'シート1!A1',
    valueInputOption: 'USER_ENTERED',
    insertDataOption: 'INSERT_ROWS', // 最後に追加
    resource: {
      values: [insertValue.split(',')],
    },
  };
  // スプレッドシートにデータを追加
  await sheets.spreadsheets.values.append(param);

  if (redirectToSheet == 'checked') {
    // リダイレクトを指定した場合、スプレッドシートを表示
    res.redirect(
      `https://docs.google.com/spreadsheets/d/${spreadsheetId}/edit#gid=0`
    );
  } else {
    res.render('pages/sheet', {
      ...req.body,
      user: req.user,
      error_message: '',
    });
  }
});
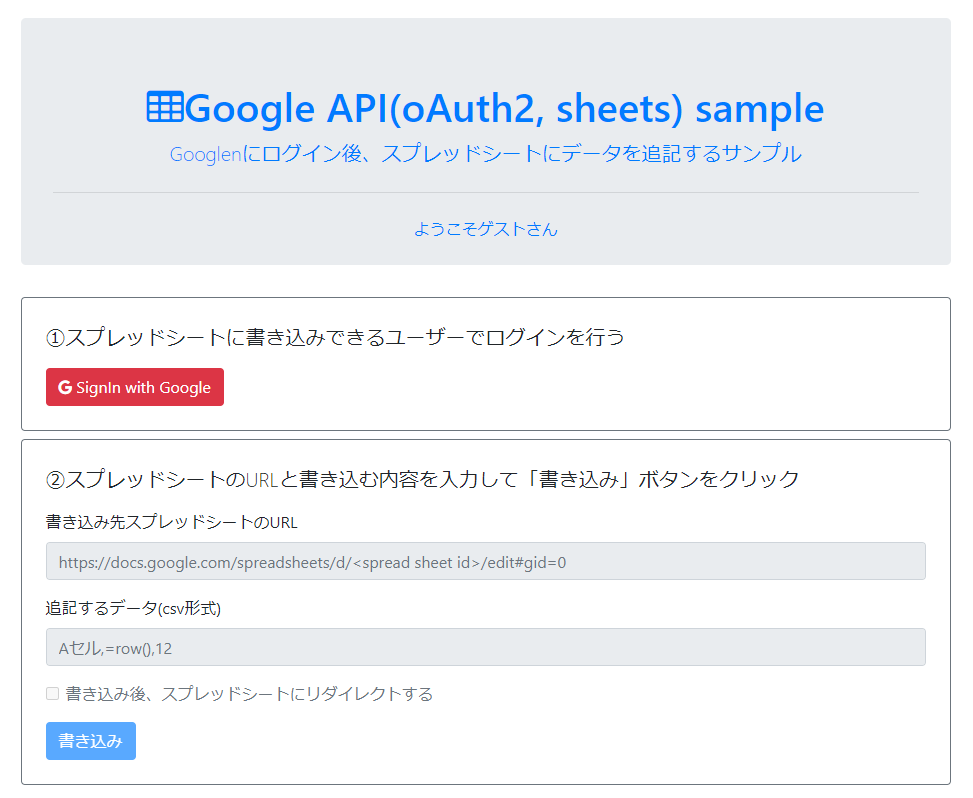
8:画面作成(ログインボタン+書き込み先スプレッドシートURL)
概要
「views/pages/sheet.ejs」ファイルを作成して下記内容を記載します
<!-- views/pages/sheet.ejs -->
<!doctype html>
<html>
<head>
<title>Google API(oAuth2) sample</title>
<link rel="stylesheet" href="https://stackpath.bootstrapcdn.com/bootstrap/4.4.1/css/bootstrap.min.css">
<link rel="stylesheet" href="https://stackpath.bootstrapcdn.com/font-awesome/4.7.0/css/font-awesome.min.css">
</head>
<body>
<div class="container">
<div class="jumbotron text-center text-primary pb-2 mt-5">
<h1 class="display-5"><span class="fa fa-table"></span>Google API(oAuth2, sheets) sample</h1>
<p class="lead">Googlenにログイン後、スプレッドシートにデータを追記するサンプル</p>
<hr class="my-4">
<p>
ようこそ<%= user? user.displayName: 'ゲスト' %>さん
<% if (user) { %> (<a href="/logout">ログアウト</a>) <% } %></p>
</div>
<% if (!user) { %>
<div class="border border-secondary rounded p-4 mb-2">
<p class="lead">①スプレッドシートに書き込みできるユーザーでログインを行う</p>
<a href="/auth/google" class="btn btn-danger"><span class="fa fa-google"></span> SignIn with Google</a>
</div>
<% } %>
<form method="POST" id="frm" class="border border-secondary rounded p-4 ">
<p class="lead">②スプレッドシートのURLと書き込む内容を入力して「書き込み」ボタンをクリック</p>
<div class="form-group">
<label for="sheetURL">書き込み先スプレッドシートのURL</label>
<input class="form-control" type="text" id="sheetURL" name="sheetURL" placeholder="https://docs.google.com/spreadsheets/d/<spread sheet id>/edit#gid=0" value="<%= sheetURL %>" <%= !user? 'readonly': ''%>>
</div>
<div class="form-group">
<label for="insertValue">追記するデータ(csv形式)</label>
<input class="form-control" id="insertValue" name="insertValue"
placeholder="Aセル,=row(),12" value="<%= insertValue %>" <%= !user? 'readonly': ''%>></input>
</div>
<div class="form-group form-check">
<input type="checkbox" class="form-check-input" id="redirectToSheet" name="redirectToSheet" value="checked" <%= !user? 'disabled': ''%>>
<label class="form-check-label" for="redirectToSheet">書き込み後、スプレッドシートにリダイレクトする</label>
</div>
<div>
<p class="text-warning"><%= error_message %></p>
<input type="submit" class="btn btn-primary" value="書き込み" <%= !user? 'disabled': ''%>></input>
<span class="text-secondary align-bottom"></span>
</div>
</form>
</div>
</body>
</html>
9:動作確認
Webアプリを起動して、http://localhost:3000 へアクセスする
$ node index.js

