ネット上には自己署名証明書を使った SSL 化の記事はたくさんあるけれども、
実際に自分で試してみると意外とハマったのでメモ。
やろうとしたことは以下の通り。
- (オレオレ)証明局の証明書とサーバ証明書は分ける
- (勉強のために) OpenSSL のスクリプトに頼らず、コマンドで必要なファイルを作っていく
- コマンドラインのみで完結させる(openssl.cnf には頼らない)
また、先に RSA鍵、証明書のファイルフォーマットについて に目を通しておくと話を理解しやすいと思う。
やることの流れ
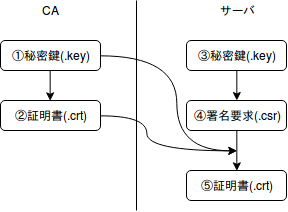
- CA の秘密鍵を作る
- ①の秘密鍵から CA の証明書を作る
- サーバ証明書用の秘密鍵を作る
- ③の秘密鍵から署名要求を作る
- ④の署名要求に CA の秘密鍵 & 証明書で署名し、サーバ証明書を作る
- nginx の設定変更
手順
1. CA の秘密鍵を作る
$ openssl genrsa -out ca.key 2048
Generating RSA private key, 2048 bit long modulus
....+++
...+++
e is 65537 (0x10001)
RSA 暗号のビット数には推奨値らしい 2048 ビットを指定。
$ cat ca.key
-----BEGIN RSA PRIVATE KEY-----
MIIEowIBAAKCAQEA1bzwrKxu5QrK7Y053qCuTYNCV7r0FmjMCXCo0yYwvk4Z171W
... (略) ...
-----END RSA PRIVATE KEY-----
2. ①の秘密鍵から CA の証明書を作る
# openssl req -new -x509 -days 3650 -key ca.key -out ca.crt
You are about to be asked to enter information that will be incorporated
into your certificate request.
What you are about to enter is what is called a Distinguished Name or a DN.
There are quite a few fields but you can leave some blank
For some fields there will be a default value,
If you enter '.', the field will be left blank.
-----
Country Name (2 letter code) []:
State or Province Name (full name) []:
Locality Name (eg, city) []:
Organization Name (eg, company) []:
Organizational Unit Name (eg, section) []:
Common Name (eg, fully qualified host name) []:example.com
Email Address []:
なんとなく、証明書の有効期限は 10 年 (3650 日) を指定。
また、証明書の情報 (Country Name 以降) は適当に省略しているけど、
実際に使う時にはそれっぽい値を入れた方が良いと思う。
対話式で入力したくない場合は -subj オプションで内容を指定することもできる。
ここでは秘密鍵からいきなり証明書を作成したけど、後述のサーバ証明書のように
秘密鍵→CSR→証明書 というやり方もあるようだ。
(逆にいきなり秘密鍵と証明書のペアを作ることも可能らしい)
$ openssl x509 -text -in ca.crt -noout
Certificate:
    Data:
        Version: 1 (0x0)
        Serial Number: 12977958493190112578 (0xb41af87d485c4542)
    Signature Algorithm: sha256WithRSAEncryption
        Issuer: CN=example.com
        Validity
            Not Before: ...(略)...
            Not After : ...(略)...
        Subject: CN=example.com
        Subject Public Key Info:
            Public Key Algorithm: rsaEncryption
                Public-Key: (2048 bit)
                Modulus:
                  ...(略)...
                Exponent: 65537 (0x10001)
    Signature Algorithm: sha256WithRSAEncryption
         ...(略)...
3. サーバ証明書用の秘密鍵を作る
$ openssl genrsa -out server.key 2048
Generating RSA private key, 2048 bit long modulus
................+++
............................................................................................................................................+++
e is 65537 (0x10001)
CA の時と同じなので、特に言うこともない。
4. ③の秘密鍵から署名要求を作る
$ openssl req -new -key server.key -out server.csr
You are about to be asked to enter information that will be incorporated
into your certificate request.
What you are about to enter is what is called a Distinguished Name or a DN.
There are quite a few fields but you can leave some blank
For some fields there will be a default value,
If you enter '.', the field will be left blank.
-----
Country Name (2 letter code) []:
State or Province Name (full name) []:
Locality Name (eg, city) []:
Organization Name (eg, company) []:
Organizational Unit Name (eg, section) []:
Common Name (eg, fully qualified host name) []:example.jp
Email Address []:

Please enter the following 'extra' attributes
to be sent with your certificate request
A challenge password []:
CA 証明書の時と似ているけど、今回は -x509 オプションがない。
また、今回も証明書の情報 (Country Name 以降) は適当に省略しているけど、
実際に使う時にはそれっぽい値を入れた方が良いと思う。
(Common Name はサーバのドメイン名と合わせないと、ブラウザアクセス時に証明書エラーになるので注意)
パスワードについても今回は省略したけど、入力した場合にどのタイミングでパスワードを求められるのかは未検証。
$ openssl req -text -in server.csr -noout
Certificate Request:
    Data:
        Version: 0 (0x0)
        Subject: CN=example.jp
        Subject Public Key Info:
            Public Key Algorithm: rsaEncryption
                Public-Key: (2048 bit)
                Modulus:
                    ...(略)...
                Exponent: 65537 (0x10001)
        Attributes:
            a0:00
    Signature Algorithm: sha256WithRSAEncryption
         ...(略)...
5. ④の署名要求に CA の秘密鍵 & 証明書で署名し、サーバ証明書を作る
$ openssl x509 -req -days 3650 -CA ca.crt -CAkey ca.key -CAcreateserial -in server.csr -out server.crt
Signature ok
subject=/CN=example.jp
Getting CA Private Key
-CA、-CAkey に CA の証明書、秘密鍵を指定するのがキモ。
また、-CAcreateserial オプションを指定しているため、証明書のファイル名.srl (ここでは ca.srl)が自動的に生成される。
# openssl x509 -text -in server.crt -noout
Certificate:
    Data:
        Version: 1 (0x0)
        Serial Number: 16770137279166685895 (0xe8bb7f00df4422c7)
    Signature Algorithm: sha1WithRSAEncryption
        Issuer: CN=example.com
        Validity
            Not Before: ...(略)...
            Not After : ...(略)...
        Subject: CN=example.jp
        Subject Public Key Info:
            Public Key Algorithm: rsaEncryption
                Public-Key: (2048 bit)
                Modulus:
                    ...(略)...
                Exponent: 65537 (0x10001)
    Signature Algorithm: sha1WithRSAEncryption
         ...(略)...
6. nginx の設定変更
 server {
-    listen       80;
+    listen       443 ssl;
     server_name  example.jp;

+    ssl_certificate /path/to/server.crt;
+    ssl_certificate_key /path/to/server.key;

     #charset koi8-r;
     #access_log  /var/log/nginx/host.access.log  main;

     location / {
         root   /usr/share/nginx/html;
         index  index.html index.htm;
     }

     ...(略)...
編集対象の設定ファイルは適宜読み替えてください。
あとは設定ファイルのチェック (nginx -t -c /etc/nginx/nginx.conf) をしてから nginx をリロード (nginx -s reload) すれば OK。
CA の証明書を配布するのをお忘れなく。
遭遇したエラー
$ nginx -t -c /etc/nginx/nginx.conf
2018/01/27 13:33:17 [emerg] 81#81: SSL_CTX_use_PrivateKey_file("/path/to/server.key") failed (SSL: error:0B080074:x509 certificate routines:X509_check_private_key:key values mismatch)
nginx: [emerg] SSL_CTX_use_PrivateKey_file("/path/to/server.key") failed (SSL: error:0B080074:x509 certificate routines:X509_check_private_key:key values mismatch)
nginx: configuration file /etc/nginx/nginx.conf test failed
サーバ証明書の秘密鍵と、証明書の情報が一致していない場合に発生する。
今回は 5. の手順で証明書に署名する時のオプションを以下のようにしてしまった時に発生した。
$ openssl x509 -req -days 3650 -signkey ca.key -in server.csr -out server.crt
Signature ok
subject=/CN=example.jp
Getting Private key
見ての通り、-signkey オプションで秘密鍵を指定しているが、このオプションで署名すると署名者が CSR の発行者になってしまうようだ。
$ openssl x509 -text -in server.crt -noout
Certificate:
    Data:
        Version: 1 (0x0)
        Serial Number: 12432708285465385003 (0xac89da507738582b)
    Signature Algorithm: sha1WithRSAEncryption
        Issuer: CN=example.jp (← example.com の秘密鍵で署名したはず!)
        Validity
            Not Before: Jan 27 13:32:04 2018 GMT
            Not After : Jan 25 13:32:04 2028 GMT
        Subject: CN=example.jp
    ...(略)...
ググッて上位にヒットするページでは CA もサーバも同じ秘密鍵を使用しているため、これで問題なかったけど、
今回は CA とサーバで秘密鍵を分けたので、このやり方は使えなかったというわけだ。1
-
今回のケースで言えば、CA の証明書を CSR 経由で作成するとしたら
-signkeyオプションが必要 ↩