以下で確認しました。
- Raspberry Pi 1 Model B (Raspbian Wheezy 2015-05-05 からアップデート)
- Raspberry Pi 2 Model B (Raspbian Jessie 2015-09-24 からアップデート)
動機
- MCP2515 TJA1050 CAN Bus Moduleというのが、$5+送料くらいで買える。(安いけど、おくられてくまで時間がかかる)
- 最近のRaspbianでは、MCP2515を使うことは**ラク**らしい。(config.txtを編集すればよく、Kernelのビルドの必要がない)
注意点
- らずぱいのGPIOの入出力電圧は3.3V
- 安いMCP2515 TJA1050 CAN Bus Moduleは、arduino向けっぽいのか、5V仕様
- TJA1050の電源 (supply voltage 4.75 < V_CC < 5.25 V) => 5V仕様
- MCP2515電源電圧 (2.7 < V_DD < 5.5 V) 3.3V/5V 可能で、5Vが使われている。
- MCP2515出力は V_DD - 0.7V ... そのまま使うと、4.3Vくらいになってしまう??
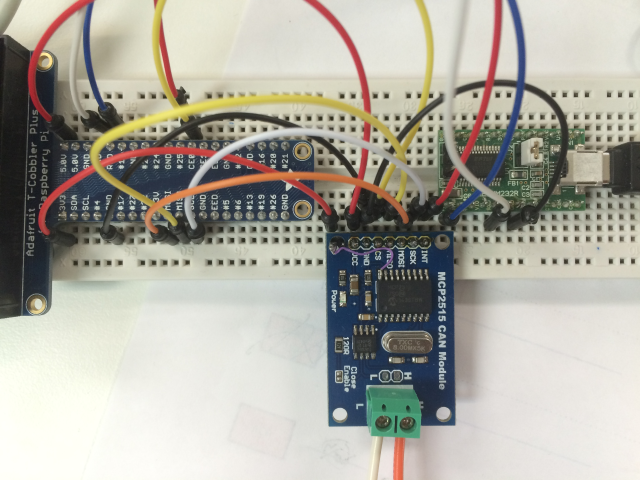
=> MCP2515の電源ピンを浮かせて、3.3Vを送り込む。(下図参照)
(確認してないけど、だいじょぶだろう...ぉぃ)
手順
-
- 配線
- 8本、間違えないように。
P1-01 3V3          -> MCP2515の浮かせたピン3.3V電源
P1-02 5V           -> VCC 5V電源
P1-06 GND          -> GND
P1-24 GPIO8(CE0)   -> CS
P1-19 GPIO10(MOSI) -> MOSI
P1-21 GPIO9 (MISO) <- MISO
P1-23 GPIO11(SCLK) -> SCK
P1-22 GPIO25       -> INT
-
- Raspbian
- SDにイメージを焼く
- ソフトの更新など(sudo apt-get update / upgrade/ rpi-update)
sudo apt-get update
sudo apt-get upgrade
sudo apt-get dist-upgrade
# 再起動
sudo reboot

# ファームアップデート
sudo rpi-update
# 再起動
sudo reboot

# 設定など
sudo raspi-config
-
- CAN Moduleを使えるようにする
- config.txt の編集- 最後のほうに追加 (
% sudo vi /boot/config.txtとか% sudo nano /boot/config) - oscillator=8000000 はついてるオシレータにあわせる。(これは、8MHz)。16MHzだったり、いろいろあるらしい
- 編集後、再起動。
/boot/config.txt
# Added for SPI-mcp2515
dtparam=spi=on
dtoverlay=spi-bcm2835-overlay
dtoverlay=mcp2515-can0-overlay,oscillator=8000000,interrupt=25
-
- 確認 (
% dmesg | grep spi)
- 確認 (
- こんなのがでるとCAN Moduleが認識されている。でなかったら、配線を確認。
pi@raspberrypi:~$ dmesg | grep spi
[    5.383449] spi spi0.0: setting up native-CS0 as GPIO 8
[    5.409457] spi spi0.1: setting up native-CS1 as GPIO 7
[   20.347837] mcp251x spi0.0 can0: bit-timing not yet defined
[   20.347879] mcp251x spi0.0: unable to set initial baudrate!
...
-
- 接続
- SocketCAN
500kbpsで接続
pi@raspberrypi:~$  sudo ip link set can0 type can bitrate 500000
pi@raspberrypi:~$ ifconfig can0
can0      Link encap:UNSPEC  HWaddr 00-00-00-00-00-00-00-00-00-00-00-00-00-00-00-00
          UP RUNNING NOARP  MTU:16  Metric:1
          RX packets:0 errors:0 dropped:0 overruns:0 frame:0
          TX packets:0 errors:0 dropped:0 overruns:0 carrier:0
          collisions:0 txqueuelen:10
          RX bytes:0 (0.0 B)  TX bytes:0 (0.0 B)

pi@raspberrypi:~$
-
- ツールの準備
- can-utils
git clone https://github.com/linux-can/can-utils.git
cd can-utils
make
-
- ダンプしてみる
- なんかしらCANデバイスにつなぐ。HとLに注意。
msg_idは、xxxxxxxxにしてます...
pi@raspberrypi:~/can-utils$ ./candump -cae -t z can0,0:0,#FFFFFFFF
 (000.000000)  can0  xxxxxxxx   [8]  01 20 34 F3 34 F3 34 F3   '. 4.4.4.'
 (000.000464)  can0  xxxxxxxx   [6]  01 43 34 F3 34 F3         '.C4.4.'
 (000.001028)  can0  xxxxxxxx   [8]  08 20 34 F3 34 F3 00 00   '. 4.4...'
 (000.001603)  can0  xxxxxxxx   [8]  08 00 00 00 00 00 00 00   '........'
...
メモ
SCLK - Serial CLocK
CE   - Chip Enable (CSと同じ)
CS   - Chip Select (CEと同じ)
MOSI - Master Out Slave In
MISO - Master In Slave Out
- wireshark/tsharkでも見れるよ
sudo apt-get install wireshark tshark
