Abstract
とあるプログラムの開発のため、three.jsで大量オブジェクトを効率よく表示するにはどうすればいいかを調べていたら、OffscreenCanvasなるものを発見。どうもWeb Workersを利用してcanvasのレンダリングをできる様子。「そうそう。こういうのを探していたんだよ!!」と歓喜したはいいものの、まずはOffscreenCanvasにてthree.jsを利用する方法を調べてみることにした。そして、軽く2回ほど絶望(軽い絶望ってなんだよw)したので、その顛末を書くことにした。
※とはいえOffscreenCanvasは絶望を補って余りある魅力的な機能であることには変わりない。
OffscreenCanvas
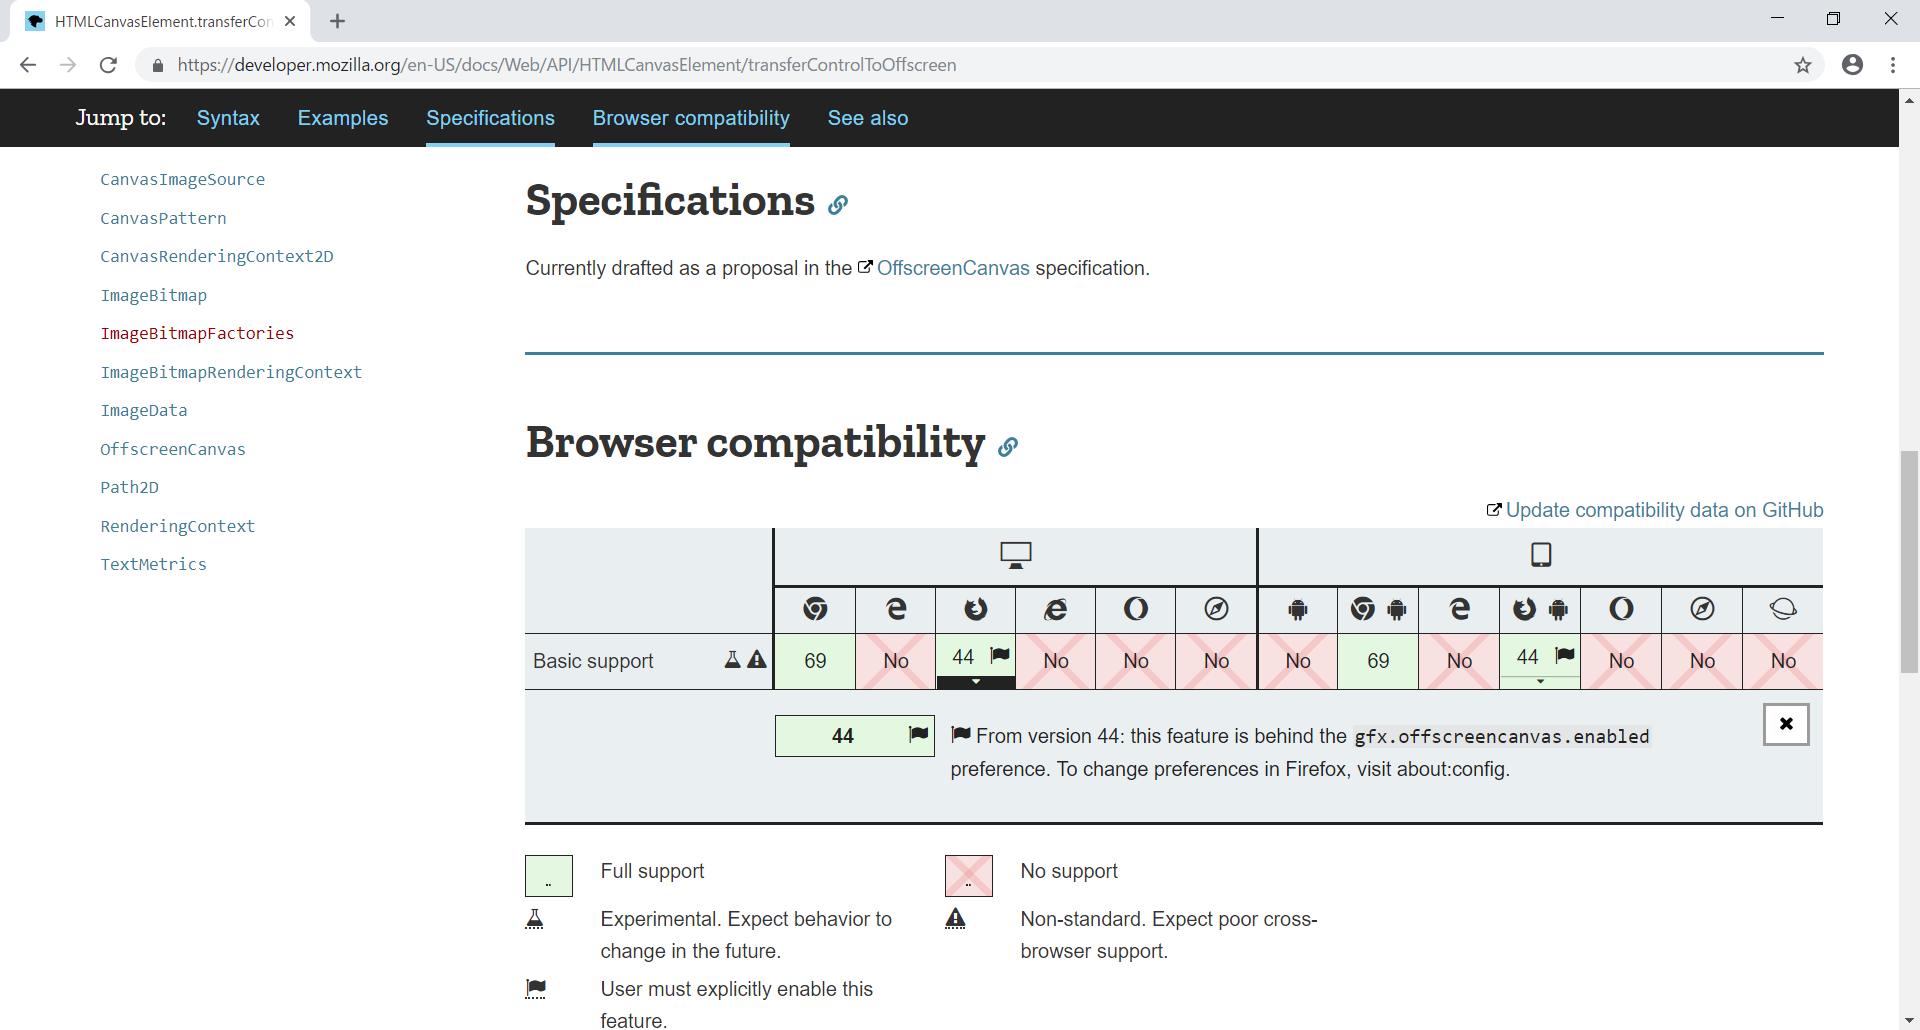
OffscreenCanvasとは、Chrome バージョン69 から正式に搭載され、Web Workersを用いて、Workerスレッドでメインスレッドに対する描画処理を行う機能。
HTMLCanvasElement.transferControlToOffscreen()

図1:transferControlToOffscreen()対応表
今まで、WebアプリケーションにおいてWebブラウザに何かを描画するには、ブラウザのメインとなるスレッドでHTMLのパース結果を描画するか、Javascriptで動的に描画を行うしか手段はなかった(Flashなどのプラグインは除く)。Web Workersを利用することで、別スレッドに計算処理のみを分離することは可能であり、使い方次第では処理を高速化することは可能だった。しかし、計算を高速に行うことはできたとしても、メインスレッドの描画性能が上がるわけではない。WebGLなどの3D表示では、描画対象のオブジェクトが多ければ多いほど、メインスレッドの描画処理、イベントが大量に発生し、結果カクついてしまう。OffscreenCanvasはそれを救ってくれる。
昔の人やゲームを作っている人には、ダブルバッファリングと言えば通じるだろうか。ダブルバッファリングとは全く違うのだけど、そう説明すると少しわかりやすい。
調査
とにもかくにも、まずはOffscreenCanvasがどういうものかとググってみるも、中々これといった情報が出てこない。サンプルコード付きのめぼしい記事は下の2つくらい。
- まだシングルスレッドでレンダリングしてるの? HTML5 CanvasとWeb Workerの最新技術
- [オフスクリーンキャンバスを使ったJSのマルチスレッド描画 – スムーズなユーザー操作実現の切り札]
(https://ics.media/entry/19043)
下の方の記事はやりたいことにかなりマッチしている。というかそのまんま。
実装方法が少し独特なところはあるけれども、結構考えてるなぁと思うところもあり、少しコードを流用させてもらい、検証してみることにした。
実装
Visual Studio Codeにて、まずはOffscreenCanvasを用いたthree.jsのgeometryを表示させてみる。
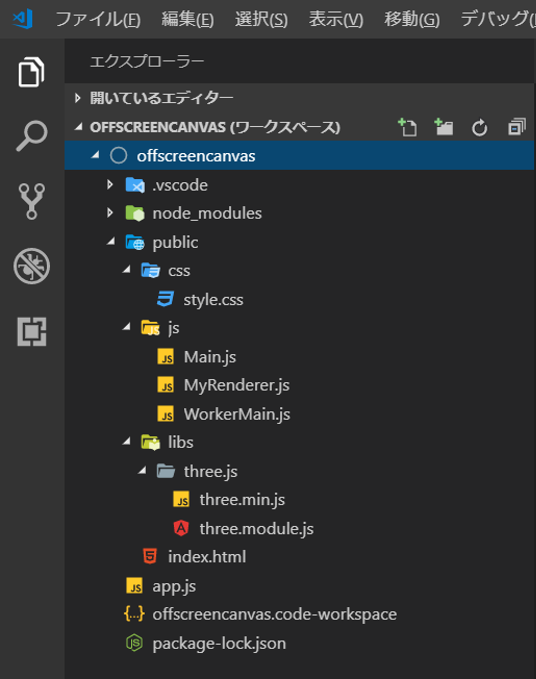
構成
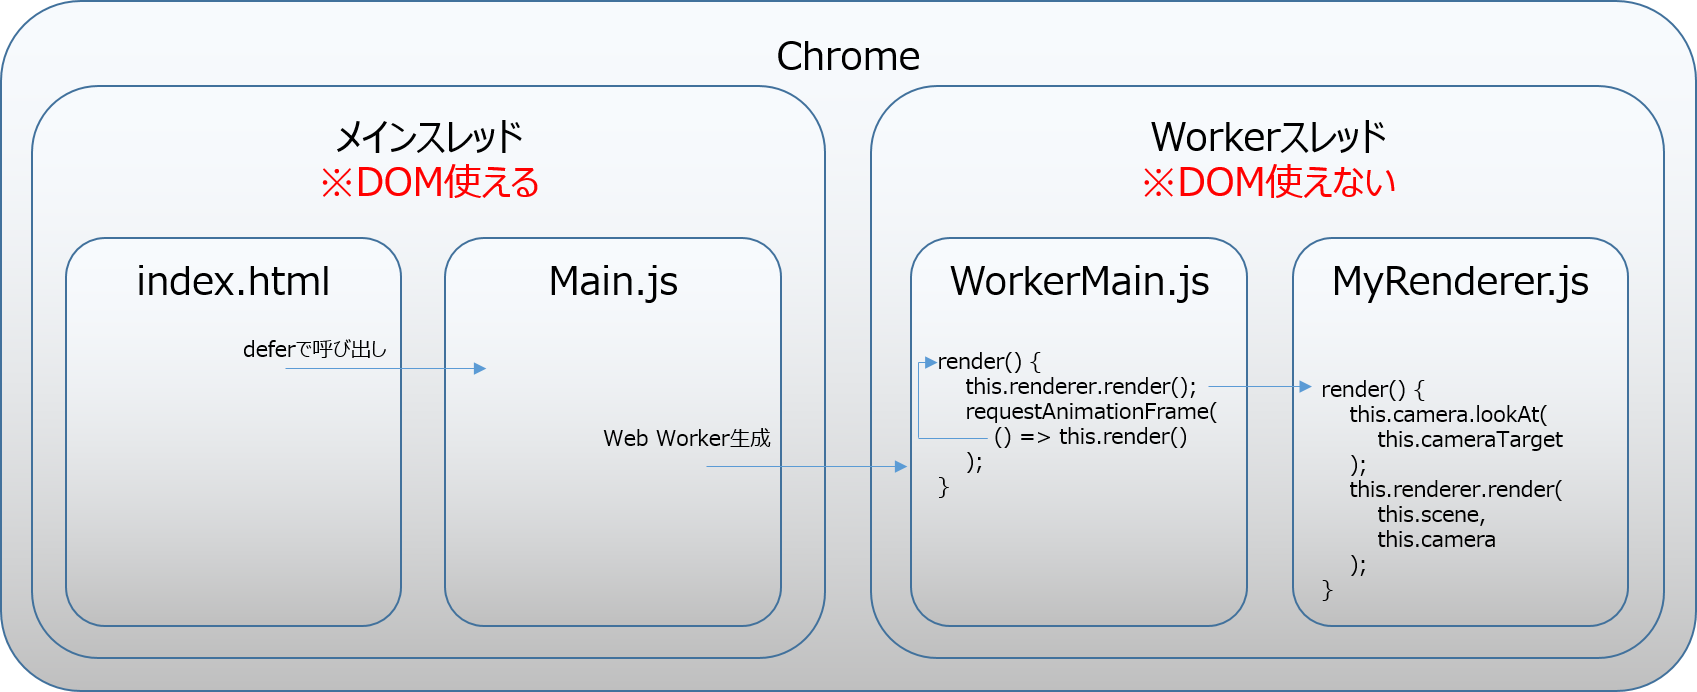
各ソースの関係性は簡単に書くと以下の通り。

図3:各ソースの関連図
MyRenderer.jsを作らずに、すべてWorkerMain.jsに押し込めてもいいかなとは思ったけれども、WorkerMainは後々色々なイベントや別Workerとのハブにさせたいので、このような構成にすることにした。
それぞれのソースは以下。
const express = require('express');
const app = express();
app.use('/', express.static('public'));
app.listen(3000);
console.log('Server running at http://localhost:3000');
今回はNodeJSでWebサーバを実装したので、Webサーバを立てるコード(app.js)
publicフォルダ配下をコンテキストルートにしている。
<html>
    <head>
        <meta name="viewport" content="width=device-width, initial-scale=1" />
        <link rel="stylesheet" type="text/css" href="css/style.css" />
        <script defer src="libs/three.js/three.min.js"></script>
        <script defer src="js/MyRenderer.js"></script>
        <script defer src="js/Main.js"></script>
    </head>
    <body>
        <canvas id="myCanvas"></canvas>
    </body>
</html>
index.htmlは特に説明の必要は無いかと。注意点としては、HTMLをロードした後にスクリプトを実行したいので、deferを指定している。
body{
    background : #000000;
    margin : 0;
}
class Main {
    constructor() {
        this.renderer = null;
        this.worker = null;
        this.init();
    }

    init() {
        const canvas = document.getElementById("myCanvas");
        const offscreenCanvas = canvas.transferControlToOffscreen();
        offscreenCanvas.width = window.innerWidth;
        offscreenCanvas.height = window.innerHeight;
        this.worker = new Worker("js/WorkerMain.js");
        this.worker.postMessage({ action: "init", canvas: offscreenCanvas }, [
            offscreenCanvas
        ]);
    }
}

new Main();
Main.jsはMainクラスを定義していて、最後に自身でMainクラスをnewしている。
const canvas = document.getElementById("myCanvas");
const offscreenCanvas = canvas.transferControlToOffscreen();
この部分でcanvasをOffscreenCanvasとして利用できるようにしている。
importScripts("../libs/three.js/three.min.js");
importScripts("MyRenderer.js");

class WorkerMain {
    constructor(canvas) {
        this.renderer = new MyRenderer(canvas);
        this.render();
    }

    update(value) {
        this.renderer.update(value);
    }

    render() {
        this.renderer.render();
        requestAnimationFrame(() => this.render());
    }
}

let workerMain = null;
onmessage = event => {
    switch (event.data.action) {
        case "init":
            workerMain = new WorkerMain(event.data.canvas);
            workerMain.update(1000);
            break;
        default:
            break;
    }
};
WorkerMain.jsはメインスレッドから呼び出されるWorker。Workerの実装とクラスが同居しているので、そこは分離した方がよかったかなとも思う。
class MyRenderer {
    constructor(canvas) {
        this.canvas = canvas;
        this.stageWidth = this.canvas.width;
        this.stageHeight = this.canvas.height;

        this.renderer = null;
        this.camera = null;
        this.scene = null;
        this.meshList = [];
        this.geometry = null;
        this.theta = 0.0;
        this.phi = 0.0;
        this.cameraTarget = null;

        this.canvas.style = { width: 0, height: 0 };

        this.renderer = new THREE.WebGLRenderer({
            canvas: this.canvas
        });
        this.renderer.setSize(this.stageWidth, this.stageHeight);
        this.scene = new THREE.Scene();
        this.camera = new THREE.PerspectiveCamera(
            45,
            this.stageWidth / this.stageHeight,
            1,
            10000
        );
        this.camera.position.x = 1000 * Math.cos(this.theta);
        this.camera.position.z = 1000 * Math.sin(this.theta);

        this.cameraTarget = new THREE.Vector3(0, 0, 0);

        this.geometry = new THREE.CubeGeometry(10, 10, 10, 1, 1, 1);
    }

    initMeshList(num) {
        if (this.meshList) {
            const length = this.meshList.length;
            for (let i = 0; i < length; i++) {
                const mesh = this.meshList[i];
                this.scene.remove(mesh);
                mesh.material.dispose();
            }
        }

        this.meshList = [];

        for (let i = 0; i < num; i++) {
            const material = new THREE.MeshBasicMaterial({
                color: `hsl(${Math.floor(360 * Math.random())}, 70%, 40%)`,
                blending: THREE.AdditiveBlending
            });
            const mesh = new THREE.Mesh(this.geometry, material);
            mesh.position.x = 900 * (Math.random() - 0.5);
            mesh.position.y = 900 * (Math.random() - 0.5);
            mesh.position.z = 900 * (Math.random() - 0.5);
            this.meshList.push(mesh);
            this.scene.add(mesh);
        }
    }

    update(value) {
        this.initMeshList(value);
    }

    render() {
        this.camera.lookAt(this.cameraTarget);
        this.renderer.render(this.scene, this.camera);
    }
}
MyRenderer.jsは、今までメインスレッドでthree.jsを実装していたコード(Scene、Renderer、Camera、Meshの生成など)をクラスとして実装したもの。three.jsではおなじみの手順。OffscreenCanvasだからと言って特殊な書き方をする必要はない。1つだけ特殊なことがあり(どっちやねんw)、
this.canvas.style = { width: 0, height: 0 };
この処理を書いてあげないと、その少し下に書いている
this.renderer.setSize(this.stageWidth, this.stageHeight);
このコードでエラーが発生する。どうもsetSizeの中でcanvasのstyleにアクセスしているらしいが、デフォルトではそれが定義されていないので、明示的に定義しないとエラーになる様子。

図4:オブジェクト1000個描画した画面
一応表示はできた。
Windowリサイズ
このままだとWindowのリサイズに対応していないので、普通にthree.jsを実装する際のWindowリサイズ処理を入れてみる。
class Main {
    constructor() {
        this.renderer = null;
        this.worker = null;
        this.resizeFlag = 0;
        this.init();
    }

    init() {
        const canvas = document.getElementById("myCanvas");
        const offscreenCanvas = canvas.transferControlToOffscreen();
        offscreenCanvas.width = window.innerWidth;
        offscreenCanvas.height = window.innerHeight;
        this.worker = new Worker("js/WorkerMain.js");
        this.worker.postMessage({ action: "init", canvas: offscreenCanvas }, [
            offscreenCanvas
        ]);

        window.addEventListener("resize", this.windowResize.bind(this));
        this.windowResize();
    }

    windowResize(event) {
        if ( this.resizeFlag ) return ;
        this.resizeFlag = setTimeout(function(){
            this.resizeFlag = 0;
            var canvasElm = document.getElementById("myCanvas");

            canvasElm.style.width = window.innerWidth + "px";
            canvasElm.style.height = window.innerHeight + "px";
            this.worker.postMessage({
                action: "windowResize",
                width: window.innerWidth,
                height: window.innerHeight
            });
        }.bind(this),500);
    }
}

new Main();
init処理でwindowのresizeイベントを追加、イベントハンドラの中でthisを使いたかったので、bind(this)を行っている。
リサイズイベントの頻度を減らしたかったので、以下のページを参考に、setTimeoutで対応した。
リサイズイベントの頻度を減らす方法
importScripts("../libs/three.js/three.min.js");
importScripts("MyRenderer.js");

class WorkerMain {
    constructor(canvas) {
        this.renderer = new MyRenderer(canvas);
        this.render();
    }

    update(value) {
        this.renderer.update(value);
    }

    render() {
        this.renderer.render();
        requestAnimationFrame(() => this.render());
    }

    windowResize(width, height) {
        this.renderer.windowResize(width, height);
    }
}

let workerMain = null;
onmessage = event => {
    switch (event.data.action) {
        case "init":
            workerMain = new WorkerMain(event.data.canvas);
            workerMain.update(1000);
            break;
        case "windowResize":
            workerMain.windowResize(event.data.width, event.data.height);
            break;
        default:
            break;
    }
};
Workerなので、onmessageでwindowResizeであるイベントを受け取り、workerMainのリサイズメソッドを呼び出している。リサイズメソッドではrendererのリサイズメソッドを呼び出している。
class MyRenderer {
    constructor(canvas) {
        this.canvas = canvas;
        this.stageWidth = this.canvas.width;
        this.stageHeight = this.canvas.height;

        this.renderer = null;
        this.camera = null;
        this.scene = null;
        this.meshList = [];
        this.geometry = null;
        this.theta = 0.0;
        this.phi = 0.0;
        this.cameraTarget = null;

        if (!this.canvas.style) {
            this.canvas.style = { width: 0, height: 0 };
        }

        this.renderer = new THREE.WebGLRenderer({
            canvas: this.canvas
        });
        this.renderer.setSize(this.stageWidth, this.stageHeight);
        this.scene = new THREE.Scene();
        this.camera = new THREE.PerspectiveCamera(
            45,
            this.stageWidth / this.stageHeight,
            1,
            10000
        );
        this.camera.position.x = 1000 * Math.cos(this.theta);
        this.camera.position.z = 1000 * Math.sin(this.theta);

        this.cameraTarget = new THREE.Vector3(0, 0, 0);

        this.geometry = new THREE.CubeGeometry(10, 10, 10, 1, 1, 1);
    }

    initMeshList(num) {
        if (this.meshList) {
            const length = this.meshList.length;
            for (let i = 0; i < length; i++) {
                const mesh = this.meshList[i];
                this.scene.remove(mesh);
                mesh.material.dispose();
            }
        }

        this.meshList = [];

        for (let i = 0; i < num; i++) {
            const material = new THREE.MeshBasicMaterial({
                color: `hsl(${Math.floor(360 * Math.random())}, 70%, 40%)`,
                blending: THREE.AdditiveBlending
            });
            const mesh = new THREE.Mesh(this.geometry, material);
            mesh.position.x = 900 * (Math.random() - 0.5);
            mesh.position.y = 900 * (Math.random() - 0.5);
            mesh.position.z = 900 * (Math.random() - 0.5);
            this.meshList.push(mesh);
            this.scene.add(mesh);
        }
    }

    update(value) {
        this.initMeshList(value);
    }

    render() {
        this.camera.lookAt(this.cameraTarget);
        this.renderer.render(this.scene, this.camera);
    }

    windowResize(width, height) {
        this.renderer.setSize(width, height);
        this.camera.aspect = width / height;
        this.camera.updateProjectionMatrix();
    }
}
rendererでは、three.jsおなじみのrendererのsetSizeと、cameraのアスペクト比を変更する。これでWindowをリサイズした際にもちゃんと追随してcanvasのサイズ変更をしてくれるようになった。
ここで**1度目の軽い絶望**w
お気づきだとは思うが、Workerなので、メインスレッドで発生したイベントを伝達するには、postMessageしなければならず、言わば中継メソッドを定義しないといけない。図3で私が採用したモジュールの関連図であれば、Main.js、WorkerMain.js、MyRenderer.jsで同じメソッドを定義する必要がある...。これは冗長すぎるw
OrbitControls
**2度目の軽い絶望**はすぐにやってきた。Windowリサイズのあたりから薄々気づいてはいたのよw
three.jsの魅力の1つは、OrbitControlsが提供されていること。画面に描画した3Dオブジェクトをマウスで簡単にグリグリできるライブラリ。これは実装せねばと思い、MyRenderer.jsにOrbitControlsを埋め込んでみたところ、
new THREE.OrbitControls( camera );
ここで早くもエラーが発生。「document is not defined」と。な、なるほど...いや、ごめんなさい。あなたがWorkerなのをすっかり忘れていましたわ。そりゃマウスイベント拾えないよねぇ。
えー。ってことは、three.jsで提供されているDOMにアクセスする系のライブラリは、OffscreenCanvasでは一切使えないという事?これは**軽くはない絶望**かもしれない。
何か回避できる手段は無いかと、まず、メインスレッドでScene、Renderer、Cameraを定義して、それをOffscreenCanvasに引き継ごうと考えてみた。しかし、メインスレッドでcanvasにSceneを作成した後にtransferControlToOffscreen()を実行すると、それはできないよと怒られる...。だめだ。どうしようもない...。
とは言え、グリグリはやりたいので、OrbitControlsもどきを実装してみた。
class Main {
    constructor() {
        this.renderer = null;
        this.worker = null;
        this.resizeFlag = 0;
        this.mouseControl = false;
        this.mouseX = 0;
        this.mouseY = 0;
        this.init();
    }

    init() {
        const canvas = document.getElementById("myCanvas");
        const offscreenCanvas = canvas.transferControlToOffscreen();
        offscreenCanvas.width = window.innerWidth;
        offscreenCanvas.height = window.innerHeight;
        this.worker = new Worker("js/WorkerMain.js");
        this.worker.postMessage({ action: "init", canvas: offscreenCanvas }, [
            offscreenCanvas
        ]);

        window.addEventListener("resize", this.windowResize.bind(this));
        window.addEventListener("mousedown", this.mouseDown.bind(this));
        window.addEventListener("mouseup", this.mouseUp.bind(this));
        window.addEventListener("mousemove", this.mouseMove.bind(this));

        this.windowResize();
    }

    windowResize(event) {
        if ( this.resizeFlag ) return ;
        this.resizeFlag = setTimeout(function(){
            this.resizeFlag = 0;
            var canvasElm = document.getElementById("myCanvas");

            canvasElm.style.width = window.innerWidth + "px";
            canvasElm.style.height = window.innerHeight + "px";
            this.worker.postMessage({
                action: "windowResize",
                width: window.innerWidth,
                height: window.innerHeight
            });
        }.bind(this),500);
    }

    mouseDown(event) {
        this.mouseControl = true;
        this.mouseX = event.screenX;
        this.mouseY = event.screenY;
    }

    mouseUp(event) {
        this.mouseControl = false;
    }

    mouseMove(event) {
        if (this.mouseControl) {
            const x = event.screenX;
            const y = event.screenY;
            this.worker.postMessage({
                action: "mouseMove",
                x: x - this.mouseX,
                y: y - this.mouseY
            });
            this.mouseX = x;
            this.mouseY = y;
        }
    }
}

new Main();
Windowリサイズの際にやったことと同じく、マウスのドラッグをrendererに通知してあげる。mouseDown、mouseUpまでrendererに通知する必要はないので、mouseMoveだけをpostMessageするようにしている。
importScripts("../libs/three.js/three.min.js");
importScripts("MyRenderer.js");

class WorkerMain {
    constructor(canvas) {
        this.renderer = new MyRenderer(canvas);
        this.render();
    }

    update(value) {
        this.renderer.update(value);
    }

    render() {
        this.renderer.render();
        requestAnimationFrame(() => this.render());
    }

    windowResize(width, height) {
        this.renderer.windowResize(width, height);
    }

    mouseMove(x, y) {
        this.renderer.mouseMove(x, y);
    }
}

let workerMain = null;
onmessage = event => {
    switch (event.data.action) {
        case "init":
            workerMain = new WorkerMain(event.data.canvas);
            workerMain.update(1000);
            break;
        case "windowResize":
            workerMain.windowResize(event.data.width, event.data.height);
            break;
        case "mouseMove":
            workerMain.mouseMove(event.data.x, event.data.y);
            break;
        default:
            break;
    }
};
WorkerMainは中継をするだけ。
class MyRenderer {
    constructor(canvas) {
        this.canvas = canvas;
        this.stageWidth = this.canvas.width;
        this.stageHeight = this.canvas.height;

        this.renderer = null;
        this.camera = null;
        this.scene = null;
        this.meshList = [];
        this.geometry = null;
        this.theta = 0.0;
        this.phi = 0.0;
        this.cameraTarget = null;

        this.canvas.style = { width: 0, height: 0 };

        this.renderer = new THREE.WebGLRenderer({
            canvas: this.canvas
        });
        this.renderer.setSize(this.stageWidth, this.stageHeight);
        this.scene = new THREE.Scene();
        this.camera = new THREE.PerspectiveCamera(
            45,
            this.stageWidth / this.stageHeight,
            1,
            10000
        );
        this.camera.position.x = 1000 * Math.cos(this.theta);
        this.camera.position.z = 1000 * Math.sin(this.theta);

        this.cameraTarget = new THREE.Vector3(0, 0, 0);

        this.geometry = new THREE.CubeGeometry(10, 10, 10, 1, 1, 1);
    }

    initMeshList(num) {
        if (this.meshList) {
            const length = this.meshList.length;
            for (let i = 0; i < length; i++) {
                const mesh = this.meshList[i];
                this.scene.remove(mesh);
                mesh.material.dispose();
            }
        }

        this.meshList = [];

        for (let i = 0; i < num; i++) {
            const material = new THREE.MeshBasicMaterial({
                color: `hsl(${Math.floor(360 * Math.random())}, 70%, 40%)`,
                blending: THREE.AdditiveBlending
            });
            const mesh = new THREE.Mesh(this.geometry, material);
            mesh.position.x = 900 * (Math.random() - 0.5);
            mesh.position.y = 900 * (Math.random() - 0.5);
            mesh.position.z = 900 * (Math.random() - 0.5);
            this.meshList.push(mesh);
            this.scene.add(mesh);
        }
    }

    update(value) {
        this.initMeshList(value);
    }

    render() {
        this.camera.lookAt(this.cameraTarget);
        this.renderer.render(this.scene, this.camera);
    }

    windowResize(width, height) {
        this.renderer.setSize(width, height);
        this.camera.aspect = width / height;
        this.camera.updateProjectionMatrix();
    }

    mouseMove(x, y) {
        this.theta += 0.005 * x;
        this.phi += 0.005 * y;
        this.camera.position.x = 1000 * Math.cos(this.theta);
        this.camera.position.z = 1000 * Math.sin(this.theta);
        this.camera.position.y = 1000 * Math.sin(this.phi);
    }
}
完全にOrbitControlsを模倣することはできなかったが、これで一応グリグリはできる。
まとめ
OffscreenCanvasを用いて、メインスレッドに影響を与えずにthree.jsを利用することは実装できた。
しかし、three.js本家サイトのexamples/webgl_worker_offscreencanvasにも「This is an experimental feature!」と書かれているように、three.jsにとってもOffscreenCanvasはまだ未知の領域。
今までの実装を捨ててでもOffscreenCanvasを選択することは可能ではあるが、色々な恩恵を受けられない(自身で実装しなければならない)可能性はかなり高い。冒頭にも書いたが、メインスレッドに影響を与えないということは、それを補って余りある魅力がある。
選択肢としては、three.jsがOffscreenCanvasを完全サポート(きっとするでしょう)するまで待つか、絶望にめげずにOffscreenCanvasを突き進むか...。
茨の道かもしれないけども私は突き進んでみようかと思う。
FUJITSU Advent Calendar について
非公式だけど、FUJITSU Advent Calendarが始まって、はや3年。tnaotoさんのブログでは2015年からやってると書いてあるけど、2015はローカルだったのかな?
別に強制されているわけではないけども、やり続けるのであれば、どんなにくだらない内容だとしても、書き続けていきたいなと勝手に思っている。今まで書いたのは、
2016年:Gear S2に自作Tizenアプリをインストールする方法
2017年:IFTTTとBeebotteを使ってGoogleHomeからRaspberryPiを操作する
2018年:OffscreenCanvasでthree.jsを利用する
まぁ社外秘情報、関係者外秘情報は書けないので仕方ないのだけども、まったくFUJITSU色なくw、むしろ他社ばかり完全趣味の世界でしかない。
でも、2017年の記事は色々なところからリンクされ、リンク先では「わかりやすい」と書かれたりしていて、こんな自分でも誰かの役に立っているんだなと少し嬉しかった。
給料をもらっている以上は何らかの形で会社に貢献し、そしてその延長で、できる限り社会にも貢献できる存在でありたいなぁと思う。
このFUJITSU Advent Calendarをよく思ってない社内の人もいるでしょう。書きたいのに制約があって書けない人もいるでしょう。そもそも知らない人の方が多いでしょう。
それでも踏み出さないと前には進めない。こういう前向きな活動やってる人たちを尊敬します。
私はそういう人たちが作った"場"をしれっと使わせていただくのであったw
