Redux&Reduxエッセンシャル
まずは,reduce,reducer,state,actionの整理
Reduce,Reducer,State,Actionとは?
reduce -直訳-> 変える
reducer -直訳-> 変化を与えるもの
state -直訳-> 状態
action -直訳-> 実行
定義
Reduceとは,一回あたりの関数適用によって行われる値の変化
Reducerとは,適用される関数の事
Stateとは,reduceされる前の初期状態
Actionとは,stateをどのように変更させるか
例) 関数 F(aを2倍にする処理を行う(Action))
F(2) ->F(a) -Reduce->4
F(2)がState,
F(a)がReducerです.
Redux実践
インポート
import { createStore } from 'redux'
簡単な例
Reducerでは,Actionによって,switch文などでStateに変更を加える
function counter(state = 0, action) {
  switch (action.type) {
  case 'INCREMENT':
    return state + 1
  case 'DECREMENT':
    return state - 1
  default:
    return state
  }
}
掲示板を作ろう
目標
JQueryで言うと,
<html>
<form>
<input type="text" id="hoge" />
<button onclick="push()">追加</button>
</form>
<ul id="list"></ul>
</html>

<script>
function push(){
let sentence = $("#hoge").val() ;
$("#list").append("<li>"+sentence+"</li>") ;
}
</script>
こんなものをReact&Reduxの基礎を踏まえながら説明.
install
React
npmはインストール済みの環境であることを前提とします.
※してない方は $brew install npm
$ npm install -g create-react-app

このようにreactをインストール
プロジェクトの作成
$ create-react-app todo
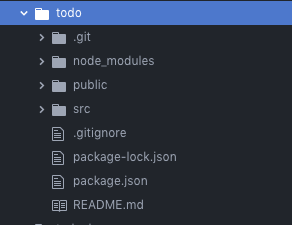
こんな感じのフォルダが出来ると思います.
$ cd todo
todoに移動しましょう.
Redux
$ npm install --save redux react-redux redux-logger
todoフォルダにReduxのインストール

これで環境構築は完了.
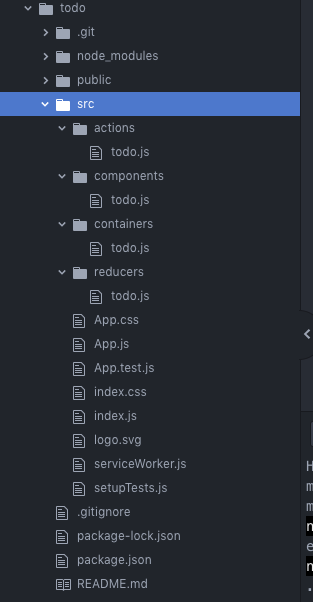
ディレクトリの作成
actions
components
containers
reducers
というフォルダをsrc下に配置
各フォルダ内にtodo.jsを作成しましょう.
また,src下にcreatestore.jsというファイルも作ってください.
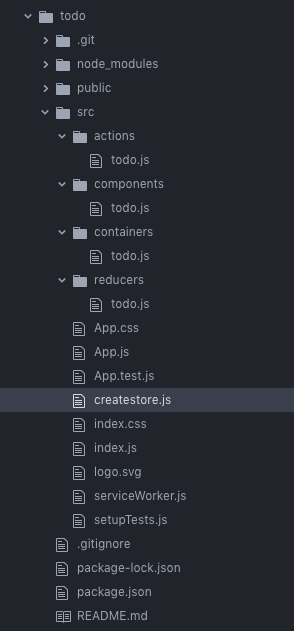
createstore.jsに関数を作ります
import { createStore as reduxCreateStore, applyMiddleware, combineReducers } from "redux";
import logger from "redux-logger";
import { todoReducer } from "./reducers/todo";

export default function createStore() {
  const store = reduxCreateStore(
    combineReducers({
      todo: todoReducer,
    }),
    applyMiddleware(
      logger,
    )
  );

  return store;
}
ReactにReduxを適用
index.jsを変更します.
import React from 'react';
import ReactDOM from 'react-dom';
import './index.css';
import App from './App';
import * as serviceWorker from './serviceWorker';

import { Provider } from 'react-redux';
import createStore from './createstore';

const store = createStore() ;

ReactDOM.render(
  <Provider store={store}>
    <App />
  </Provider>,
  document.getElementById('root')
);


// If you want your app to work offline and load faster, you can change
// unregister() to register() below. Note this comes with some pitfalls.
// Learn more about service workers: https://bit.ly/CRA-PWA
serviceWorker.unregister();
redux,createstoreをインポートして,Providerにstoreをセットしてるだけです.
serviceWorker.unregister()とはオフラインでのキャッシュを無効にしてます.
これはcreate-react-appをすると標準でついてます.今は無視してOKです.
Component定義
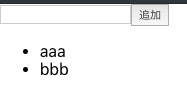
components/todo.js
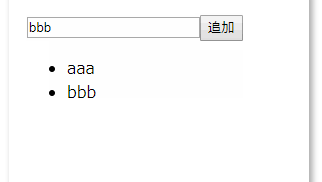
todo追加用のテキストボックスとボタンを書き入れます.
import React from 'react';

export default class Todo extends React.Component{
  render(){
    return(
      <div>
        <input type="text" />
        <button>追加</button><br />
        <ul>
          <li>aaa</li>
          <li>bbb</li>
        </ul>
      </div>
    );
  }
}
Action定義
actions/todo.js
export const addTodo = (todo) => {
  return {
    type: 'ADD_TODO',
    payload: { todo: todo }
  };
}
Actionは、Reducerに指令を出します。
type プロパティを必ず持ち、これが処理のキーになります。
payload プロパティは、処理に使うパラメータで、この例では追加するTODOを持たせています
Reducer定義
reducer.todo.js
const initialState = {
  todoList: []
}

export const todoReducer = (state = initialState, action) => {
  switch (action.type) {
    case 'ADD_TODO':
      // 新しく追加するTODO
      const todo = action.payload.todo;
      // stateを複製して追加
      const newState = Object.assign({}, state);
      newState.todoList.push(todo);
      return newState;
    default:
      return state;
  }
};
state は書き換えるのではなく新たなオブジェクトとするのがredux.
単純に引数のstateに追加するのではなく、
Object.assignメソッドで複製した新たな state に対して追加し、
それを戻り値とします。
Componentの定義
components/todo.js
import { connect } from 'react-redux';
import * as actions from '../actions/todo';
import Todo from '../components/todo';

const mapStateToProps = state => {
  return {
    todo: state.todo,
  }
}

const mapDispatchToProps = dispatch => {
  return {
    addTodo: (todo) => dispatch(actions.addTodo(todo)),
  }
}

export default connect(mapStateToProps, mapDispatchToProps)(Todo)
mapStateToProps関数
使用する state を切り出して、propsで参照できるようにするための関数
mapDispatchToProps関数
dispatchするための関数をpropsにマッピングするための関数
それぞれ定義したものを、connect関数でコンポーネントに接続し、exportします。こうすることで、コンポーネントがreduxによる状態管理を意識せず、stateやdispatchを参照、実行できるようになります。
コンテナの使い方は、コンポーネントをimportしている箇所をコンテナに切り替えるのみ。
app.js
import React, { Component } from 'react';
import './App.css';
//import Todo from './components/todo';
import Todo from './containers/todo';
Componentの書き換え
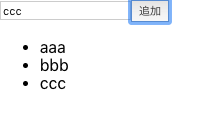
components/todo.js
import React from 'react';

export default class Todo extends React.Component {
  state = {
    todo: ''
  }

  render() {
    console.log(this.props);

    // StoreのTodoからリストを生成
    const list = this.props.todo.todoList.map((todo, index) => <li key={index}>{todo}</li>)

    return (
      <div>
        <input type="text" onChange={elm => this.setState({ todo: elm.target.value })} />
        <button onClick={() => this.props.addTodo(this.state.todo)}>追加</button><br />
        <ul>
          {list}
        </ul>
      </div>
    );
  }
}
冗長なコードになればなるほどreduxの恩恵が大きいです.
変更点がすぐに分かるので,チームでの開発が従来よりも簡単.