完成したサービス
概要
ユーザーはブラウザ上で麻雀の手牌を構築する。
作成された手牌を登録するとURLが発行される。
発行されたURLをTwitter等で共有すると、作成した手牌の画像がOGP画像として表示される。
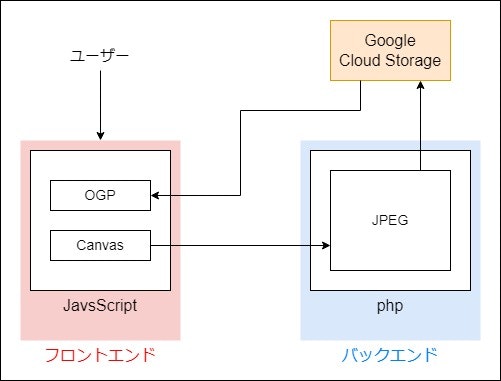
処理
大まかな図
処理の流れ
ユーザーの操作によりCanvas描画。
→Canvasをphpファイルに送信し、JPEG化。
→JPEGをCloud Storageに保存。
→一意なIDを発行し、JPEGのファイル名と共にDBに保存。
→IDをクエリパラメータとして持つアクセスに対してCloud Storageの画像をOGP画像として返却。
コード
Canvasをphpへ送信
canvas.js
const canvas = document.getElementById('canvas');
// 適当な描画処理
const dataURL = canvas.toDataURL();
fetch('save.php',{
  method: 'POST',
  body: JSON.stringify({
    canvas: dataURL,
  })
}).then(response=>{
  if(!response.ok) throw new Error();
  return response.text();
}).then(text=>{
  //成功時の処理
}).catch(error=>{
  //失敗時の処理
});
CanvasをJPEG化
save.php
$input = file_get_contents('php://input');
$json = json_decode($input, true);
$data_canvas = $json['canvas'];
$str_canvas64 = preg_replace('/^data:image\/png;base64,/i', '', $data_canvas);
$str_canvas = base64_decode($str_canvas64);
$canvas = imagecreatefromstring($str_canvas);
$image = image_data($canvas);

function image_data($gd){
  ob_start();
  imagejpeg($gd,null,75);
  return(ob_get_clean());
}
JPEG化した画像ファイルをCloud Storageへアップロード
save.php
require __DIR__.'/vendor/autoload.php';
use Google\Cloud\Storage\StorageClient;

const key_path = 'path/to/keyFile.json';
const project_id = 'PROJECT_ID';
const bucket_name = 'BUCKET_NAME';
const secretKEY = 'SECRET_KEY';

$input = file_get_contents('php://input');
$json = json_decode($input, true);
$data_canvas = $json['canvas'];
$str_canvas64 = preg_replace('/^data:image\/png;base64,/i', '', $data_canvas);
$str_canvas = base64_decode($str_canvas64);
$canvas = imagecreatefromstring($str_canvas);
$image = image_data($canvas);
$filename = 'FILE_NAME.jpg';

try{
  $storage = new StorageClient([
    'keyFilePath' => key_path
  ]);
  $bucket = $storage->bucket(bucket_name);
  $bucket->upload($image, [
    'name' => $filename
  ]);
}catch (PDOException $e) {

}

function image_data($gd){
  ob_start();
  imagejpeg($gd,null,75);
  return(ob_get_clean());
}
Cloud Storage内のファイルへアクセス
index.php
<?php
  $filename = 'FILE_NAME.jpg';
  $src_img = 'https://storage.googleapis.com/BUCKET_NAME/'.$filename;
?>

<head>
  <!-- ~~ -->
  <meta property="og:image" content="<?php echo $src_img ?>">
  <!-- ~~ -->
</head>
<!-- ~~ -->
余談
当初は全てfirebaseで完結させようと考えていたが、Cloud Functionsの設定がどうにも上手く行かずに頓挫。
ファイル保管の部分だけCloud Storageに任せ、その他はレンタルサーバーで賄うこととなった。
追記(JavaScriptだけでアップロードする方法)
canvasからそのままCloud Storageへアップロードすることが可能だった。
省略
npm install ~
foo.js
import firebase from 'firebase/compat/app';
import { getStorage, uploadBytes, ref } from "firebase/storage";

const firebaseConfig = {
  //apikey等色々
};
firebase.initializeApp(firebaseConfig);

saveCanvas();

async function saveCanvas(){
  const canvas = document.createElement('canvas');
  // 描画処理なんやかんや
  try{
    const blob = await new Promise(resolve=>canvas.toBlob(resolve,'image/webp',.75);
    const storage = getStorage();
    const storageRef = ref(storage, 'fileName.webp');
    await uploadBytes(storageRef, blob);
  }catch{
    //エラー時処理
  }
}
