先週やったらハマった気がしたのですが、今日再挑戦したらうまくいきました。。
どこでハマったのかもわからないのですが、またハマると嫌なので、メモを残しておきます。
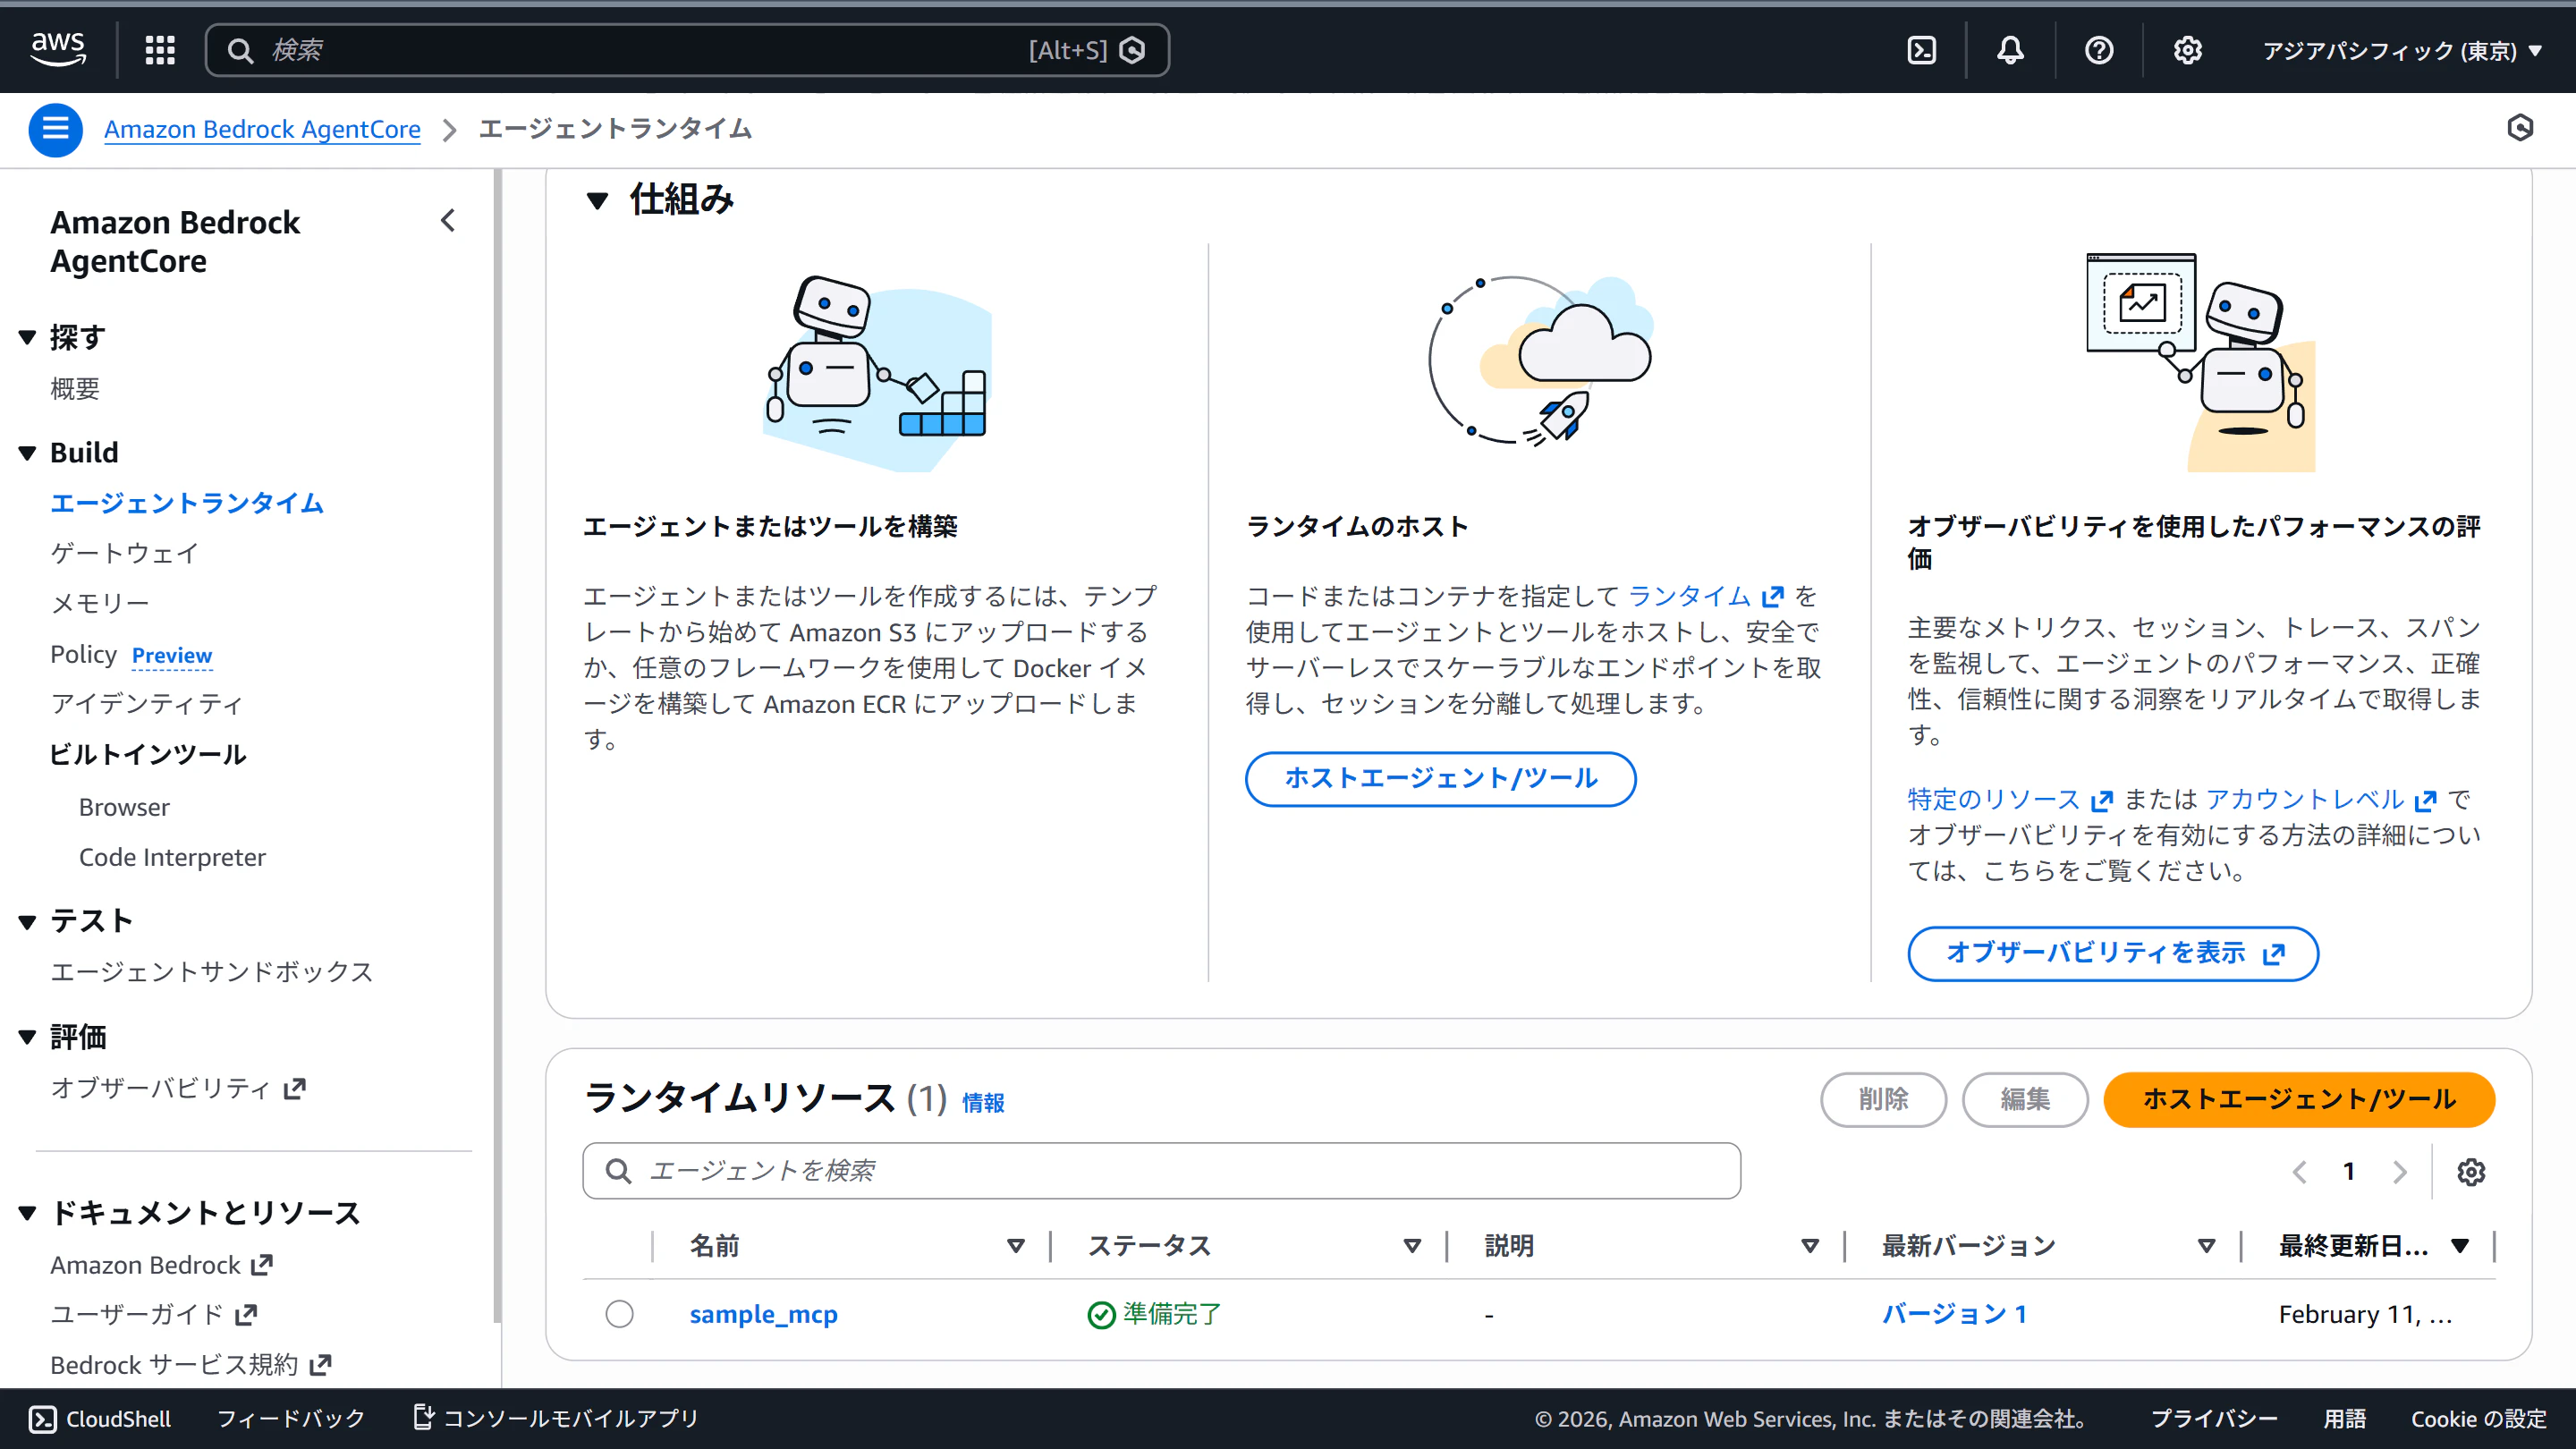
AgentCore RuntimeにMCPサーバーをデプロイ
公式ドキュメントを参考にデプロイします。
-
Pythonプロジェクトを作成
uv init agentcore-mcp --python 3.13
cd agentcore-mcp/
ファイルが作成されます。
tree -a. ├── main.py ├── pyproject.toml ├── .python-version └── README.md -
ライブラリーをインストール
uv add mcp uv add --dev bedrock-agentcore-starter-toolkit -
main.pyにコーディング公式ドキュメントの内容をそのままコピペしました。
main.py
# my_mcp_server.py from mcp.server.fastmcp import FastMCP from starlette.responses import JSONResponse mcp = FastMCP(host="0.0.0.0", stateless_http=True) @mcp.tool() def add_numbers(a: int, b: int) -> int: """Add two numbers together""" return a + b @mcp.tool() def multiply_numbers(a: int, b: int) -> int: """Multiply two numbers together""" return a * b @mcp.tool() def greet_user(name: str) -> str: """Greet a user by name""" return f"Hello, {name}! Nice to meet you." if __name__ == "__main__": mcp.run(transport="streamable-http") -
AgentCore Runtimeにデプロイ
agentcore configureを実行します。uv run agentcore configure --entrypoint main.py --protocol mcp --disable-memoryウィザードが始まります。
Configuring Bedrock AgentCore...
✓ Using file: main.py
エージェントの名前を入力します。
-は使えなかったはずなので注意しましょう。🏷️ Inferred agent name: main Press Enter to use this name, or type a different one (alphanumeric without '-') Agent name [main]: sample_mcp ✓ Using agent name: sample_mcppyproject.tomlが検出されるのでそのままエンター
🔍 Detected dependency file: pyproject.toml
Press Enter to use this file, or type a different path (use Tab for autocomplete):
Path or Press Enter to use detected dependency file: pyproject.toml
✓ Using requirements file: pyproject.toml
ダイレクトコードデプロイを選択します。
🚀 Deployment Configuration
Select deployment type:
  1. Direct Code Deploy (recommended) - Python only, no Docker required
  2. Container - For custom runtimes or complex dependencies
Choice [1]: 1
Pythonのバージョンを選択します。
Select Python runtime version:
  1. PYTHON_3_10
  2. PYTHON_3_11
  3. PYTHON_3_12
  4. PYTHON_3_13
Choice [4]: 4
✓ Deployment type: Direct Code Deploy (python.3.13)
実行ロールを自動作成します。何も入力せずエンターを入力します。
🔐 Execution Role
Press Enter to auto-create execution role, or provide execution role ARN/name to use existing
Execution role ARN/name (or press Enter to auto-create):
✓ Will auto-create execution role
ダイレクトコードデプロイに使うS3バケットを作成します。これも自動作成でいいのでエンターを入力します。
🏗️  S3 Bucket
Press Enter to auto-create S3 bucket, or provide S3 URI/path to use existing
S3 URI/path (or press Enter to auto-create):
✓ Will auto-create S3 bucket
認証は、あとでCognitoに変えるのですが、この時点ではIAM認証のまま進めます。
🔐 Authorization Configuration
By default, Bedrock AgentCore uses IAM authorization.
Configure OAuth authorizer instead? (yes/no) [no]:
✓ Using default IAM authorization
許可リストは特に指定しないので未入力でエンターです。
🔒 Request Header Allowlist Configure which request headers are allowed to pass through to your agent. Common headers: Authorization, X-Amzn-Bedrock-AgentCore-Runtime-Custom-* Configure request header allowlist? (yes/no) [no]: ✓ Using default request header configuration.bedrock_agentcoreディレクトリと.bedrock_agentcore.yamlが作成されます。デプロイします。
uv run agentcore deployデプロイできました!
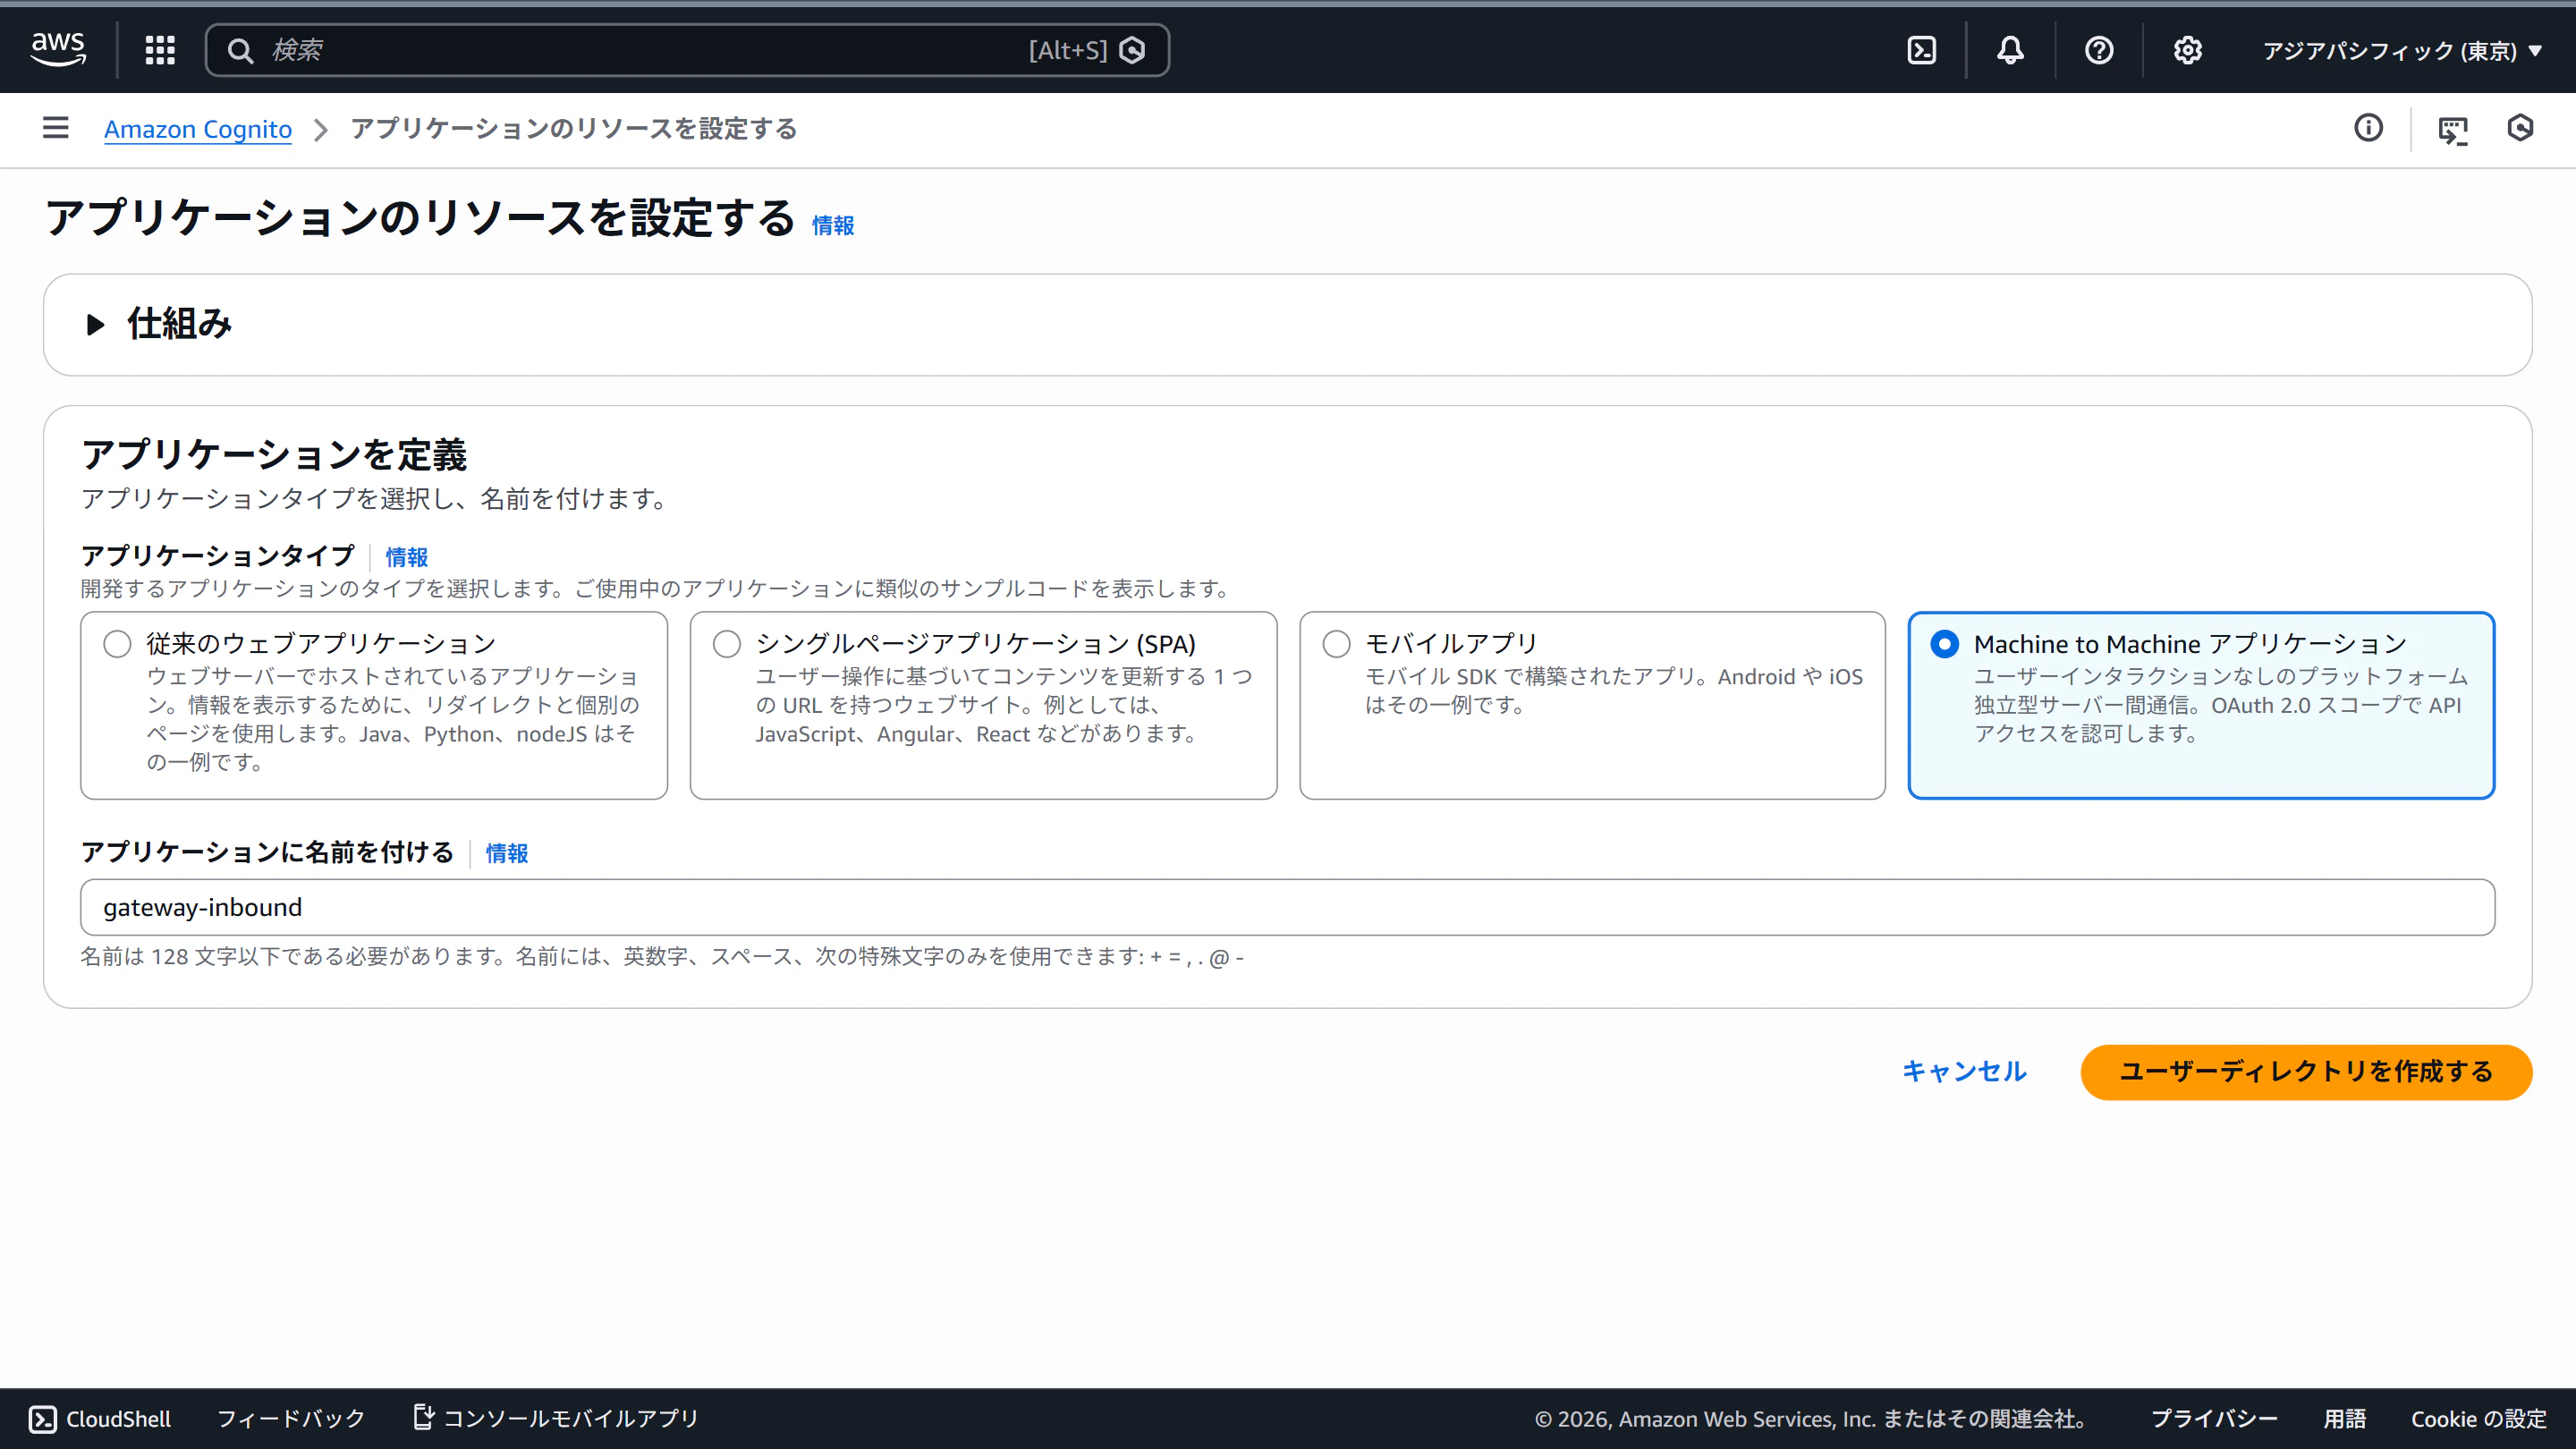
Cognito User Poolを作成
AgentCore Runtimeのインバウンドとして使うCognitoを作ります。
アプリケーションタイプは「Machine to Machine アプリケーション」を選びます。
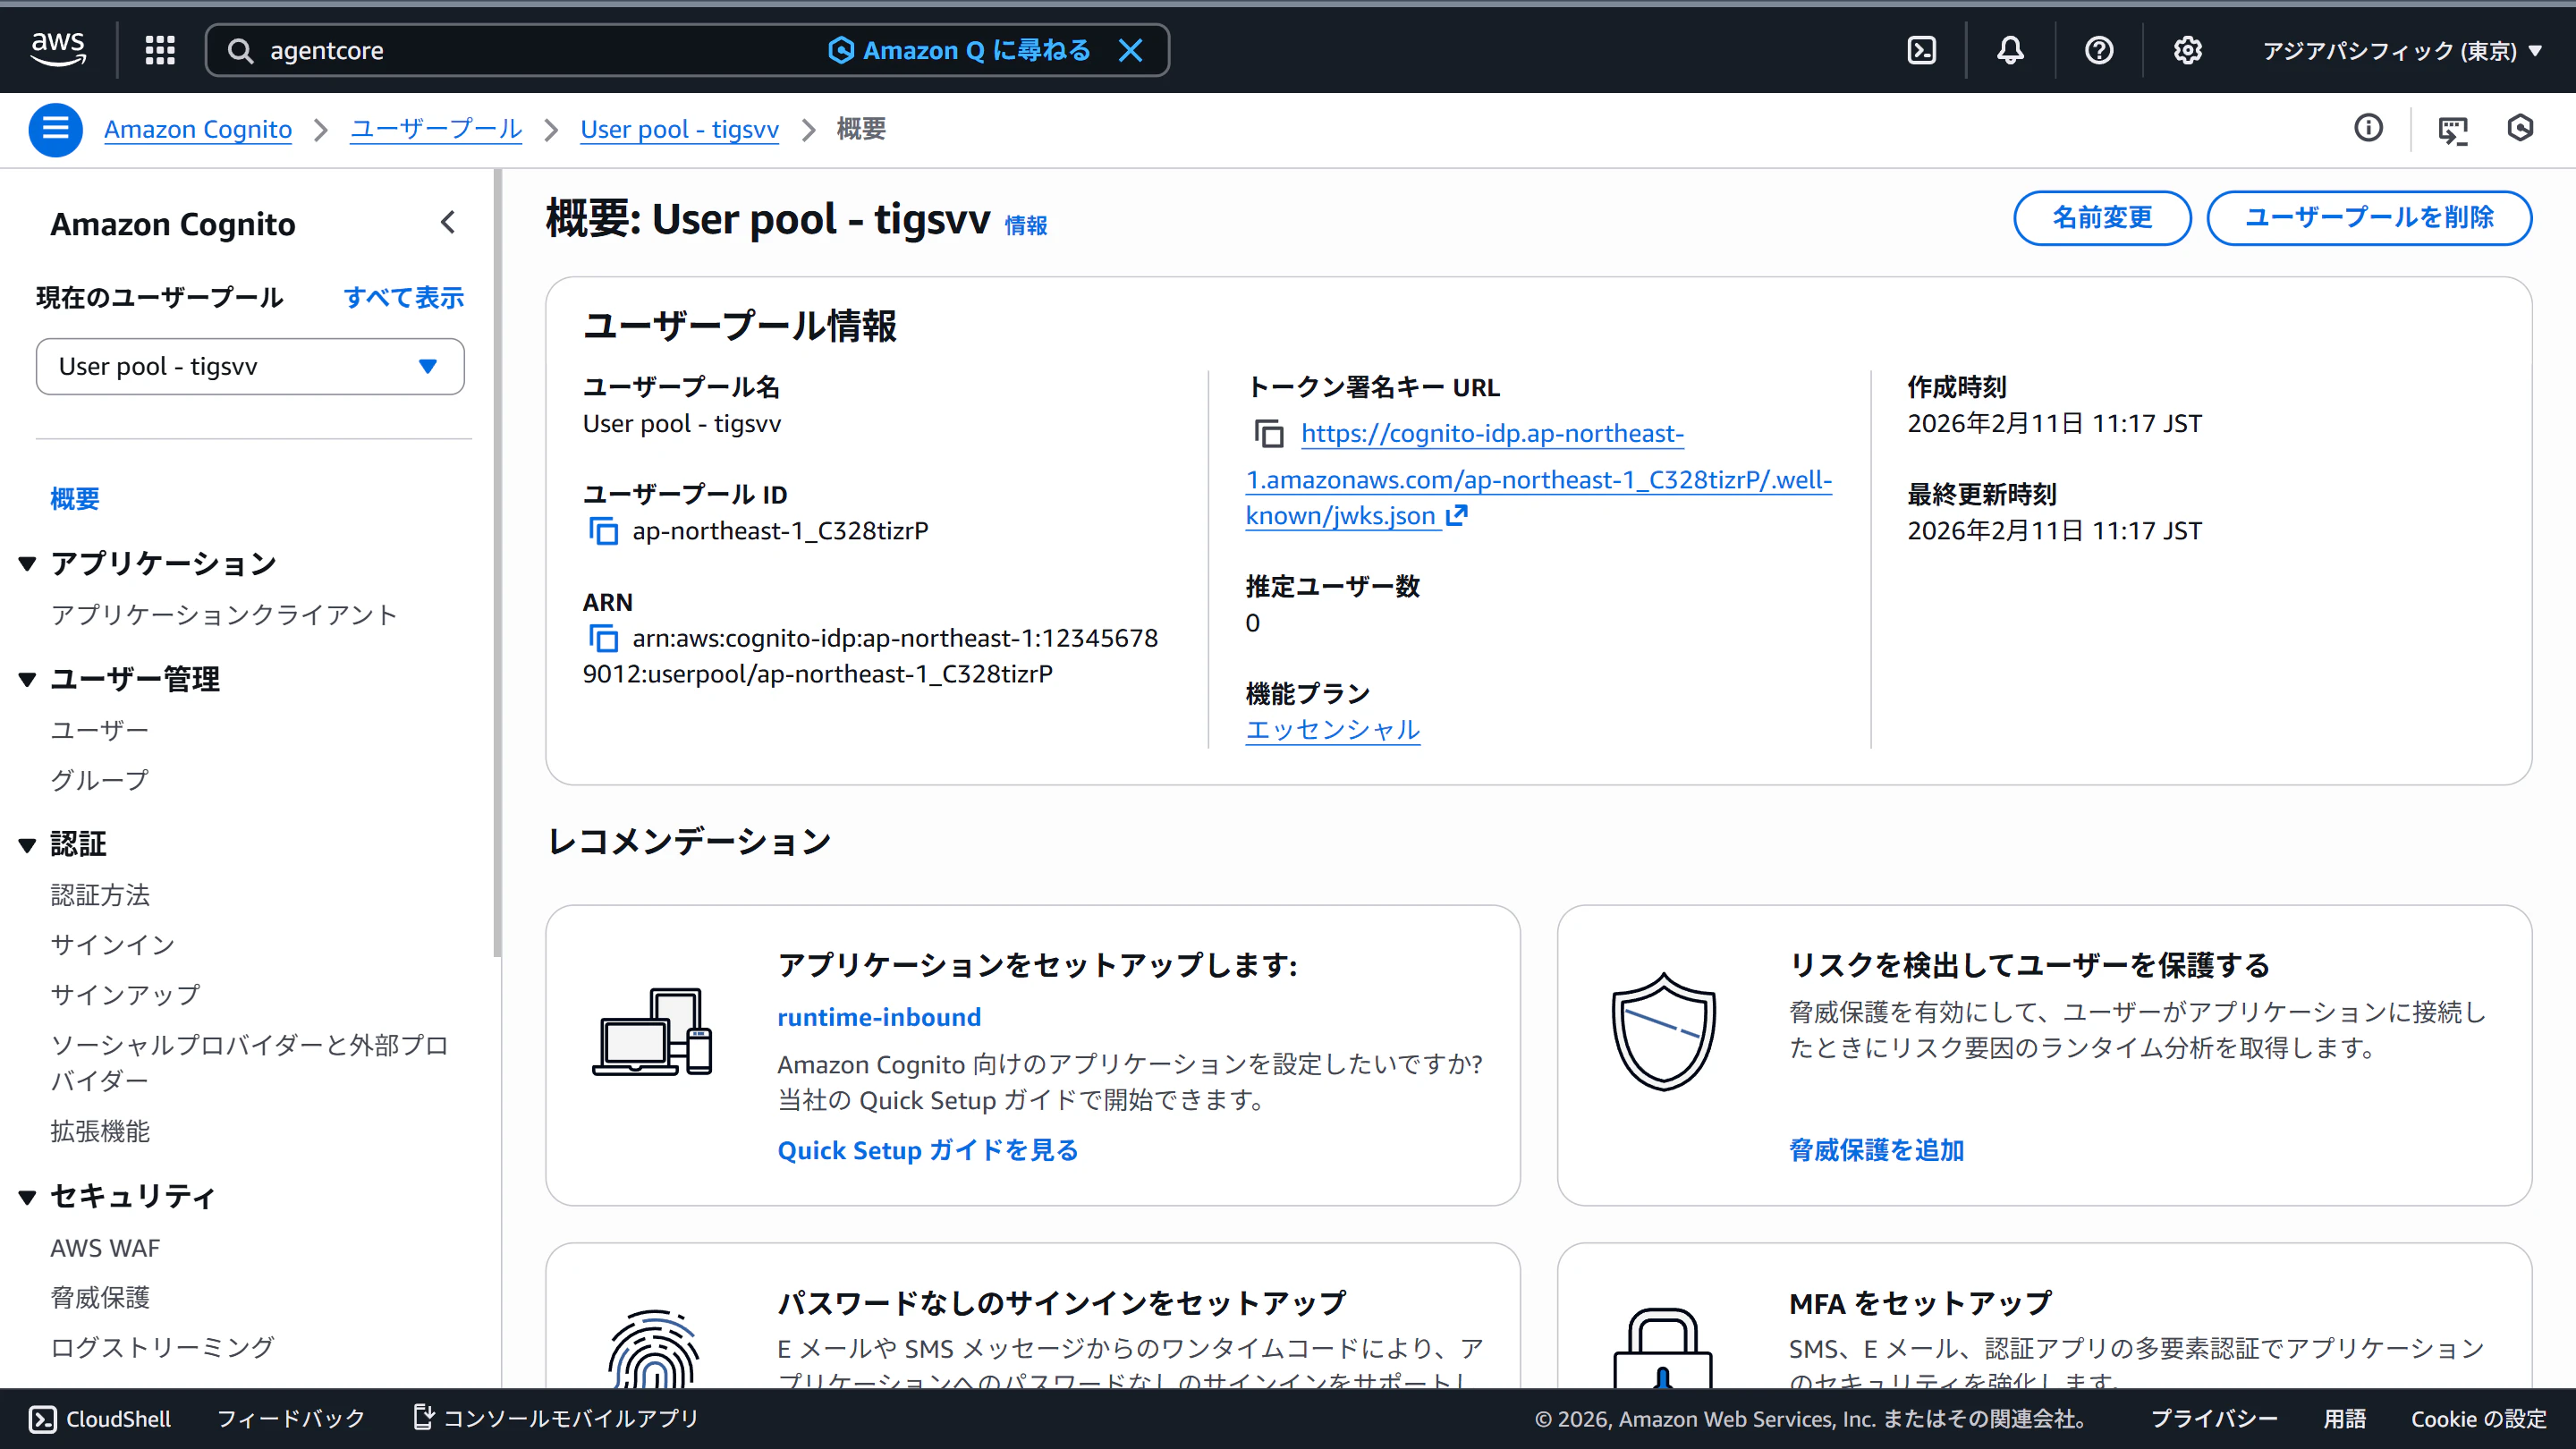
ユーザープールの概要ページにある「トークン署名キーURL」をメモします。
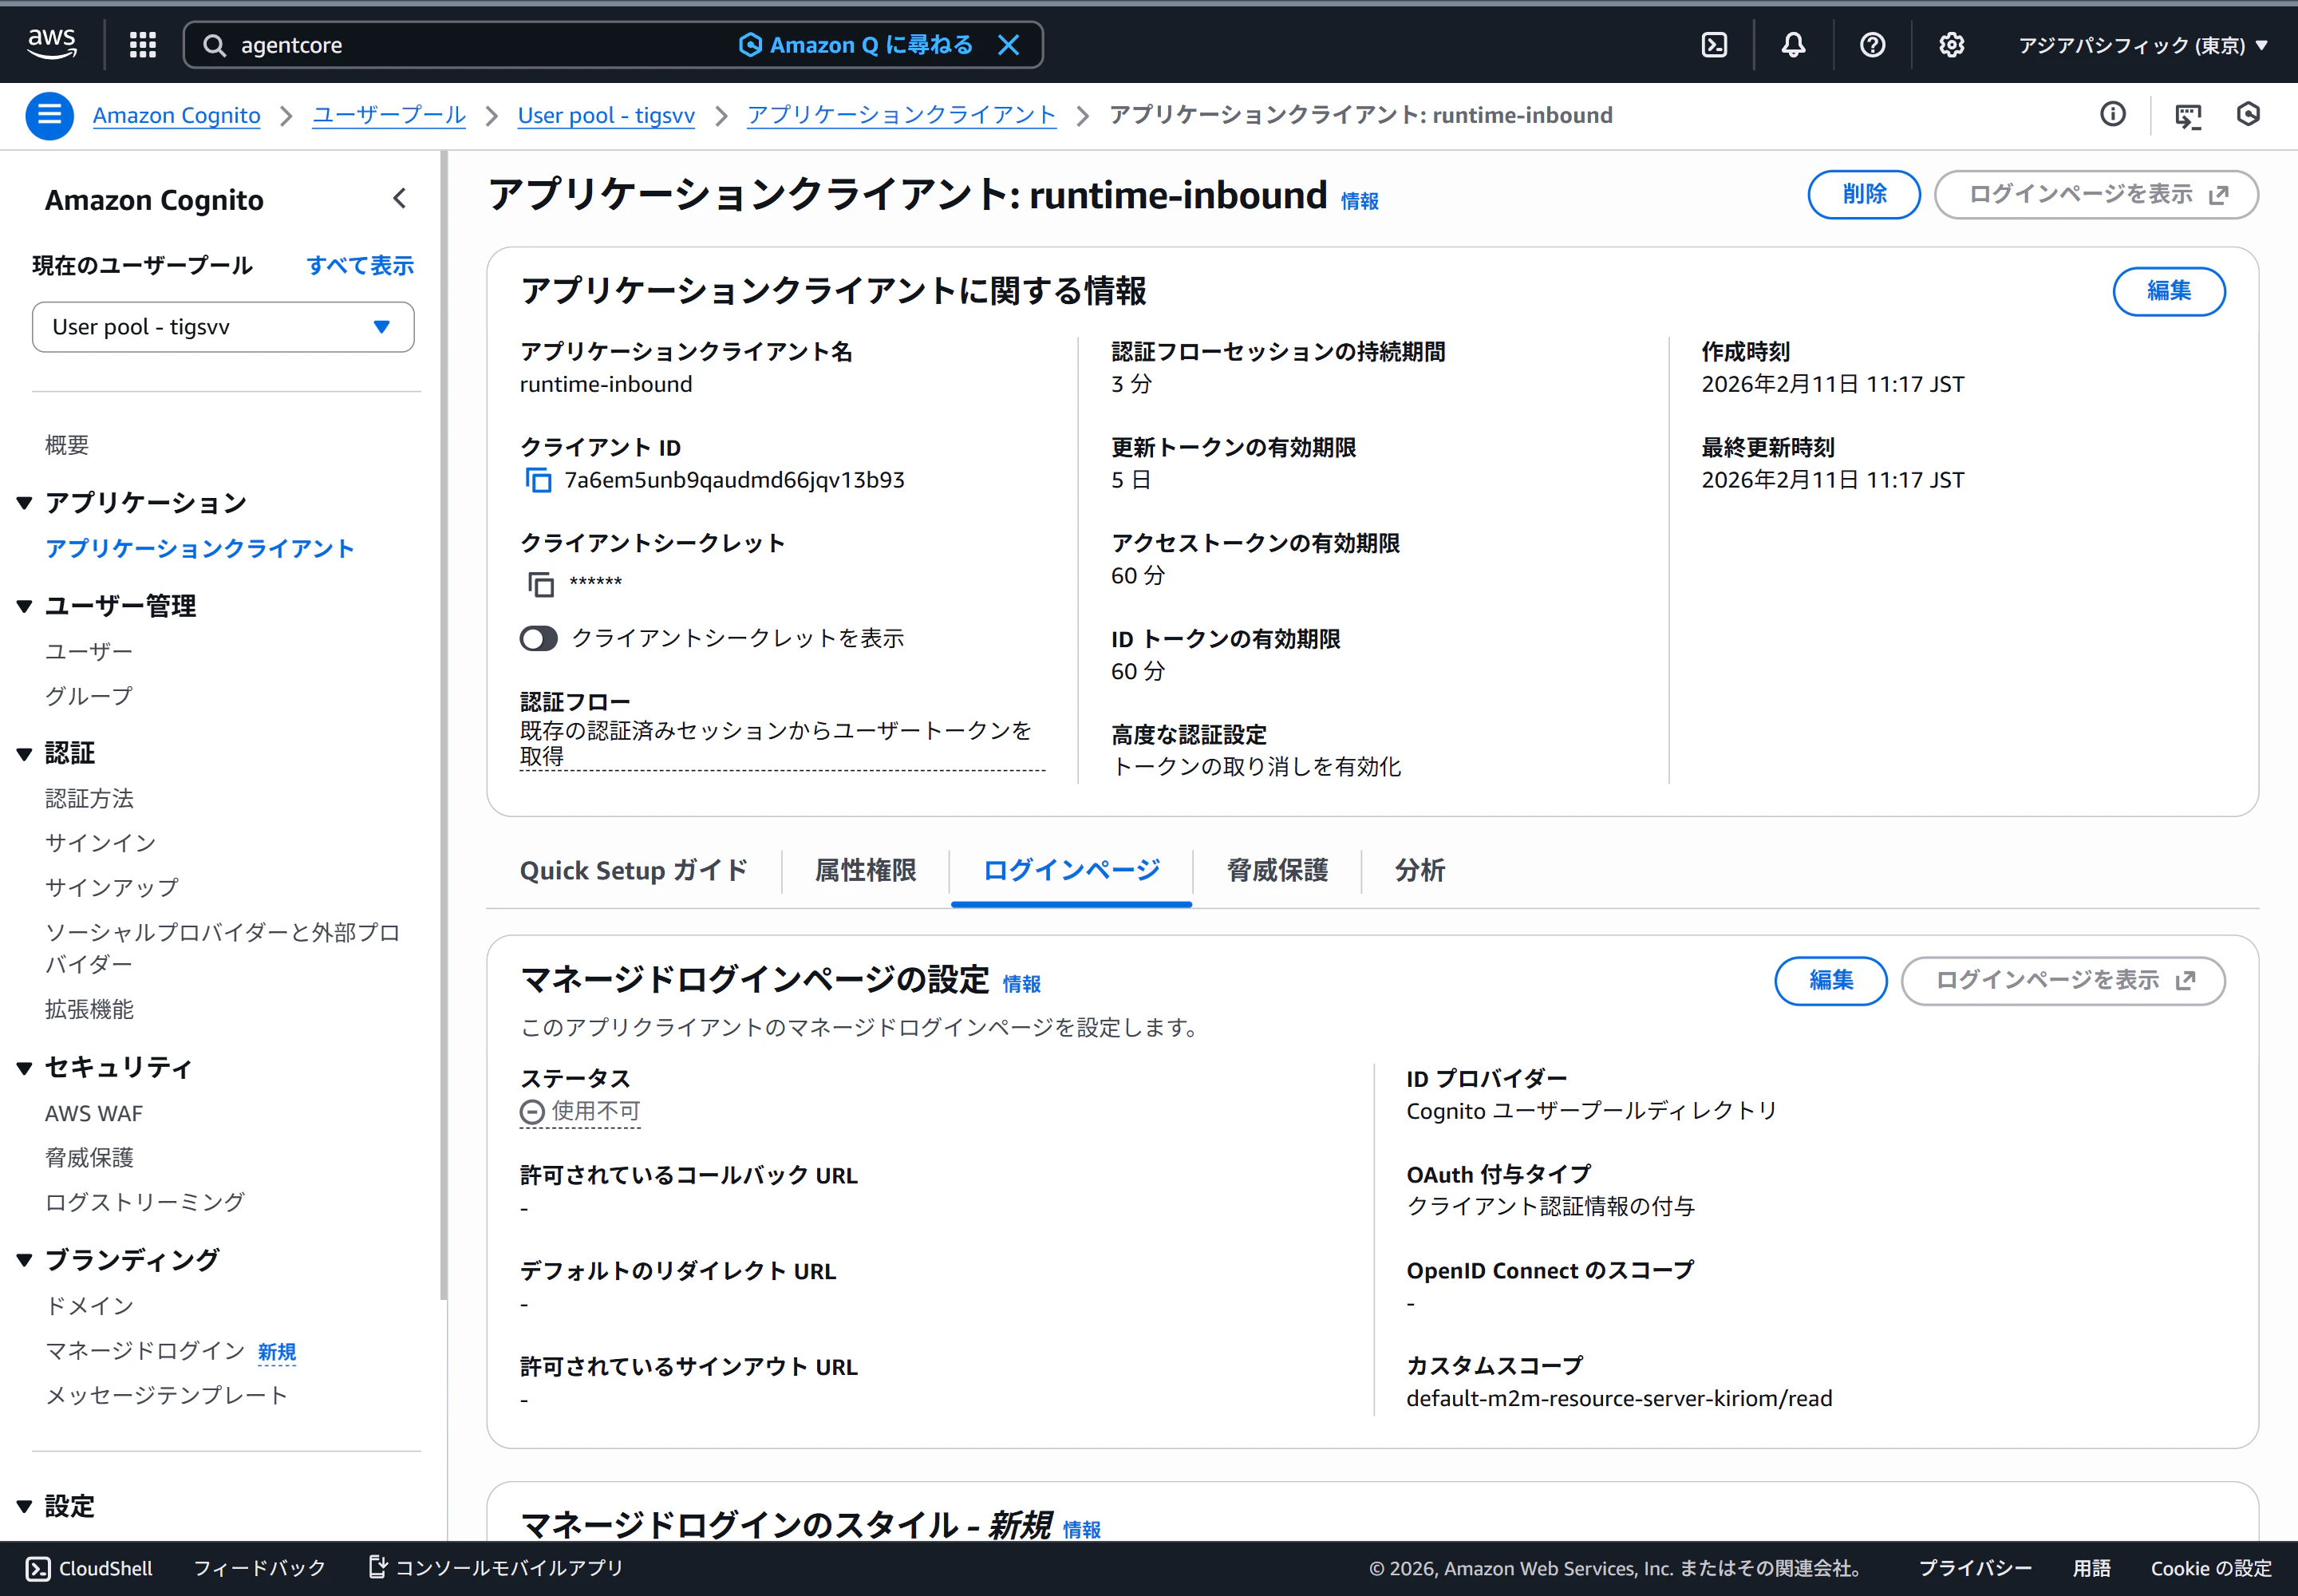
アプリケーションクライアントの画面にある「クライアントID」「クライアントシークレット」をメモします。
AgentCore Runtimeのインバウンド認証を更新
先程AgentCore RuntimeにデプロイしたMCPサーバーのインバウンド認証をIAM認証からOAuth認証に変更します。
インバウンド認証タイプを「JSON Web Tokens (JWT) を使用」に変更し、以下の2つを入力します。
| 項目 | 値 |
|---|---|
| 検出 URL | Cognitoのトークン署名キーURLの末尾をjwks.jsonからopenid-configurationに変更したもの |
| クライアント | CognitoのクライアントID |

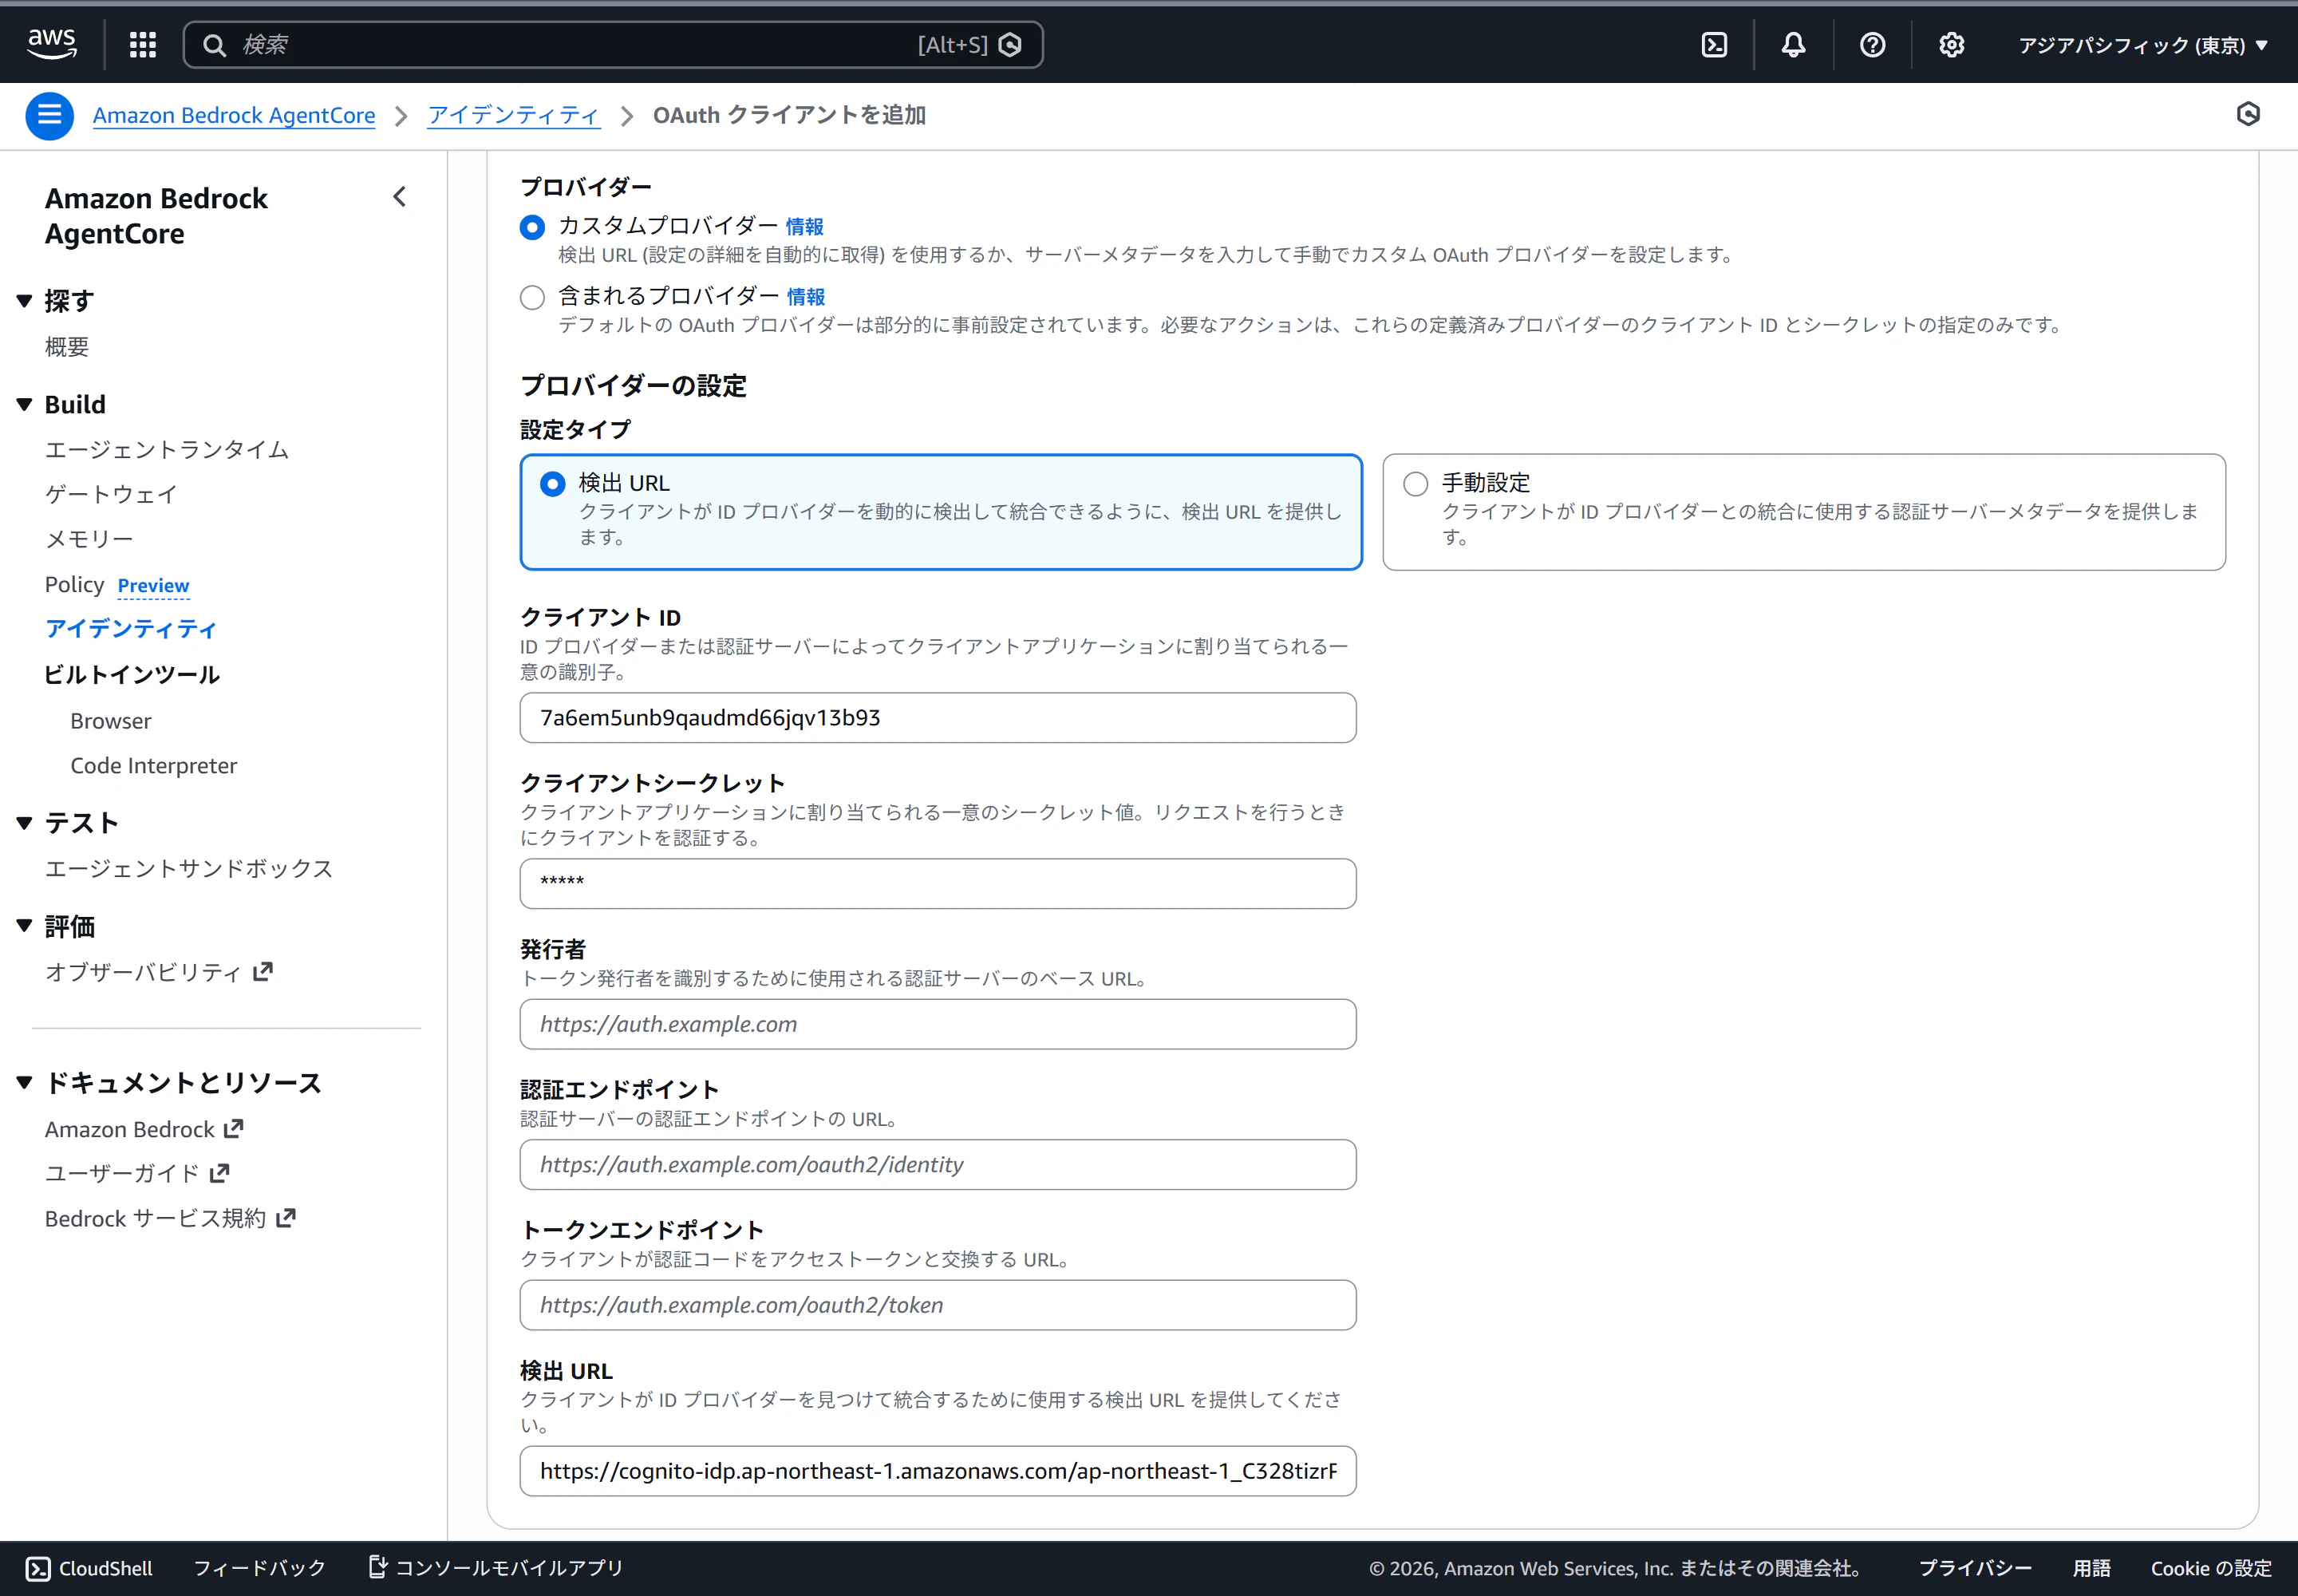
AgentCore IdentityにMCPサーバーの認証情報を登録
AgentCore Identityに、AgentCore RuntimeのMCPサーバーへのインバウンド認証(=AgentCore Gatewayからのアウトバンド認証)を登録します。
プロバイダーは「カスタムプロバイダー」を選択します。
クライアントID、クライアントシークレット、検出URLを入力します。
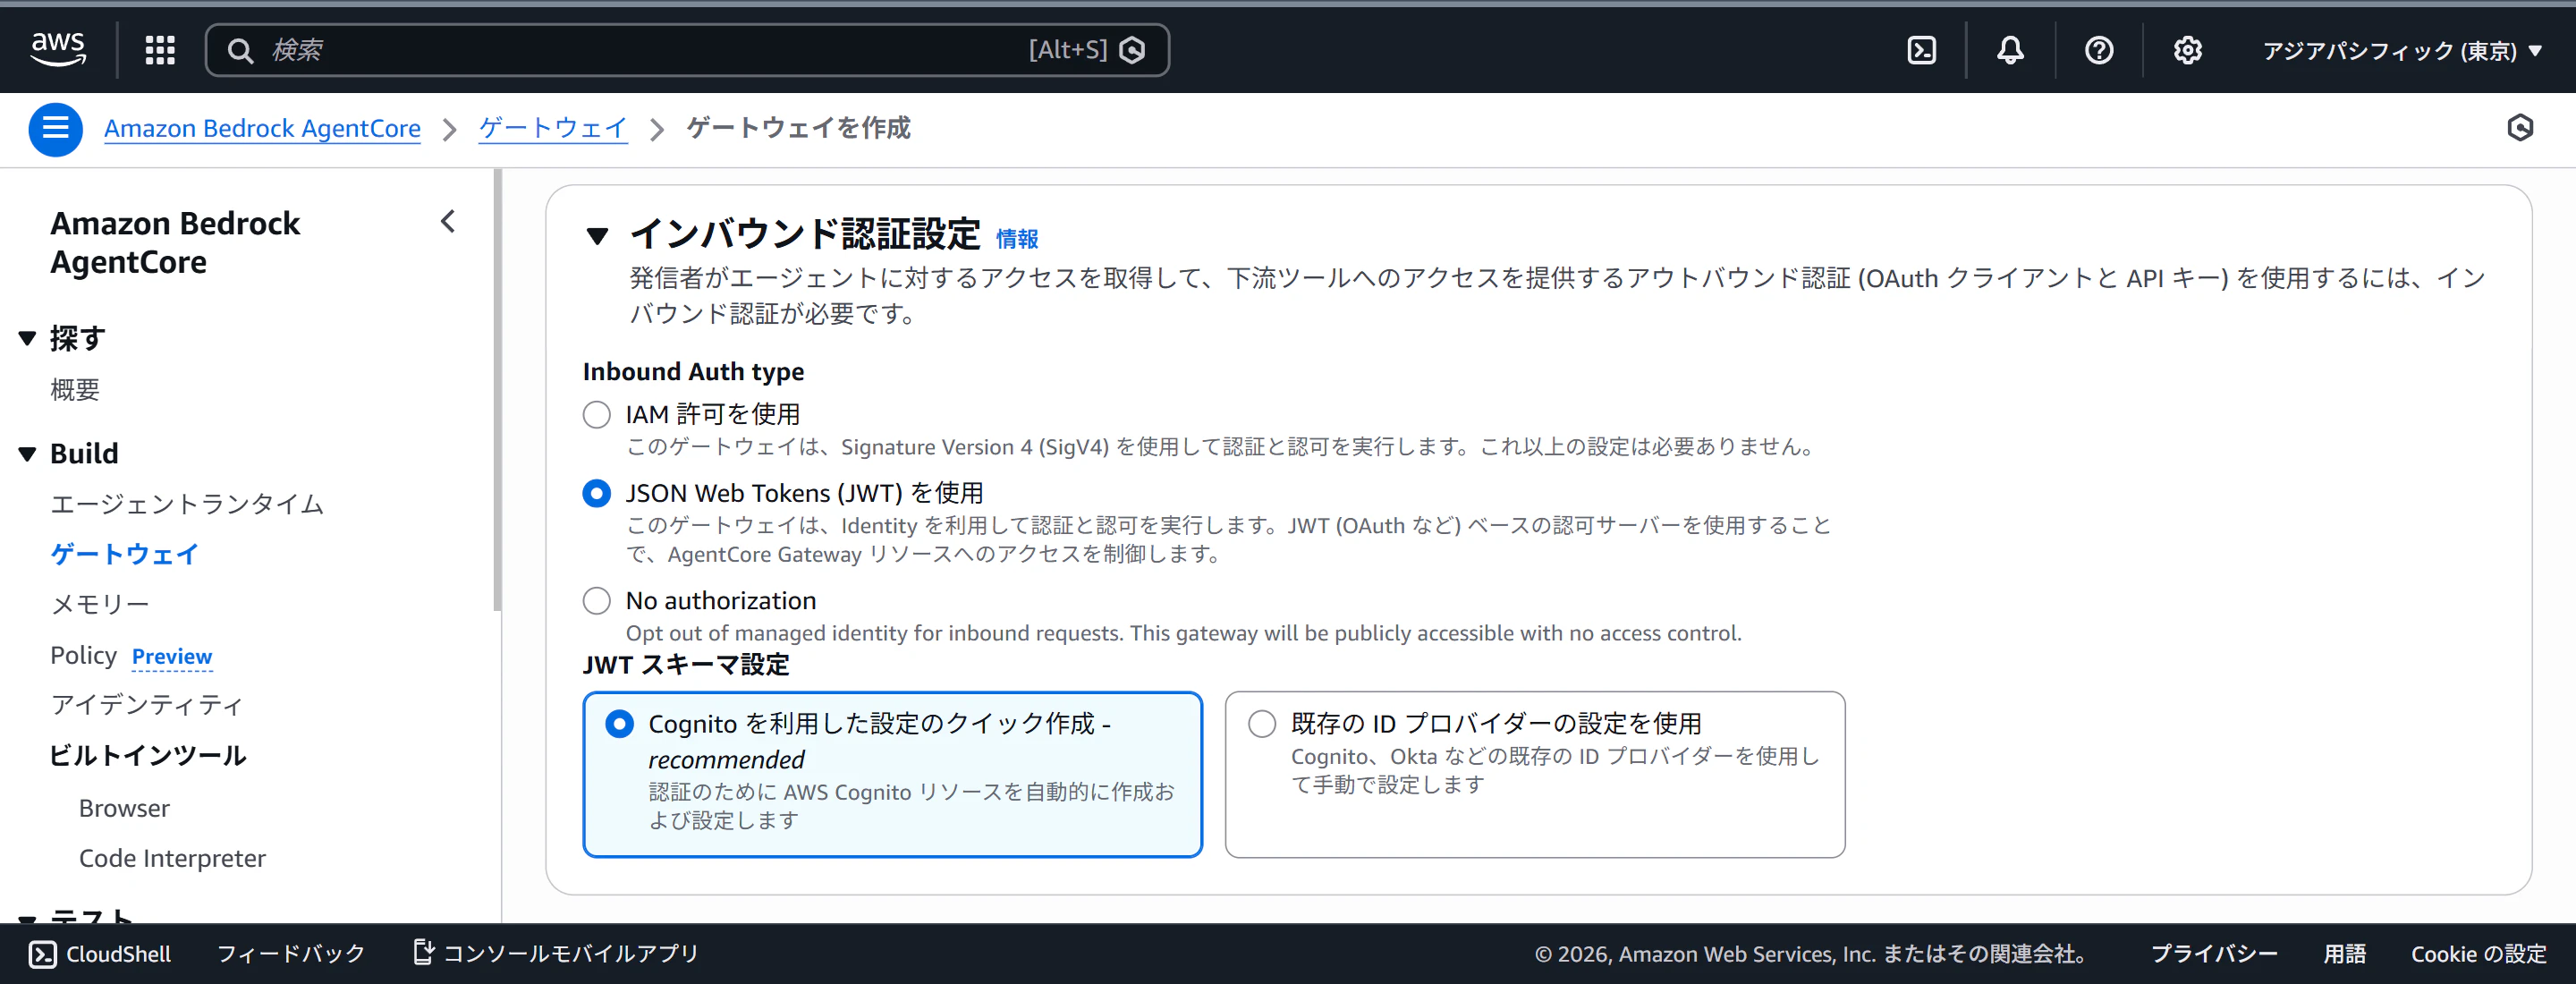
AgentCore Gatewayを作成
インバウンド認証設定で、Inbound Auth typeを「JSON Web Tokens (JWT) を使用」にします。
JWT スキーマ設定を「Cognito を利用した設定のクイック作成」にします。
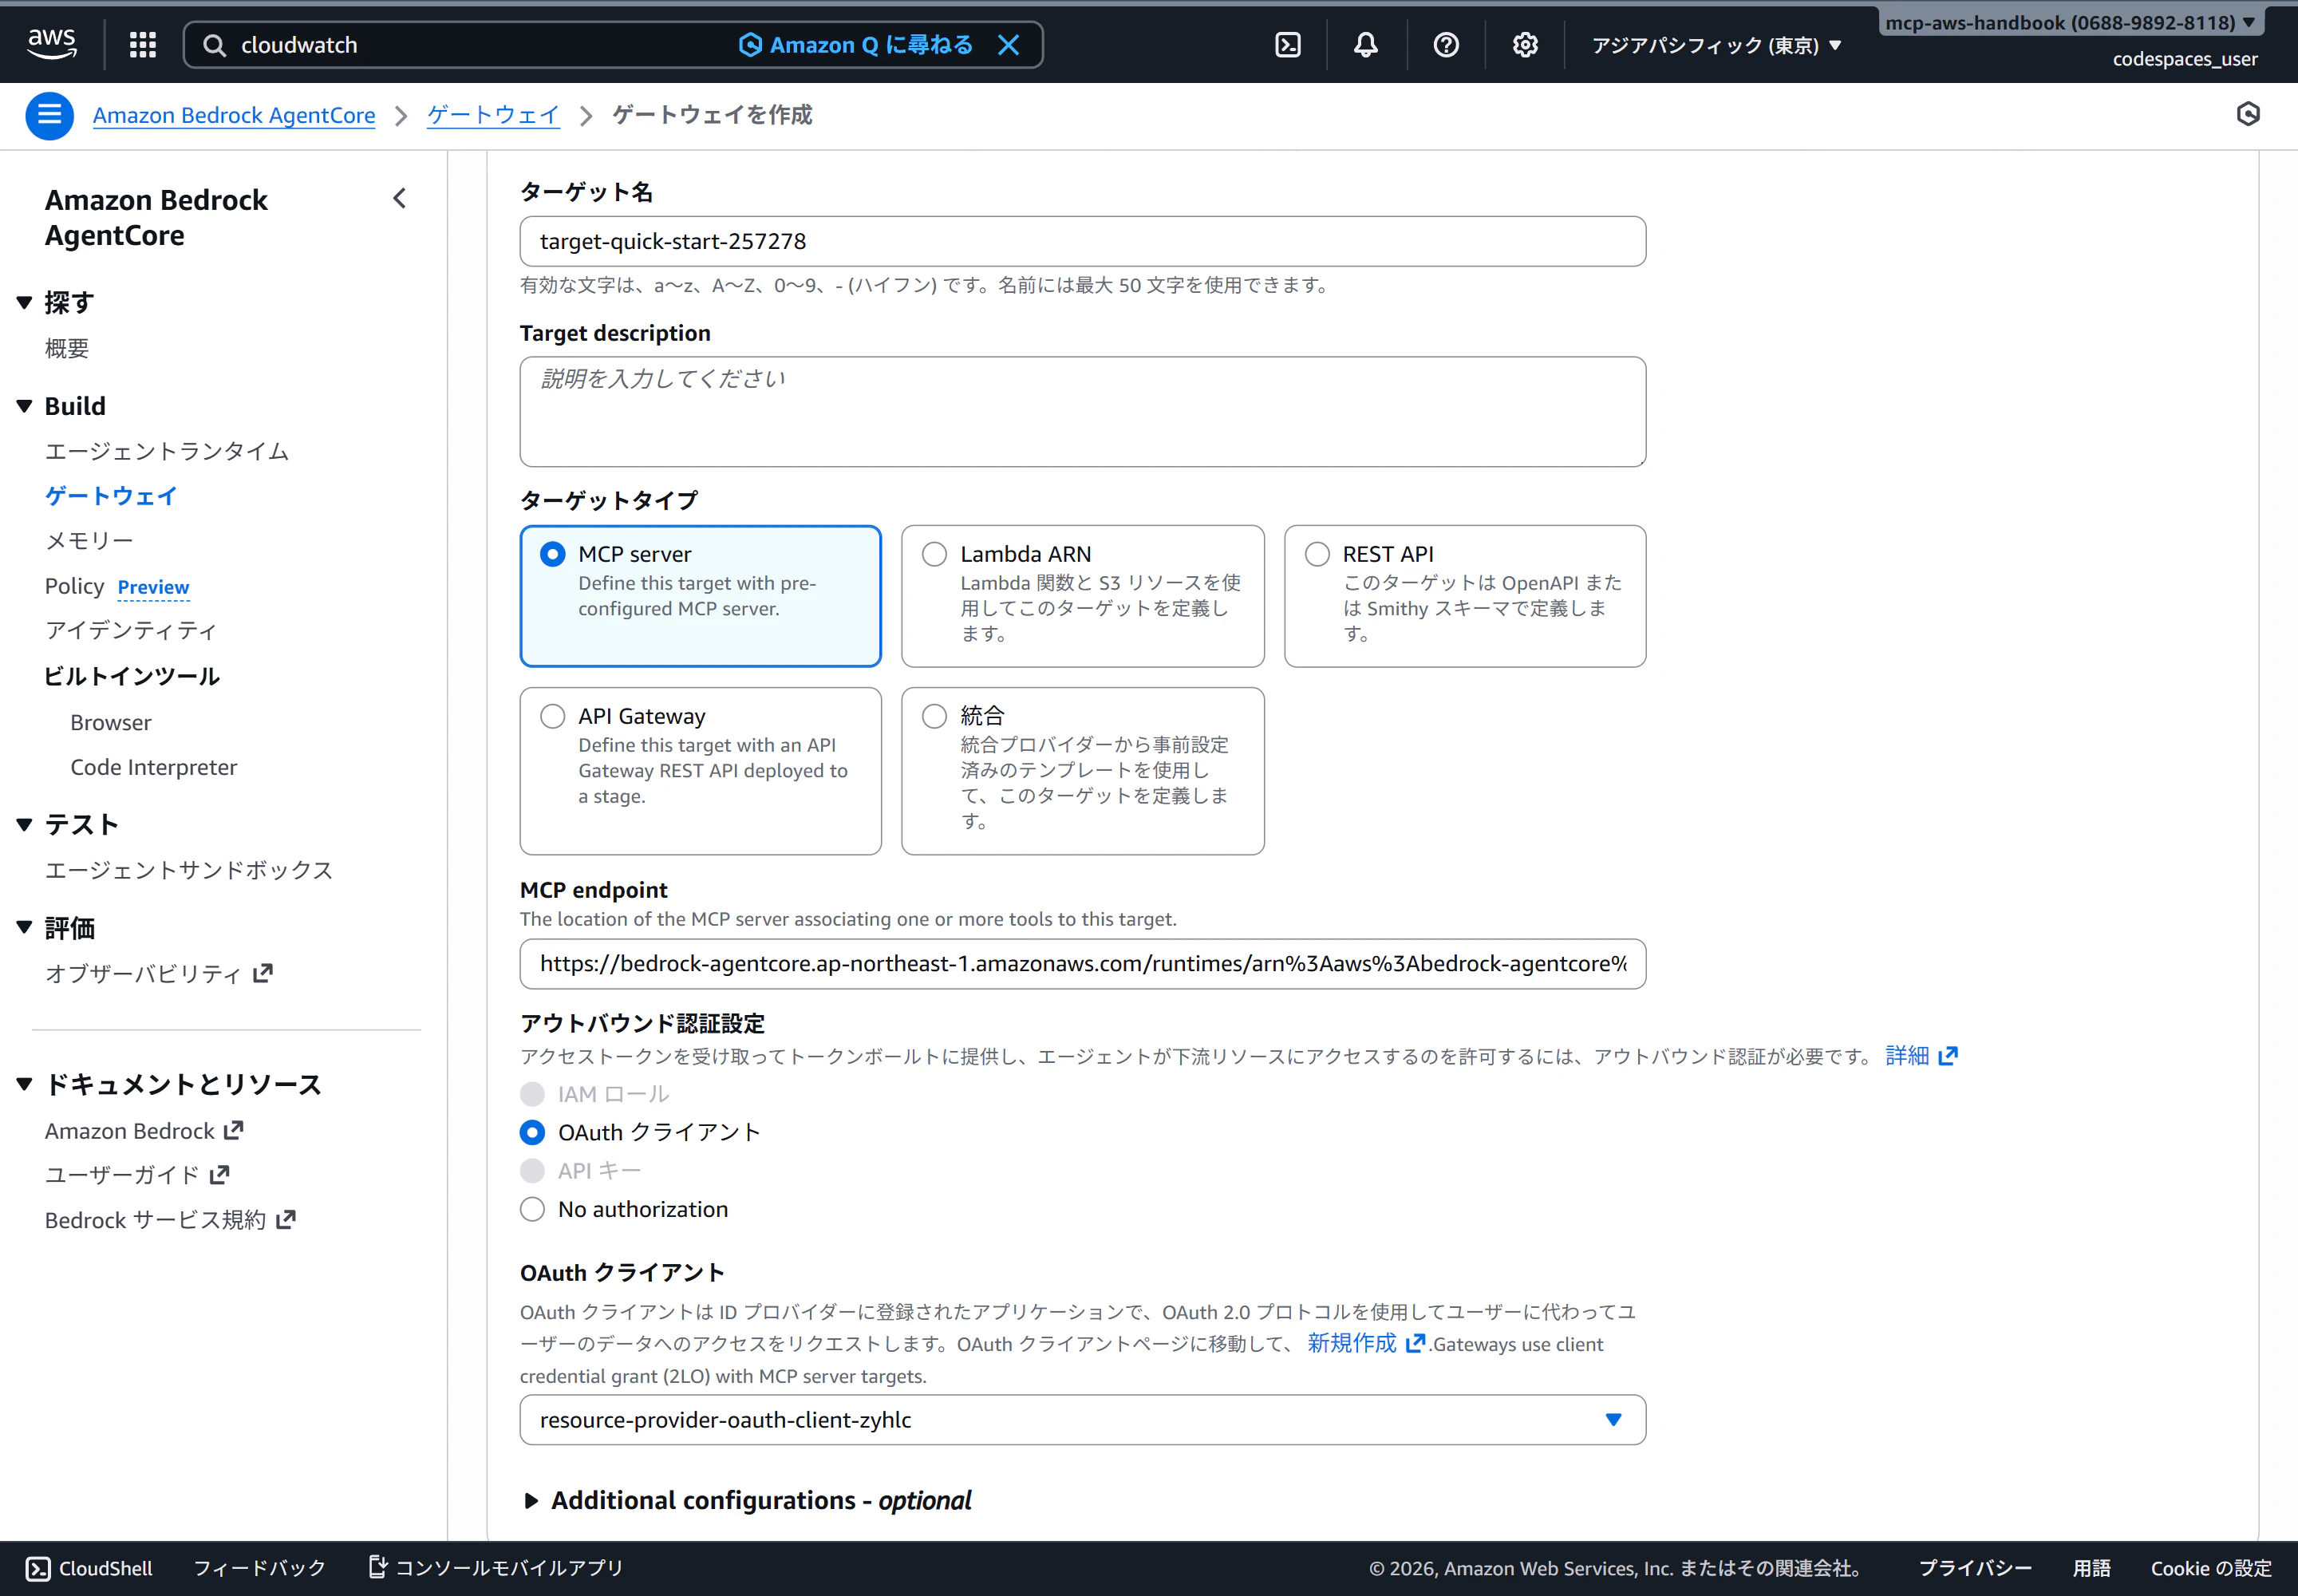
続いてターゲットを設定します。
MCP endpointは、RuntimeにデプロイしたMCPサーバーのARNをエンコードして作成します。
REGION=ap-northeast-1
AGENT_ARN=arn:aws:bedrock-agentcore:ap-northeast-1:123456789012:runtime/sample_mcp-KuKtJ5GUik

ENCODED_ARN=$(echo -n "$AGENT_ARN" | jq -sRr @uri)

MCP_URL="https://bedrock-agentcore.${REGION}.amazonaws.com/runtimes/${ENCODED_ARN}/invocations?qualifier=DEFAULT"
アウトバウンド認証設定はOAuthクライアントを指定し、先程作成したAgentCore Identityを指定します。
これで完成です。