
AWS IoT CoreとAzure IoT HubでIoT機器からデータをアップロードするサンプルを試しました。

手順の比較
| No. | AWS IoT Core | Azure IoT Hub |
|---|---|---|
| (事前) | - | Azure CLIにエクステンションを追加する |
| (事前) | - | リソース グループを作成する |
| 1 | - | IoT Hubを作成する |
| 2 | モノを作成する | デバイスを作成する |
| 3 | 証明書を作成する | - |
| 4 | ポリシーを作成する | - |
| 5 | 証明書にポリシーをアタッチする | - |
| 6 | 証明書にモノをアタッチする | - |
| 7 | 送信側のプログラムを作成する | 送信側のプログラムを作成する |
- AzureはIoT Hubそのものを作成する手順があります。
- 認証方式がAWSはX.509 証明書、Azureは対称キーです。他の認証方式を使うと手順も変わると思います。
AWSの手順
モノを作成する
コマンド一発です。
aws iot create-thing --thing-name Thing001
証明書を作成する
パラメータで出力ファイル名を指定しています。
aws iot create-keys-and-certificate --certificate-pem-outfile "Cert001.cert.pem" --public-key-outfile "Cert001.public.key" --private-key-outfile "Cert001.private.key" --set-as-active
この先の手順で、実行結果に含まれる証明書のARN(certificateArn)が必要となりますのでメモっておきましょう。(下の実行結果はAWS CLIのリファレンスの例です)
実行結果
{
    "certificateArn": "arn:aws:iot:us-west-2:123456789012:cert/9894ba17925e663f1d29c23af4582b8e3b7619c31f3fbd93adcb51ae54b83dc2",
    "certificateId": "9894ba17925e663f1d29c23af4582b8e3b7619c31f3fbd93adcb51ae54b83dc2",
    "certificatePem": "
-----BEGIN CERTIFICATE-----
MIICiTCCEXAMPLE6m7oRw0uXOjANBgkqhkiG9w0BAQUFADCBiDELMAkGA1UEBhMC
VVMxCzAJBgNVBAgEXAMPLEAwDgYDVQQHEwdTZWF0dGxlMQ8wDQYDVQQKEwZBbWF6
b24xFDASBgNVBAsTC0lBTSEXAMPLE2xlMRIwEAYDVQQDEwlUZXN0Q2lsYWMxHzAd
BgkqhkiG9w0BCQEWEG5vb25lQGFtYEXAMPLEb20wHhcNMTEwNDI1MjA0NTIxWhcN
MTIwNDI0MjA0NTIxWjCBiDELMAkGA1UEBhMCEXAMPLEJBgNVBAgTAldBMRAwDgYD
VQQHEwdTZWF0dGxlMQ8wDQYDVQQKEwZBbWF6b24xFDAEXAMPLEsTC0lBTSBDb25z
b2xlMRIwEAYDVQQDEwlUZXN0Q2lsYWMxHzAdBgkqhkiG9w0BCQEXAMPLE25lQGFt
YXpvbi5jb20wgZ8wDQYJKoZIhvcNAQEBBQADgY0AMIGJAoGBAMaK0dn+aEXAMPLE
EXAMPLEfEvySWtC2XADZ4nB+BLYgVIk60CpiwsZ3G93vUEIO3IyNoH/f0wYK8m9T
rDHudUZEXAMPLELG5M43q7Wgc/MbQITxOUSQv7c7ugFFDzQGBzZswY6786m86gpE
Ibb3OhjZnzcvQAEXAMPLEWIMm2nrAgMBAAEwDQYJKoZIhvcNAQEFBQADgYEAtCu4
nUhVVxYUntneD9+h8Mg9qEXAMPLEyExzyLwaxlAoo7TJHidbtS4J5iNmZgXL0Fkb
FFBjvSfpJIlJ00zbhNYS5f6GuoEDEXAMPLEBHjJnyp378OD8uTs7fLvjx79LjSTb
NYiytVbZPQUQ5Yaxu2jXnimvw3rrszlaEXAMPLE=
-----END CERTIFICATE-----\n",
    "keyPair": {
        "PublicKey": "-----BEGIN PUBLIC KEY-----\nMIIBIjANBgkqhkEXAMPLEQEFAAOCAQ8AMIIBCgKCAQEAEXAMPLE1nnyJwKSMHw4h\nMMEXAMPLEuuN/dMAS3fyce8DW/4+EXAMPLEyjmoF/YVF/gHr99VEEXAMPLE5VF13\n59VK7cEXAMPLE67GK+y+jikqXOgHh/xJTwo+sGpWEXAMPLEDz18xOd2ka4tCzuWEXAMPLEahJbYkCPUBSU8opVkR7qkEXAMPLE1DR6sx2HocliOOLtu6Fkw91swQWEXAMPLE\GB3ZPrNh0PzQYvjUStZeccyNCx2EXAMPLEvp9mQOUXP6plfgxwKRX2fEXAMPLEDa\nhJLXkX3rHU2xbxJSq7D+XEXAMPLEcw+LyFhI5mgFRl88eGdsAEXAMPLElnI9EesG\nFQIDAQAB\n-----END PUBLIC KEY-----\n",
        "PrivateKey": "-----BEGIN RSA PRIVATE KEY-----\nkey omittted for security reasons\n-----END RSA PRIVATE KEY-----\n"
    }
}
ポリシーを作成する
まずポリシードキュメントを作成します。お試しなのでフルオープンですのでお気をつけください。
{
  "Version": "2012-10-17",
  "Statement": [
      {
          "Effect": "Allow",
          "Action": [
              "iot:*"
          ],
          "Resource": [
              "*"
          ]
      }
    ]
}
次にポリシーを作成します。
aws iot create-policy --policy-name Policy001 --policy-document file://policy.json
証明書にポリシーをアタッチする
コマンド一発。証明書のARNは先の手順で取得したものです。
aws iot attach-policy --policy-name Policy001 --target "{証明書のARN}"
証明書にモノをアタッチする
こちらもコマンド一発。証明書のARNは先の手順で取得したものです。
aws iot attach-thing-principal --thing-name Thing001 --principal "{証明書のARN}"
送信側のプログラムを作成する
https://aws.amazon.com/jp/premiumsupport/knowledge-center/iot-core-publish-mqtt-messages-python/
にあるサンプルを使います。
AWS IoT SDK for Python v2のインストール
pip install awsiotsdk
ソースコードの変更
| 変数名 | 内容 |
|---|---|
| ENDPOINT | *1で取得できます |
| CLIENT_ID | モノの名前(Thing001) |
| PATH_TO_CERT | CERTのファイルパス(Cert001.cert.pem) |
| PATH_TO_KEY | プライベートキーのファイルパス(Cert001.private.key) |
| PATH_TO_ROOT | ここのAmazonルートCA 1をダウンロード |
*1 aws iot describe-endpoint --endpoint-type iot:Data-ATSコマンド
実行結果
20回送信したら終了します。
Connecting to xxxxxxxxxxxxxx-ats.iot.ap-northeast-1.amazonaws.com with client ID 'Thing001'...
Connected!
Begin Publish
Published: '{"message": "Hello World [1]"}' to the topic: 'test/testing'
Published: '{"message": "Hello World [2]"}' to the topic: 'test/testing'
Published: '{"message": "Hello World [3]"}' to the topic: 'test/testing'
Published: '{"message": "Hello World [4]"}' to the topic: 'test/testing'
Published: '{"message": "Hello World [5]"}' to the topic: 'test/testing'
Published: '{"message": "Hello World [6]"}' to the topic: 'test/testing'
Published: '{"message": "Hello World [7]"}' to the topic: 'test/testing'
Published: '{"message": "Hello World [8]"}' to the topic: 'test/testing'
Published: '{"message": "Hello World [9]"}' to the topic: 'test/testing'
Published: '{"message": "Hello World [11]"}' to the topic: 'test/testing'
Published: '{"message": "Hello World [12]"}' to the topic: 'test/testing'
Published: '{"message": "Hello World [13]"}' to the topic: 'test/testing'
Published: '{"message": "Hello World [14]"}' to the topic: 'test/testing'
Published: '{"message": "Hello World [15]"}' to the topic: 'test/testing'
Published: '{"message": "Hello World [16]"}' to the topic: 'test/testing'
Published: '{"message": "Hello World [17]"}' to the topic: 'test/testing'
Published: '{"message": "Hello World [18]"}' to the topic: 'test/testing'
Published: '{"message": "Hello World [19]"}' to the topic: 'test/testing'
Published: '{"message": "Hello World [20]"}' to the topic: 'test/testing'
Publish End
Azureの手順
Azure CLIにエクステンションを追加する
一部エクステンションが必要なコマンドがあるため、azure-iotエクステンションをインストールします。
az extension add --name azure-iot
リソース グループを作成する
IoT部分とは直接関係ありませんが、Azureの場合は必ずリソースグループが必要です。
az group create --name iot-resource-group --location japaneast
IoT Hubを作成する
コマンド一発。お試しなのでSKUはF1(無料)としてます。
az iot hub create --name iot-hub-00001 --resource-group iot-resource-group --partition-count 2 --sku F1
デバイスを作成する
コマンド一発
az iot hub device-identity create --hub-name iot-hub-00001 --device-id Device001
送信側のプログラムを作成する
https://github.com/Azure-Samples/azure-iot-samples-python/blob/master/iot-hub/Quickstarts/simulated-device/SimulatedDevice.py
にあるサンプルを使います。
IoT Hub Device SDKのインストール
pip install azure-iot-device
ソースコードの変更
| 変数名 | 内容 |
|---|---|
| CONNECTION_STRING | *2で取得できます |
*2 az iot hub device-identity connection-string show --hub-name iot-hub-00001 --device-id Device001コマンド
実行結果
無限に続きます
IoT Hub Quickstart #1 - Simulated device
Press Ctrl-C to exit
IoT Hub device sending periodic messages, press Ctrl-C to exit
Sending message: {"temperature": 22.73671571030419,"humidity": 65.13300283503716}
Message successfully sent
Sending message: {"temperature": 21.122891449050375,"humidity": 75.35478976197727}
Message successfully sent
Sending message: {"temperature": 30.11015190710952,"humidity": 79.1313503131281}
Message successfully sent
Sending message: {"temperature": 29.056883680577876,"humidity": 74.9253608733604}
Message successfully sent
Sending message: {"temperature": 30.35374671931261,"humidity": 73.57241118544626}
Message successfully sent
Sending message: {"temperature": 33.336413834339076,"humidity": 65.31133008367256}
Message successfully sent
Sending message: {"temperature": 34.92260215374919,"humidity": 69.53101153342156}
Message successfully sent
確認方法について
AWSとAzureでメッセージが届いたか確認する方法が違ったので、紹介します。
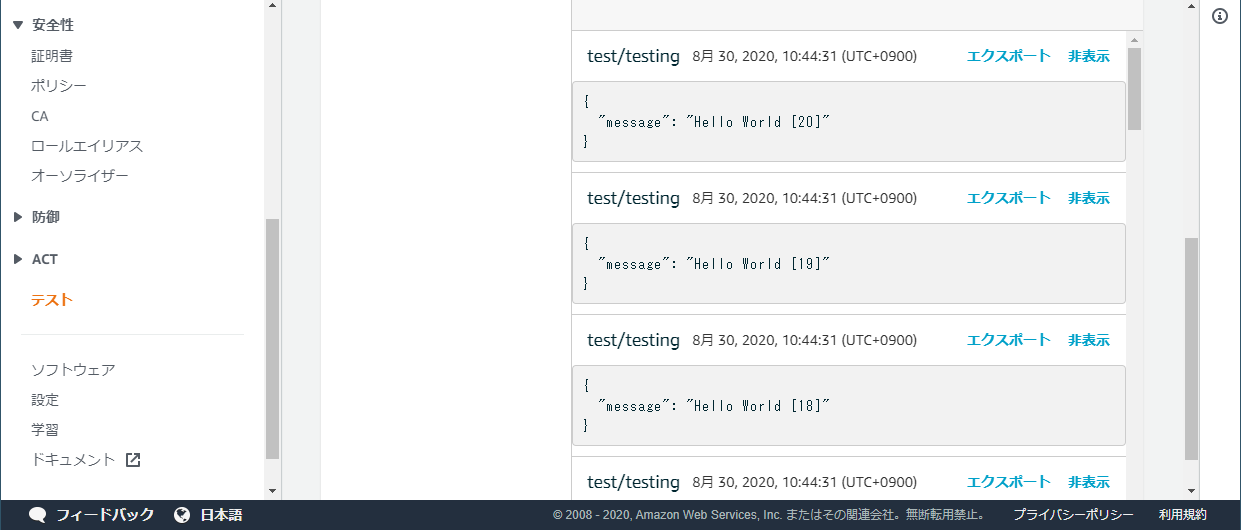
AWSの場合
マネジメントコンソールのテストで確認できます。
Azureの場合
CLIコマンドで確認できます。
az iot hub monitor-events --hub-name iot-hub-00001 --device-id Device001
Starting event monitor, filtering on device: Device001, use ctrl-c to stop...
{
    "event": {
        "origin": "Device001",
        "module": "",
        "interface": "",
        "component": "",
        "payload": "{\"temperature\": 24.86829506815134,\"humidity\": 62.82101201700818}"
    }
}
{
    "event": {
        "origin": "Device001",
        "module": "",
        "interface": "",
        "component": "",
        "payload": "{\"temperature\": 27.671191300371653,\"humidity\": 70.30860685264159}"
    }
}
{
    "event": {
        "origin": "Device001",
        "module": "",
        "interface": "",
        "component": "",
        "payload": "{\"temperature\": 22.581311567865644,\"humidity\": 66.70979111038993}"
    }
}
Stopping event monitor...
おしまい。