目的
Spring Quickstart Guideを取り組み終えた方、SpringBootを学び始めた方、復習をしたい方に向けて、
公式ガイドSecuring a Web Applicationを実際に取り組み学んだことを共有します。
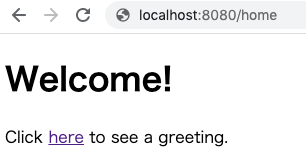
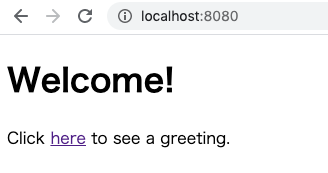
完成形を確認します。
トップページがあり、hereをクリックすると、
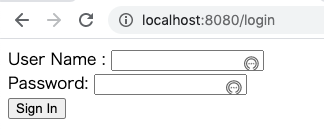
ログインページに移動します。テストユーザー用のユーザー名とパスワードを入力し、Sign inボタンをクリックすると、

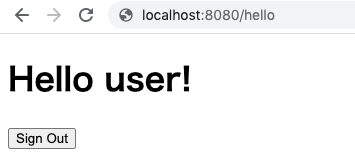
認証された人しか閲覧できないページに遷移します。ログインされていない状態ではこの画面にアクセスは出来ません。
開発環境、これまでのおさらいは以下になります。
OS: macOS Mojave バージョン10.14.6
テキストエディタ: Visual Studio Code(以下VSCode)
Java: 11.0.2
QuickstartGuide
Building a RESTful Web Service編
Consuming a RESTful Web Service編
Accessing Data with JPA編
Handling Form Submission編
Securing a Web Application編
1.SpringBoot projectを始めよう!
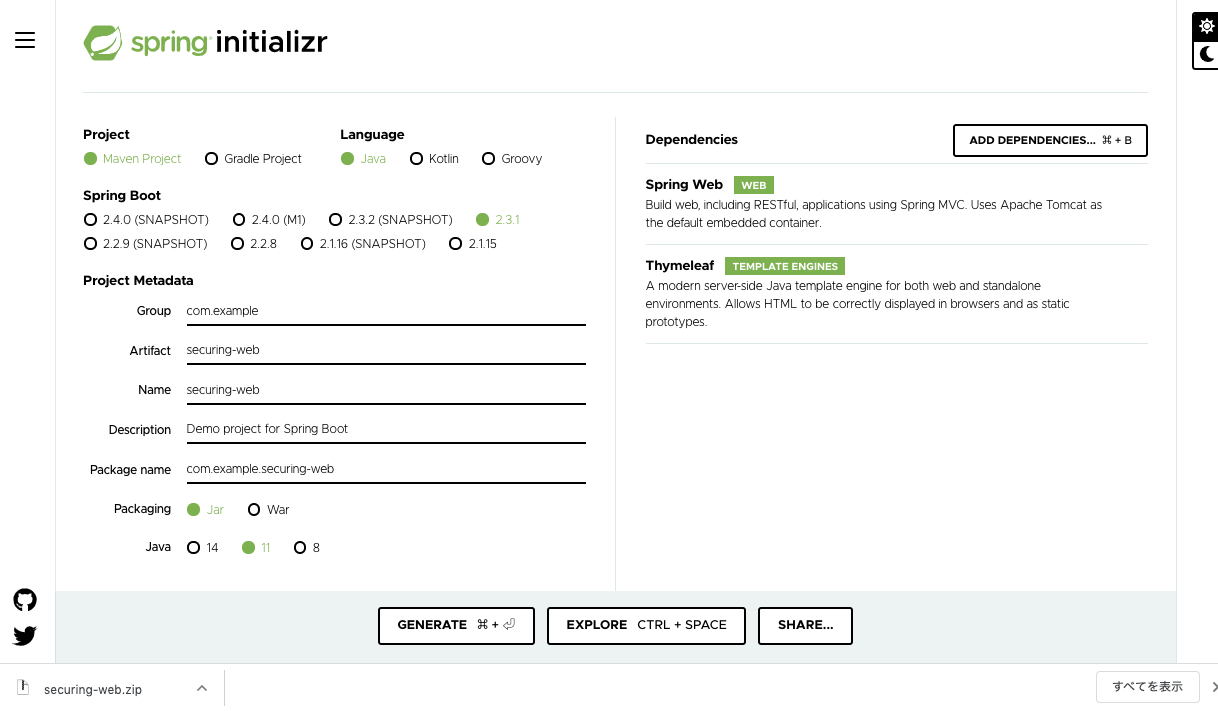
まずは、spring initializr にアクセスします。
1.ADD DEPENDENCIESボタンをクリックして、Spring WebとThymeleafを追加。
2.Artifact, Nameは、securing-webに変更。
3.Javaを11に変更。
そしてGENERATEボタンをクリックしてZipファイルをダウンロードします。
ダウンロードしたZipファイルを展開したら準備完了です。
2.コードを追加しよう!
先ほどのフォルダをVSCodeで開きます。
拡張機能のJava Extension Packのインストールの推奨します。と言われるのでインストールしておきましょう。
home.htmlを作成しよう!
src/main/resources/templates/ にhome.htmlファイルを作成します。

公式を参考にコードを追加します。トップページになります。
<!DOCTYPE html>
<html xmlns="http://www.w3.org/1999/xhtml" xmlns:th="https://www.thymeleaf.org"
      xmlns:sec="https://www.thymeleaf.org/thymeleaf-extras-springsecurity3">
  <head>
    <title>Spring Security Example</title>
  </head>
  <body>
    <h1>Welcome!</h1>

    <p>Click <a th:href="@{/hello}">here</a> to see a greeting.</p>
  </body>
</html>
htmlタグの部分は、th:〇〇やsec:〇〇と記述出来るようにする為のものです(thymeleafやSpringSecurityのタグを用いた記述方法が可能になる)。
では、追加したコードのthymeleafの記述について深掘りしていきます。
thymeleafとは、springbootで扱う事が出来るテンプレートエンジンです。th:〇〇と記述します。
日本語で書かれたthymeleafチュートリアルもあります!
th:href
aタグのhref属性にセットするタグです。記述の仕方は、th:href="@{}"です。
{}の中はパスを指定します。今回は/helloですので、タグをクリックすると、http://localhost:8080/helloに遷移する事になります。
hello.htmlを作成しよう!
src/main/resources/templates/ にhello.htmlファイルを作成します。
公式を参考にコードを追加します。
<!DOCTYPE html>
<html xmlns="http://www.w3.org/1999/xhtml" xmlns:th="https://www.thymeleaf.org"
      xmlns:sec="https://www.thymeleaf.org/thymeleaf-extras-springsecurity3">
  <head>
    <title>Hello World!</title>
  </head>
  <body>
    <h1 th:inline="text">Hello [[${#httpServletRequest.remoteUser}]]!</h1>
    <form th:action="@{/logout}" method="post">
      <input type="submit" value="Sign Out"/>
    </form>
  </body>
</html>
th:inlineは、タグのテキスト内に変数の値を展開する為のものです。表示したい変数を[[...]]で囲みます。
今回は、${#httpServletRequest.remoteUser}なので、認証されているユーザーの名前を表示するようになっています。
Sign Outボタンが押されると、/login?logoutにリダイレクトにされます。
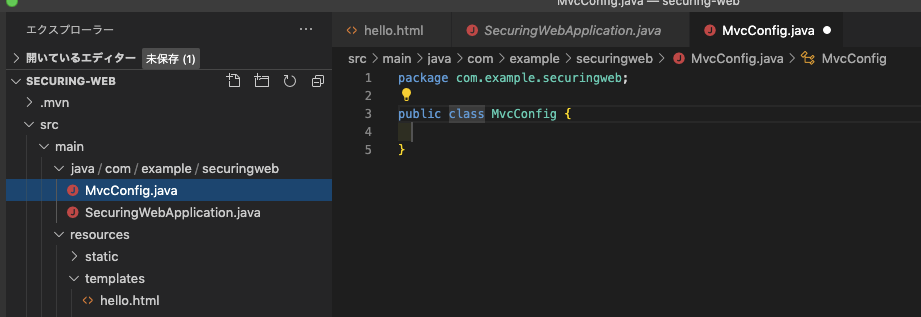
MvcConfig.javaを作成しよう!
src/main/java/com/example/securingweb/ にMvcConfig.javaファイルを作成します。
公式を参考にコードを追加します。
package com.example.securingweb;

import org.springframework.context.annotation.Configuration;
import org.springframework.web.servlet.config.annotation.ViewControllerRegistry;
import org.springframework.web.servlet.config.annotation.WebMvcConfigurer;

@Configuration
public class MvcConfig implements WebMvcConfigurer {

  public void addViewControllers(ViewControllerRegistry registry) {
    registry.addViewController("/home").setViewName("home");
    registry.addViewController("/").setViewName("home");
    registry.addViewController("/hello").setViewName("hello");
    registry.addViewController("/login").setViewName("login");
  }

}
**@Configuration**アノテーションは、Springの色々な設定をJavaのコード上で行えるようにするためにクラスに付与するものです。(設定クラス)
WebMvcConfigurerインターフェースを実装したMvcConfigクラスを作成し、addViewControllersメソッドをオーバーライドしています。
registry.addViewController("/home").setViewName("home");
別のControllerを用意して、@GetMappingアノテーションを用いてView名をreturnするやり方するのではなく、
上記記述によって、
http://localhost:8080/homeというURLの時、home.htmlというテンプレートを参照するようになります。
URLとテンプレートがマッピングされるようにしているみたいです。
login.htmlの実装は後ほど。
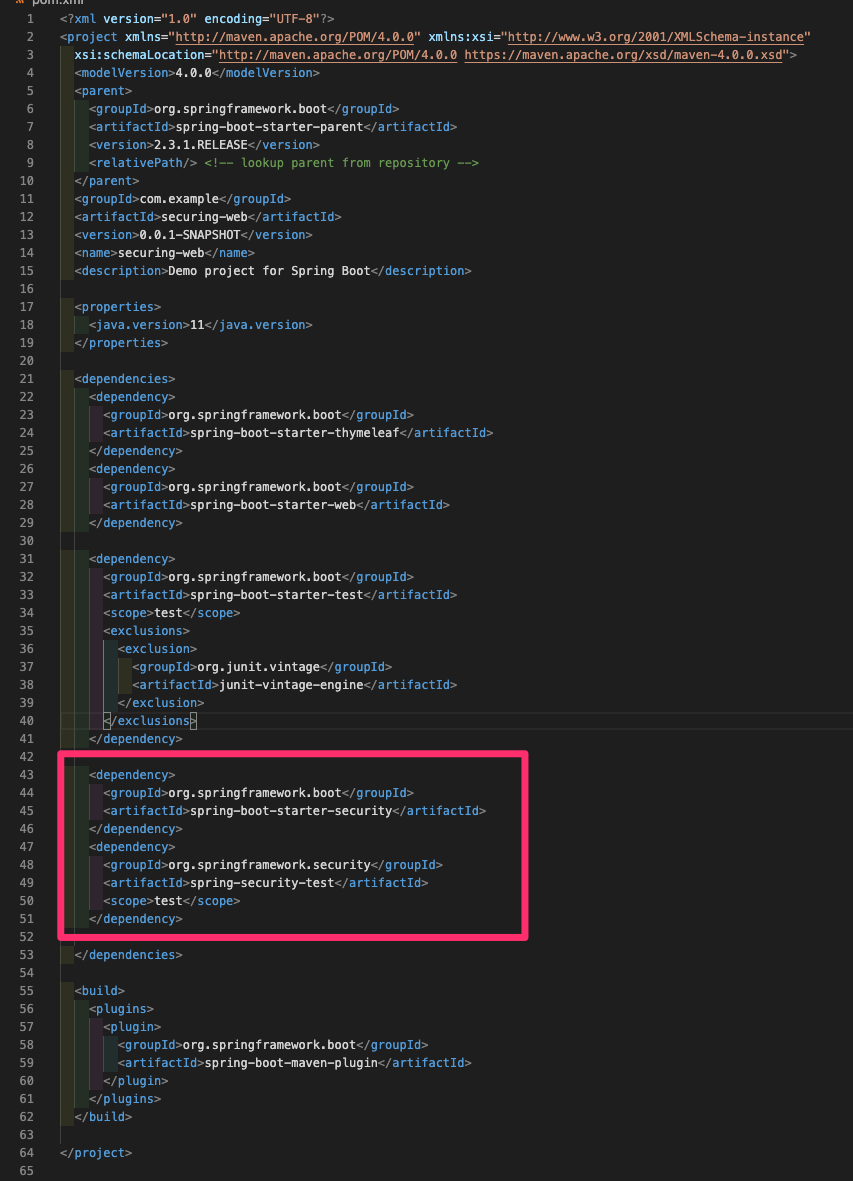
pom.xmlにSpring Securityを追加しよう!
Spring Securityを使用する為に、pom.xmlに以下を追加してください。
Spring Securityとは、Webアプリケーションにセキュリティ機能を追加するためのフレームワーク。
認証、認可、一般的な悪用に対する保護の包括的なサポートを提供します。
<dependency>
  <groupId>org.springframework.boot</groupId>
  <artifactId>spring-boot-starter-security</artifactId>
</dependency>

<dependency>
  <groupId>org.springframework.security</groupId>
  <artifactId>spring-security-test</artifactId>
  <scope>test</scope>
</dependency>
WebSecurityConfig.javaを作成しよう!
src/main/java/com/example/securingweb/ にWebSecurityConfig.javaファイルを作成します。
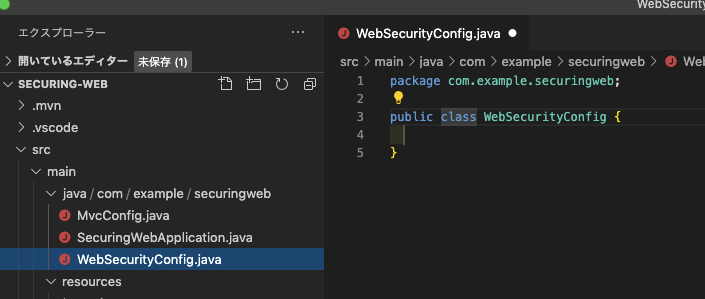
公式を参考にコードを追加します。
package com.example.securingweb;

import org.springframework.context.annotation.Bean;
import org.springframework.context.annotation.Configuration;
import org.springframework.security.config.annotation.authentication.builders.AuthenticationManagerBuilder;
import org.springframework.security.config.annotation.web.builders.HttpSecurity;
import org.springframework.security.config.annotation.web.configuration.EnableWebSecurity;
import org.springframework.security.config.annotation.web.configuration.WebSecurityConfigurerAdapter;

import org.springframework.security.crypto.bcrypt.BCryptPasswordEncoder;
import org.springframework.security.crypto.password.PasswordEncoder;


@Configuration
@EnableWebSecurity
public class WebSecurityConfig extends WebSecurityConfigurerAdapter {

  @Override
  protected void configure(HttpSecurity http) throws Exception {
    http
      .authorizeRequests()
        .antMatchers("/", "/home").permitAll()
        .anyRequest().authenticated()
        .and()
      .formLogin()
        .loginPage("/login")
        .permitAll()
        .and()
      .logout()
        .permitAll();
  }

  @Override
  protected void configure(AuthenticationManagerBuilder auth) throws Exception {

    String password = passwordEncoder().encode("password");

    auth.inMemoryAuthentication()
        .passwordEncoder(passwordEncoder())
        .withUser("user").password(password).roles("USER");
  }

  @Bean
  public PasswordEncoder passwordEncoder() {
      return new BCryptPasswordEncoder();
  }

}
追加したコードを深掘りしていきます。
①@EnableWebSecurityとWebSecurityConfigurerAdapterクラスの継承
@Configuration
@EnableWebSecurity
public class WebSecurityConfig extends WebSecurityConfigurerAdapter {
  // 省略
}
@EnableWebSecurityアノテーションを付与する事により、Spring Securityが有効になります。
そして、WebSecurityConfigurerAdapterという抽象クラスを継承しています。このクラスにある、configureメソッドをオーバーライドして、
ページのアクセス制限の有無を実装していきます。
②ページのアクセス制限を設定する
@Override
protected void configure(HttpSecurity http) throws Exception {
  http
    .authorizeRequests()
      .antMatchers("/", "/home").permitAll() // アクセス制限が必要のないURL
      .anyRequest().authenticated()  // その他URLは、認証が必要。認証済みではないとアクセスできない
      .and()
    .formLogin()
      .loginPage("/login") // ログイン画面もアクセス制限なし
      .permitAll() // 認証は不要
      .and()
    .logout()
      .permitAll(); // 認証は不要
}
configureメソッドをオーバーライドしています。
引数でHttpSecurityを受け取っており、httpリクエスト関連の部分についての設定を記述するためのメソッドになっています。
ログイン、ログアウト、その他のページのアクセス時に認証は必要であるのかどうかを設定しています。
③認証するユーザーの設定
この部分の実装は、公式ガイド通りに進めるとdeprecated(非推奨)と言われてしまいました。
ですので、少し違う実装になっています。
@Override
protected void configure(AuthenticationManagerBuilder auth) throws Exception {

// パスワードをエンコード
String password = passwordEncoder().encode("password");

// インメモリの認証を行うための設定
auth.inMemoryAuthentication()
    .passwordEncoder(passwordEncoder())
    .withUser("user").password(password).roles("USER");
}

@Bean
public PasswordEncoder passwordEncoder() {
  return new BCryptPasswordEncoder();
}
**PasswordEncoder passwordEncoder()**は、パスワードのハッシュ化をする為のメソッドを定義しています。
そして、文字列のpasswordをString password = passwordEncoder().encode("password");の部分でハッシュ化しています。
AuthenticationManagerBuilderは、メモリ内認証を可能にする為のクラスで、
// インメモリの認証を行うための設定
auth.inMemoryAuthentication()
    .passwordEncoder(passwordEncoder())
    .withUser("user").password(password).roles("USER");
}
ここでそれを実装しており、認証するユーザーの設定を行っています。
login.htmlを作成しよう!
src/main/resources/templates/ にlogin.htmlファイルを作成します。
公式を参考にコードを追加します。ログインページになります。
<!DOCTYPE html>
<html xmlns="http://www.w3.org/1999/xhtml" xmlns:th="https://www.thymeleaf.org"
      xmlns:sec="https://www.thymeleaf.org/thymeleaf-extras-springsecurity3">
  <head>
    <title>Spring Security Example </title>
  </head>
  <body>
    <div th:if="${param.error}">
      Invalid username and password.
    </div>
    <div th:if="${param.logout}">
      You have been logged out.
    </div>
      <form th:action="@{/login}" method="post">
        <div><label> User Name : <input type="text" name="username"/> </label></div>
        <div><label> Password: <input type="password" name="password"/> </label></div>
        <div><input type="submit" value="Sign In"/></div>
      </form>
  </body>
</html>
User NameとPasswordを入力する欄があります。
th:if="${param.error}は、ユーザー認証が失敗した時に表示される領域で、
th:if="${param.logout}は、サインアウトをした際に表示される領域となります。(hello.htmlでSign Outボタンが押された後に表示される)
3.実行してみよう!
アプリケーション実行の準備が出来たので確認しましょう。
ターミナルで以下のコマンドを入力してEnterしてください。
$ ./mvnw spring-boot:run
トップページが表示されます。
hereをクリックすると、ログインページが表示されます。
適当なUser NameとPasswordを入力してSign Inボタンを押してみると、
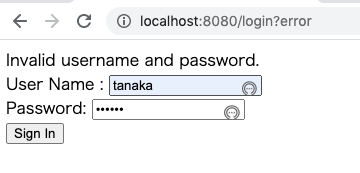
ログインページが再表示され、エラーメッセージも表示されていますね。
次に、Uesr Nameにuser、Passwordにpasswordと入力してSign Inボタンを押してみると、

認証された人しか閲覧できないページに遷移出来ました。

Sign Outボタンを押すと、
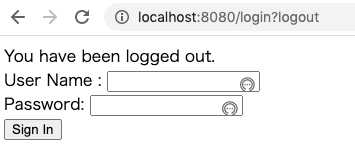
先ほどのログインページにリダイレクトされ、メッセージも表示されています。
お疲れ様でした。完成です!
参考サイト
User.withDefaultPasswordEncoder()のdeprecatedの代替案
【Spring Security はじめました】#2 ユーザー認証
Spring Security で「Hello World!」