2023/12/28
新規作成
経緯・課題
・IBM Cloud SaaS 版 sysdig secure で Vulnerability Engine版 が利用できるようになったので、エージェント導入など、環境設定の情報を整理しました。RuntimeとRegistryスキャンが対象です。
前提・環境など
・MacOS Sonoma (14.1) Apple M1 Pro
・Chrome
・Firefox (OpenShift 4.12.44 Private エンドポイント参照用)
・OpenShift 4.12
・helm
・IBM Contianer Registry
・IBM Cloud
参考知識
1.2種類のEngine
Sysdig Secureには[Legacy] Scanning engineと New Vulnerability Management engineの2種類のエンジンがあります。
利用中のエンジンがいずれのver.かどうかについては、メニュー一覧にScan が含まれるか、Vulnerability が含まれるかによって判断できます。または、Settings > User Profileメニューから、設定が可能です。(2022.4.19以降の新規ユーザーについては、Legacy Scanning engineの利用には別途問い合わせが必要だそうです。)
詳細:Which Scanning Engine to Use
2.Sysdig Secure 各種機能の利用について
以降は、Vulnerability engine の利用を想定して記載します。
2.1 Runtime
Sysdig Monitor のエージェントを一括で導入する場合 (推奨手順)
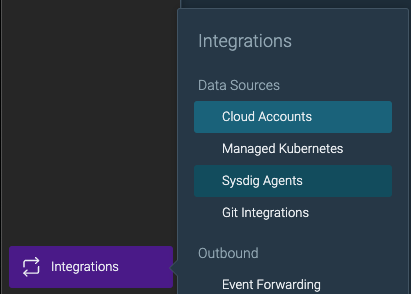
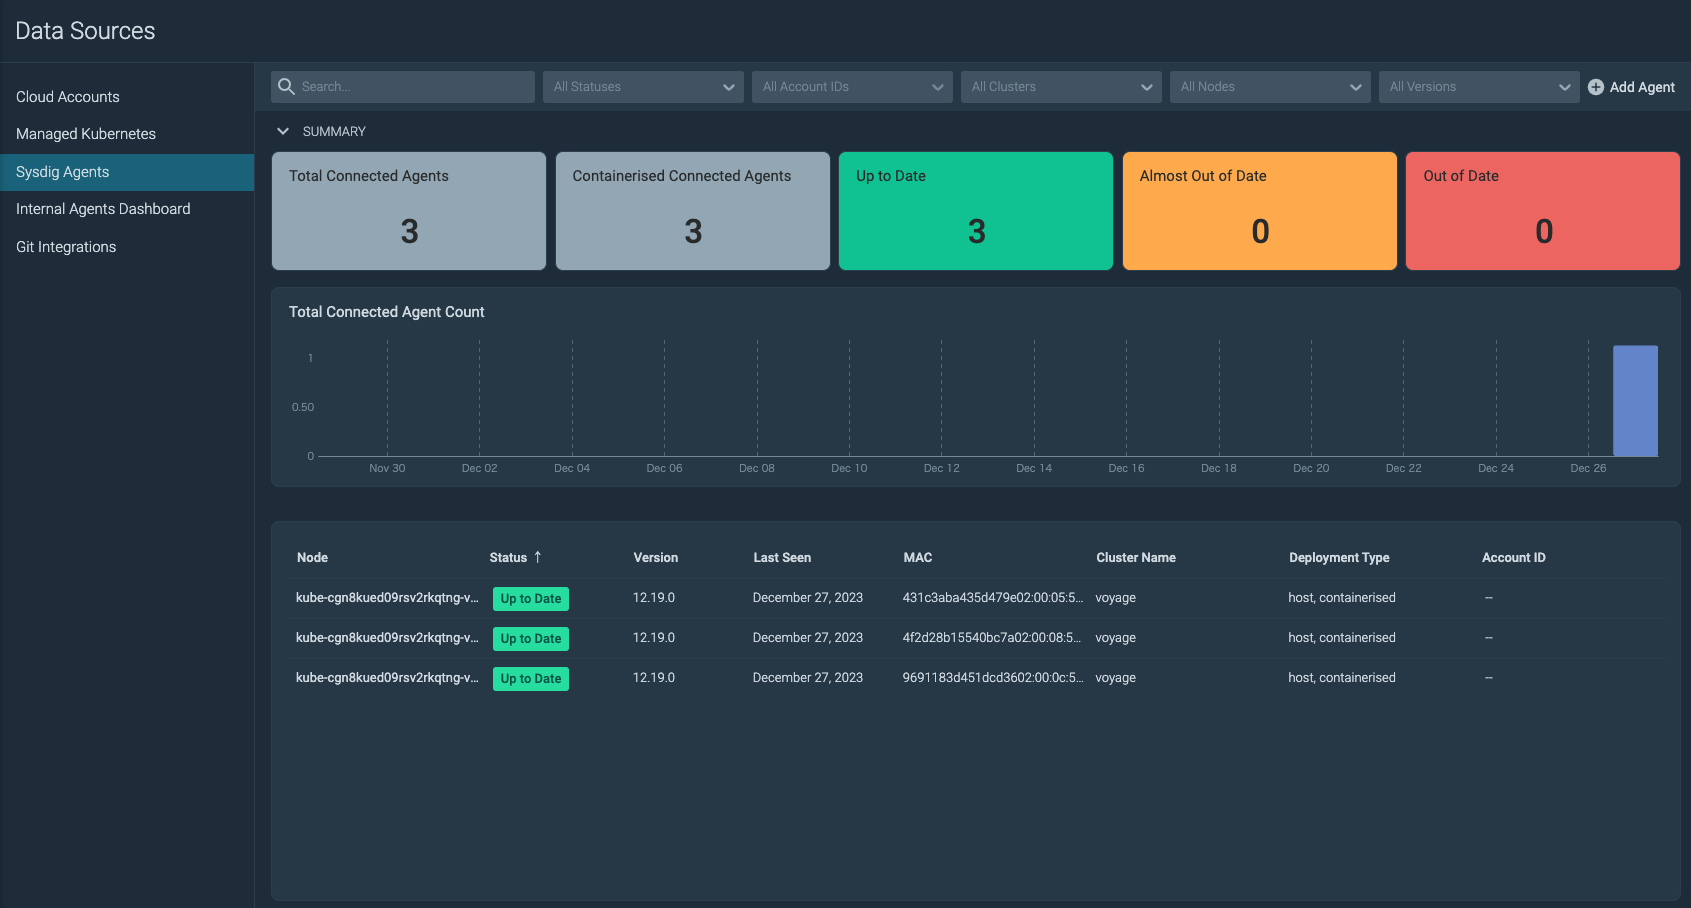
Integrations > Data Sources > Sysdig Agents を選択します。
右上の+ Add Agentをクリックします。
Kubernetes を選択します。
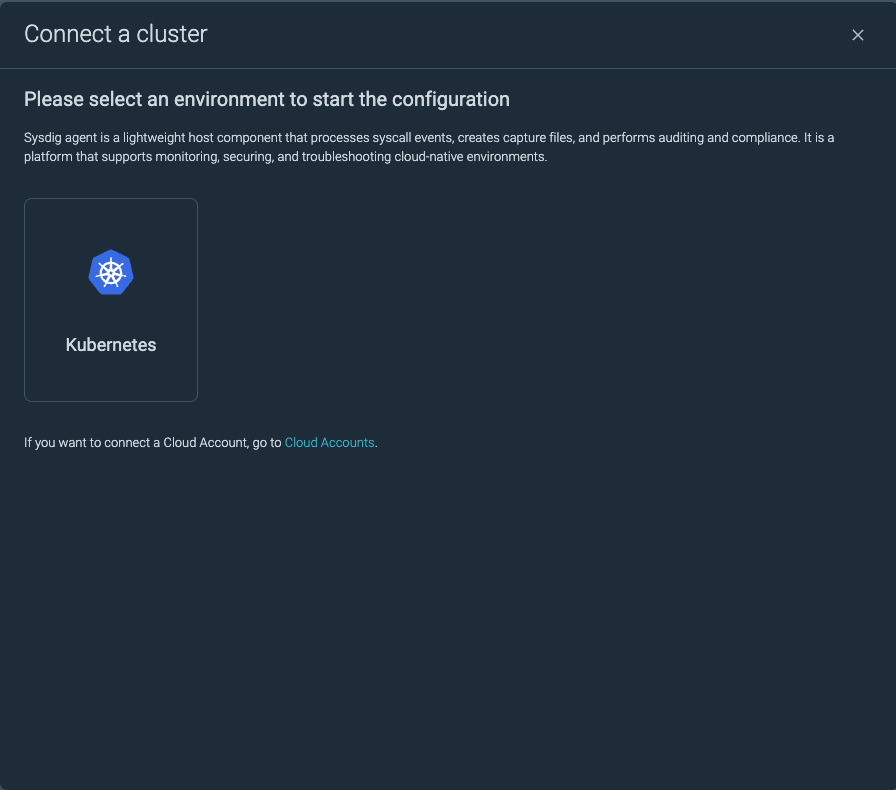
cluster Nameを実際の環境に沿って編集し、Run helm below: 以下をコピーして、OpenShift クラスターの管理サーバー(Helm コマンドが利用可能なサーバー)でコマンド実行します。

Sysdig Monitor のエージェントは導入済みで、Secureの機能のみ追加したい場合
前述の一括導入の手順でコマンドを取得した後、コマンド最終行に以下のオプションを追加します。(前行に、改行記号の¥を忘れないでください。)
--set agent.enabled=FALSE
このオプション追加により、node-analyzerとKSPMに関連するリソースのみが導入されます。
OpenShiftに導入されるリソース
| リソース | 用途 | 名称 | num | 概要 |
|---|---|---|---|---|
| pod | sysdig-agent | pod/sysdig-agent-xxx | 3 | Sysdig Monitorのメトリクス収集に必要な最低限のagent |
| pod | node-anlyzer | pod/sysdig-agent-node-analyzer-xxx | 3 | Sysdig Secureの Vulnerabilities > Runtime機能を利用するために必要なagent |
| pod | KSPM | pod/sysdig-agent-kspmcollector-xxx | 1 | Sysdig SecureのKubernetes Security Posture Management (KSPM)(Posture機能)に必要なagent |
| daemonset | sysdig-agent | sysdig-agent | 1 | Sysdig Monitorに必要なsysdig-agentのデーモンセット |
| daemonset | node-analyzer | sysdig-agent-node-analyzer | 1 | Sysdig Secureのためのデーモンセット |
| deployment | KSPM | sysdig-agent-kspmcollector | 1 | Sysdig Secureのためのデプロイメント |
| replicaset | KSPM | sysdig-agent-kspmcollector-xxxxxx | 1 | Sysdig Secureのためのレプリカセット |
node-analyzer pod の内容
node-analyzer には、3つのコンテナが含まれます。
- sysdig-kspm-analyzer
- sysdig-runtime-scanner
- sysdig-host-scanner
導入後30分から1時間程度で、以下のような画面に切り替わります。
Vulnerabilitys > Overview

vulnerability > Runtimeメニュー

Posutre メニュー

5.Copy and run the Helm commands. This will install the Sysdig agent and give you:

Runtime Threat Detection
Vulnerability Host Scanning
Runtime Image Scanning
Kubernetes Security Posture Management (Compliance)
詳細:Documentation/ Installation/ Sysdig Secure/ Install Agent Components/ Kubernetes
2.2 Registry
指定したRegistryを定期的にスキャンするcronjobをOpenShiftに作成します。ここでは、IBM Container Registryを対象とします。
詳細はinstall-registry-scanner/#ibm-container-registryを参照ください。
2.2.1 helmでのregistry-scanner導入
以下のように、helm installを実行します。コマンド実行によって、OpenShiftクラスターにcronjobが作成されます。
$ cat registry_helm.sh

helm install registry-scanner sysdig/registry-scanner --version=1 \
--set config.secureBaseURL="<Sysdig Secure URL>" \ #1.Sysdig Secure のエンドポイントURL
--set config.secureAPIToken="<Sysdig Secure APIToken>"  \ #2.Sysdig Secure のAPIToken
 --set config.registryType=icr \ #3.IBM Container Registryの指定
--set config.registryURL=https://us.icr.io \ #4.ICRのURL
--set config.registryUser=iamapikey \ #5.iamapikeyによる認証
--set config.registryPassword="<apikey password>" \ #5.iamapikeyによる認証
--set config.registryAccountId="<IBM Cloud Account ID>" #6.IBMCloudアカウント
$ ./registry_helm.sh
NAME: registry-scanner
LAST DEPLOYED: Wed Dec 27 16:46:29 2023
NAMESPACE: ibm-observe
STATUS: deployed
REVISION: 1
TEST SUITE: None
NOTES:
# ============================================================================================
#  Info: Chart version 1.1.27 has been installed with Registry Scanner 0.2.62.
#
#        The chart version follows SemVer (https://semver.org/), you can pin
#        the chart version with --version=1, --version=1.0, --version=1.0.0, etc.
#        Using --version=1 will ensure that you get the latest 1.x.x version, but
#        you don't get any breaking changes when updating.
#
#        For more information, or you are still using the legacy scanning engine,
#        please check the documentation:
#        > https://docs.sysdig.com/en/docs/installation/container-registry-scanner/
# ============================================================================================
#
# Cronjob 'registry-scanner' with schedule: "0 6 * * 6" has been created to perform a periodical scan.
# For troubleshooting, check the status of the jobs and logs of the 'registry-scanner' pods that are created on every execution.
#
2.2.2 Sysdig Secure関連パラメーター
上述の #1〜#2 のパラメータは、それぞれ Sysdig Secure コンソールから取得します。
#1: Sysdig Secure URL
前述の node-agentインストール時のコマンドと同様です。apiEndpoint設定オプションの以下の行を参考にします
--set nodeAnalyzer.nodeAnalyzer.apiEndpoint=au-syd.security-compliance-secure.cloud.ibm.com \
--set config.secureBaseURL="https://au-syd.security-compliance-secure.cloud.ibm.com" \
#2: Sysdig Secure APIToken
Settings > User Profile から、 Sysdig Secure API の項目を参照します。以下のようにマスキングされている値をコピーします。Agent Access Key とは異なることに注意してください。
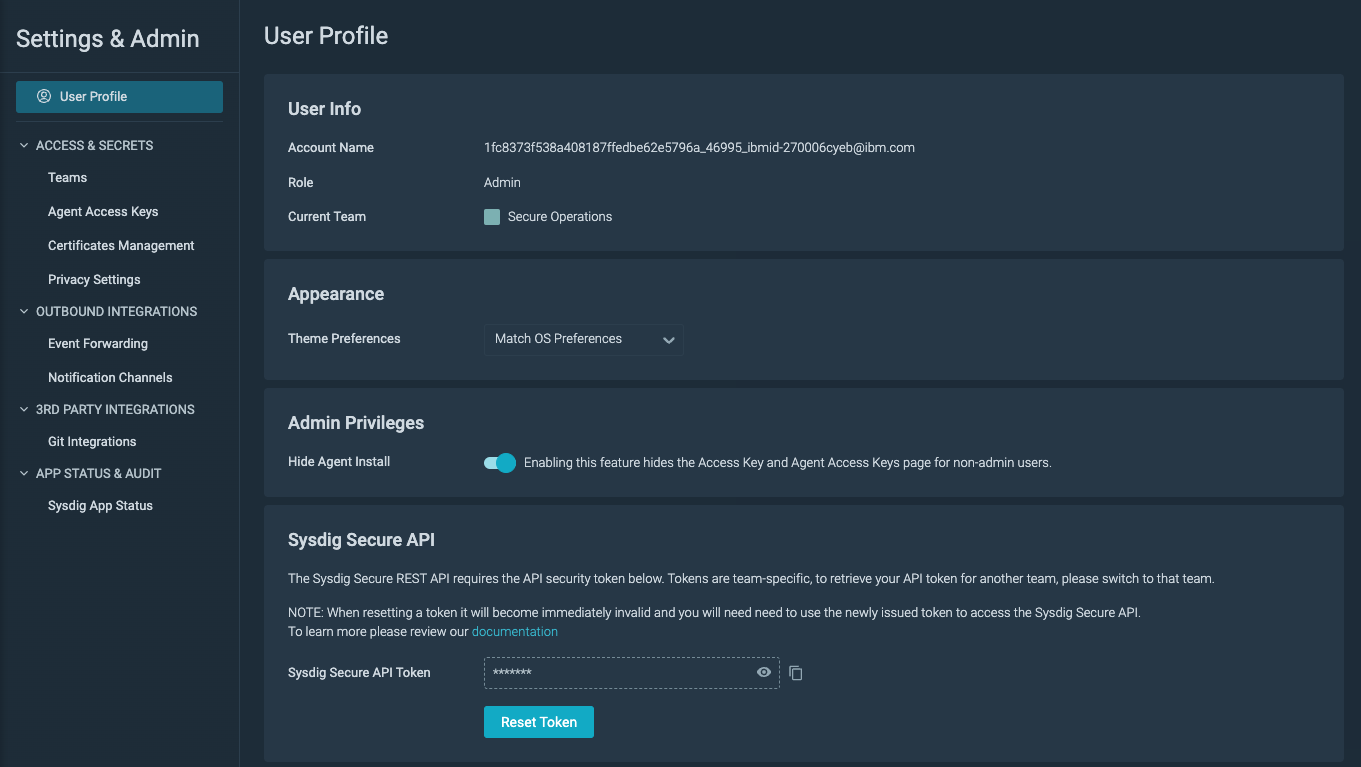
Sysdig Secure API Token ********
--set config.secureAPIToken="********(実際の値に置き換えてください)" \
Sysdig Secure 認証チェック
helmコマンドの実行前に、SecureサーバーURLとAPI Tokenが正しいかチェックができます。
$ curl --header "Authorization: Bearer zzzzzzzzzzzzzzzzzzzzzz" https://au-syd.security-compliance-secure.cloud.ibm.com/api/registryscanner/v1/images
unable to authenticate
$ curl --header "Authorization: Bearer xxxxxxxxxxxxxxxxxxxxxxx" https://au-syd.security-compliance-secure.cloud.ibm.com/api/registryscanner/v1/images
{"totalFound":1,"images":[{"id":"9db99f5a-9507-46db-8d1b-9acf86e3972b","detectionTimestamp":"2023-12-27T12:52:30.890596Z","scanResultID":"17a4b1583d461e53260567e8ca2fa493","name":"us.icr.io/testb/nginx:latest","vulnerabilities":[0,0,1,14,0,31,4,74],"exploitCount":2,"imageID":"sha256:5628e5ea3c17fa1cbf49692edf41d5a1cdf198922898e6ffb29c19768dca8fd3","registryMetadata":{"name":"us.icr.io","vendor":"icr"},"origin":"sysdig-registry-scanner"}]}
2.2.2 ICR関連パラメーター
上述の #3~6 については、 ICR関連の設定値をおきます。
#3.IBM Container Registryの指定
ここでは、固定で icrを設定します。
--set config.registryType=icr \
#4.ICRのURL
registryのURLに合わせて書き換えます。
--set config.registryURL=https://us.icr.io \
#5.iamapikeyによる認証
ICRの認証をIAM のAPIkeyを用いて行います。
IBM Cloudの管理コンソールから 管理 > アクセス (IAM) メニューを開き、あらかじめAPIキーを作成しておいてください。APIキーの名前(name)は指定不要です。apikeyの値のみを参照します。(<apikey>の値は、APIキー作成時のみ参照可能なため、必ずjson形式でDLするか、コピーしておいてください)

--set config.registryUser=iamapikey \
--set config.registryPassword="<apikey>" \
#6.IBMCloudアカウント
ibmcloudコマンドでのログイン情報を参考に、アカウントIDを取得します。
$ ibmcloud login -sso
API エンドポイント: https://cloud.ibm.com
リージョン: au-syd
y
https://identity-2.ap-north.iam.cloud.ibm.com/identity/passcode からワンタイム・コードを取得して、続行します。
デフォルトのブラウザーで URL を開きますか? [Y/n] >
ワンタイム・コード >
認証中です...
OK

アカウントを選択:
1. 田中 太郎\'s Account (xxxxxxxxxxxxxxxxxxxxxxxxxx)
2. 佐藤 花子\'s private account (yyyyyyyyyyyyyyyyyyyyyyyyyyyy)
3. 鈴木 三郎\'s Account (zzzzzzzzzzzzzzzzzzzzzzzzzzzz)
(略)
数値を入力してください>
カッコのなかの英数字列を指定します。
--set config.registryAccountId="xxxxxxxxxxxxxxxxxxxxxxxxxx"
helmコマンドの実行結果
helmコマンド実行によって、CronJobが以下のように作成されます。
$ oc get cronjob
NAME               SCHEDULE      SUSPEND   ACTIVE   LAST SCHEDULE   AGE
registry-scanner   11 17 * * *   False     0        <none>          6h7m
$
なお、以下のようにhelm upgrade コマンドを実行することにより、スケジュールを再設定することができます。
--set cronjob.schedule="11 17 * * *"
helm upgrade registry-scanner sysdig/registry-scanner \
--set config.secureBaseURL="https://au-syd.security-compliance-secure.cloud.ibm.com" \
--set config.secureAPIToken="<APIToken>" \
--set config.registryType=icr \
--set config.registryURL="https://us.icr.io" \
--set config.registryUser=iamapikey \
--set config.registryPassword="<Password>" \
--set config.registryAccountId="<AccountID>" \
--set cronjob.schedule="11 17 * * *" \
--set config.logging="debug"
参考:Sysdig Helm Charts Repository
2.2.3 ジョブの手動実行
作成したregistry-scanner ジョブは、helm updateコマンドによって実行時間の変更ができますが、テスト等のために即時jobを実行することもできます。
以下のようにcronjobを利用してjobを作成します。
oc create job --from=cronjob/registry-scanner registry-scanner-manual-test
詳細なオプションはこちらを参照してください。
Registry Scanner #manual-launch
Sysdig Helm Charts Repository
2.2.4 ジョブ実行結果
・OpenShift上では以下のようにjobとpodが作成されます。
$ oc get job
NAME                              COMPLETIONS   DURATION   AGE
registry-scanner-manual-test      0/1           16m        16m
$ oc get po
NAME                                          READY   STATUS      RESTARTS      AGE
registry-scanner-manual-test-jpvhz            1/1     Running     0             2m21s
・コンソールでのスキャン結果画面 Vulnerabilities > Registry

ここまでで、RuntimeとRegistryスキャンの機能を追加しました。
その他の機能については別途記事にしたいと思います。