こんにちは、もっちゃんと申します。
前回の記事ではLUISの解説・説明的な内容を扱いました。
そして今回は実際に手を動かしてLUISを使って理解していこうと思います!
さっそく使ってみる
事前準備
Microsoft AzureのサブスクリプションとCognitive Servicesのリソースを事前に作成して用意しておきましょう!
新しいアプリの開始
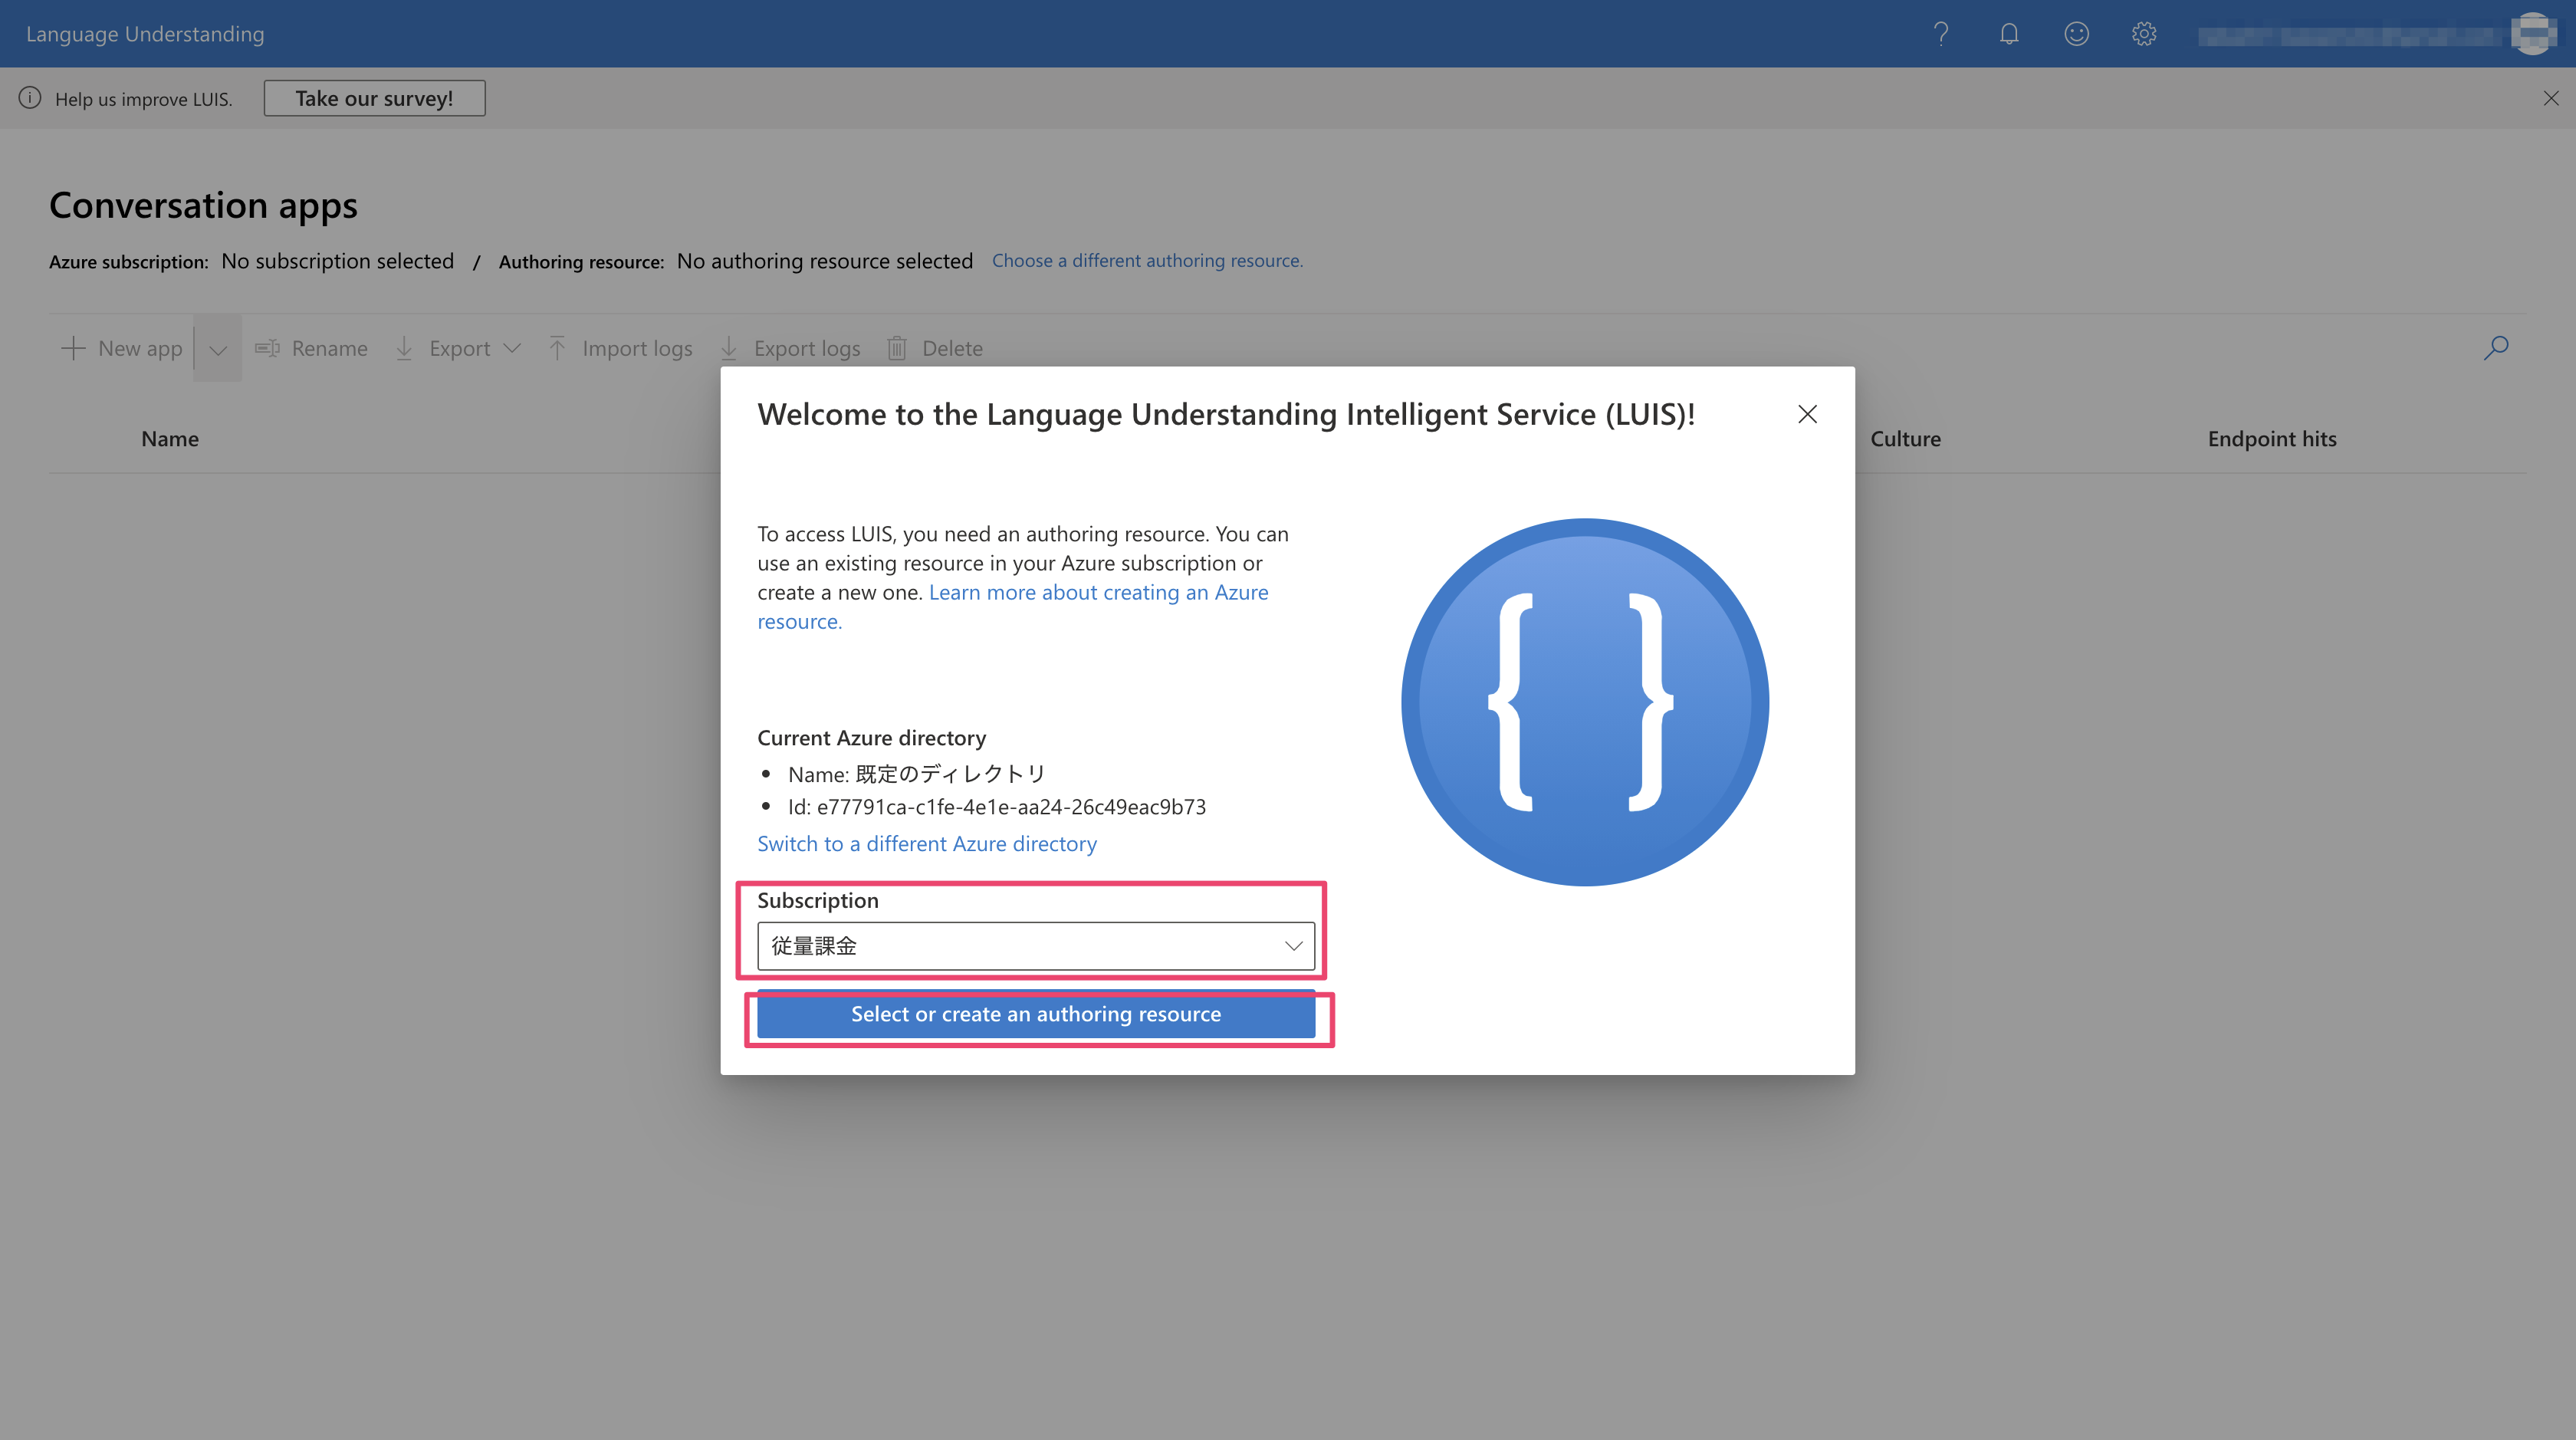
まずは、LUIS 専用のポータル画面にアクセスしてサインインを行い、LUISの画面に入ったら使用するサブスクリプションを選択します。
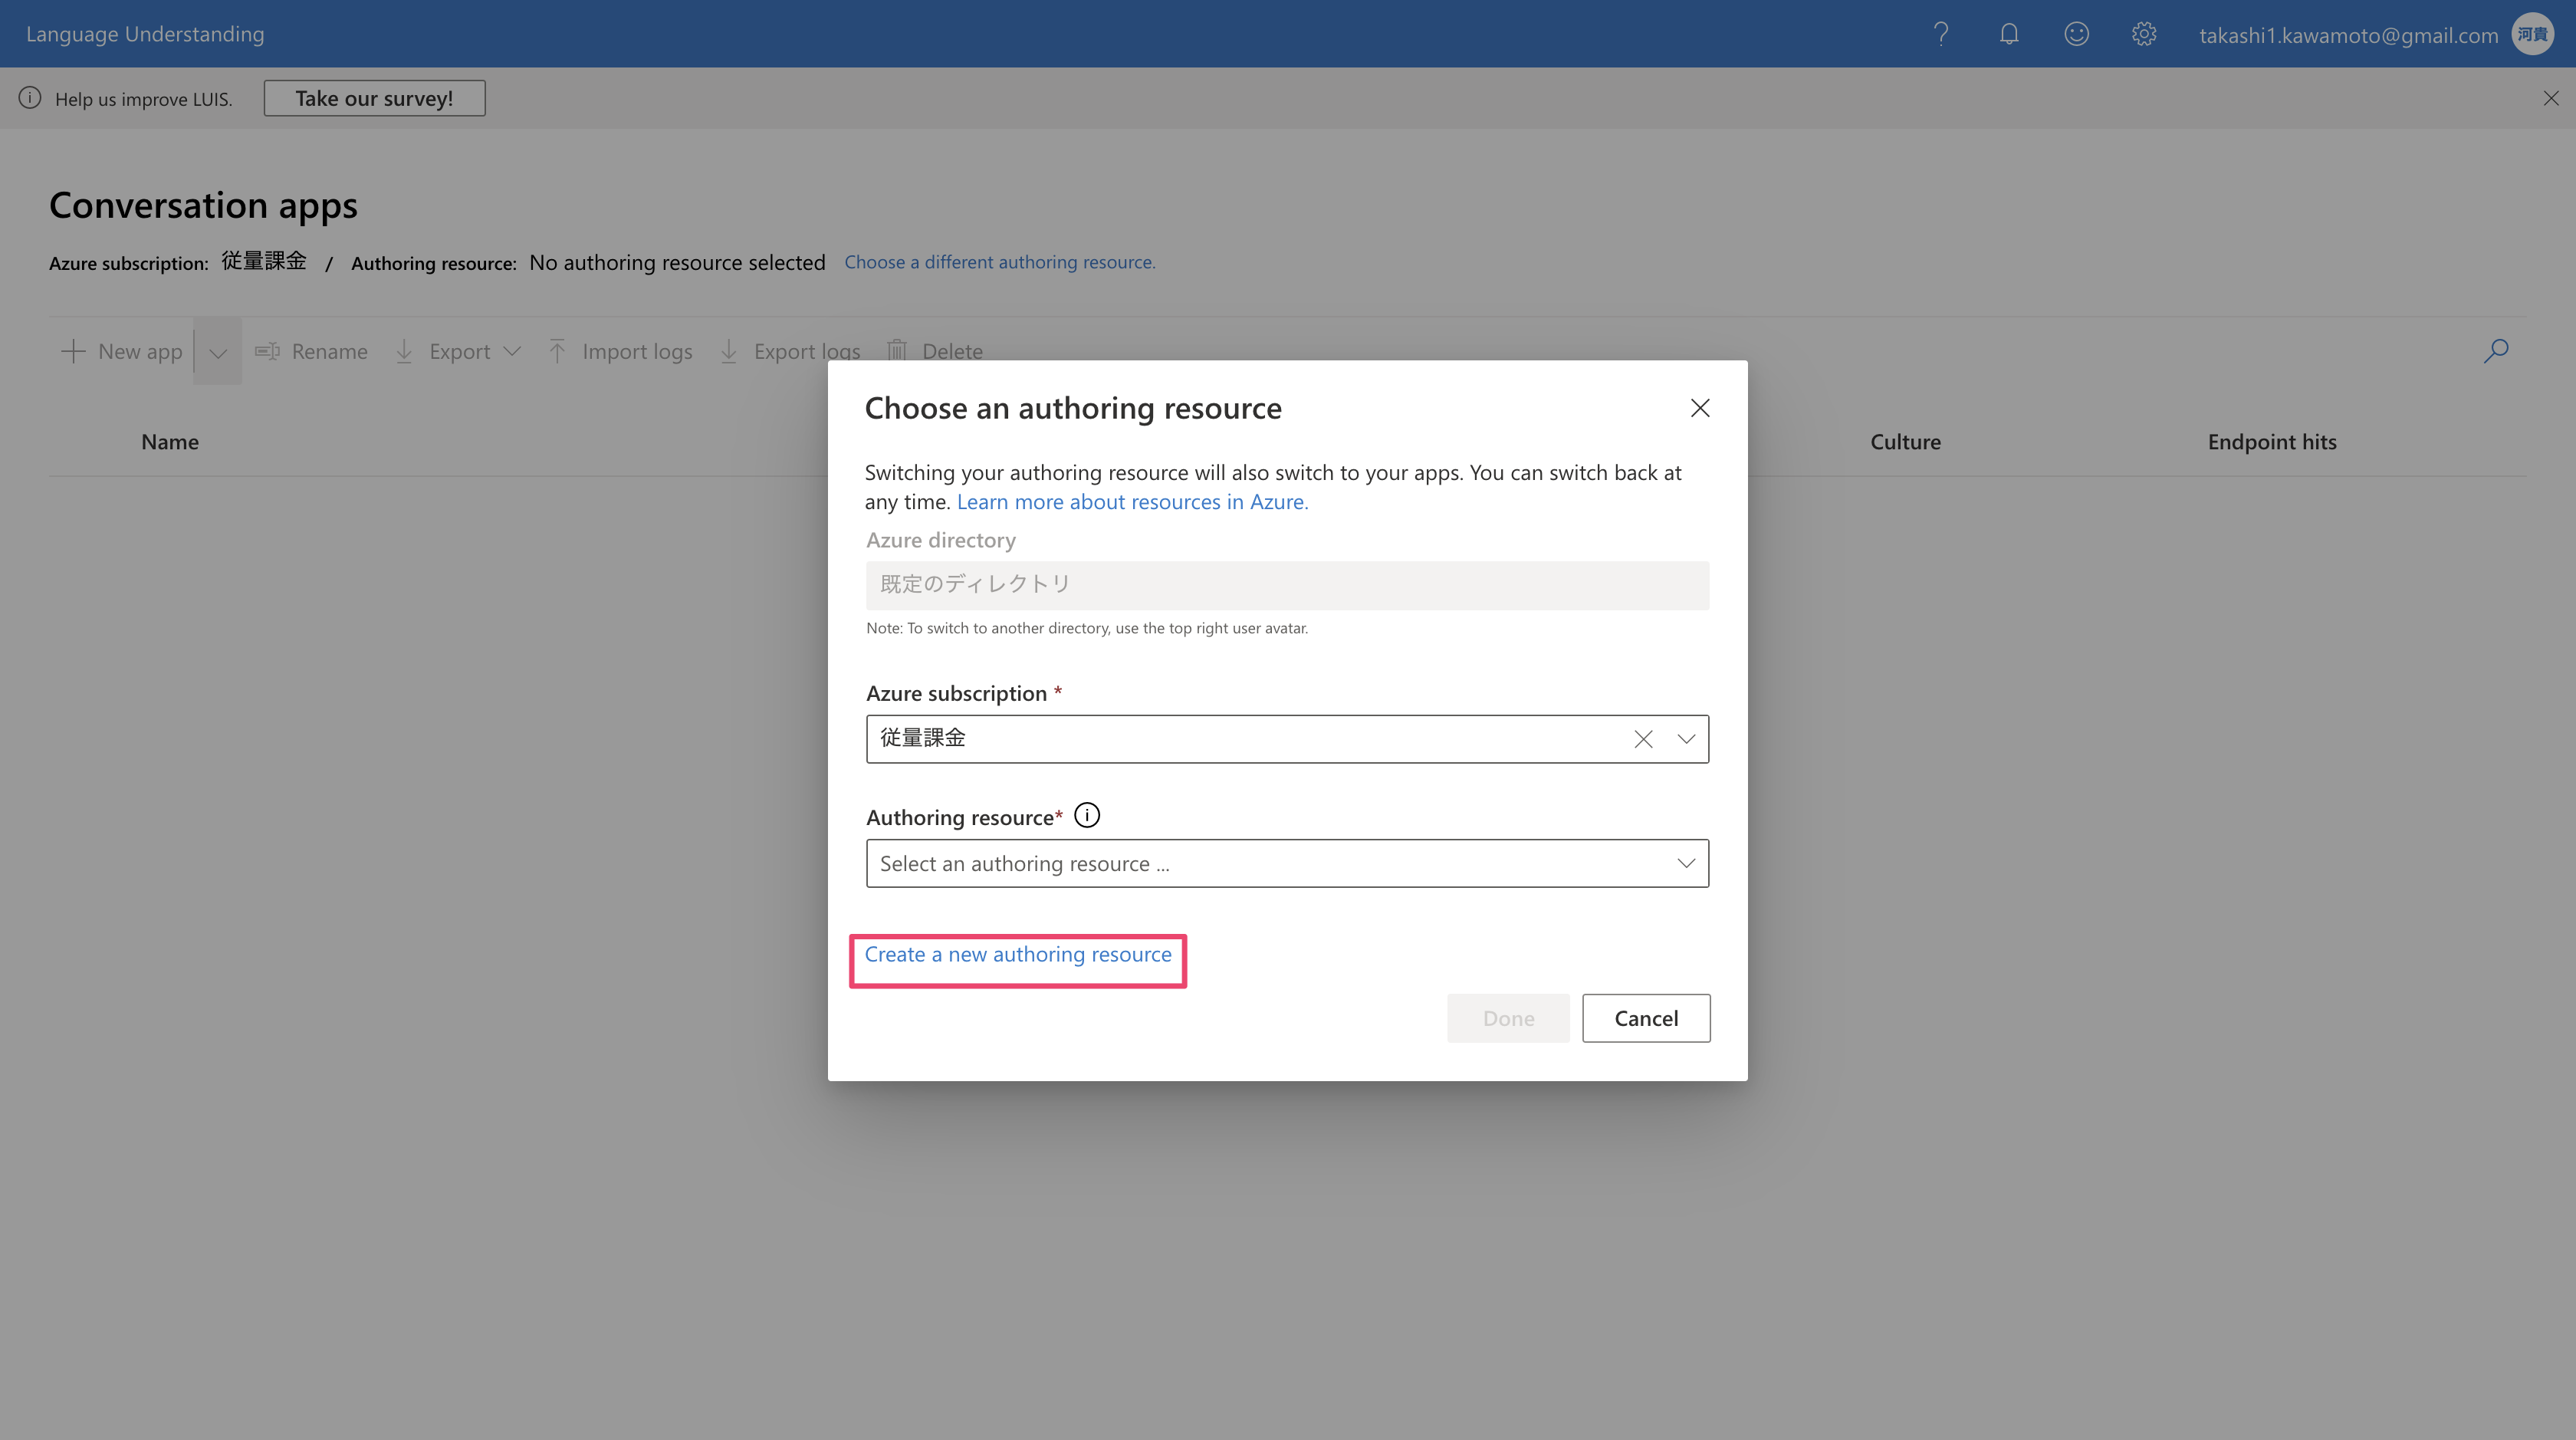
Create a new authoring resourceをクリックして
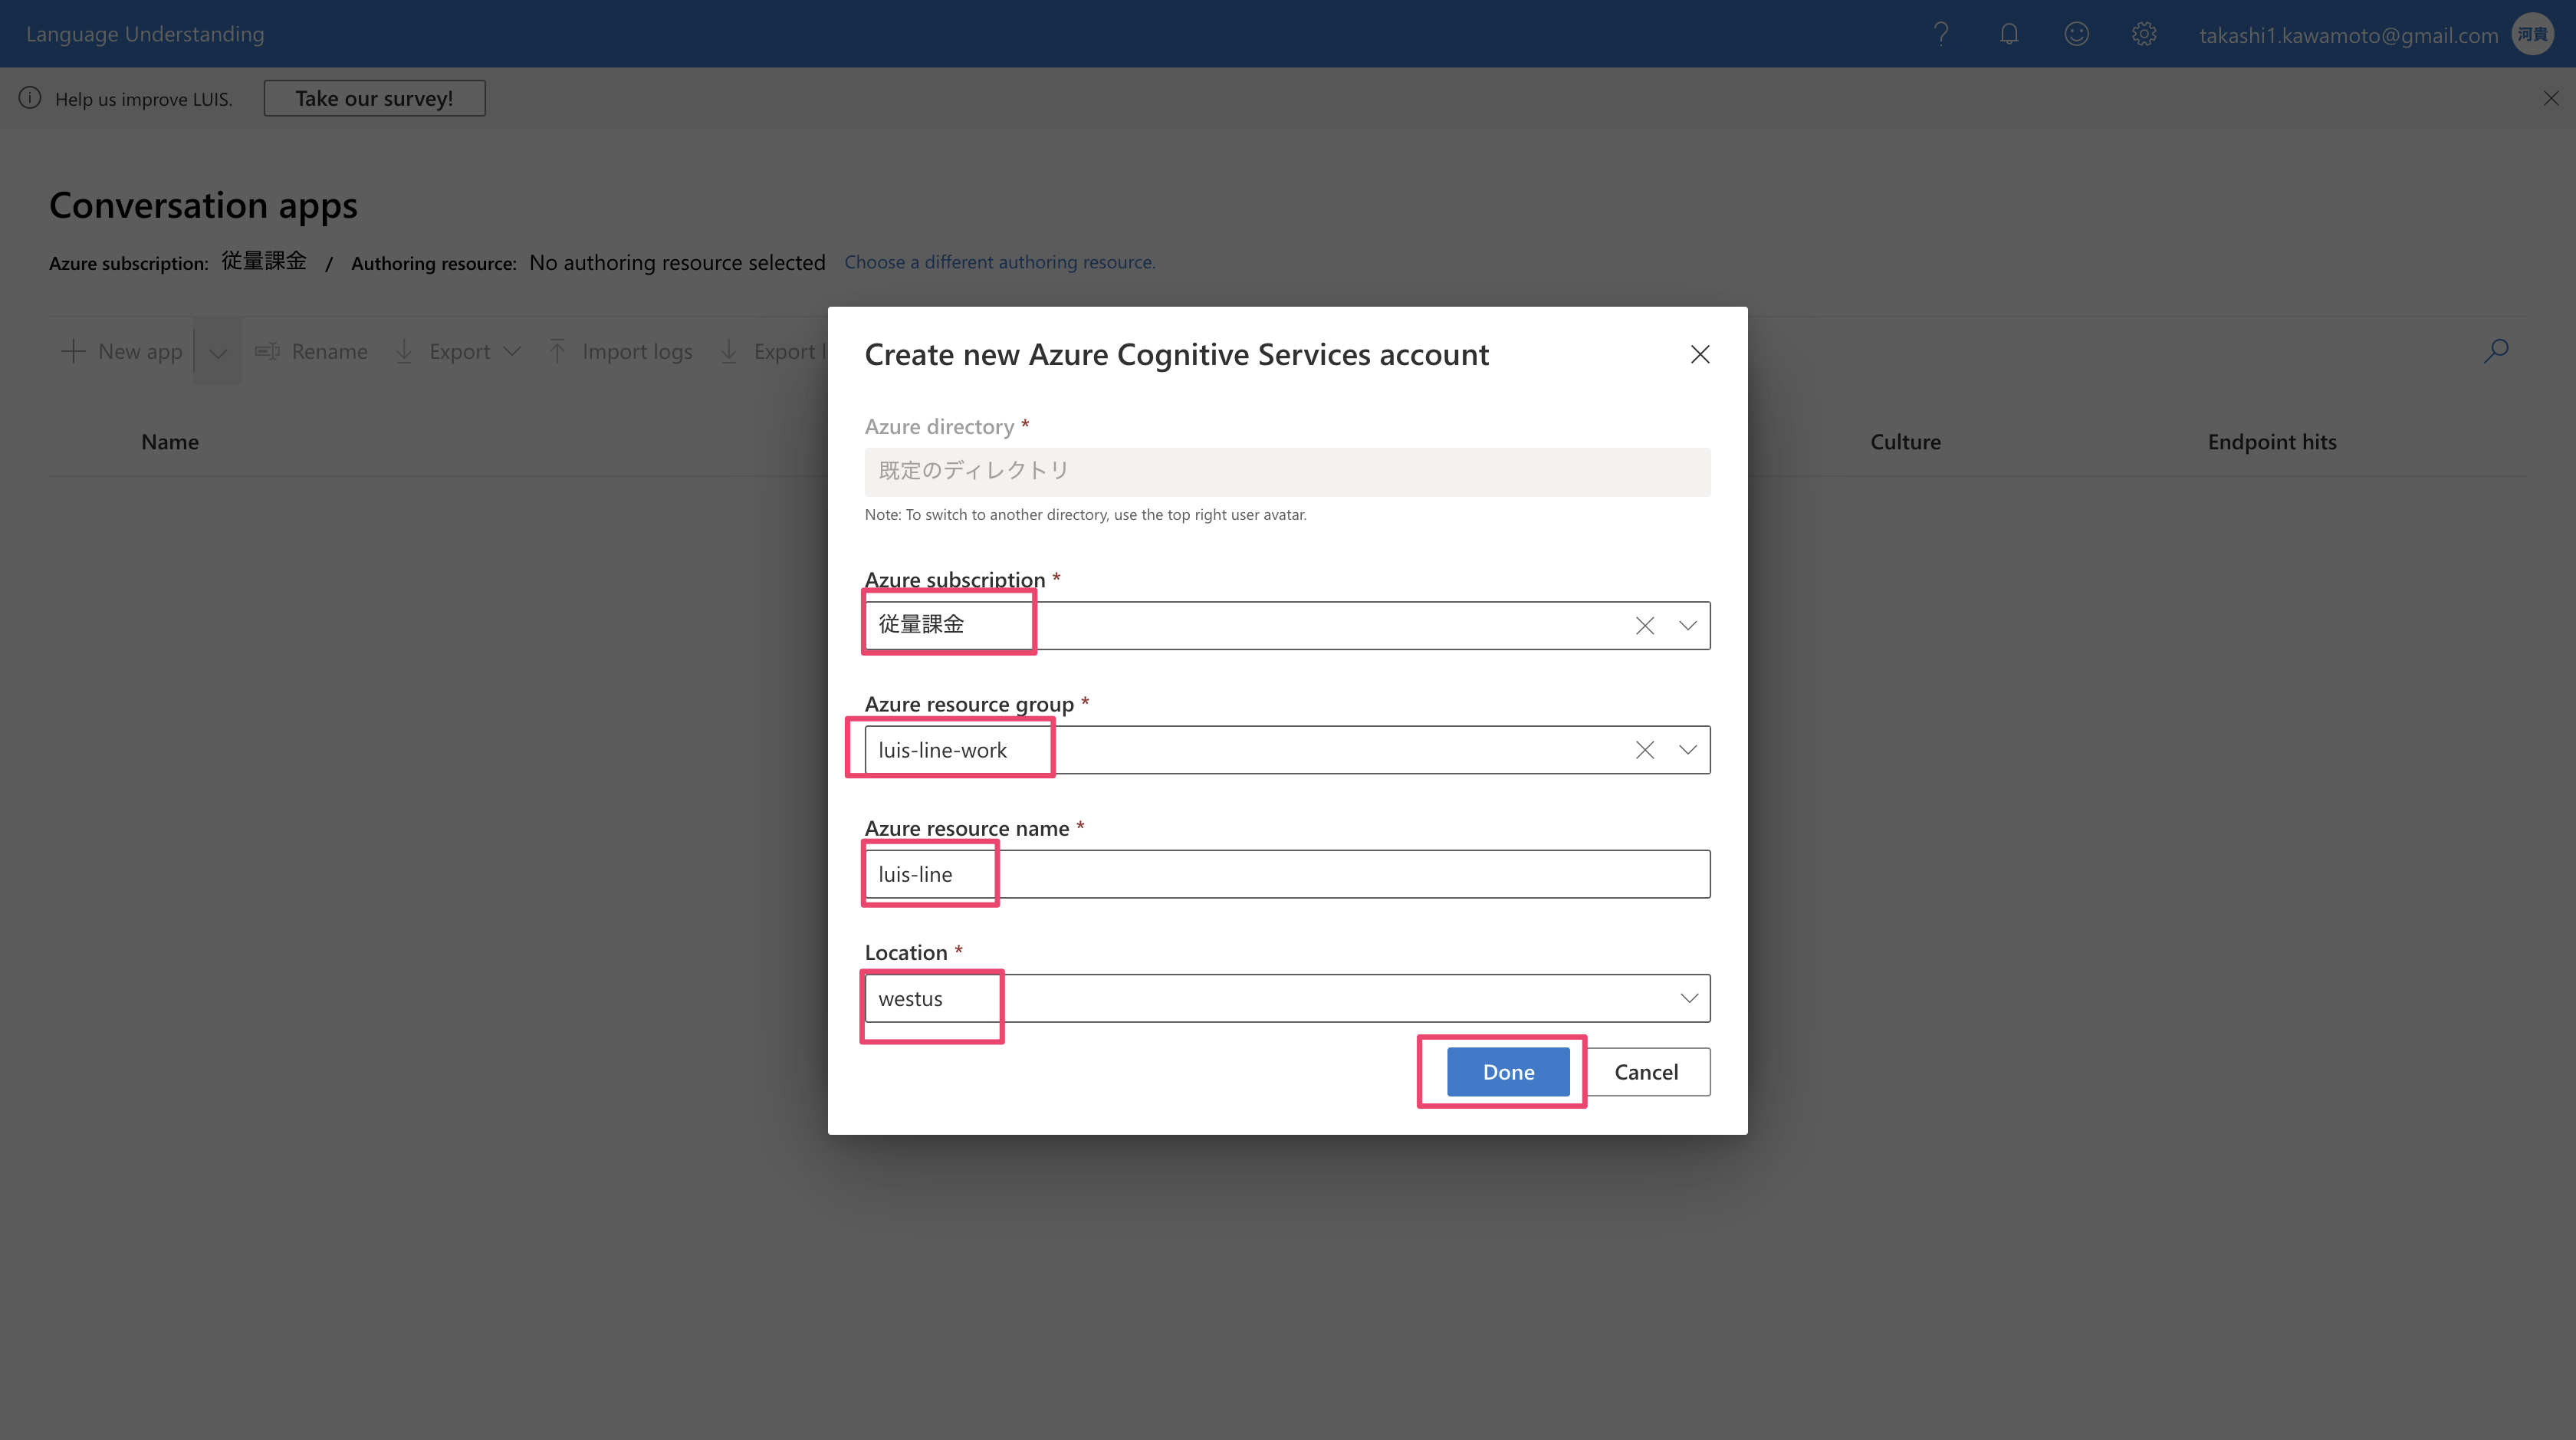
下記の項目を埋め、Doneボタンを押します。
- Azure subscription: 事前準備で用意しておいたサブスクリプション
- Azure resource group: Azureのリソースグループ名
- Azure resource name: 任意のリソース名
- Location: ロケーション(現時点ではLocationは日本のゾーンを選択できない)
するとCreate new app画面が表示れるので、これまた必要な項目を埋めてDoneボタンを押します。
- Name: 任意の名前
- Culture:
Japaneseを選択 - Description: 任意の説明
- Prediction resource: 事前準備で用意しておいたCognitive Servicesのリソース
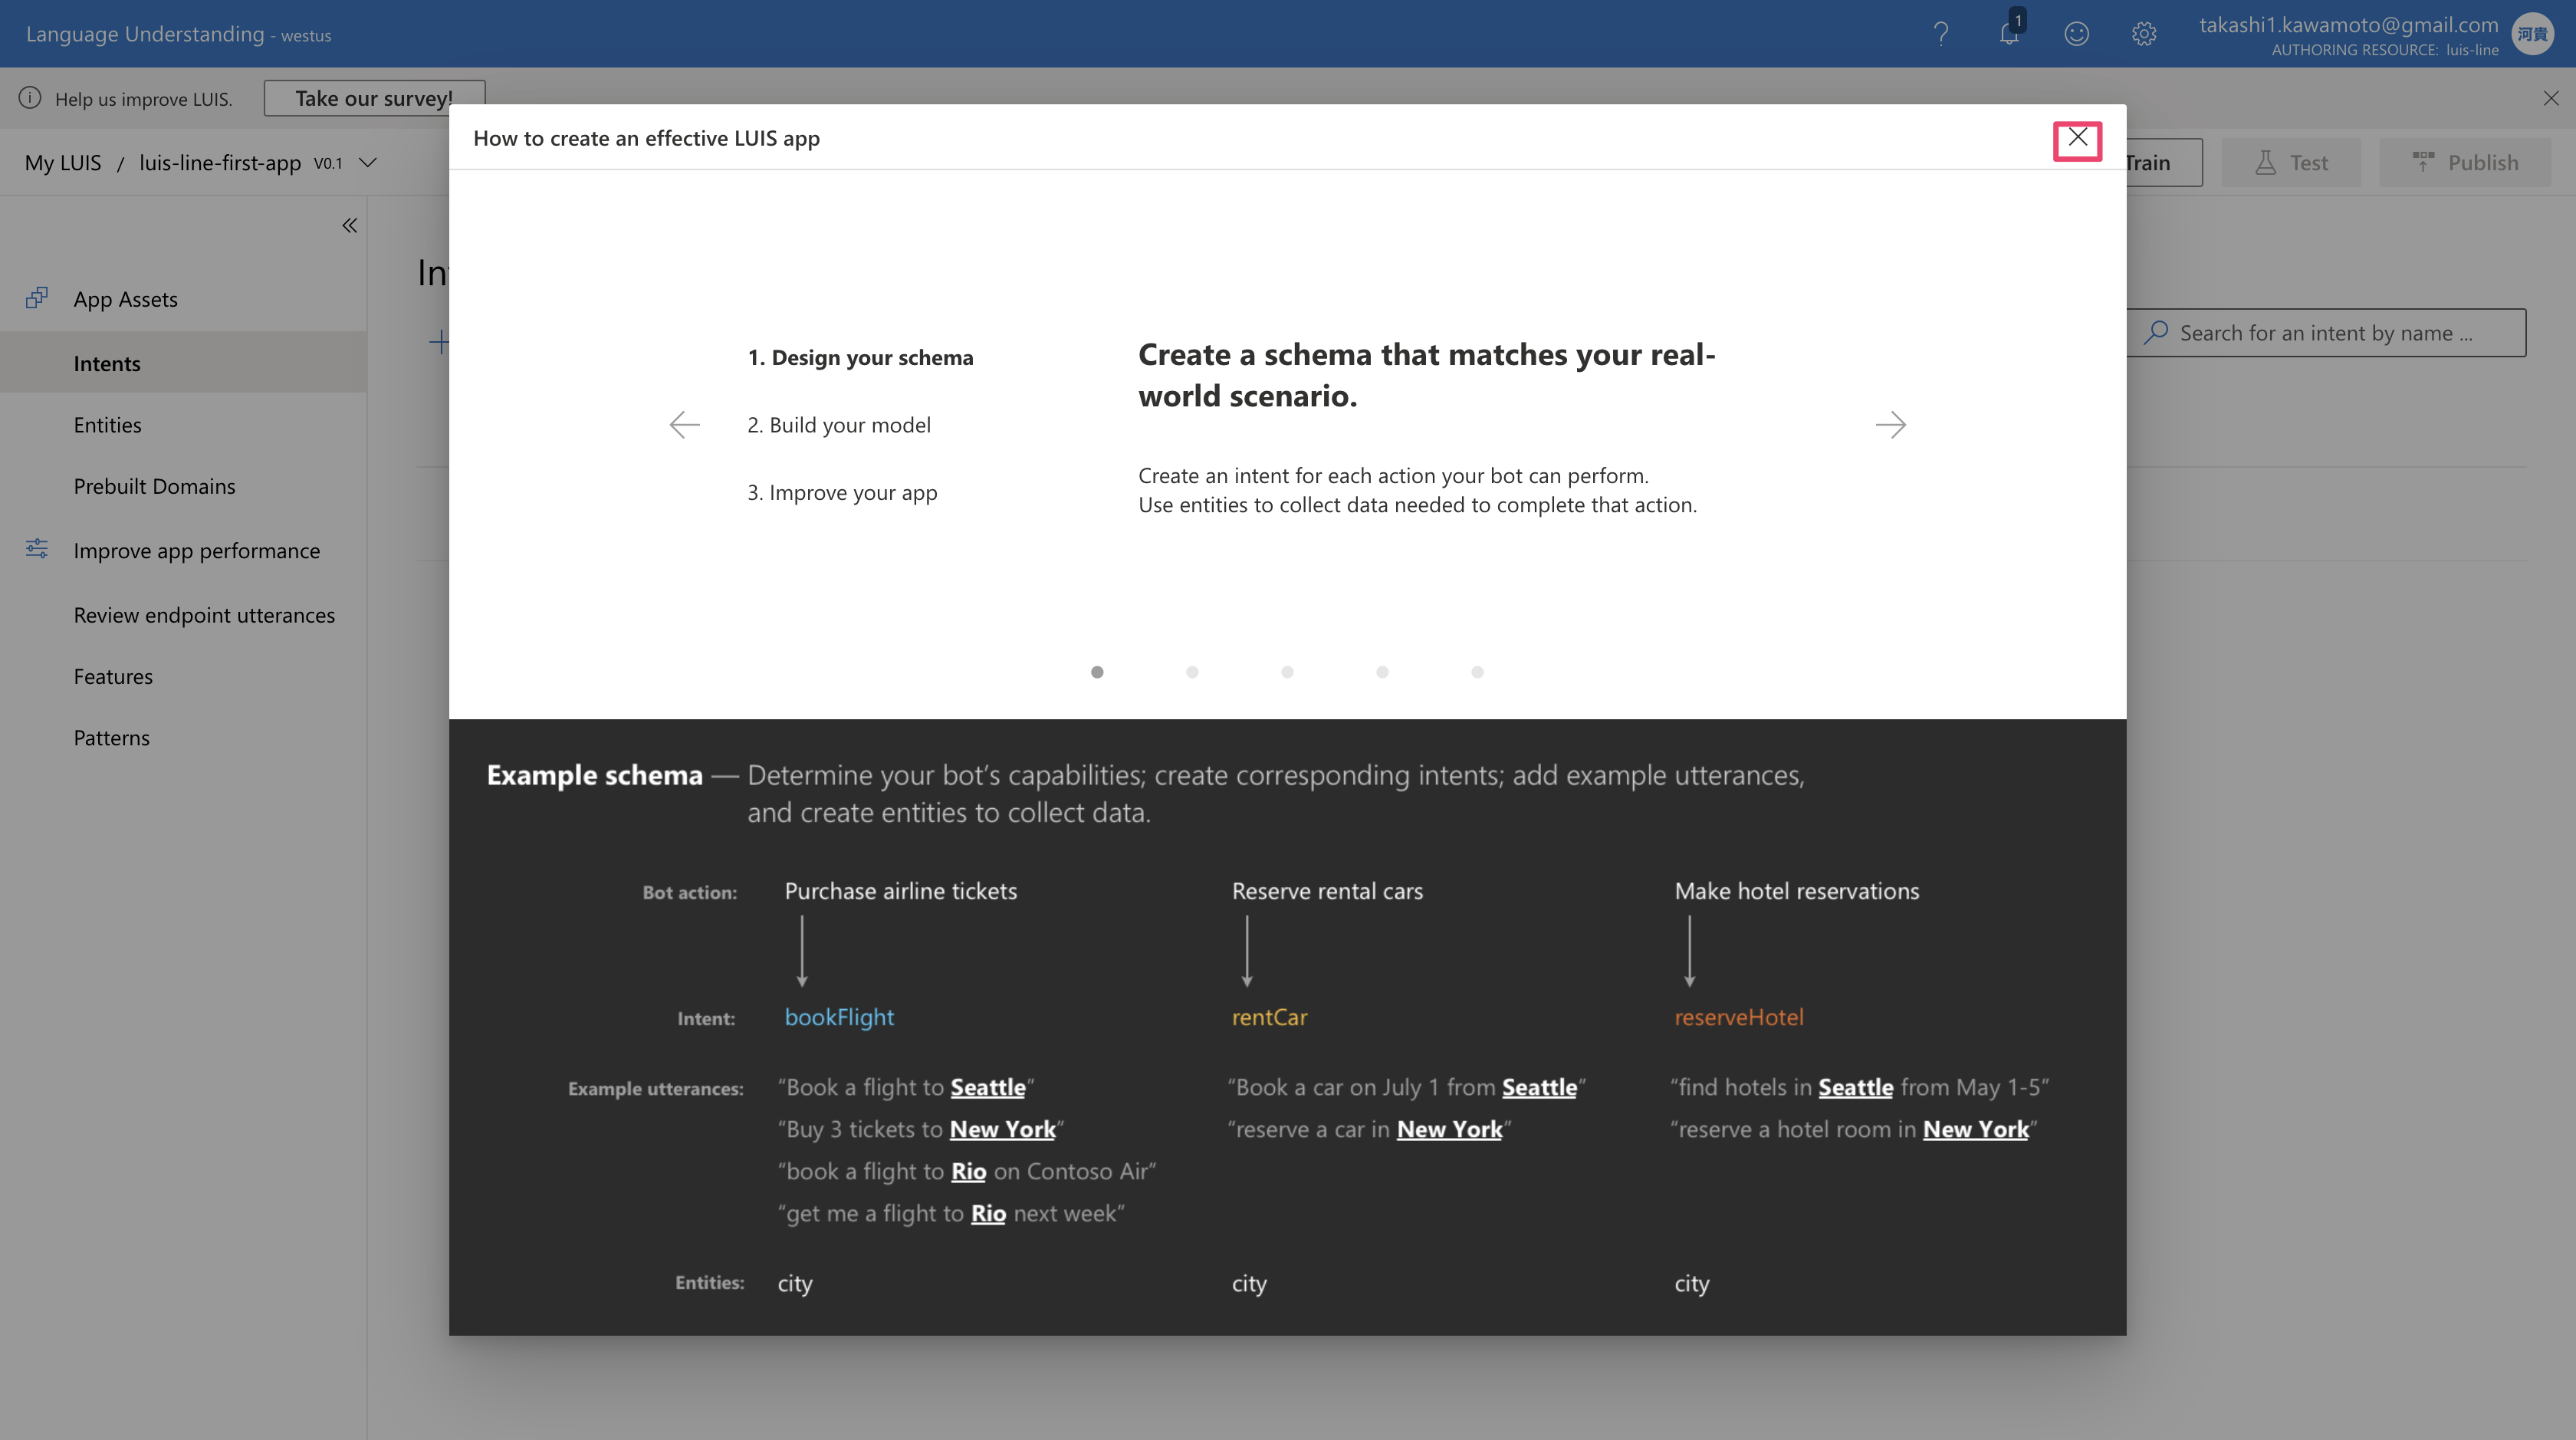
しばらくすると下記の案内ダイアログとともに、LUISの新しいアプリ作成が完了します。(ダイアログは右上のバツボタンで消しましょう)
Entity(エンティティ)作成
次にエンティティを新規作成していきます。
下記のように必要な情報を入力し、TypeはMachine learnedを選択するようにしてください。
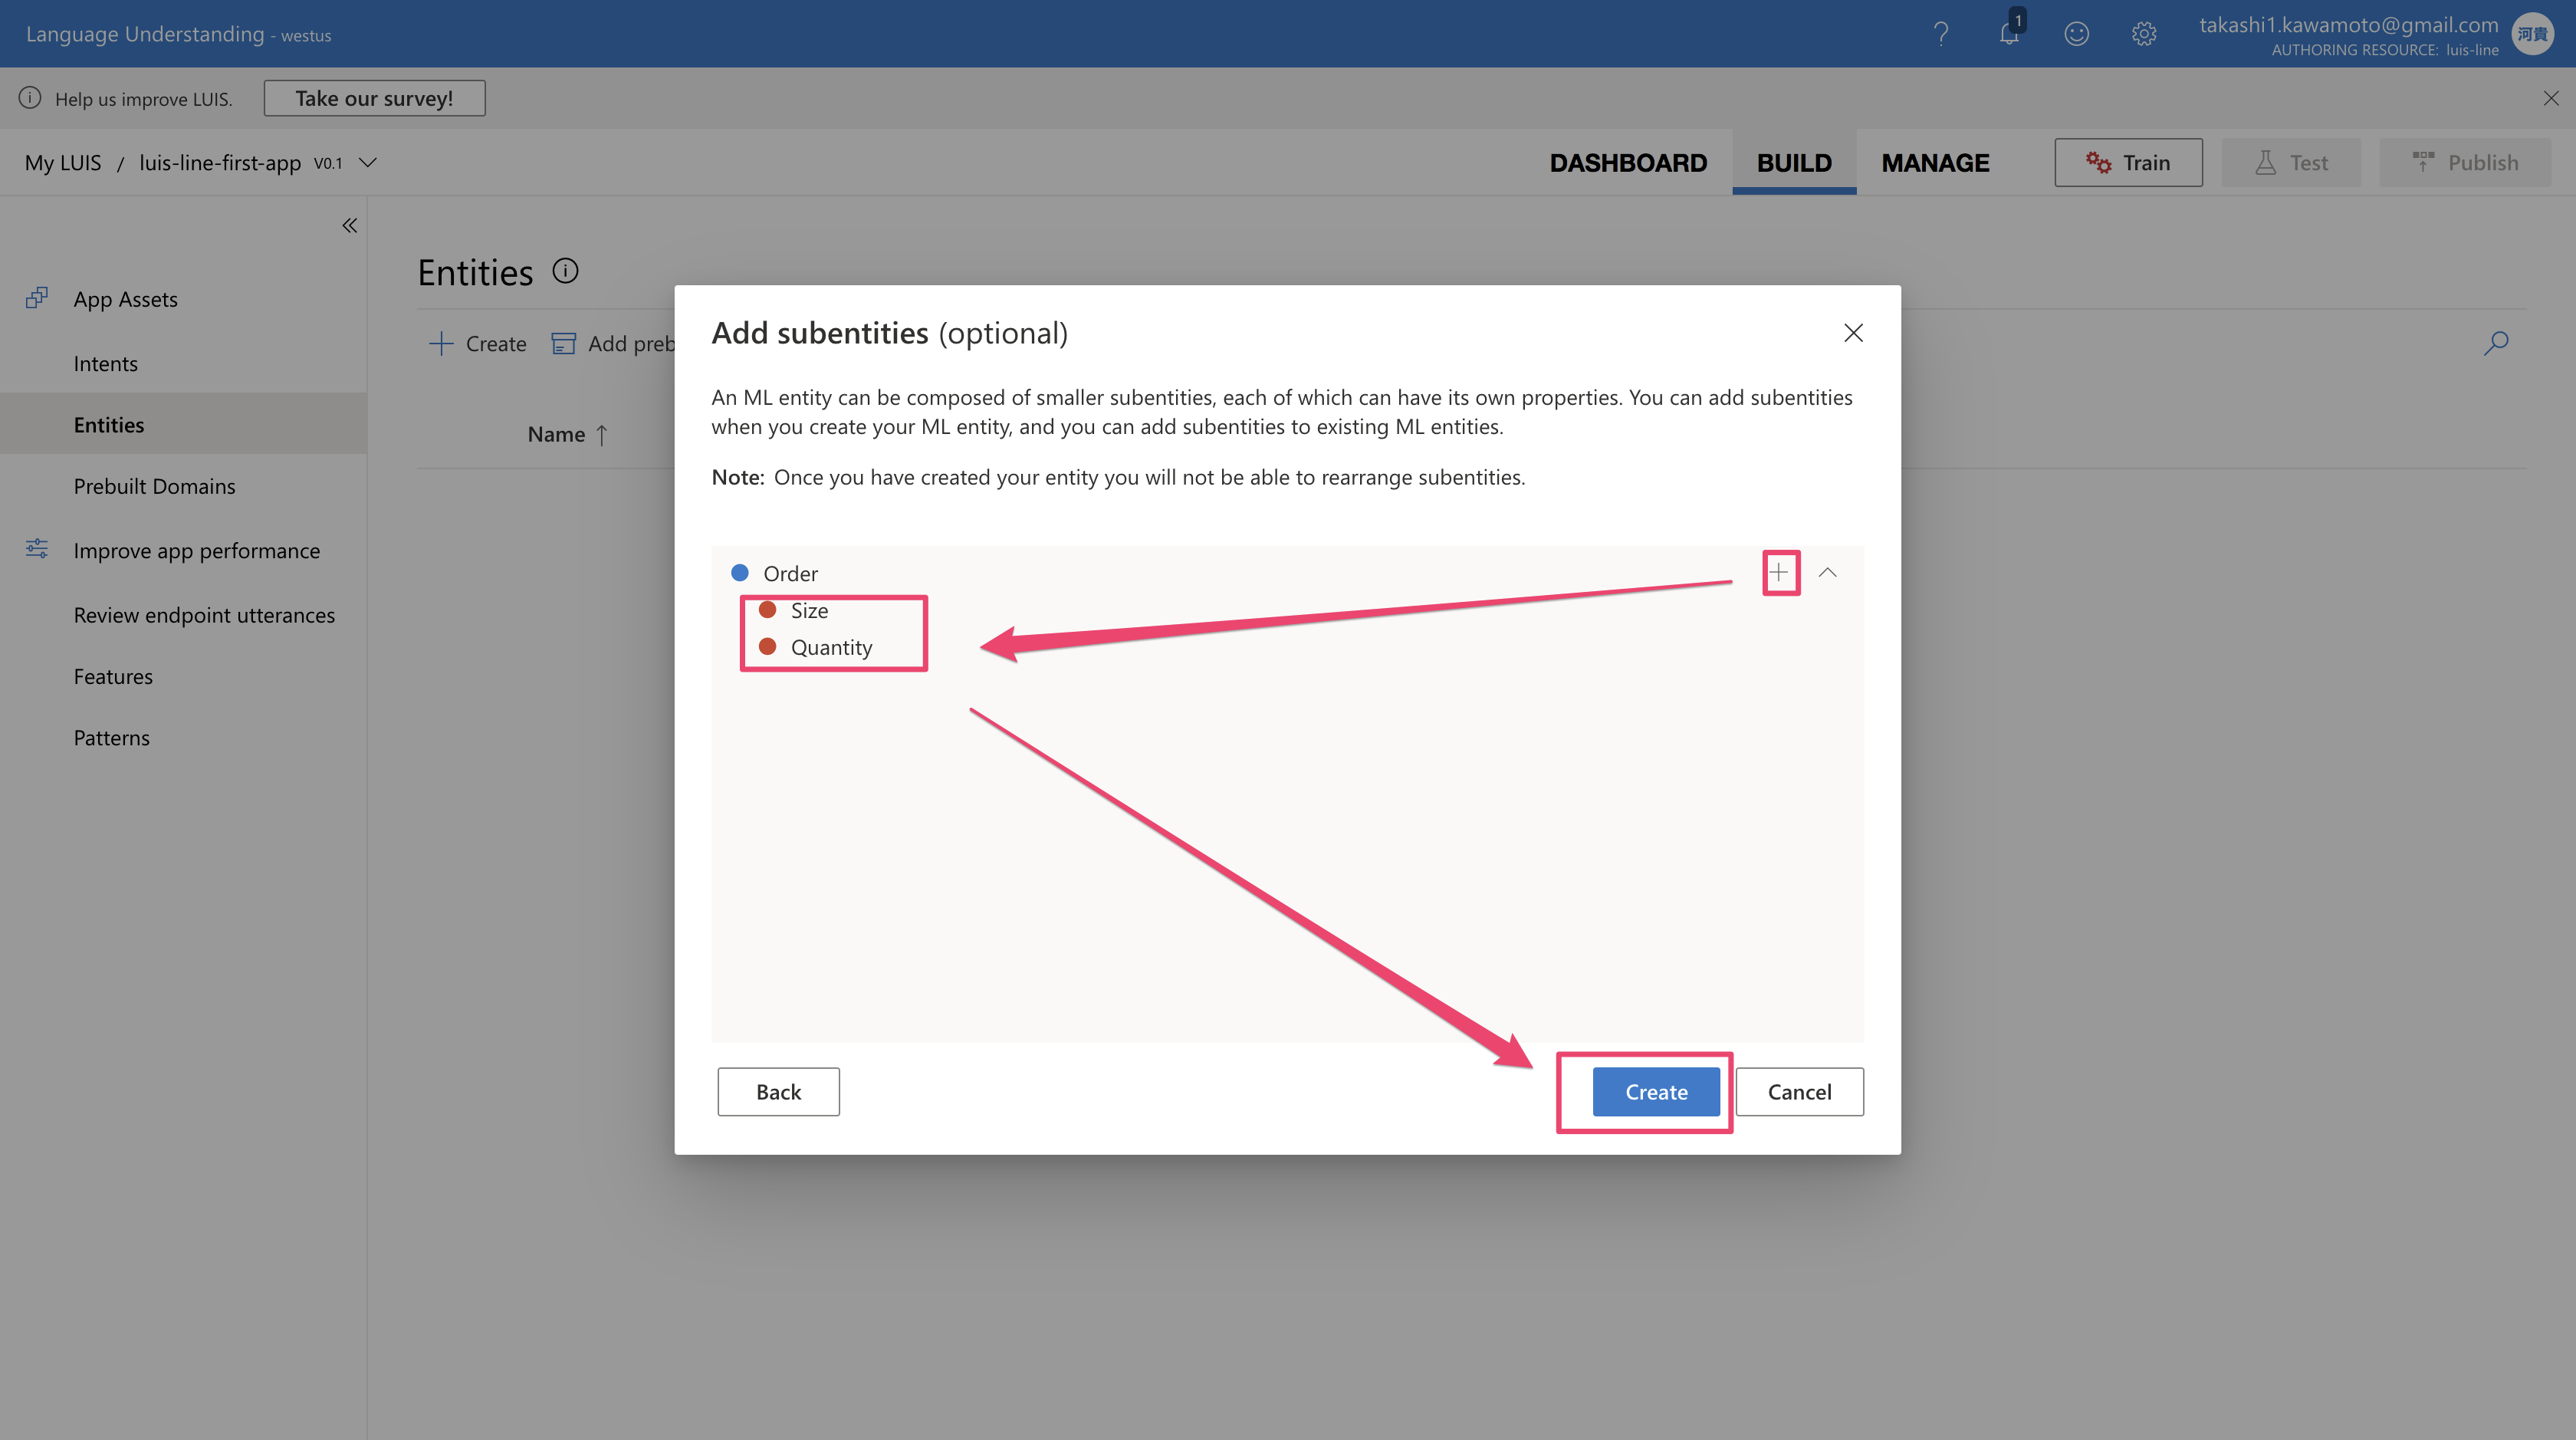
そして次の画面でサブエンティティ、SizeとQuantityを追加します。
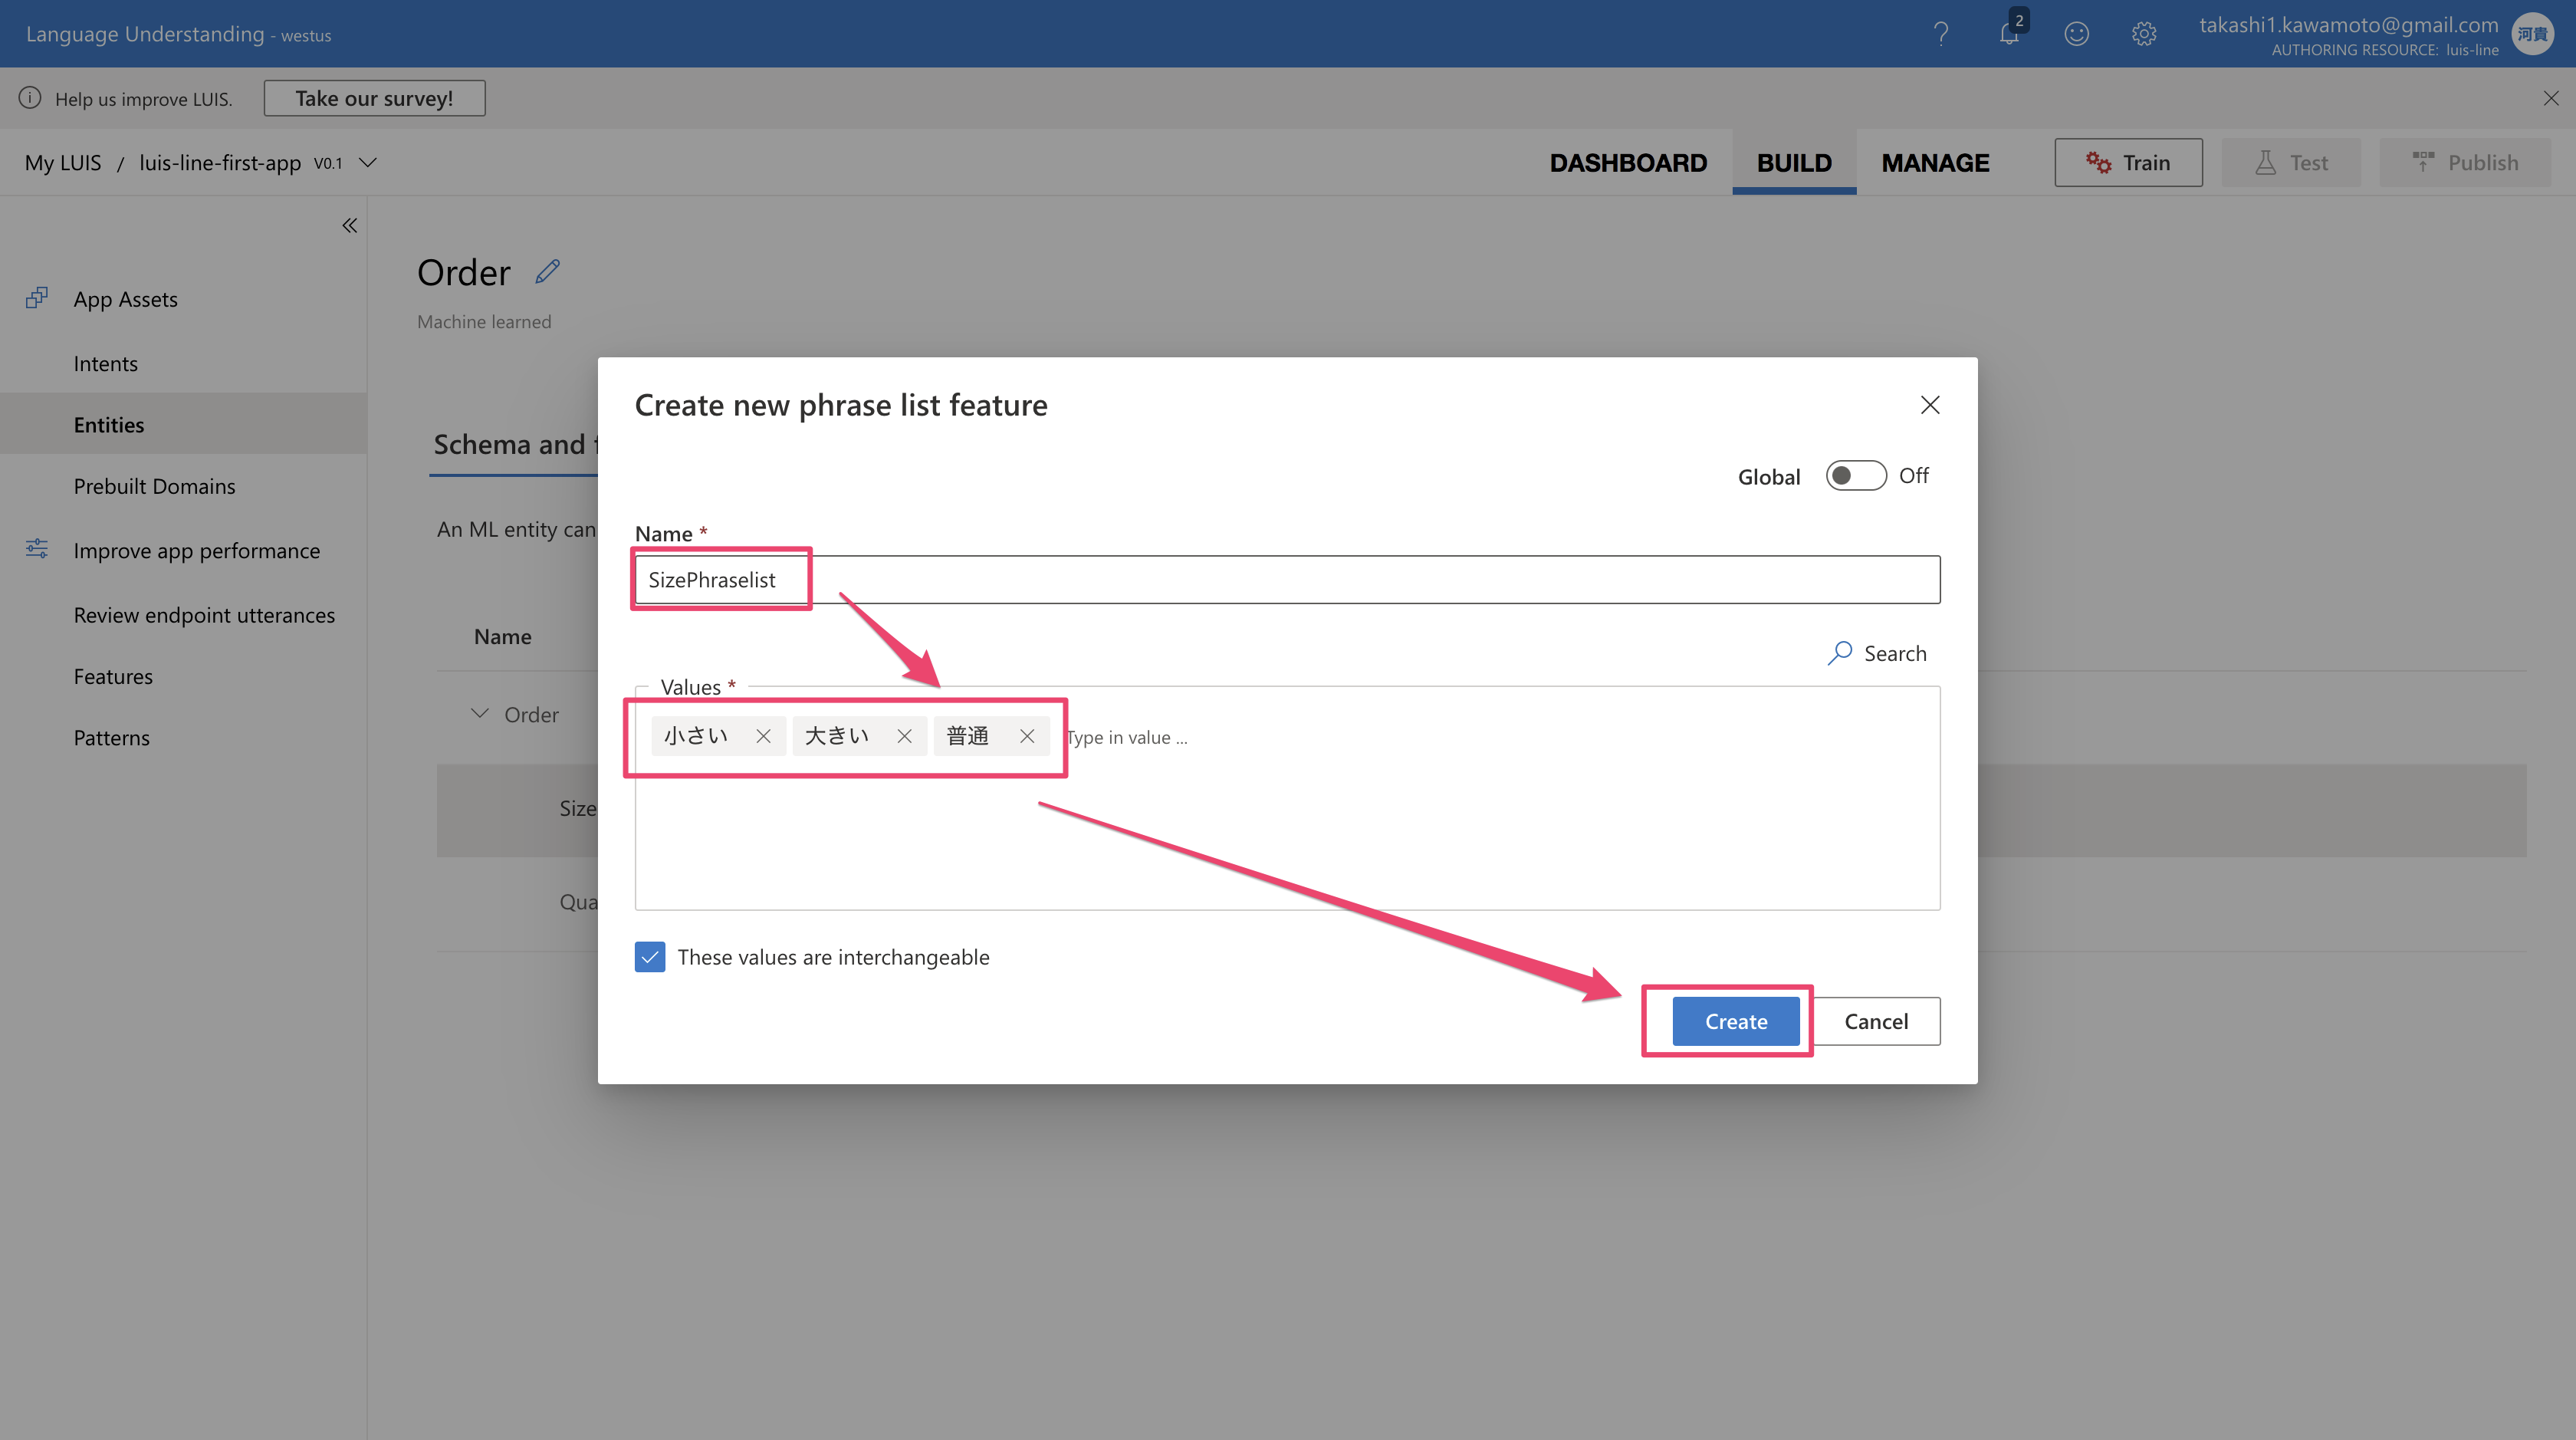
そして、今作成したSizeサブエンティティに語句一覧(phrase list)を設定して、特徴量を追加していきます。
ここではいったん小さい、大きい、普通とかを入れておきます。
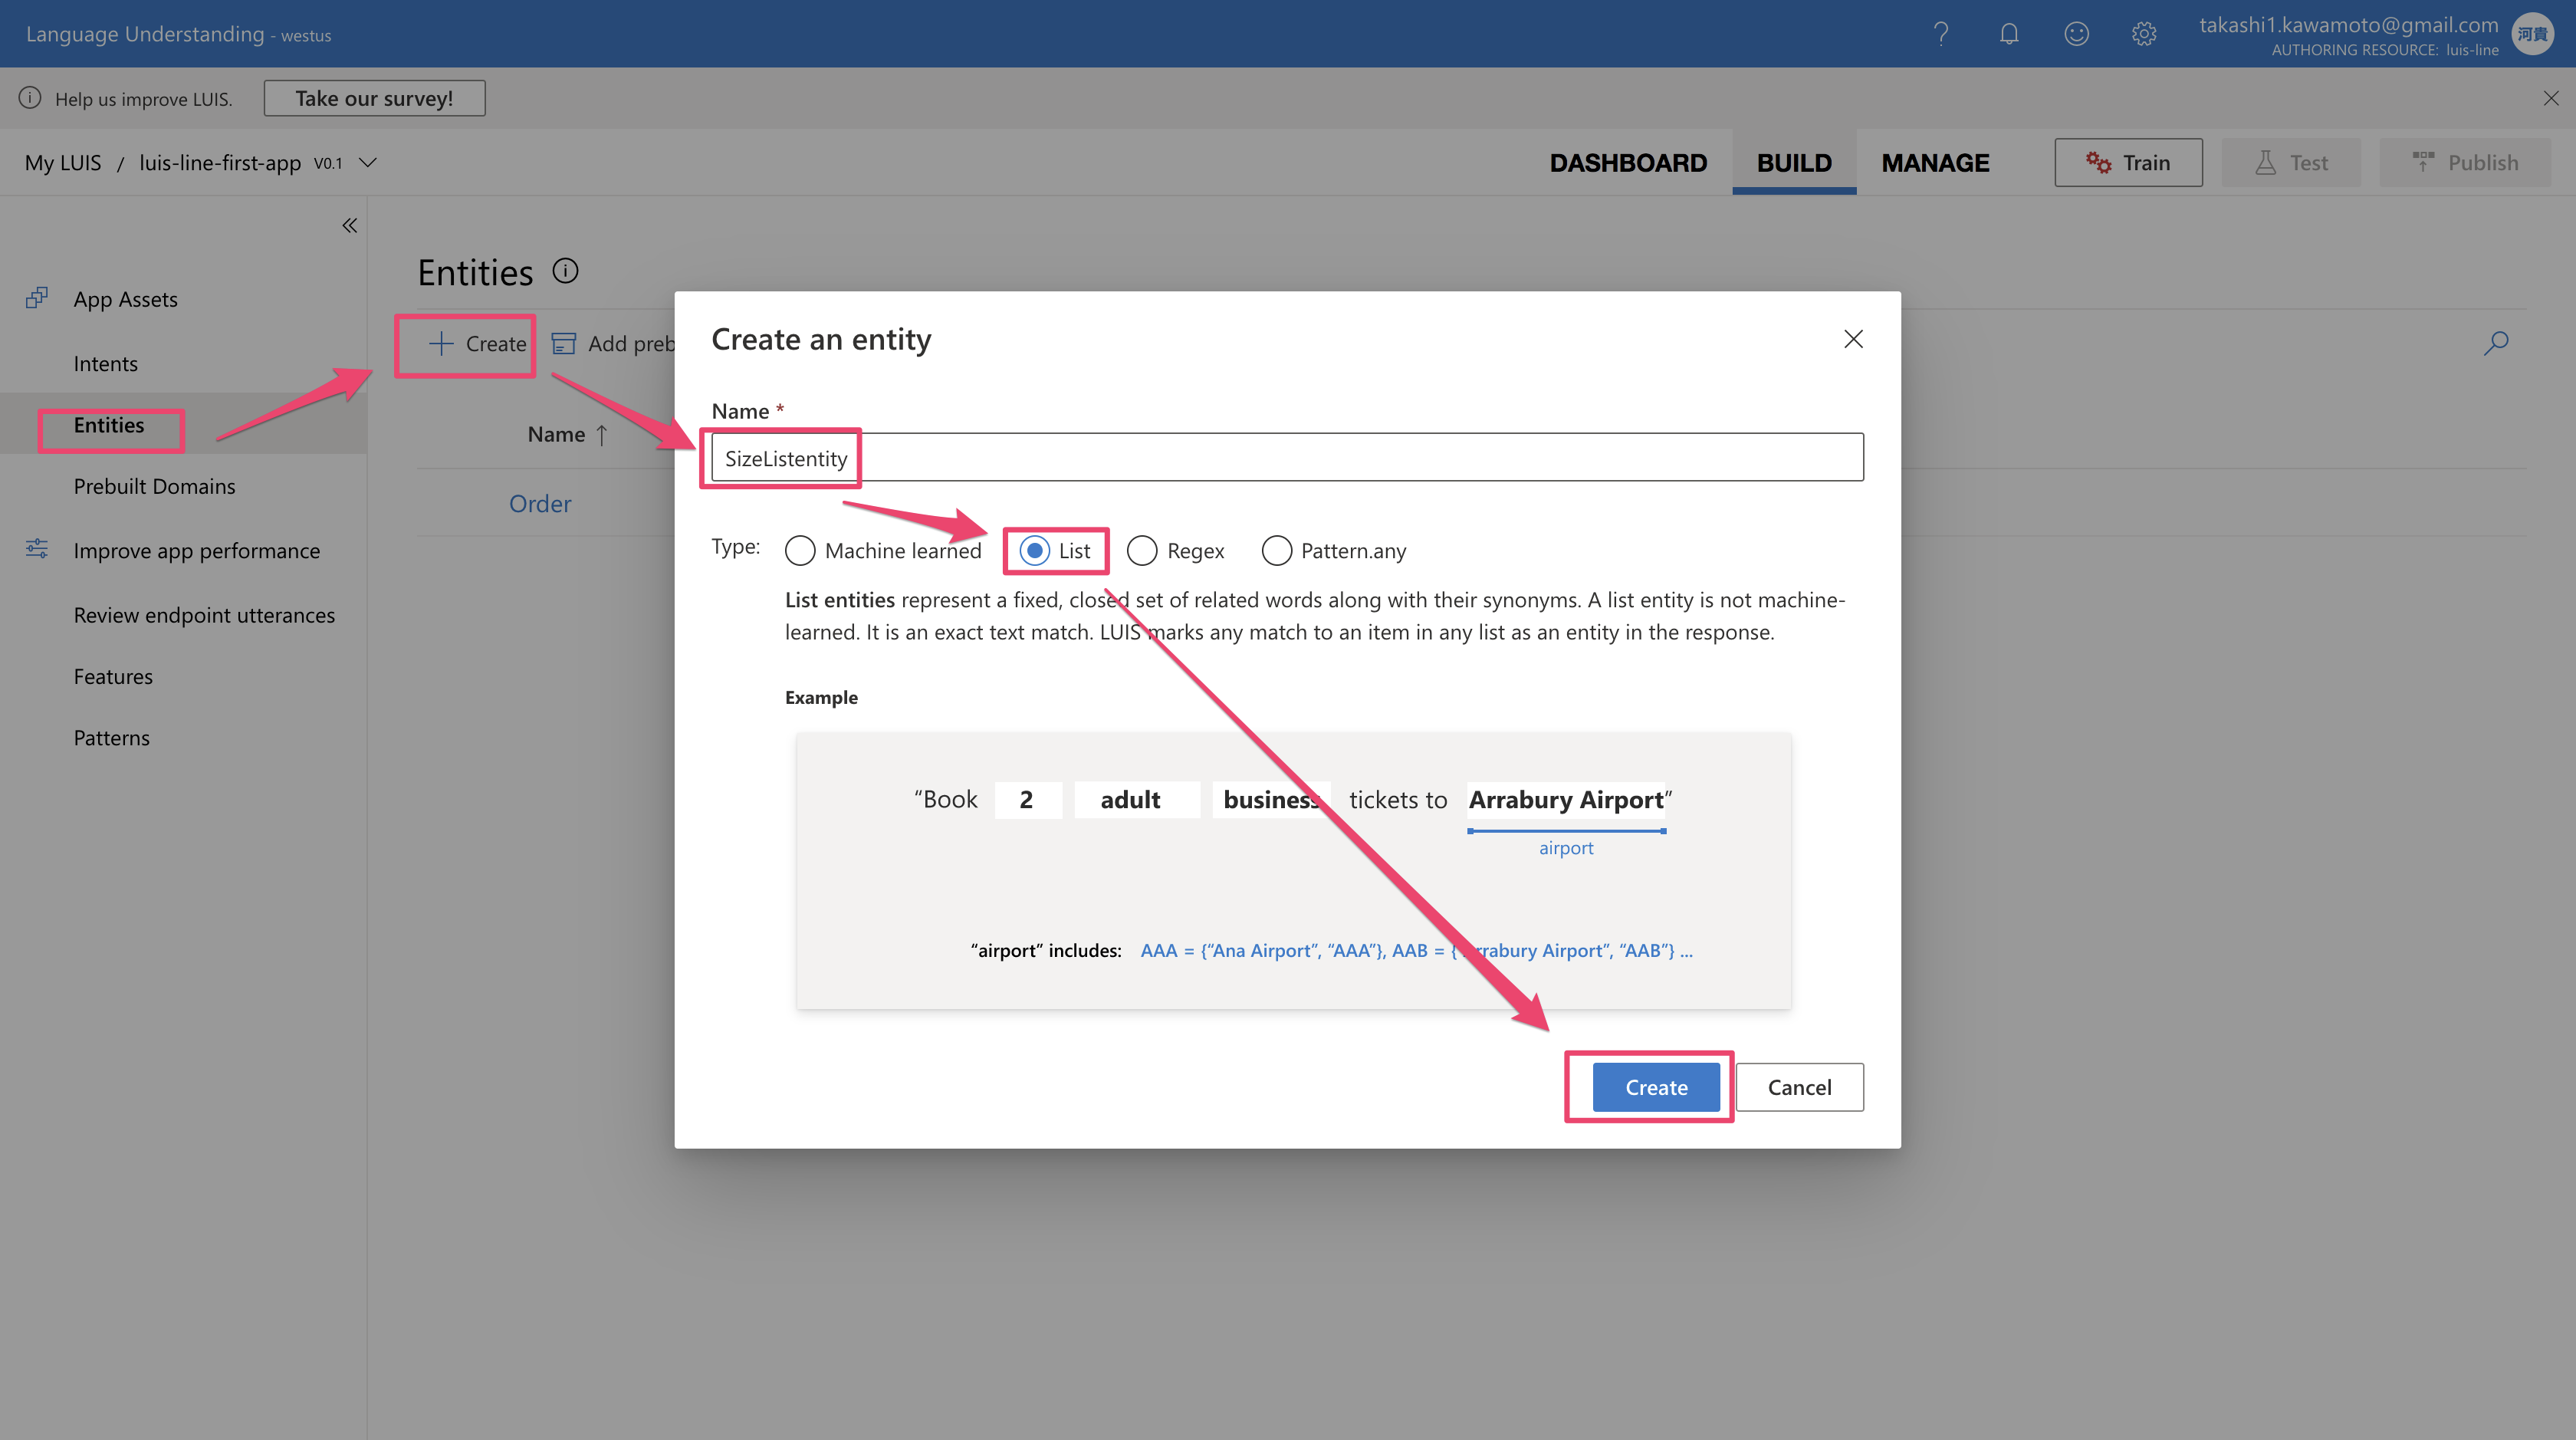
まだまだエンティティを作成していきます。次はリストエンティティです。(SizeListentityの名前で作成します)
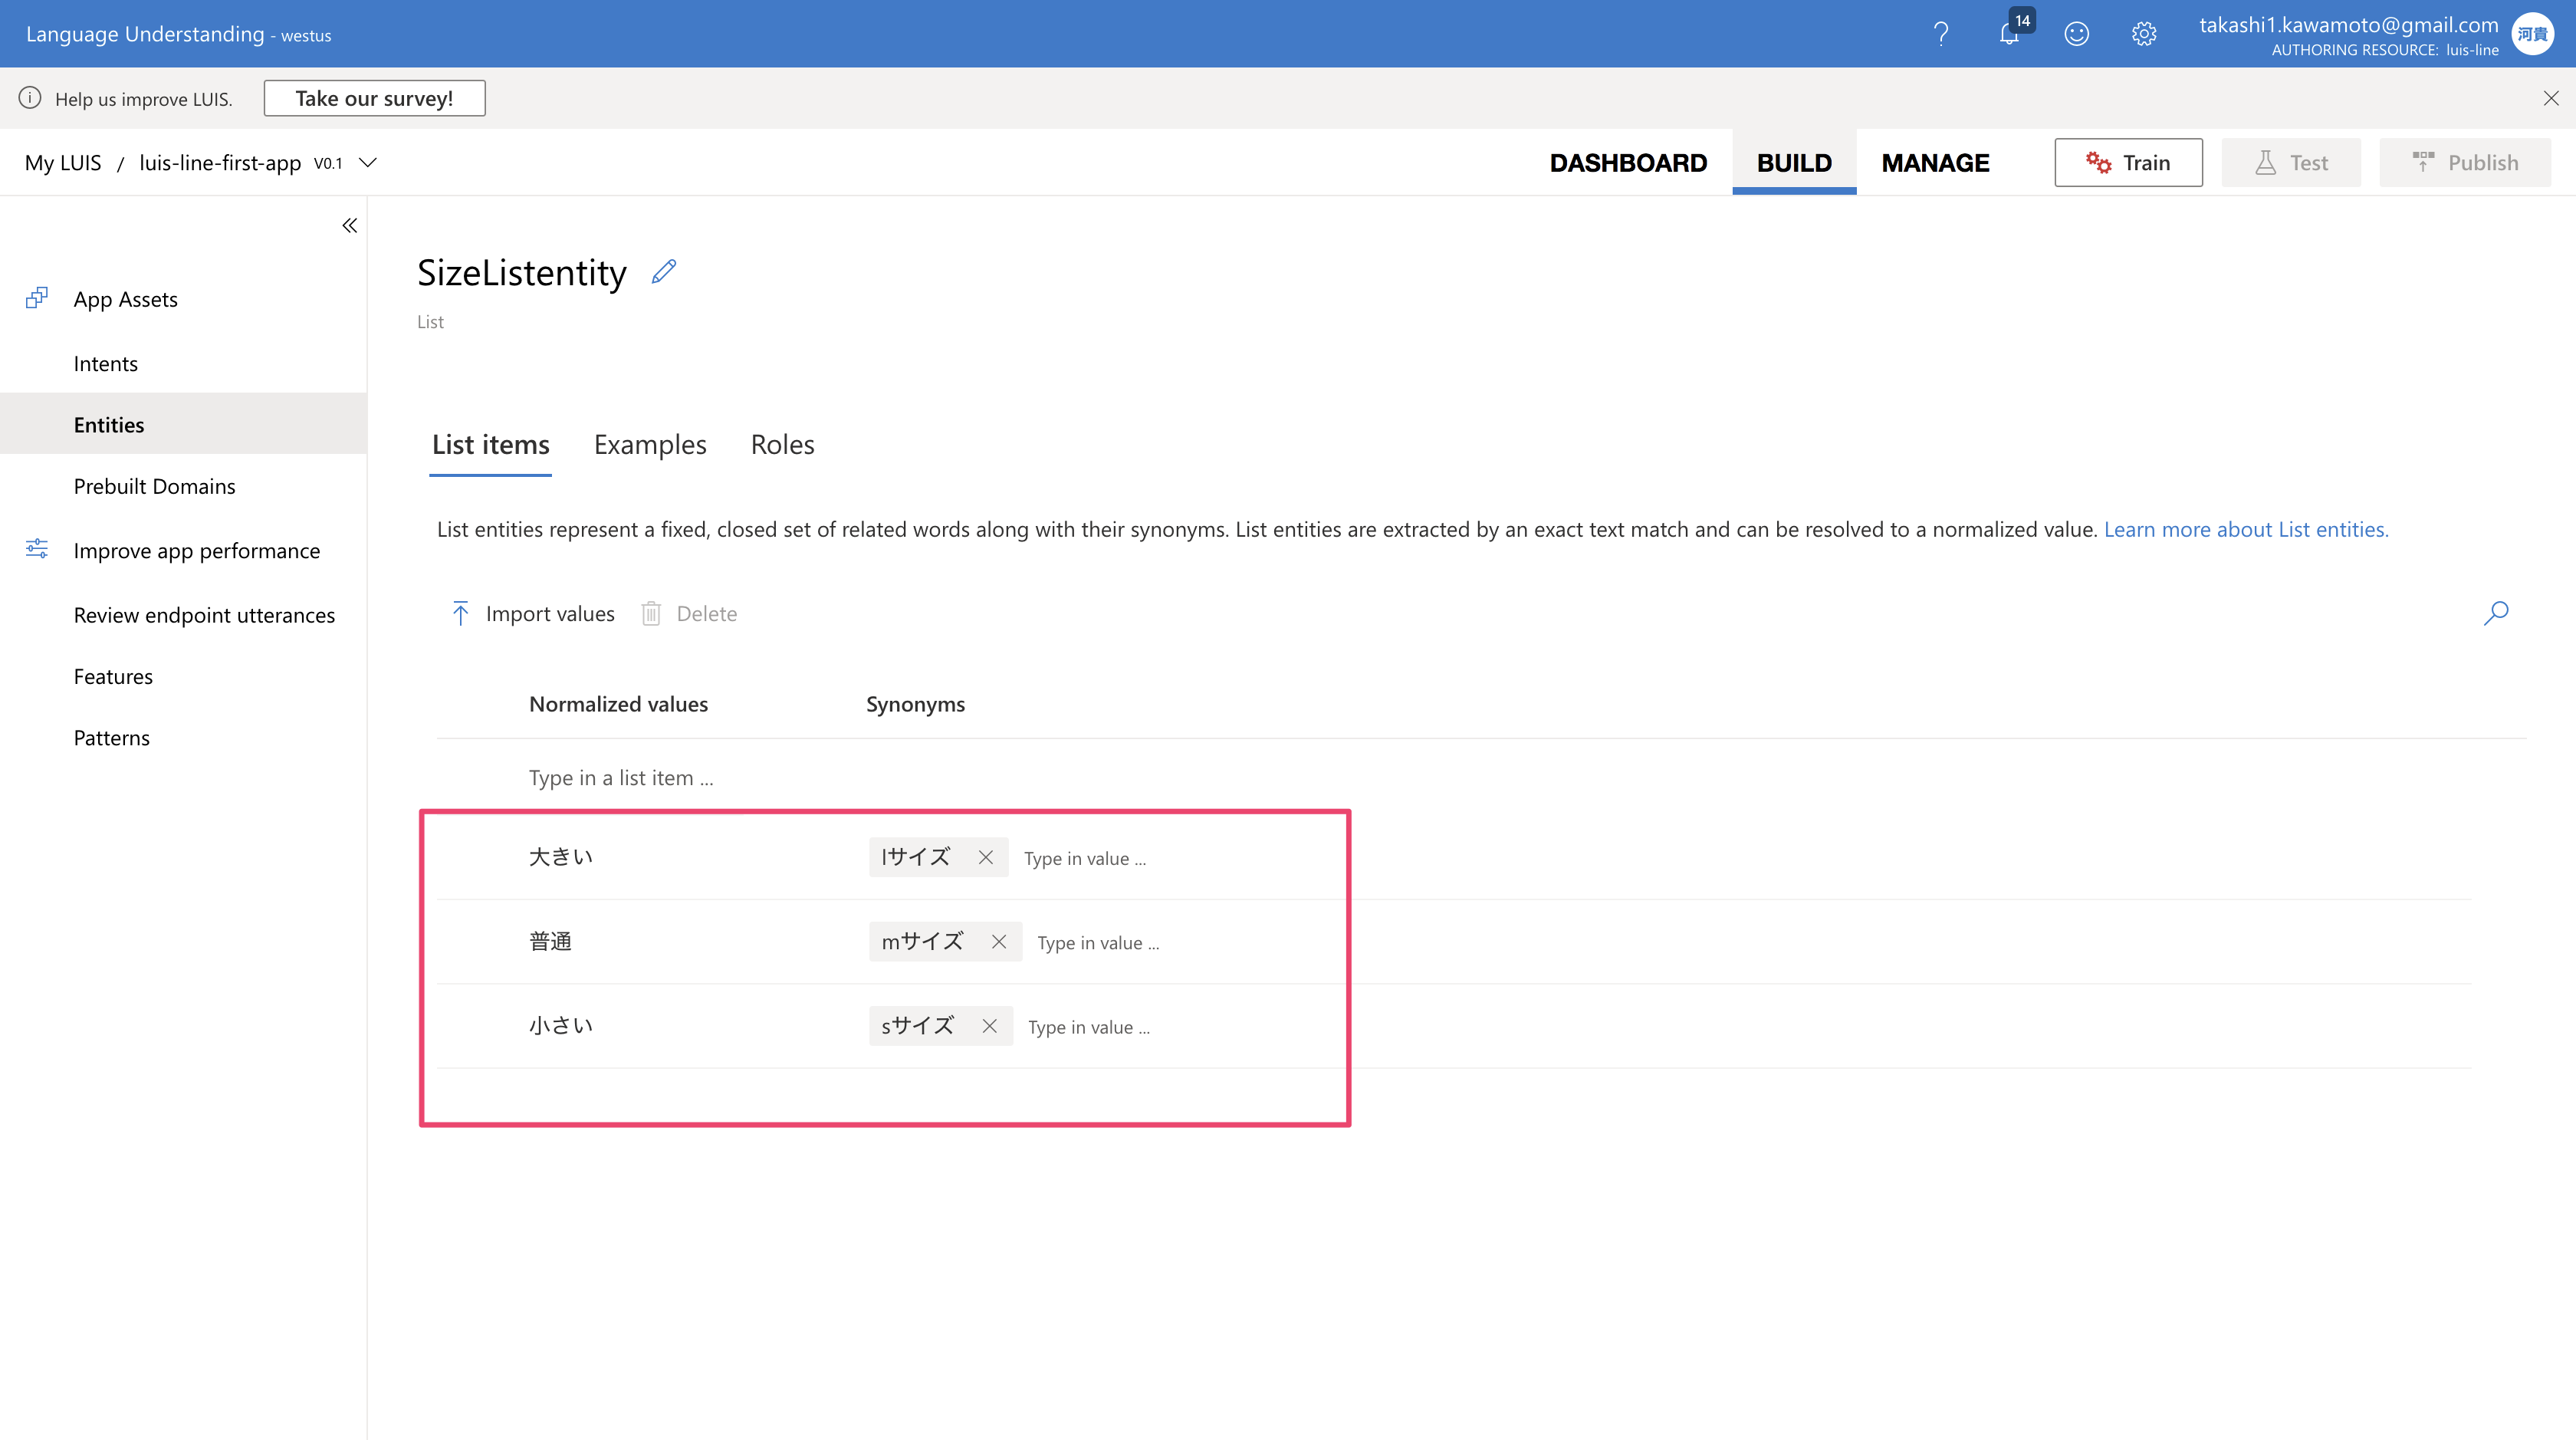
リストエンティティは下記のように、シノニム(Synonyms)も含めて設定してください。(シノニムはできるだけ多く設定した方が良いですね!)
そしてサブエンティティSizeに@SizeListentityを追加します。
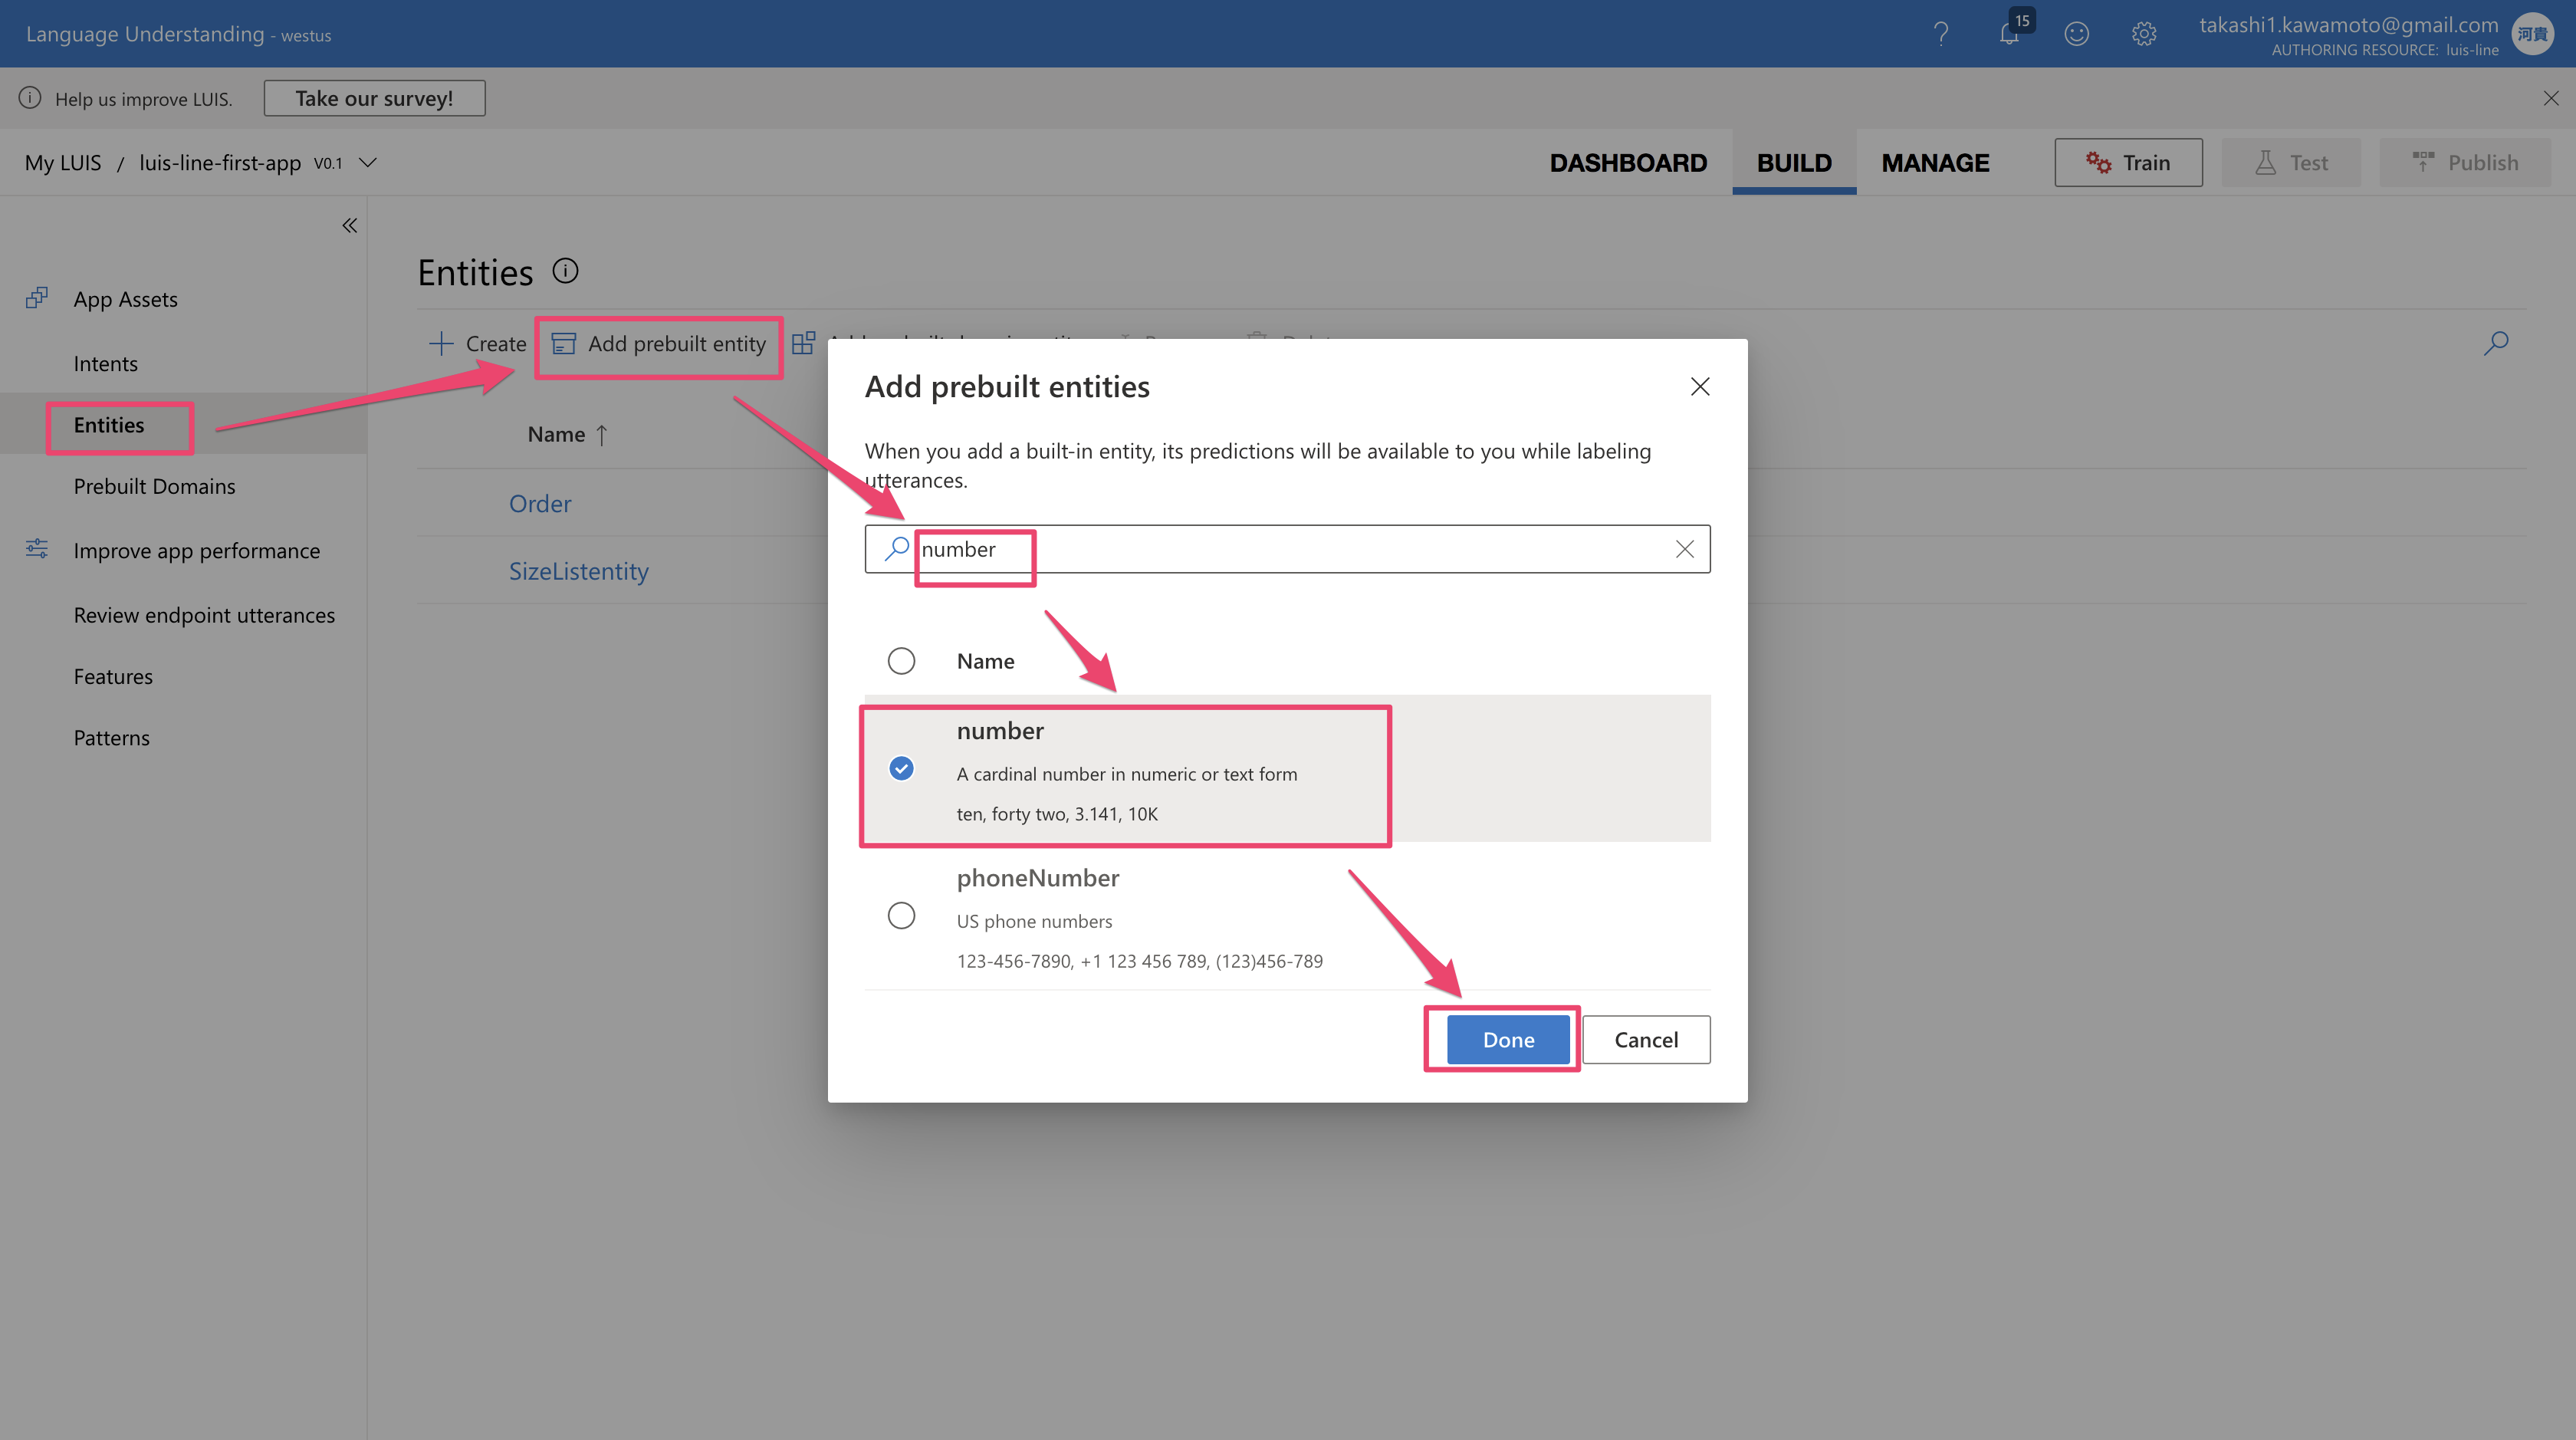
そしてもう1つ、事前構築済みの number エンティティを追加します。
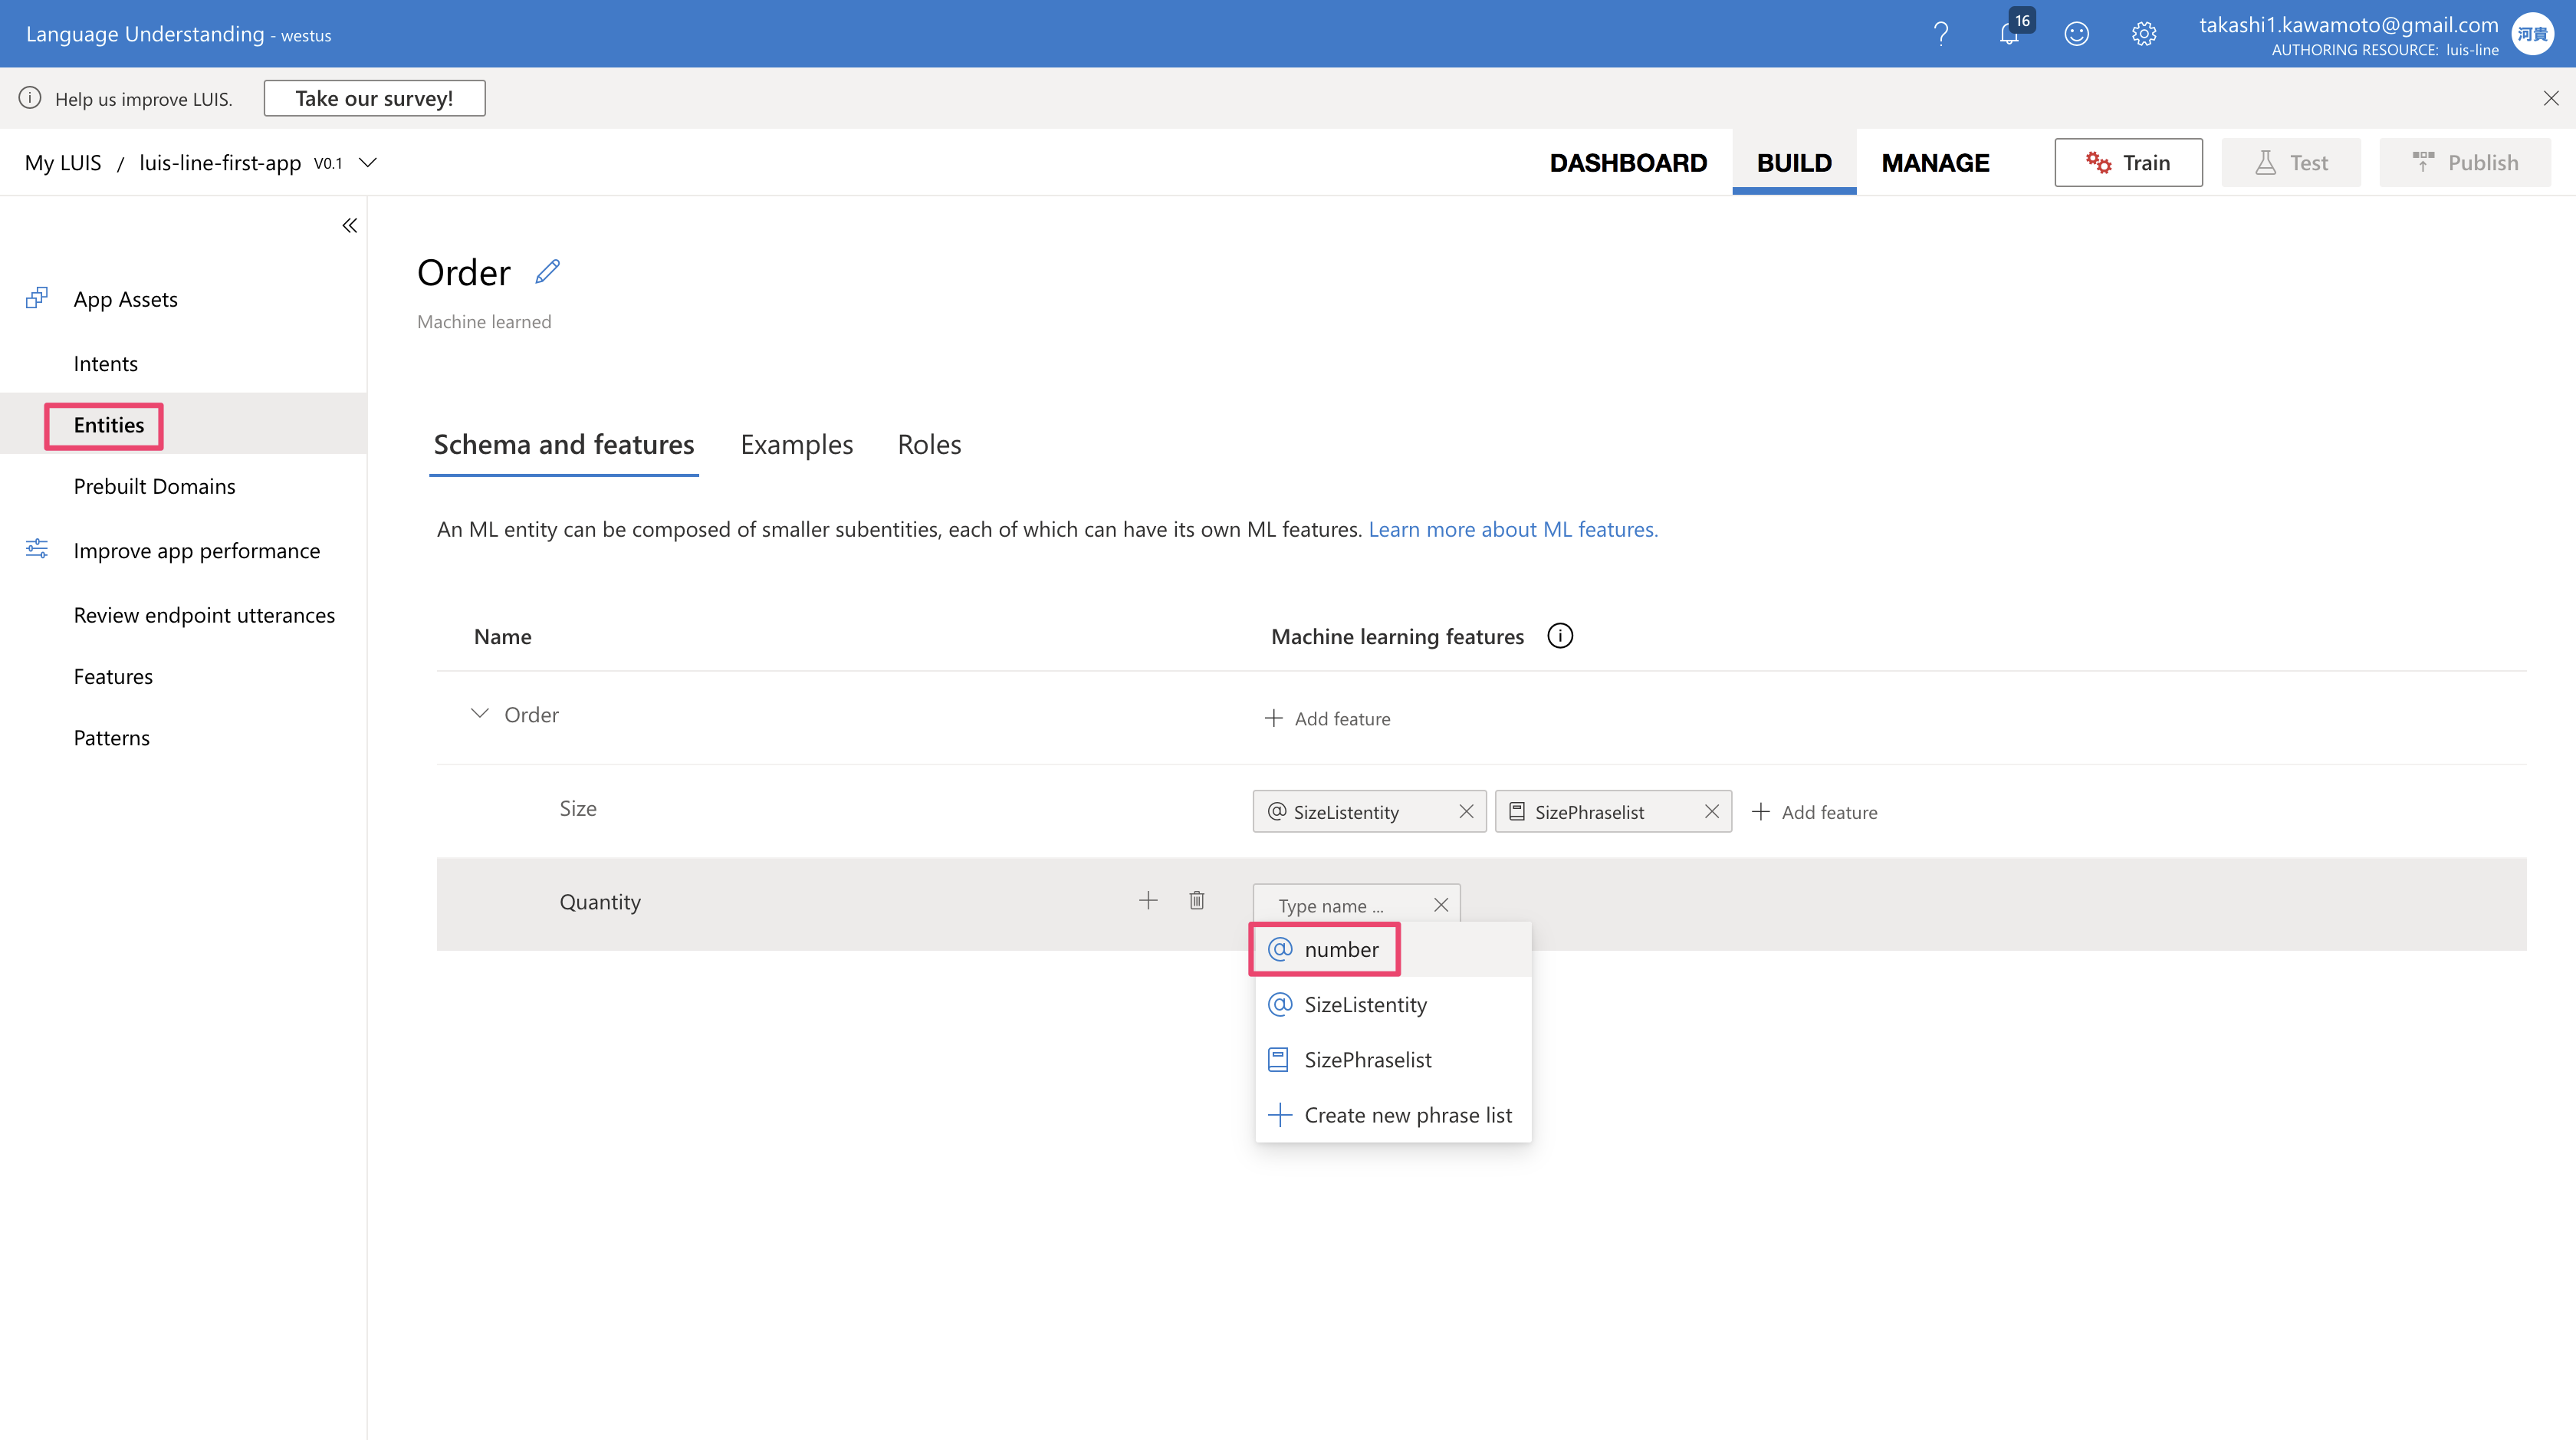
こちらもサブエンティティSizeに@numberを追加。
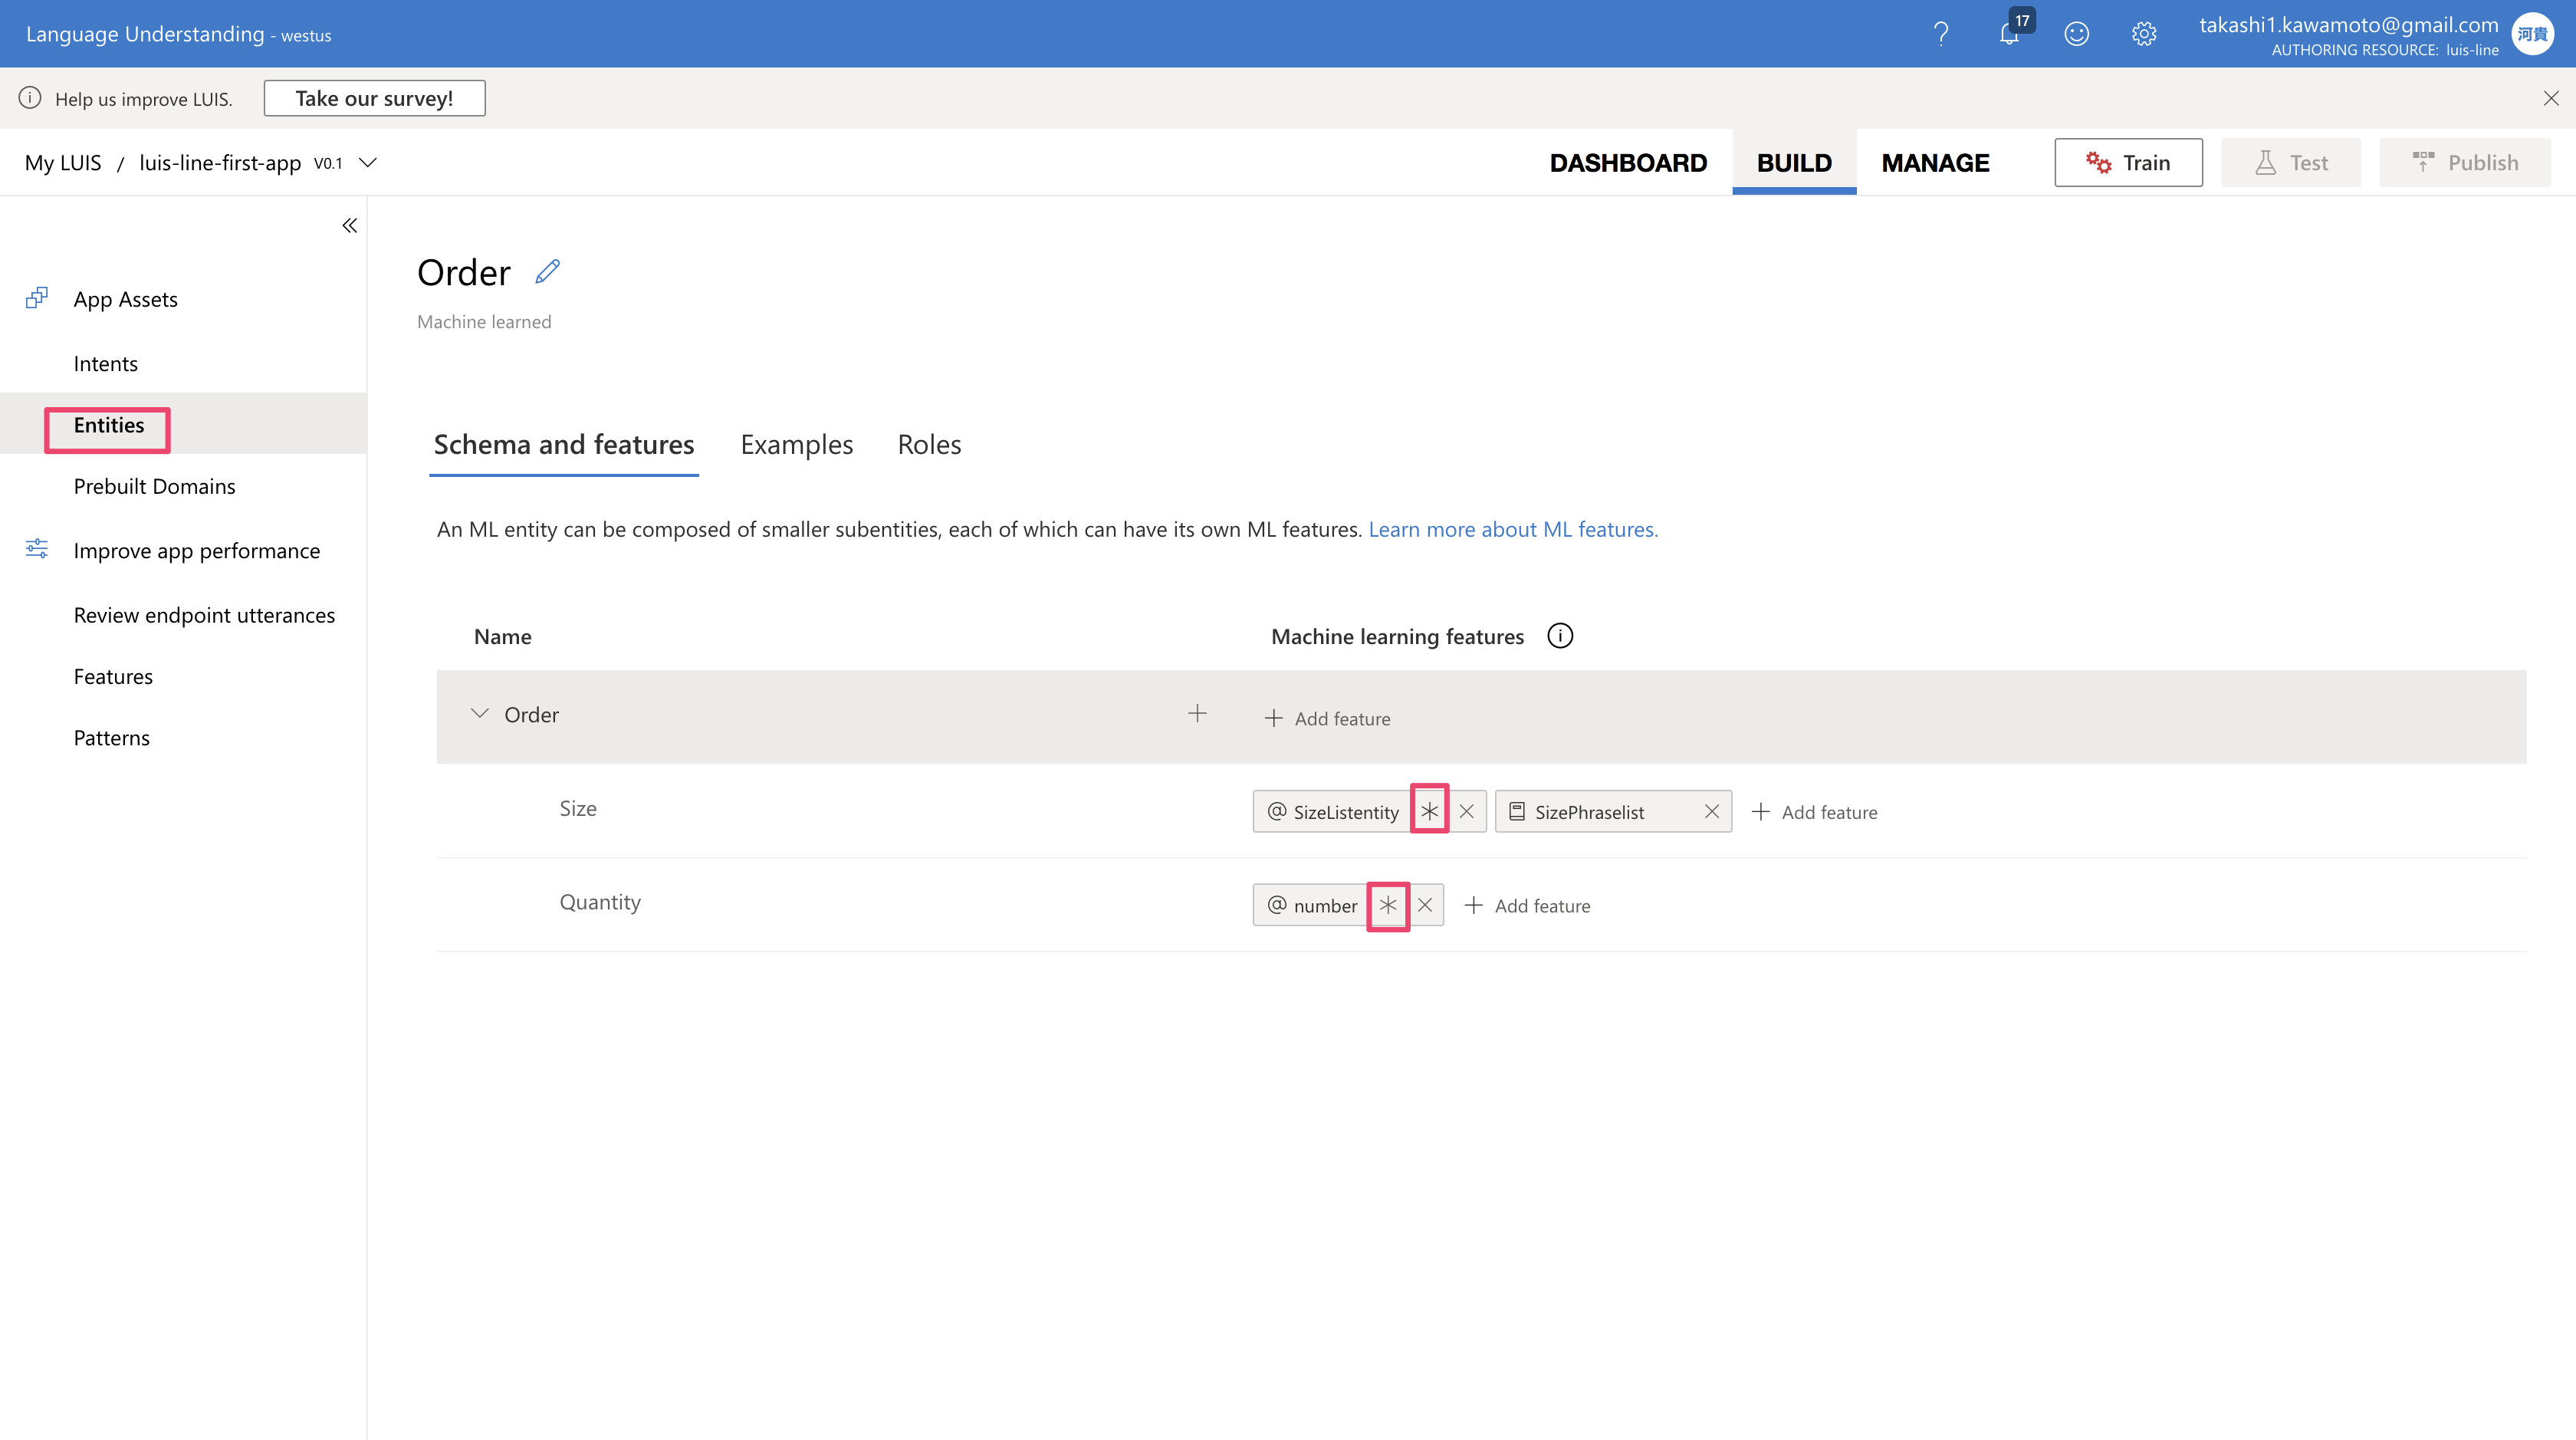
ついでに必須の特徴量も設定します。
Intent作成
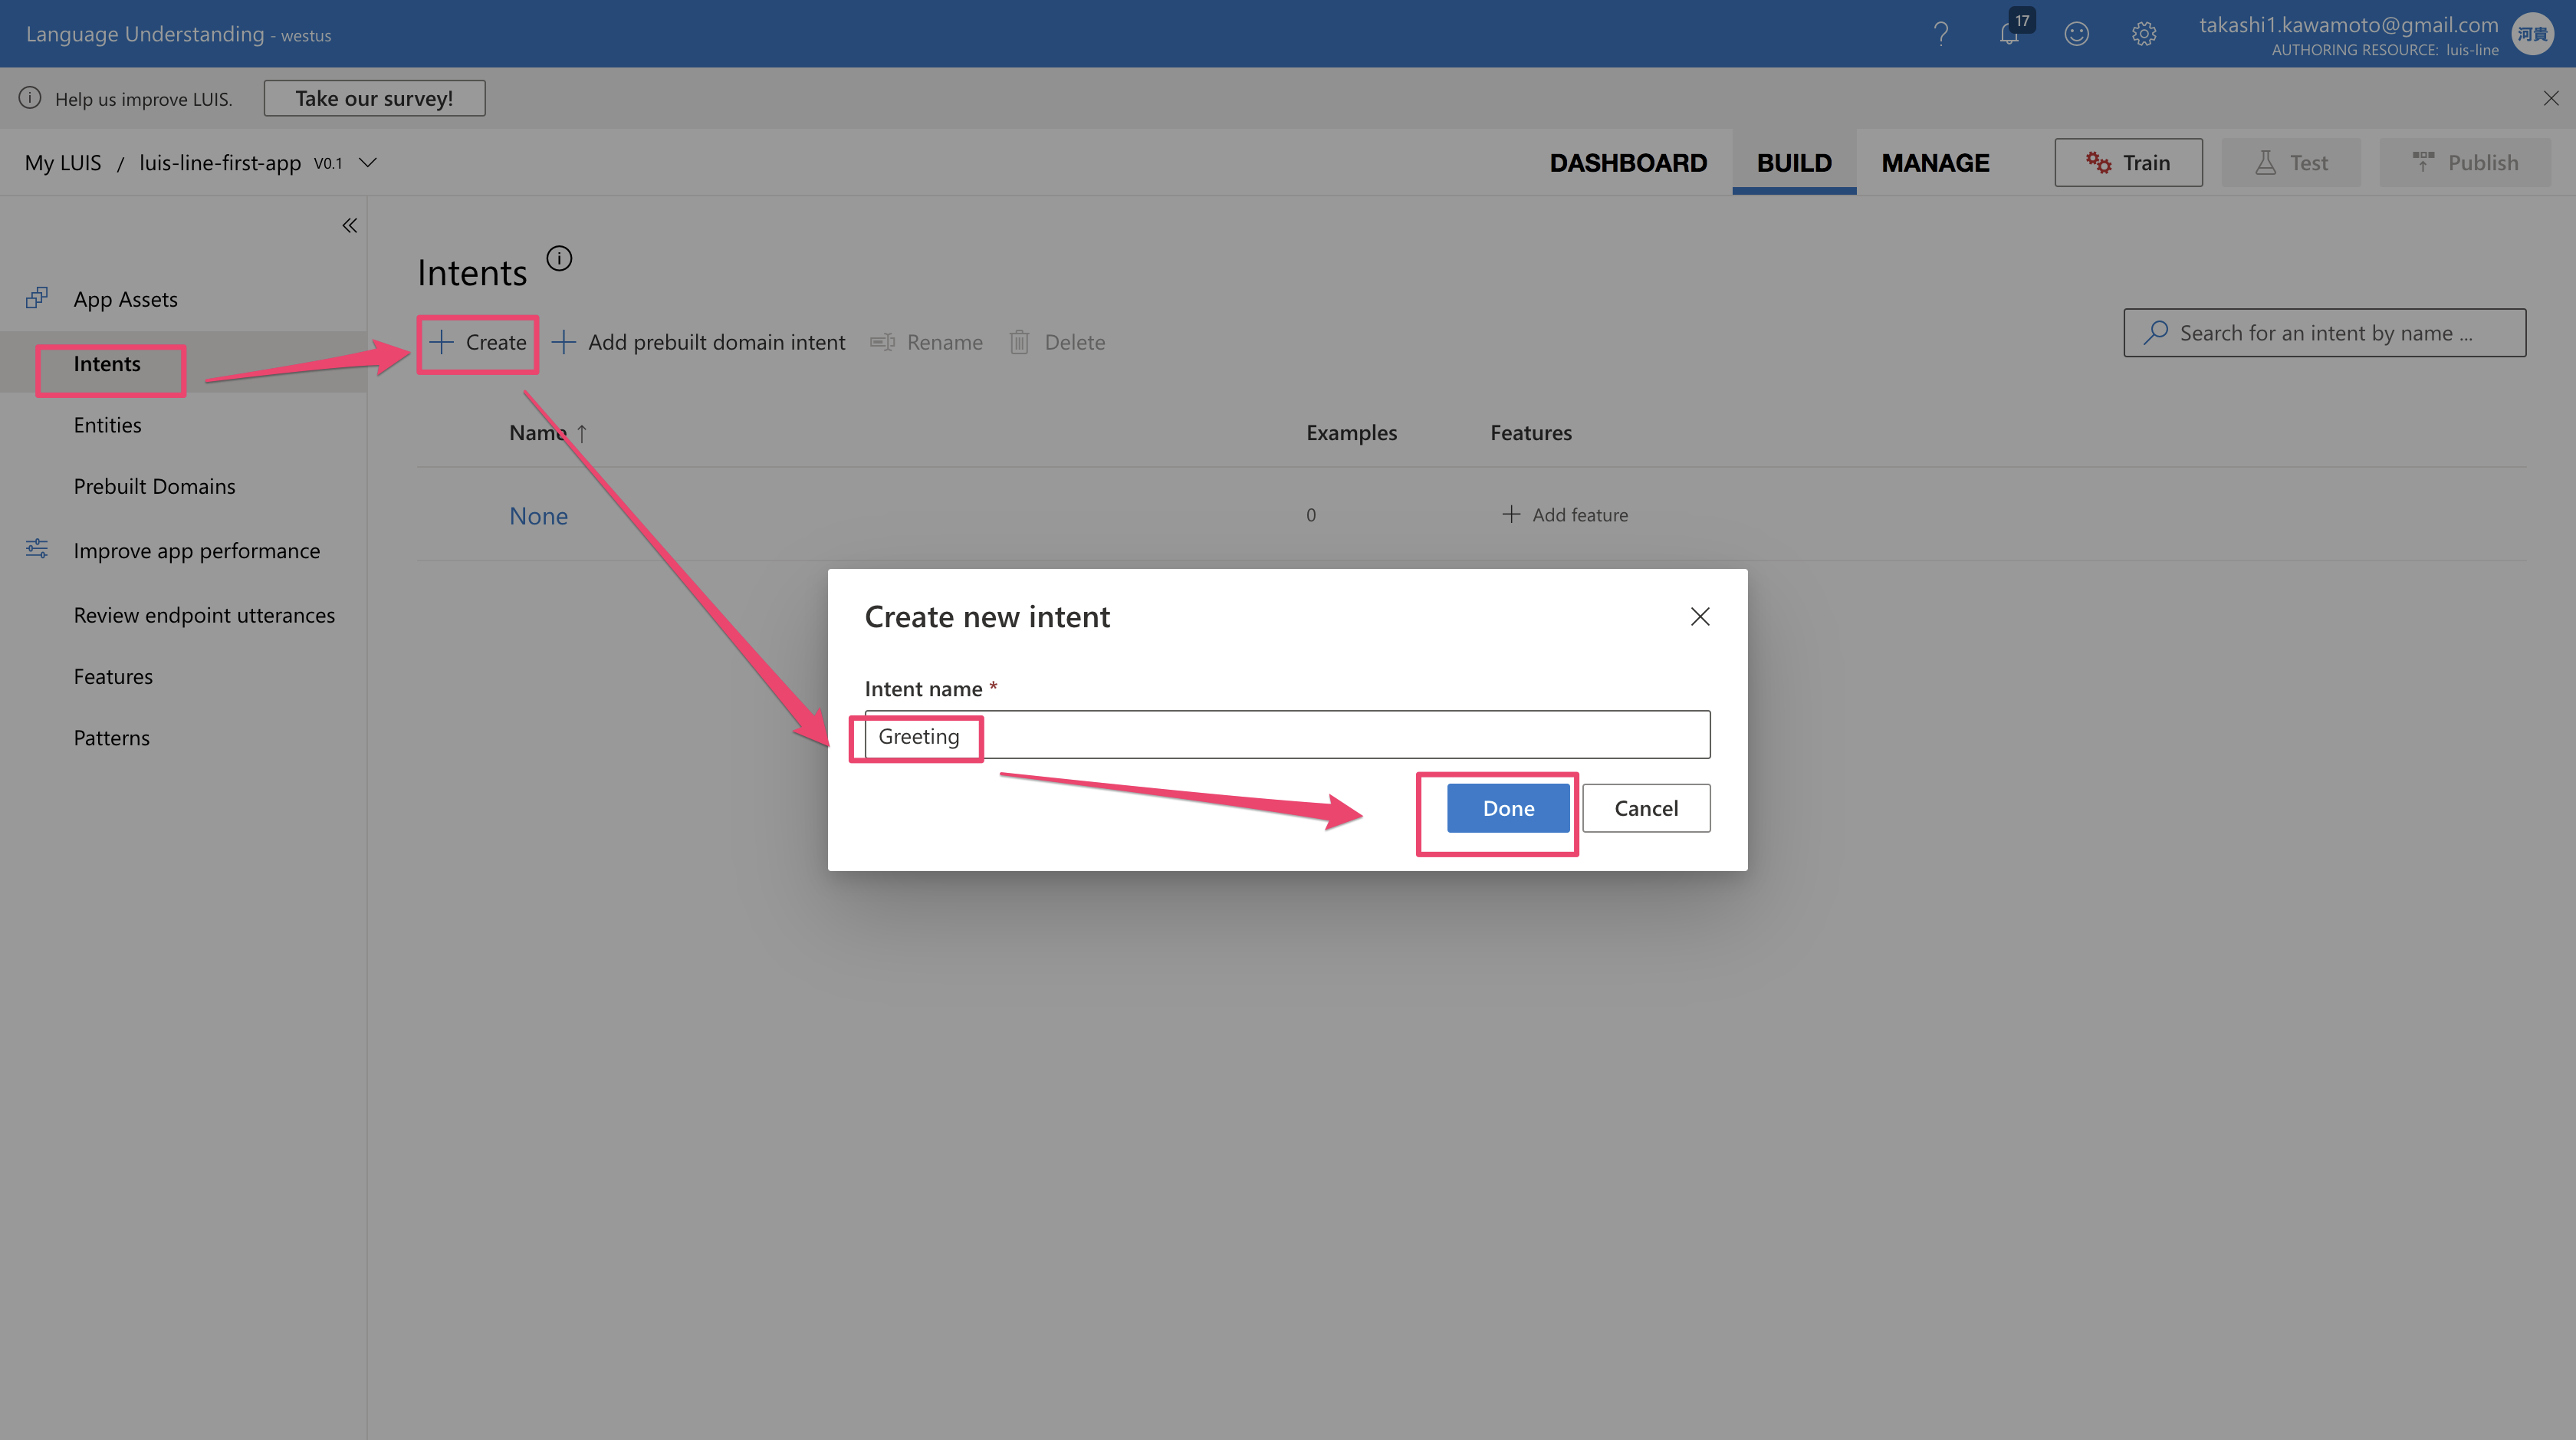
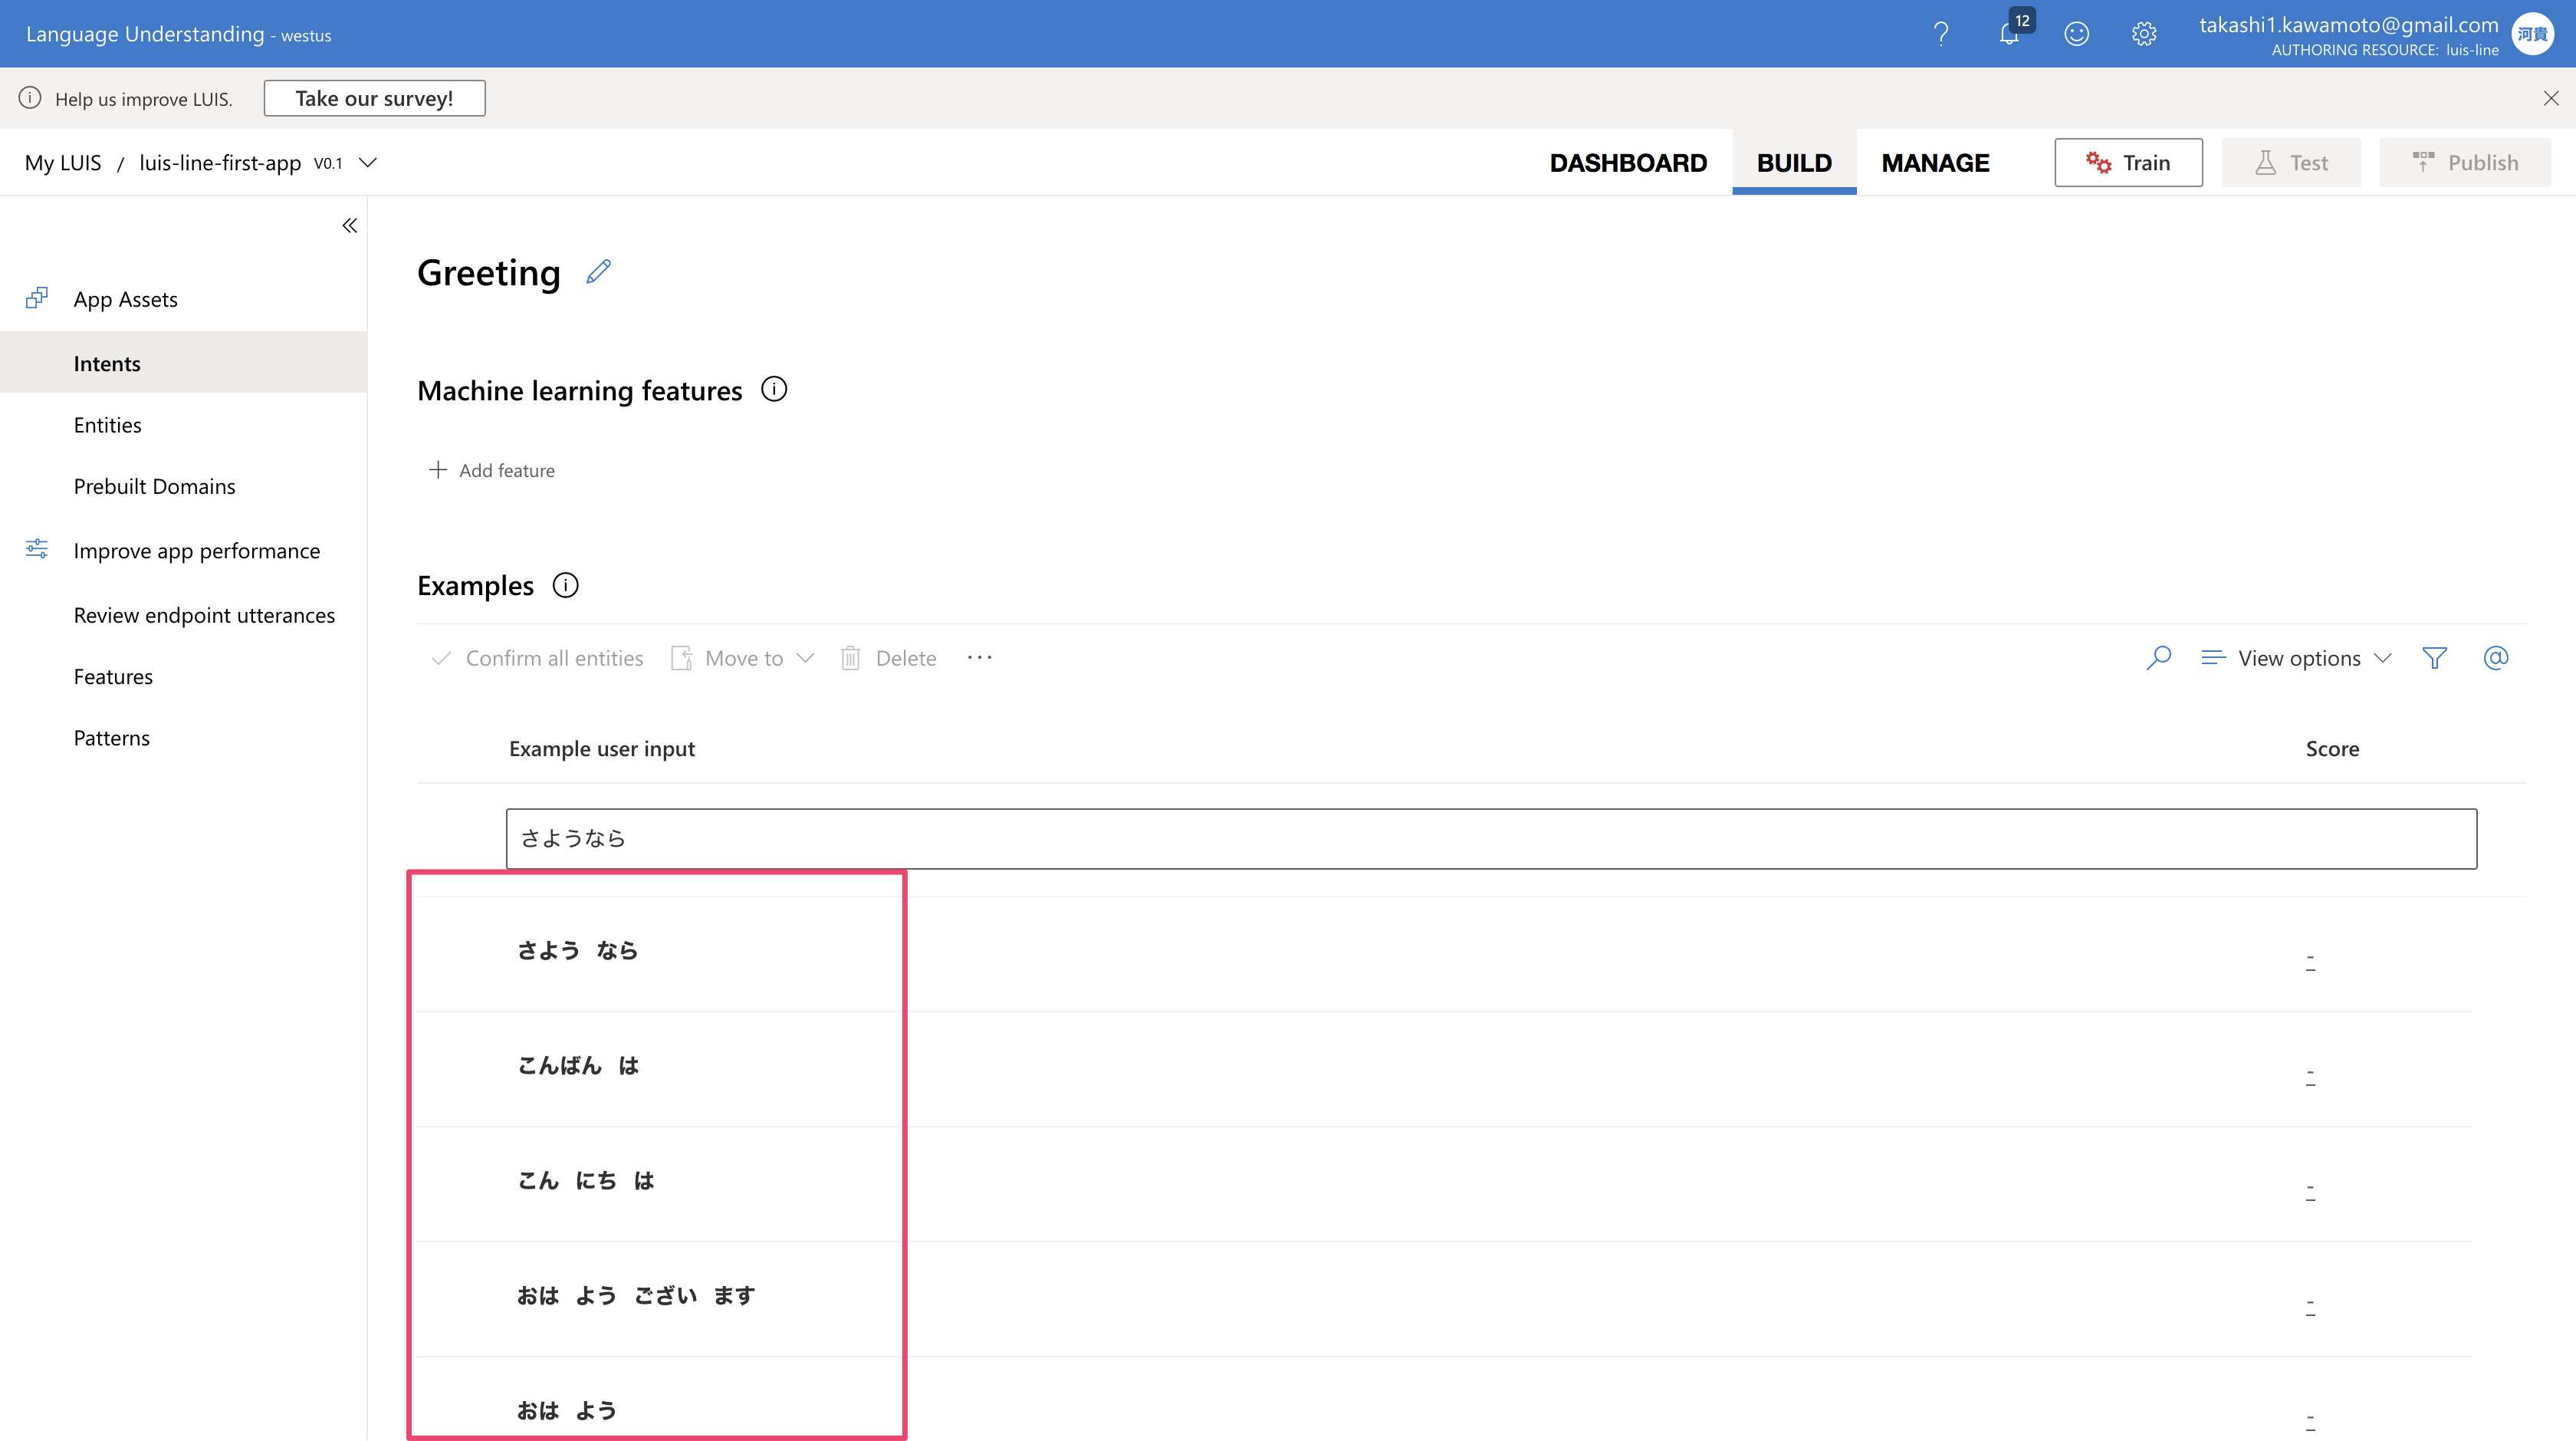
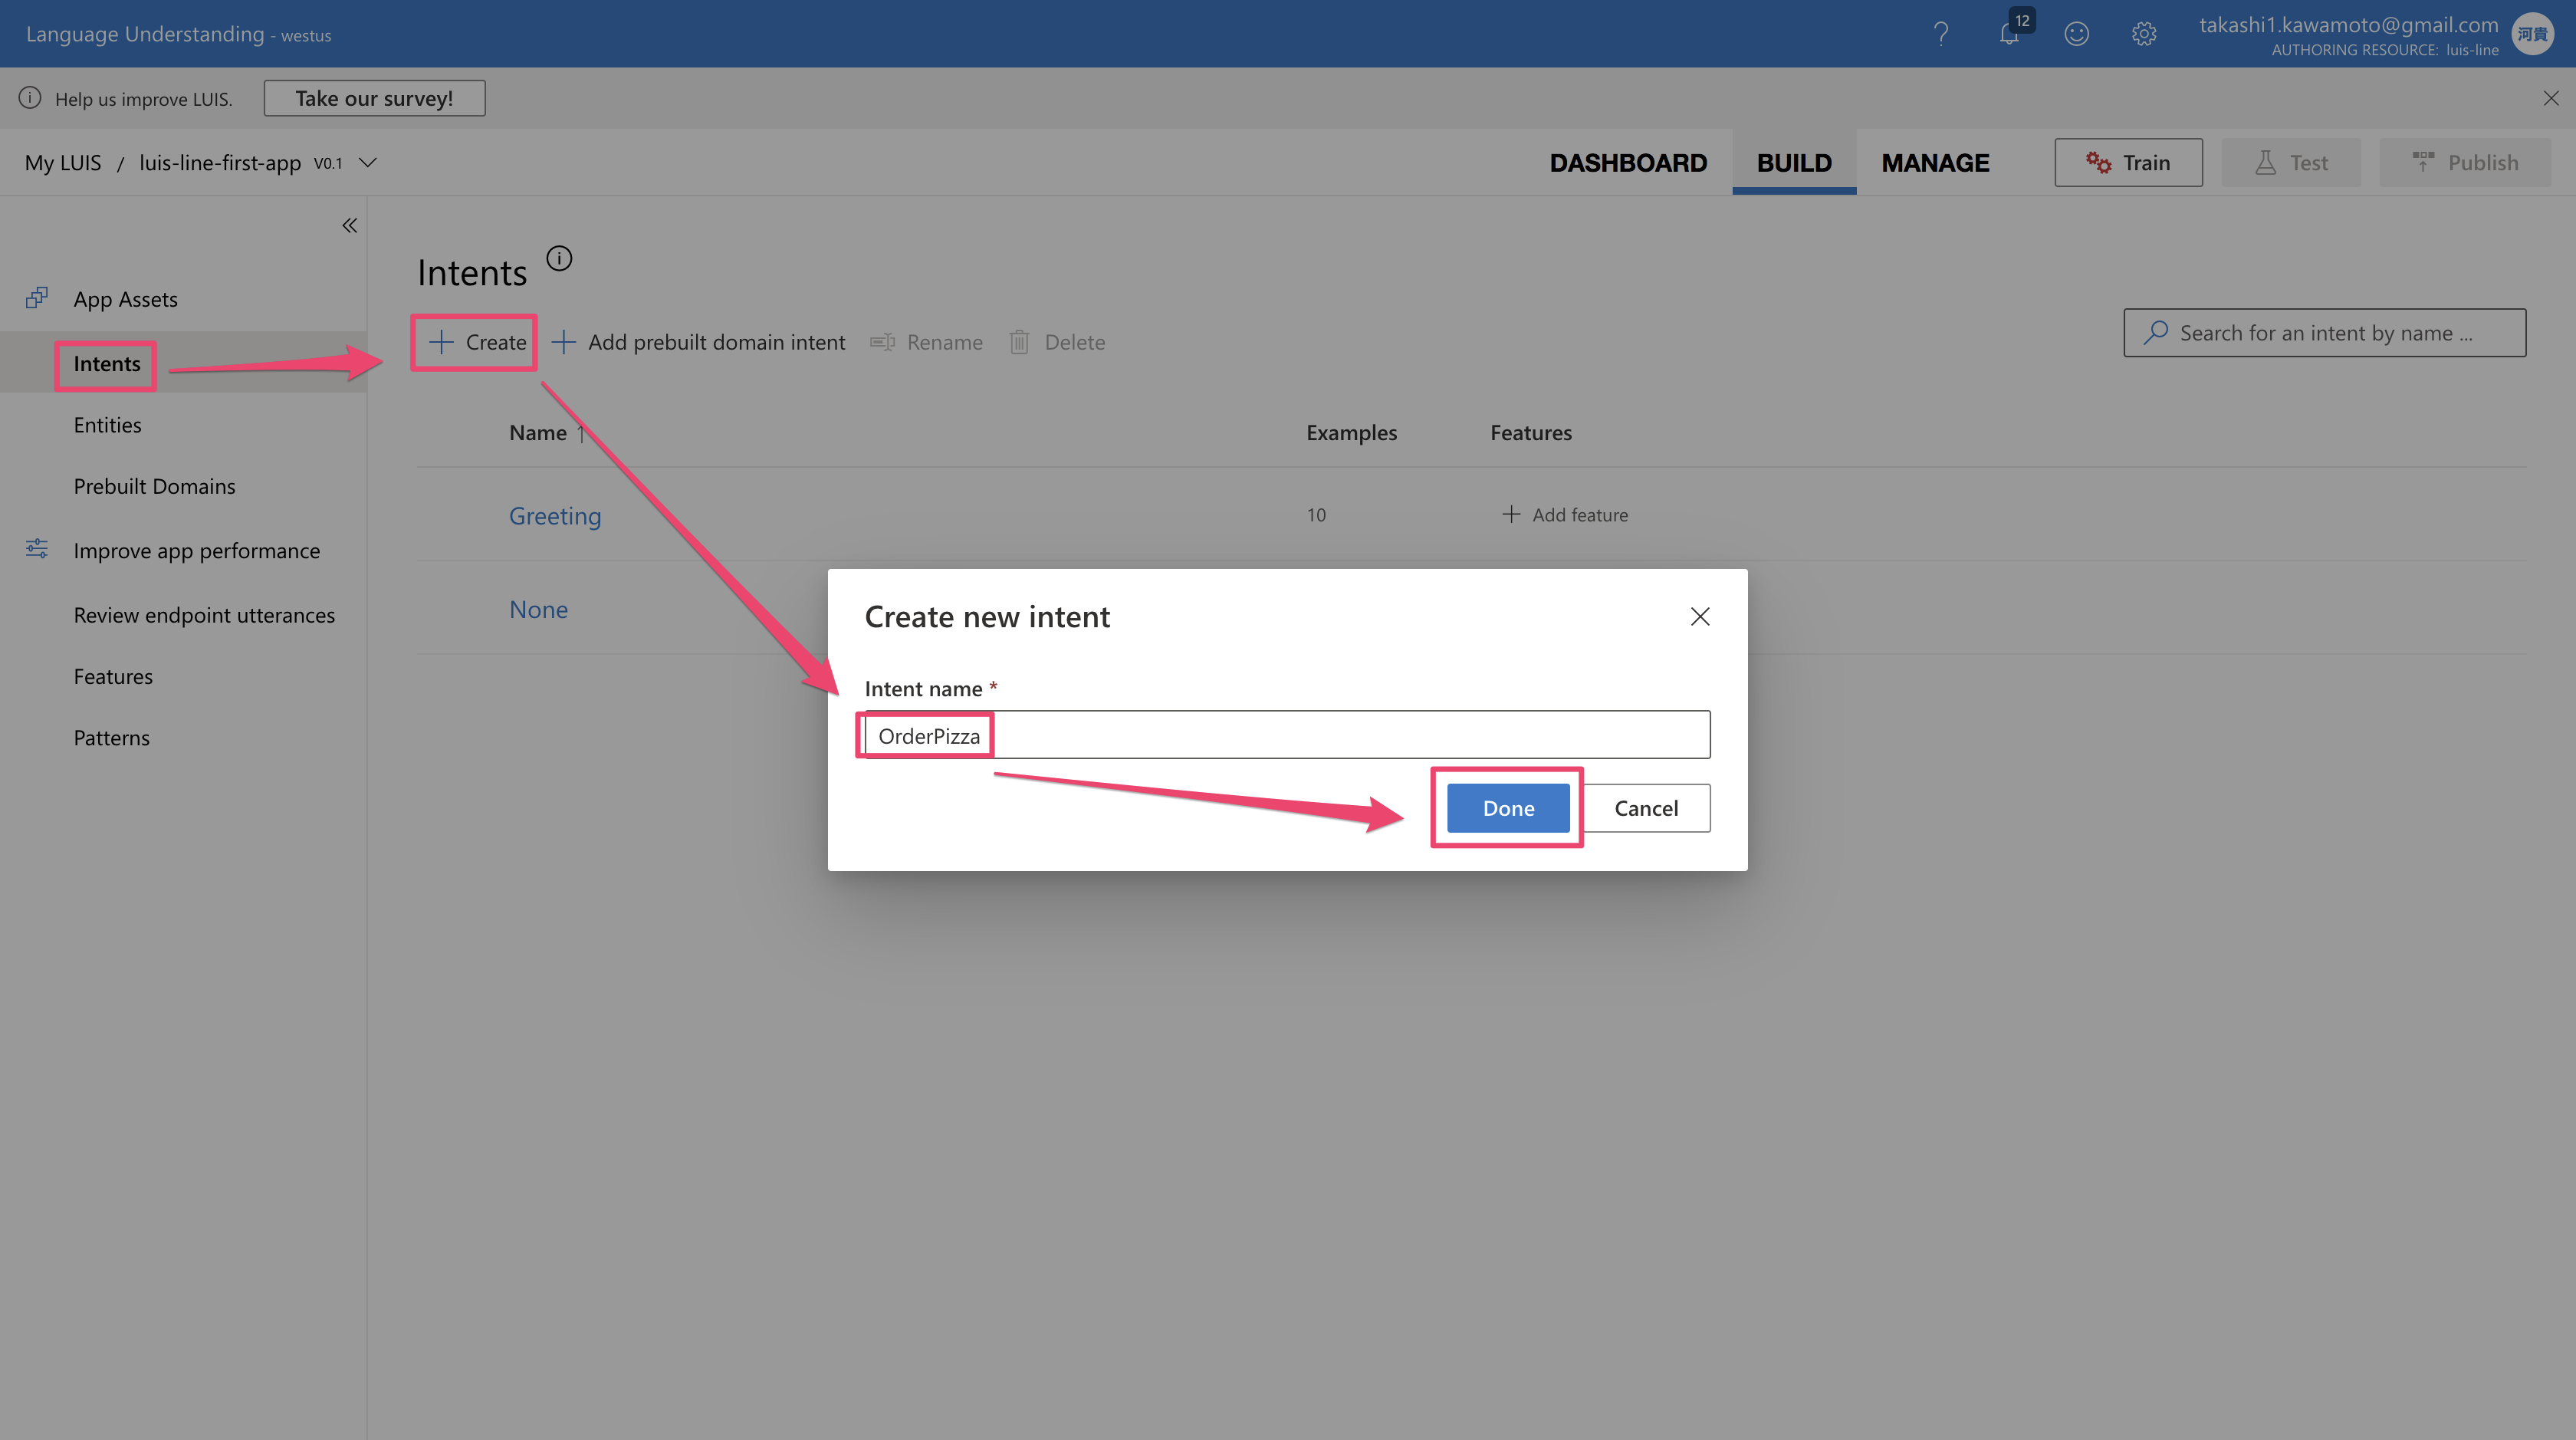
続いてIntentの作成をしていきます。まずは Greeting(挨拶)のIntentを作成してみます。
中身は下記のような感じで、あいさつ系の文章をいくつか入れておきます。
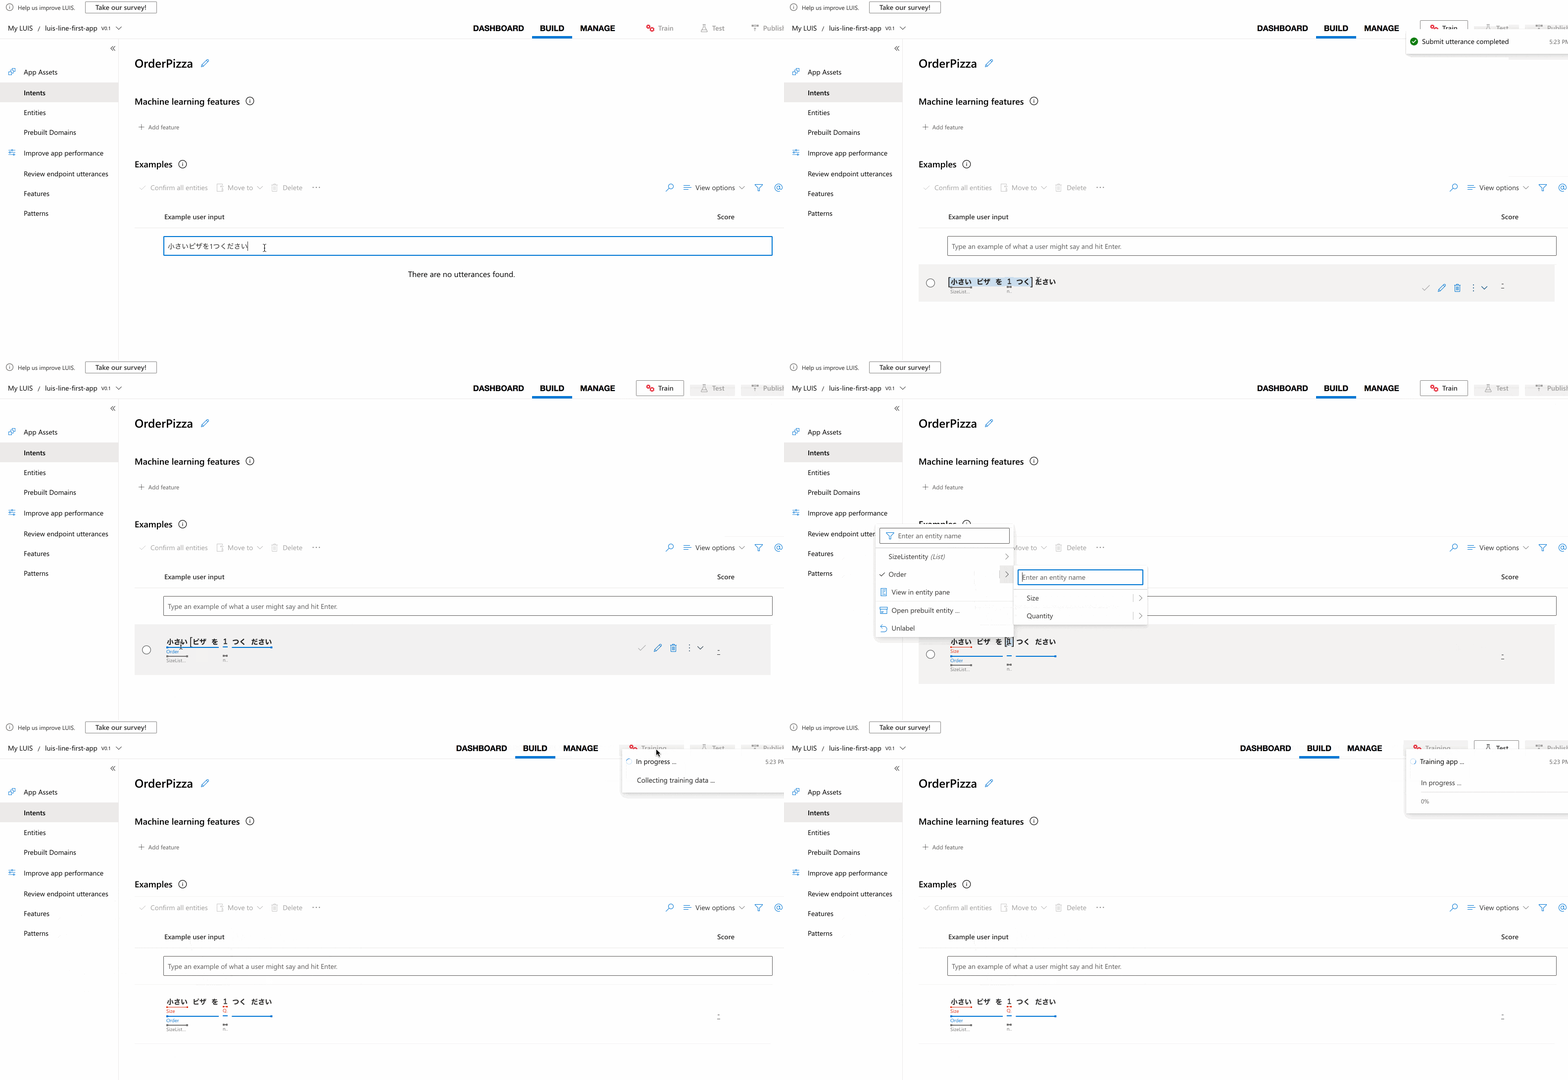
次にOrderPizza Intentを作成していきます。
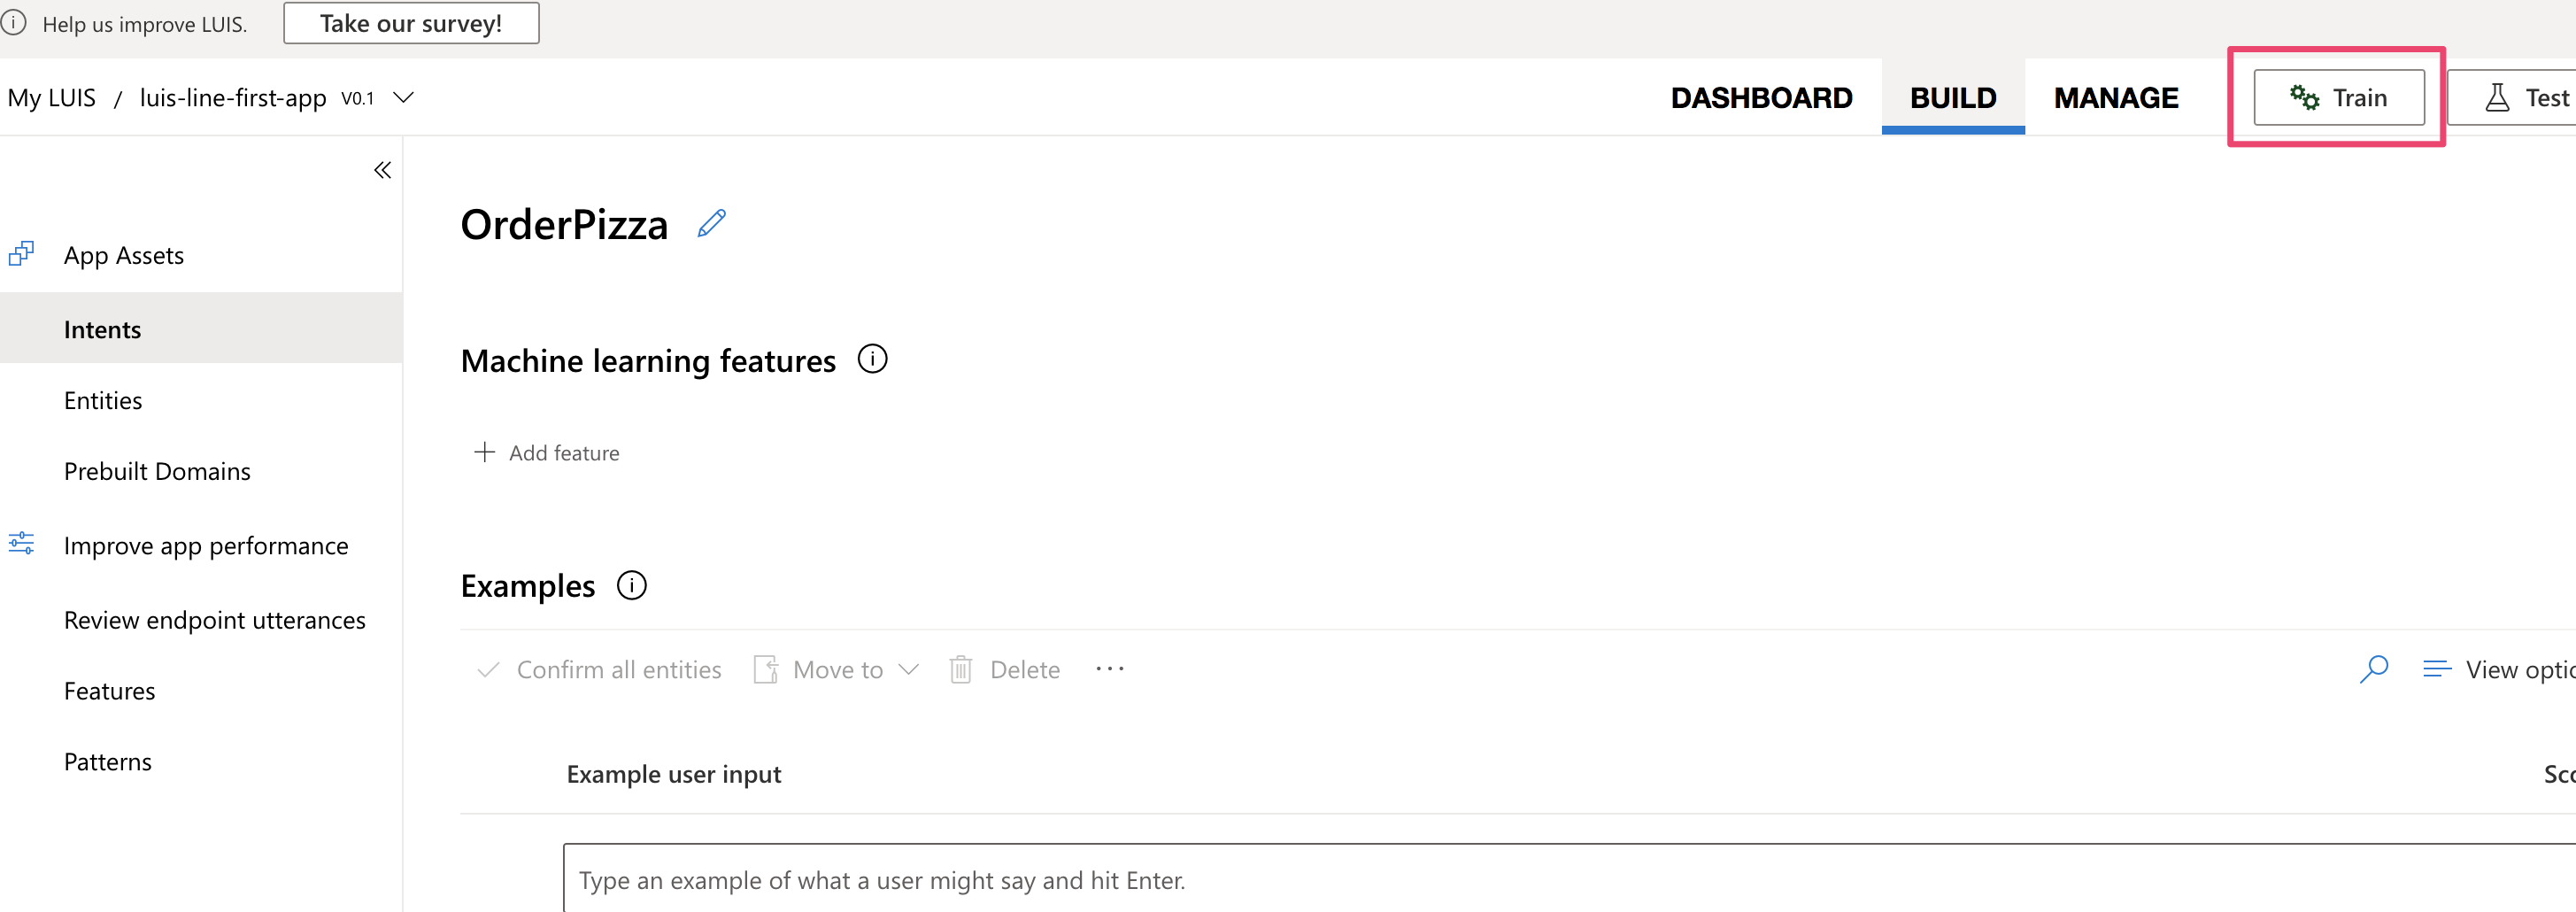
下記のようにサンプル発話を追加した後、Order、Size、Quantityのエンティティをラベル付けします。その後右上のTrainボタンも押しておきます。
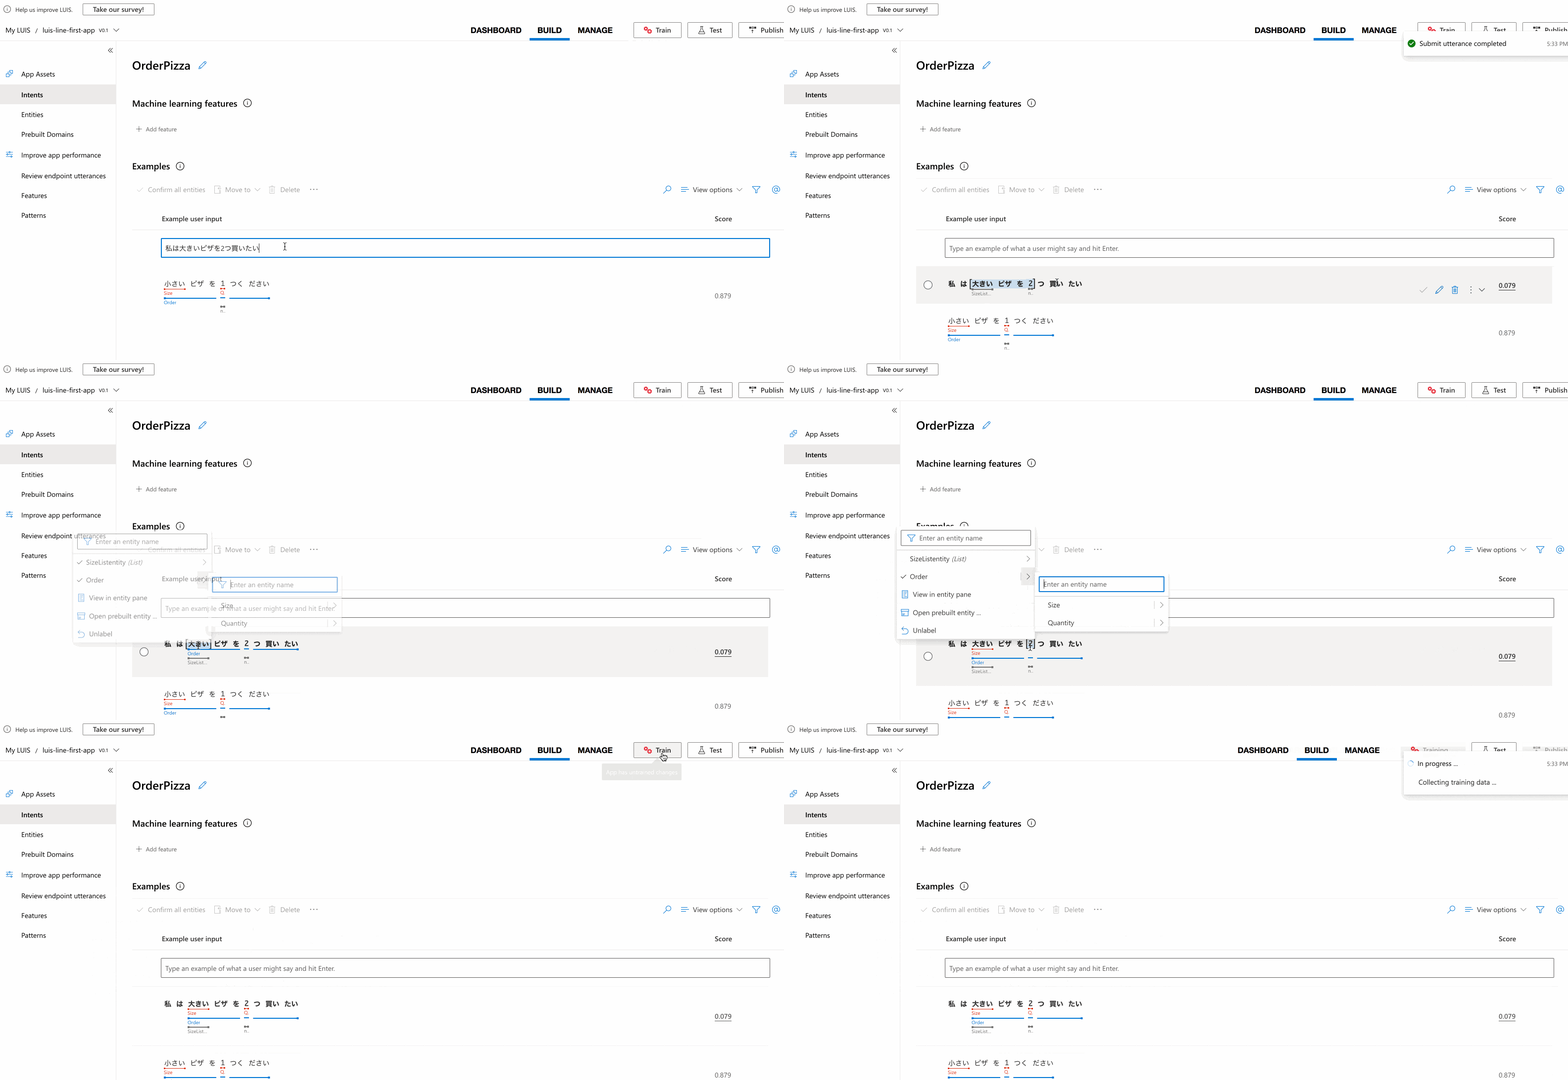
さらに発話を追加して ラベルをつけてトレーニングを実施していくと
すると自動のラベル付けの精度が次第に向上していくのが分かると思います。(ラベル付けが間違ってなければ右にあるチェックマークを押して確定させましょう)
こんな感じでIntetに発話サンプルをどんどん追加していきましょう!
モデルのビルドとテストの実行
ここでいったん画面右上のTrainボタンを押してトレーニングを実行しておきます。
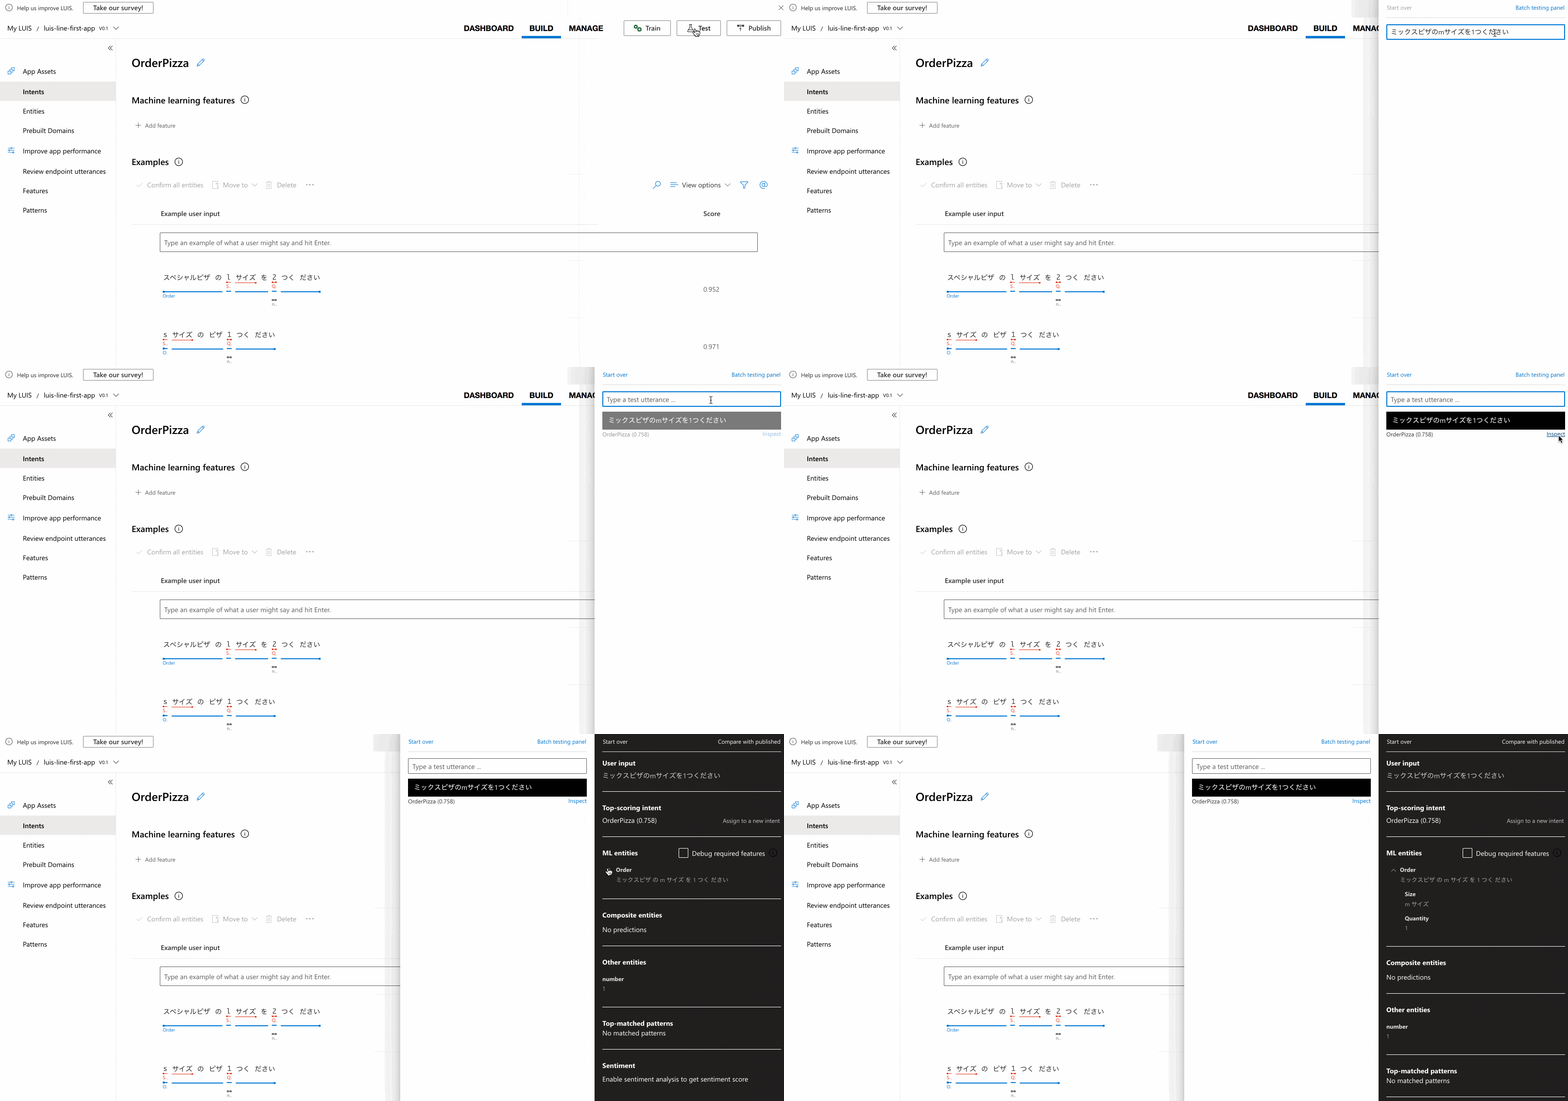
そして下記のようにテストパネルを開いて試しの注文文章を入れてテスト実行してみましょう。ちゃんと思ったIntentやEntityの抽出ができましたでしょうか?(ここで思った精度が出ない場合は、Intentのサンプル発話を追加するなどデータをもう少し追加してトレーニングを実行するサイクルを繰り返してみてください)
作成したLUISアプリを公開(Publish)する
テスト実行で良い感じに動いてましたら、このLUISアプリの公開(Publish)を行いたいと思います。公開するとエンドポイントのURLが発行されるので、チャットボットなどのアプリケーションに組み込むことが可能です。
エンドポイントを実行してLUISの予測結果を確認する
アプリケーションに組み込む前に先ほど発行したエンドポイントURLをcurlで叩いてみましょう。ここではいったんsサイズのピザを3つくださいという文章を送ってみます。
https://cog-luis.cognitiveservices.azure.com/luis/prediction/v3.0/apps/7fbff360-2283-40fb-a04a-7cea206908fe/slots/production/predict?subscription-key=af1cfef00b6b4ddc9968153363512cea&verbose=true&show-all-intents=true&log=true&query=sサイズのピザを3つください
実行結果は下記のjsonが返ってきました。予測としてはOrderPizzaのIntentがスコア0.9693499と高い数値を示しています。また、SizeやQuantityの値の抽出もしっかりできてそうですね。
{
    "query": "sサイズのピザを3つください",
    "prediction": {
        "topIntent": "OrderPizza",
        "intents": {
            "OrderPizza": {
                "score": 0.9693499
            },
            "Greeting": {
                "score": 0.012079056
            },
            "None": {
                "score": 0.008686903
            }
        },
        "entities": {
            "Order": [
                {
                    "Size": [
                        [
                            "小さい"
                        ]
                    ],
                    "Quantity": [
                        "3"
                    ],
                    "$instance": {
                        "Size": [
                            {
                                "type": "SizeListentity",
                                "text": "sサイズ",
                                "startIndex": 0,
                                "length": 4,
                                "score": 0.97143835,
                                "modelTypeId": 1,
                                "modelType": "Entity Extractor",
                                "recognitionSources": [
                                    "model"
                                ]
                            }
                        ],
                        "Quantity": [
                            {
                                "type": "Quantity",
                                "text": "3",
                                "startIndex": 8,
                                "length": 1,
                                "score": 0.9942513,
                                "modelTypeId": 1,
                                "modelType": "Entity Extractor",
                                "recognitionSources": [
                                    "model"
                                ]
                            }
                        ]
                    }
                }
            ],
            "$instance": {
                "Order": [
                    {
                        "type": "Order",
                        "text": "sサイズのピザを3つください",
                        "startIndex": 0,
                        "length": 14,
                        "score": 0.9689606,
                        "modelTypeId": 1,
                        "modelType": "Entity Extractor",
                        "recognitionSources": [
                            "model"
                        ]
                    }
                ]
            }
        }
    }
}
LINE Botに組み込んでみる
ターミナルでエンドポイントのURLを叩くだけだと面白く無いので、アプリっぽいものに組み込んでみましょう。LINEのBotなら簡単に実現できるので活用していきます。
基本的にはこちらの記事通りに進めていただいて、下記の2ファイルとApplication Settingの値を今回用に変更・追加してください。
- requirements.txt
azure-functions
line-bot-sdk
azure-cognitiveservices-language-luis
- ___init ___.py
import logging
import os
import azure.functions as func

## https://docs.microsoft.com/ja-jp/azure/cognitive-services/luis/client-libraries-rest-api?tabs=windows&pivots=programming-language-python
from azure.cognitiveservices.language.luis.authoring import LUISAuthoringClient
from azure.cognitiveservices.language.luis.authoring.models import ApplicationCreateObject
from azure.cognitiveservices.language.luis.runtime import LUISRuntimeClient
from msrest.authentication import CognitiveServicesCredentials
from functools import reduce

import json, time, uuid

appId = os.getenv('APP_ID', None)
predictionKey = os.getenv('PREDICTION_KEY', None)
predictionEndpoint = os.getenv('PREDICTION_ENDPOINT', None)

runtimeCredentials = CognitiveServicesCredentials(predictionKey)
clientRuntime = LUISRuntimeClient(endpoint=predictionEndpoint, credentials=runtimeCredentials)

from linebot import (
    LineBotApi, WebhookHandler
)
from linebot.exceptions import (
    InvalidSignatureError
)
from linebot.models import (
    MessageEvent, TextMessage, TextSendMessage,
)

# get channel_secret and channel_access_token from your environment variable
channel_secret = os.getenv('LINE_CHANNEL_SECRET', None)
channel_access_token = os.getenv('LINE_CHANNEL_ACCESS_TOKEN', None)

line_bot_api = LineBotApi(channel_access_token)
handler = WebhookHandler(channel_secret)

def main(req: func.HttpRequest) -> func.HttpResponse:
    logging.info('Python HTTP trigger function processed a request.')

    # get x-line-signature header value
    signature = req.headers['x-line-signature']

    # get request body as text
    body = req.get_body().decode("utf-8")
    logging.info("Request body: " + body)

    # handle webhook body
    try:
        handler.handle(body, signature)
    except InvalidSignatureError:
        func.HttpResponse(status_code=400)

    return func.HttpResponse('OK')


@handler.add(MessageEvent, message=TextMessage)
def message_text(event):
    predictionRequest = { "query" : event.message.text }
    predictionResponse = clientRuntime.prediction.get_slot_prediction(appId, "production", predictionRequest)
    logging.info("Top intent: {}".format(predictionResponse.prediction.top_intent))
    logging.info("Sentiment: {}".format (predictionResponse.prediction.sentiment))
    logging.info("Intents: ")
    for intent in predictionResponse.prediction.intents:
        logging.info("\t{}".format (json.dumps (intent)))
        logging.info("\t{}".format (type(intent)))
    logging.info("Entities: {}".format (predictionResponse.prediction.entities))
    line_bot_api.reply_message(
        event.reply_token,
        [TextSendMessage(text=f'Intent: {predictionResponse.prediction.top_intent}'),
         TextSendMessage(text=f'Entity: {predictionResponse.prediction.entities}')]
    )
- Application Setting
APP_ID、PREDICTION_KEY、PREDICTION_ENDPOINTの値をApplication Settingに設定します。
まとめ
簡単ではありましたが、LUISをアプリケーションに組み込むところまでやってみました。機械学習を使うと聞くとハードルが高そうですが、近頃は機械学習の民主化が非常に進んでいるのでこういったLUISのようにある程度誰でも機械学習を活用することができる世の中になっていますね!自身のアプリケーションをワンランク上のクオリティにできるのではないでしょうか。
(個人的には機械学習は特定の人たちが使うものというより通常のソフトフェア開発の延長線上にあり、一歩進んだ姿と思っています。何らかの形で全ての開発者が、プログラム言語を使うのと同様に機械学習を活用するのがあたりまえの世界が来るのも近いと感じています)
また、今回はLUISを主に使いましたが、Bot FrameworkやQnA Makerといった相性の良いサービスと組み合わせるとさらに強力になりそうです。
参考
- https://docs.microsoft.com/ja-jp/azure/cognitive-services/luis/luis-concept-feature
- https://docs.microsoft.com/ja-jp/azure/cognitive-services/luis/client-libraries-rest-api?tabs=windows&pivots=programming-language-python
- https://docs.microsoft.com/ja-jp/python/api/azure-cognitiveservices-language-luis/?view=azure-python
- https://github.com/Azure-Samples/cognitive-services-python-sdk-samples/tree/master/samples/language/luis
- https://docs.microsoft.com/en-us/python/api/azure-cognitiveservices-language-luis/azure.cognitiveservices.language.luis.runtime.models.predictionresponse?view=azure-python
- https://docs.microsoft.com/en-us/python/api/azure-cognitiveservices-language-luis/azure.cognitiveservices.language.luis.runtime.models.intent?view=azure-python
- https://docs.microsoft.com/en-us/rest/api/cognitiveservices-luis/runtimev3.0/prediction/getslotprediction
- https://github.com/Azure/azure-sdk-for-python
