はじめに
前回の記事「OpenCVでスプライトを回転させる」は夏休みに完成させることができず、週末も使って何とか一区切りさせた。
ところが、アップした翌日にはもう新たなアイデアが浮かんできた。やはり誘惑が多い環境はよろしくない。勉強をするにはもっと厳しい環境に身を置かなくては。職場とか。
cv2.warpAffine()の詳細
前回割愛した、cv2.warpAffine()の必須でない引数に興味深いものがあった。
参考記事 : OpenCVで画像上に別の画像を描画する
- src 元画像。必須。
- M 2*3の変換行列。必須。
- dsize 出力画像サイズを
(width, height)のタプルで指定する。必須。 - dst 背景(元画像の外)画像。サイズはdsizeと同じである必要がある。
- flags 画像補完の方法。デフォ値は
cv2.INTER_LINEAR。他にcv2.INTER_NEARESTなど。 - borderMode 背景(元画像の外)の処理方法。デフォ値は
cv2.BORDER_CONSTANT。 - borderValue
borderMode=cv2.BORDER_CONSTANTの際の色。デフォ値は0。後述。
事前に元画像を小加工する
画像処理の結果をわかりやすくするため、ちょっとした関数を作っておく。最小限の部分しか記載しないので注意。
def makeSampleImg(img4): # RGBA4チャンネル画像を持ってくる
h, w = img4.shape[:2]
# 周囲に色を付けるだけでなくA=255(不透明)にするのがミソ
cv2.rectangle(img4, (0,0), (w-1,h-1), (0,0,255,255), 1)
return img4
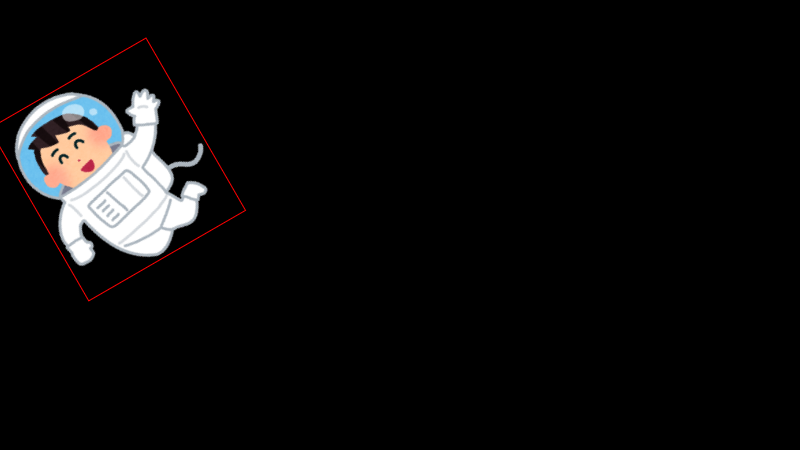
img_origin = cv2.imread(filename, -1) # RGBA画像
img4 = makeSampleImg(img_origin)
img3 = img4[:, :, :3] # A要素をなくしRGB画像にする
| 元画像 | 小加工 | 3チャンネル化 |
|---|---|---|
 |
 |
 |
背景を単色で塗りつぶす
borderMode=cv2.BORDER_CONSTANTで背景を単色にする。borderModeのデフォ値はこれなのでわざわざ記載する必要はない。
いくつか試してみる。
M = cv2.getRotationMatrix2D((w/2,h/2), 30, 1)
img_rot31 = cv2.warpAffine(img3, M, (w, h), borderValue=(255,255,0))     # 前景RGB、背景RGB
img_rot32 = cv2.warpAffine(img3, M, (w, h), borderValue=(255,255,0,0))   # 前景RGB、背景RGBA(A成分=0)
img_rot33 = cv2.warpAffine(img3, M, (w, h))                              # 前景RGB、背景指定なし
img_rot41 = cv2.warpAffine(img4, M, (w, h), borderValue=(255,255,0))     # 前景RGBA、背景RGB
img_rot42 = cv2.warpAffine(img4, M, (w, h), borderValue=(255,255,0,0))   # 前景RGBA、背景RGBA(A成分=0)
img_rot43 = cv2.warpAffine(img4, M, (w, h))                              # 前景RGBA、背景指定なし
img_rot44 = cv2.warpAffine(img4, M, (w, h), borderValue=(255,255,0,255)) # 前景RGBA、背景RGBA(A成分あり)
前景がRGB画像の場合、背景色としてRGBAの4チャンネルを指定してもA成分は無視される(img_rot32)。
borderValueを指定しないと背景が黒になる(img_rot33、というかデフォの演算)が、背景色が(0,0,0)になると理解すべき。
| img_rot31 | img_rot32 | img_rot33 |
|---|---|---|
 |
 |
 |
前景がRGBA画像の場合、背景色としてRGBの3チャンネルを指定しても出力結果はRGBAの4チャンネルとなる。このとき付与されたA成分は0。Aは透明度ではなく不透明度なので、これが0ということはRGB…じゃなかったBGR値が定義されていても結果として透明になる(img_rot41)。borderValueを指定しない場合も背景が透明になる(img_rot43)が、こちらも背景色が(0,0,0,0)になると考えれば理解しやすい。
もちろんA成分に0でない値を設定すればちゃんと色が付く(img_rot44)。
| img_rot41 | img_rot42 | img_rot43 | img_rot44 |
|---|---|---|---|
 |
 |
 |
 |
背景として画像を設定する
borderMode=cv2.BORDER_TRANSPARENTとするとdstで背景画像を指定することができる。
OpenCVではよくある話だが、cv2.warpAffine()するとdstで指定した背景画像は加工されてしまう。元画像を保持する必要があるときはdst=back.copy()としておく必要がある。
TRANSPARENTだから透明になるのだな、だったらdstを指定しなければ透明背景になるのかな、と期待したのだが、そう簡単にはいかなかった。Oh! なんだかイクラを食べたくなってきたぞ。
back = cv2.imread(back_name)  # 前景画像と同サイズのRGB画像
back4 = cv2.cvtColor(back, cv2.COLOR_BGR2BGRA) # RGBA画像にする A成分は0ではなく255になる

M = cv2.getRotationMatrix2D((w/2,h/2), 30, 1)
img_rot35 = cv2.warpAffine(img3, M, (w, h), borderMode=cv2.BORDER_TRANSPARENT, dst=back.copy())   # 前景RGB、背景RGB
img_rot36 = cv2.warpAffine(img3, M, (w, h), borderMode=cv2.BORDER_TRANSPARENT, dst=back4.copy())  # 前景RGB、背景RGBA
img_rot37 = cv2.warpAffine(img3, M, (w, h), borderMode=cv2.BORDER_TRANSPARENT)                    # 前景RGB、背景指定なし
img_rot45 = cv2.warpAffine(img4, M, (w, h), borderMode=cv2.BORDER_TRANSPARENT, dst=back.copy())   # 前景RGBA、背景RGB
img_rot46 = cv2.warpAffine(img4, M, (w, h), borderMode=cv2.BORDER_TRANSPARENT, dst=back4.copy())  # 前景RGBA、背景RGBA
img_rot47 = cv2.warpAffine(img4, M, (w, h), borderMode=cv2.BORDER_TRANSPARENT)                    # 前景RGBA、背景指定なし
前景背景ともにRGB画像(img_rot35)で想定通りの挙動となった。
RGB前景で背景画像を指定しなかった場合、実行するたびに結果が変わってしまった(img_rot37)。numpyには初期化されていない配列を作るnumpy.empty()という関数がある。ここでも同様の仕様で背景画像(というかnumpy配列)が作られているのだろう。
RGB前景でRGBA背景を指定したimg_rot36でゴミあり黒背景になってしまった理由はよくわからない。
| img_rot35 | img_rot36 | img_rot37その1 | img_rot37その2 |
|---|---|---|---|
 |
 |
 |
 |
前景背景ともにRGBA画像(img_rot46)は想定通りとはいえ、残念な結果でもある。前景の透明部分で背景を表示してくれたら嬉しかったのだが、そもそもアフィン変換はそういうものではないのだから仕方がない。
RGBA前景にRGB背景を指定したimg_rot45とRGBA前景で背景画像を指定しなかったimg_rot47は背景が透明になった。いずれもA要素に0が付与されたためと思われる。
要するに、想定外の使い方はしないほうが賢明だというありきたりな結論となった。
| img_rot45 | img_rot46 | img_rot47 |
|---|---|---|
 |
 |
 |
スプライトに活用する
以上、先人の記事を参考に、画像の上に透明を含むRGBA画像を貼ることを考えたのだが、結論としては無理だった。
とはいえ、背景画像からはみ出てもエラーにならない仕様は魅力的だ。そこで、これまでやってきたマスク手法とアフィン変換を組み合わせることにした。
そしたら…できてしまった、超簡単に。外接四角形がどうとかROIがどうとか、面倒なのがまったくなしで。
import cv2

def makeSampleImg(img4):
    h, w = img4.shape[:2]
    cv2.rectangle(img4, (0,0), (w-1,h-1), (0,0,255,255), 1)
    return img4

def putSprite_Affine(back, front4, pos, angle=0, center=(0,0)):
    x, y = pos
    front3 = front4[:, :, :3]
    mask1 =  front4[:, :, 3]
    mask3 = 255- cv2.merge((mask1, mask1, mask1))
    bh, bw = back.shape[:2]

    M = cv2.getRotationMatrix2D(center, angle, 1)
    M[0][2] += x
    M[1][2] += y
    front_rot = cv2.warpAffine(front3, M, (bw,bh))
    mask_rot = cv2.warpAffine(mask3, M, (bw,bh), borderValue=(255,255,255))
    tmp = cv2.bitwise_and(back, mask_rot)
    result = cv2.bitwise_or(tmp, front_rot)
    return result

if __name__ == "__main__":
    filename_front = "uchuhikoushi.png"
    filename_back = "space.jpg"
    img_front = cv2.imread(filename_front, -1)
    img_front = makeSampleImg(img_front)  # RGBA画像に枠をつける(必須ではない)
    img_back = cv2.imread(filename_back)

    pos = [(0, 50), (300,200), (400,400), (500,-50), (-100,1000)] # 画像を置く左上座標
    xc, yc = 140, 60  # 前景画像の回転中心
    angle = 0

    while True:
        img = img_back.copy()
        for x,y in pos:
            img = putSprite_Affine(img, img_front, (x,y), angle, (xc,yc))

            # 正しく描写されていることを確認する(必須ではない)
            cv2.circle(img, (x,y), 5, (0,255,0), -1)       # 前景画像の左上にマーク
            cv2.circle(img, (x+xc,y+yc), 5, (0,0,255), -1) # 回転中心にマーク
            cv2.putText(img, f"angle={angle}", (10,440), cv2.FONT_HERSHEY_SIMPLEX, 1, (0,0,255), 2)

        cv2.imshow("putSprite_Affine", img)

        key = cv2.waitKey(1) & 0xFF
        if key == ord("q"):
            break
        angle = (angle + 30) % 360

    cv2.destroyAllWindows()
欠点といえば、背景画像全体に対しマスク画像とRGB画像をアフィン変換しているので計算量が無駄に大きい(「オーバーヘッドが大きい」というらしい)ことが挙げられる。
| 描写途中のfront_rot |
|---|
 |
| 描写途中のmask_rot |
 |
| 結果 |
ここでは前回のアニメGIFを載せるが、実際は赤枠付きのキャラが回転する。
|
これが実行スピードにどう影響するか、今度確認してみよう。
終わりに
まだ終わりません。