はじめに
OpenCVで透過画像を扱う ~スプライトを舞わせる~の続きです。
スプライトを回転させるって、ワクワクしますな。ナムコのSYSTEM II基板を思い出します。アサルトとか、オーダインとか。プレイステーション本体を購入する前にナムコミュージアム VOL.4を買ったものだ。
OpenCVで画像を回転させる
OpenCVではcv2.rotate()で画像を90度単位で回転できることができるが、任意の角度で回転させる関数はない。より高度な関数があるので、それを使う。
アフィン変換のお勉強
回転や拡大縮小などの一次変換と平行移動を合わせた写像をアフィン変換という。要は
\begin{pmatrix}
x' \\
y'
\end{pmatrix}
=
\begin{pmatrix}
a & b \\
d & e
\end{pmatrix}
\begin{pmatrix}
x \\
y
\end{pmatrix}
+
\begin{pmatrix}
c \\
f
\end{pmatrix}
という変換だ。この形ではプログラムしづらいので
\begin{pmatrix}
x' \\
y' \\
1
\end{pmatrix}
=
\begin{pmatrix}
a & b & c \\
d & e & f \\
0 & 0 & 1
\end{pmatrix}
\begin{pmatrix}
x \\
y \\
1
\end{pmatrix}
と表現することにする。一番下がなんとなく気持ち悪いが、1=1という恒等式があるだけだ。
この
\begin{pmatrix}
a & b & c \\
d & e & f \\
\end{pmatrix}
を定義して、cv2.warpAffine()という関数にかける。
ただし、画像を回転させるにあたり、わざわざ
\begin{pmatrix}
cosθ & -sinθ & 0 \\
sinθ & cosθ & 0 \\
\end{pmatrix}
という計算をする必要はない。cv2.getRotationMatrix2D()で得られる行列を使えばよいのだ。
回転行列を作る cv.getRotationMatrix2D(center, angle, scale)
- center 回転中心。
- angle 回転角度。反時計回りで、単位はラジアンではなく度。
- scale 拡大縮小の倍率。
平行移動分は自分で追加しよう。
画像をアフィン変換する cv.warpAffine(src, M, dsize)
- src 元画像。
- M 2*3の変換行列。
- dsize 出力画像サイズを
(width, height)のタプルで指定する。 - これら以外にも必須でない引数があるが省略。
実践
変換行列は具体的にどうなっているのかなっと。
import cv2
angle = 30  # degrees
M = cv2.getRotationMatrix2D((0,0), angle, 1)
print (M)
print (M.shape)
print (M.dtype)
[[ 0.8660254  0.5        0.       ]
 [-0.5        0.8660254  0.       ]]
(2, 3)
float64
cos30度 = √3 /2 = 0.8660254…だからまさしく回転行列の…って、あれ? マイナスの位置が違ってるぞ?
どうやら数学で使うxy平面とは違い下が正になっている座標系に対応した計算になっているらしい。
で、これを使って実際に画像変換してみる。
import cv2

filename = "hoge.png"
img = cv2.imread(filename)
h, w = img.shape[:2]
center = (140,60)
angle = 0

while True:
    angle = (angle + 10) % 360
    M = cv2.getRotationMatrix2D(center, angle, 1)
    img_rot = cv2.warpAffine(img, M, (w, h))
    cv2.imshow(filename, img_rot)
    key = cv2.waitKey(100) & 0xFF
    if key == ord("q"):
        break

cv2.destroyAllWindows()
結果はこう。
| 元画像 | 結果 |
|---|---|
 |
 |
回転角度と回転中心については理解したが、「ちょっと待てよ、そもそも画像がはみ出してるじゃん」と言いたくなってくる。
はみ出しを避ける
はみ出しを避けるにはどうするか。どうするかって、計算するんだよ計算。
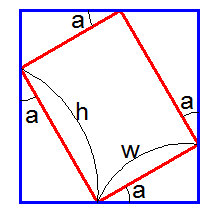
2辺の長さが w と h である長方形(赤)が角度aだけ傾いたとき、外接する四角形(青)のサイズは
rot_w = w*cos(a) + h*sin(a)
rot_h = w*sin(a) + h*cos(a)
となる。0度~90度 を外れるとサインやコサインがマイナスになるので、正確には各項は絶対値とする必要がある。
ああ、ようやく理解したぞ。後述の先人たちの記事にこの式が出てきて回転行列とも違うし何だろうと思っていたのよね。
で、この青の長方形に収まるように位置を平行移動すればいいわけだ。(0,0)を回転中心としているので、画像中心を基準で考える、と。
import cv2
import numpy as np

filename = "hoge.png"
img = cv2.imread(filename)
h, w = img.shape[:2]
angle = 0

while True:
    angle = (angle + 10) % 360
    a = np.radians(angle)
    w_rot = int(np.round(w*abs(np.cos(a)) + h*abs(np.sin(a))))
    h_rot = int(np.round(w*abs(np.sin(a)) + h*abs(np.cos(a))))

    M = cv2.getRotationMatrix2D((w/2,h/2), angle, 1)
    M[0][2] += -w/2 + w_rot/2
    M[1][2] += -h/2 + h_rot/2

    img_rot  = cv2.warpAffine(img, M, (w_rot,h_rot))
    cv2.imshow(filename, img_rot)
    key = cv2.waitKey(100) & 0xFF
    if key == ord("q"):
        break

cv2.destroyAllWindows()
結果はこう。画像がウィンドウからはみ出ることはなくなったが、ウィンドウの位置(画像の左上の位置)が共通という制約の上でのアニメーションなので暴れているのは仕方がない。
回転中心を指定する
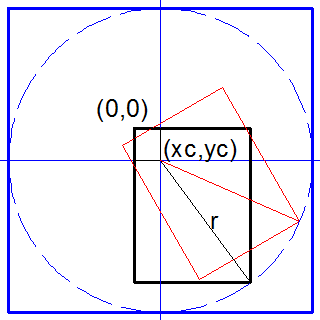
中心を指定して回転させ、さらに作られた画像が暴れないようにするには、あらかじめ回転後の画像が描かれるキャンバスのサイズを決めておけばよい。
キャンパスのサイズを求めるのは難しくない。回転中心と四隅の距離のうち、最大のやつが半径に相当する。キャンバスのサイズはその2倍。

調子が良かったのだろう、以下のソースでは半径を求める式をわずか1行で表現している。
今となっては自分でもどういう計算をしているのか読み解くのが大変なほどだ。あまり技巧に走るのもよくないな。
import cv2
import numpy as np

filename = "hoge.png"
img = cv2.imread(filename)
h, w = img.shape[:2]
xc, yc = 140, 60 # 回転中心
angle = 0

# 回転中心と四隅の距離の最大値を求める
pts = np.array([(0,0), (w,0), (w,h), (0,h)])
ctr = np.array([(xc,yc)])
r = np.sqrt(max(np.sum((pts-ctr)**2, axis=1)))
winH, winW = int(2*r), int(2*r)

while True:
    angle = (angle + 10) % 360
    M = cv2.getRotationMatrix2D((xc,yc), angle, 1)
    M[0][2] += r - xc
    M[1][2] += r - yc

    imgRot = cv2.warpAffine(img, M, (winW,winH))
    cv2.imshow("", imgRot)
    key = cv2.waitKey(100) & 0xFF
    if key == ord("q"):
        break

cv2.destroyAllWindows()
回転画像を背景画像に合成する
以上の処理を、前回のスプライト関数に追加する。
int()でなくmath.ceil()で切り上げしたほうが良かったかもしれない。
import cv2
import numpy as np

def putSprite_mask2(back, front4, pos, angle=0, center=(0,0)):
    x, y = pos
    xc, yc = center
    fh, fw = front4.shape[:2]
    bh, bw = back.shape[:2]

    # 回転中心と四隅の距離の最大値を求める
    pts = np.array([(0,0), (fw,0), (fw,fh), (0,fh)])
    ctr = np.array([(xc,yc)])
    r = int(np.sqrt(max(np.sum((pts-ctr)**2, axis=1))))

    # 回転する
    M = cv2.getRotationMatrix2D((xc,yc), angle, 1)
    M[0][2] += r - xc
    M[1][2] += r - yc
    imgRot = cv2.warpAffine(front4, M, (2*r,2*r))  # 回転画像を含む外接四角形

    # 外接四角形の全体が背景画像外なら何もしない
    x0, y0 = x+xc-r, y+yc-r
    if not ((-2*r < x0 < bw) and (-2*r < y0 < bh)) :
        return back

    # 外接四角形のうち、背景画像内のみを取得する
    x1, y1 = max(x0,  0), max(y0,  0)
    x2, y2 = min(x0+2*r, bw), min(y0+2*r, bh)
    imgRot = imgRot[y1-y0:y2-y0, x1-x0:x2-x0]

    # マスク手法で外接四角形と背景を合成する
    front_roi = imgRot[:, :, :3]
    mask1 = imgRot[:, :, 3]
    mask_roi = 255 - cv2.merge((mask1, mask1, mask1))
    roi = back[y1:y2, x1:x2]
    tmp = cv2.bitwise_and(roi, mask_roi)
    tmp = cv2.bitwise_or(tmp, front_roi)
    back[y1:y2, x1:x2] = tmp

    return back


if __name__ == "__main__":
    filename_back = "space.jpg"
    filename_front = "uchuhikoushi.png"
    img_back = cv2.imread(filename_back)
    img_front = cv2.imread(filename_front, -1)

    pos = [(0, 50), (300,200), (400,400), (500,-50), (-100,1000)] # 画像を置く左上座標
    xc, yc = 140, 60  # 前景画像の回転中心
    angle = 0

    while True:
        back = img_back.copy()
        for x,y in pos:
            img = putSprite_mask2(back, img_front, (x,y), angle, (xc,yc))

            # 正しく描写されていることを確認する(必須ではない)
            cv2.circle(img, (x,y), 5, (0,255,0), -1)       # 前景画像の左上にマーク
            cv2.circle(img, (x+xc,y+yc), 5, (0,0,255), -1) # 回転中心にマーク
            cv2.putText(img, f"angle={angle}", (10,440), cv2.FONT_HERSHEY_SIMPLEX, 1, (0,0,255), 2)

        cv2.imshow("putSprite_mask2", img)

        key = cv2.waitKey(0) & 0xFF
        if key == ord("q"):
            break
        angle = (angle + 30) % 360

    cv2.destroyAllWindows()
終わりに
本当はこの先、外接四角形を最小限にして左上座標を細かく制御することで同等の挙動を実現させたかったのだが、図形と行列と、つまりは高校数学レベルの問題がうまく解けずにそこまではできなかった。
えー? 今、高校で行列やらないの?!
参考記事
指定した角度づつ元画像の中心を軸に回転させた画像を作成して保存する。
opencvの画像回転で、はみ出した部分が切り取られないようにする方法
完全に理解するアフィン変換


