下記の記事は2022年12月時点では古くなっています。新しい記事は、下記にあります。
何かの参考のため、記事は残しておきます。
新規で Nuxt3 のプロジェクトを作る方法と、Nuxt2 のプロジェクトを作ってから Nuxt3 に移行させる方法の両方を試しました。
後者の方法は、vue2 (Nuxt2) 互換モードになるので、Nuxt3 を使っているとはいいがたいのですが一応。
Nuxt3 プロジェクト作成
下記のとおりにやる。
$ npx nuxi init projectname
$ cd projectname
$ yarn install
$ yarn dev
firebase 関連
下記のとおりにやる。
$ yarn global add firebase-tools
初期化
$ firebase init hosting
...
? What do you want to use as your public directory? .output/public
? Configure as a single-page app (rewrite all urls to /index.html)? No
? Set up automatic builds and deploys with GitHub? No
✔  Wrote .output/public/404.html
✔  Wrote .output/public/index.html

i  Writing configuration info to firebase.json...
i  Writing project information to .firebaserc...

✔  Firebase initialization complete!
public のところを dist でなく .output/public にする。
次に firebase 関連のツールを yarn add する。
$ yarn add --dev firebase-admin firebase-functions firebase-functions-test
公式を見るとしなくてもいいように読めるかもしれないけど、しないとビルドできない。
firebase.json の書き換え
{
  "functions": {
    "source": ".output/server"
  },
  "hosting": [
    {
      "site": "<your-project-name>",
      "public": ".output/public",
      "cleanUrls": true,
      "rewrites": [
        {
          "source": "**",
          "function": "server"
        }
      ],
      "ignore": [
        "firebase.json",
        "**/.*",
        "**/node_modules/**"
      ]
    }
  ],
}
こんな感じに書き換える。ignore のところは最初からあるものそのまま。<your-project-name> のところに自分のプロジェクト名を入れる。
ビルド
NITRO Engine を使う場合。
$ NITRO_PRESET=firebase yarn build
使わない場合。使わなくても build はできて start もできるけど、firebase コマンドではうまく動かないぽい?
$ yarn build
firebase emulators の設定(必要に応じて)
NITRO を使う場合は functions を使うので、ローカルテストでも emulators が必要になる(多分)。
emulator を使うには JRE v8 以降が必要なので、なければ入れる。下記は ubuntu の場合。ubuntu 以外の場合はJREを参照。
$ sudo apt-get install openjdk-8-jre
emulator の初期化
$ firebase init emulators
...
=== Emulators Setup
? Which Firebase emulators do you want to set up? Press Space to select emulators, then Enter
to confirm your choices. Authentication Emulator, Firestore Emulator, Hosting Emulator
? Which port do you want to use for the auth emulator? 9099
? Which port do you want to use for the firestore emulator? 8080
? Which port do you want to use for the hosting emulator? 5000
? Would you like to enable the Emulator UI? Yes
? Which port do you want to use for the Emulator UI (leave empty to use any available port)?
? Would you like to download the emulators now? No

i  Writing configuration info to firebase.json...
i  Writing project information to .firebaserc...

✔  Firebase initialization complete!
enulator の使いたい機能を選ぶ。上では hosting, firestore, auth を選んでいる。
emulator をスタート
$ firebase emulators:start
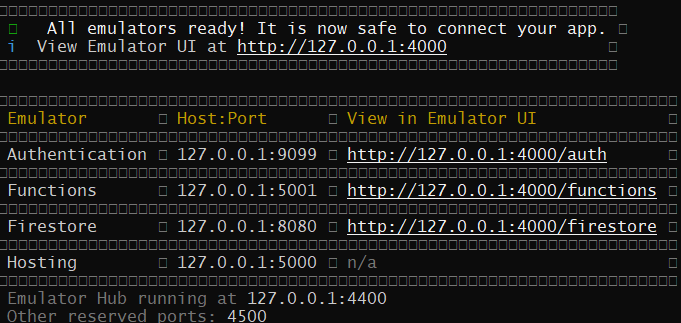
こうなれば、エミュレータの起動は成功。http://localhost:5000/ にアクセスしてみる。

この画面が表示されていれば成功。
deploy
$ firebase deploy
このとき、NITRO を使っていると hosting だけじゃなくて functions も使うので、無料プランでは deplpy しても動かないぽい。blaze プラン(有料プラン)にして functions を使えるようにしておかないといけない。
ただ、firebase 関連のモジュールが、v9 が使われているのかよくわからない(とりあえず latest で動いてはいる)。
一瞬、どうやったのかわからないのだけど functions なしで生成できた気がする。しかし再現不能。
Nuxt Bridge で Nuxt2 のプロジェクトを Nuxt3 化する
ほぼ下記に書いてある通り。
普通に Nuxt2 のプロジェクトを作る。
$ yarn create nuxt-app projectname
✨  Generating Nuxt.js project in projectname
? Project name: projectname
? Programming language: JavaScript
? Package manager: Yarn
? UI framework: None
? Nuxt.js modules: (Press <space> to select, <a> to toggle all, <i> to invert selection)
? Linting tools: (Press <space> to select, <a> to toggle all, <i> to invert selection)
? Testing framework: None
? Rendering mode: Universal (SSR / SSG)
? Deployment target: Static (Static/Jamstack hosting)
? Development tools: (Press <space> to select, <a> to toggle all, <i> to invert selection)
? What is your GitHub username? bbled
? Version control system: Git
一度 yarn dev して動作を確認しておく。
$ yarn dev
localhost:3000 にアクセスして下記画面が出たらとりあえず成功。

package-lock.json と yarn.lock を削除する。
$ cd projectname
$ rm yarn.lock package-lock.json
package.json を書き換える。
"nuxt": "^2.15.0"
この部分を、
"nuxt-edge": "latest"
これに書き換える。書き換えたら yarn install する。
nuxt bridge をインストールする。
$ yarn add --dev @nuxt/bridge@npm:@nuxt/bridge-edge
package.json の下記の部分を書き換える。(nuxi コマンドを使うようにする)
  "scripts": {
    "dev": "nuxt",
    "build": "nuxt build",
    "start": "nuxt start",
    "generate": "nuxt generate"
  },
これを
  "scripts": {
    "dev": "nuxi dev",
    "build": "nuxi build",
    "start": "node .output/server/index.mjs",
    "generate": "nuxi generate"
  },
こうしておく。firebase hosting の場合、generate と dev しか使わないので、build と start はなくてもいい(はず)。
yarn generate できるか試しておく。
$ yarn generate
firebase (v9) の準備
2021/11 現在、firebase のバージョンを指定しないと v9 になる(はず)。
$ yarn add firebase
$ yarn add @nuxjs/firebase
firebase のプロジェクトの初期化をする。
$ firebase init hosting
...
? Please select an option: Use an existing project
? Select a default Firebase project for this directory: your-project (your-project)
i  Using project your-project (your-project)
...
? What do you want to use as your public directory? dist
? Configure as a single-page app (rewrite all urls to /index.html)? No
? Set up automatic builds and deploys with GitHub? No
✔  Wrote dist/404.html
? File dist/index.html already exists. Overwrite? No
一度、動作をためしておく。
$ yarn generate
$ firebase serve --only hosting
=== Serving from '/mnt/d/github/nuxt3_sample/nuxt_bridge'...

i  hosting: Serving hosting files from: dist
✔  hosting: Local server: http://localhost:5000
http://localhost:5000 にアクセスして、下記が表示されたら成功。
問題なく動けば、firebase deploy で deploy もできる。
内部的なコマンドは変更されてても、完全に動作自体は Nuxt2 と同じなので、この状態ではあんまり移行したメリットがない気がする(多分)。
vite もデフォルトでON らしいけど、見た目に使われてる感じがしないし。
firebase v9 が本当に動くのかテスト
nuxt.confiog.js の modules のあたりを下記に書き換える。
    modules: ['@nuxtjs/firebase'],
    firebase:
      {
        config: {
          apiKey: '<apiKey>',
          authDomain: '<authDomain>',
          projectId: '<projectId>',
          storageBucket: '<storageBucket>',
          messagingSenderId: '<messagingSenderId>',
          appId: '<appId>',
          measurementId: '<measurementId>'
        },
        services: {
          auth: true // Just as example. Can be any other service.
        }
      },
apiKey とかは firebase のプロジェクトの設定のところからコピーする。
- 参考:Nuxt +Firebase のメモ:ここの apiKey の設定のところ
firebase authentication 側の設定もしておく
- 参考:Firebase の web アプリにメールアドレスでユーザ登録をさせて確認メールを送る:これの「Firebase Authentication の設定」のところ
index.vue を下記のようにしてみる。
<template>
  <v-app>
    <v-container>
      <h1>ログインテスト</h1>
      <input type="button" value="auth" @click="login"/>
    </v-container>
  </v-app>
</template>

<script>
import { getAuth, createUserWithEmailAndPassword } from "firebase/auth";
export default {
  methods: {
    login: function()
    {
      const auth = getAuth();
      console.log( "login" );
      // firebase v9
      createUserWithEmailAndPassword(auth, "sample@gmail.com", "sample")
        .then((userCredential) => {
                    const user = userCredential.user;
          console.log( user );
        })
        .catch((error) => {
          const errorCode = error.code;
          const errorMessage = error.message;
          console.log( errorCode );
          console.log( errorMessage );
        });
    },
  }
}
</script>
メールアドレスとパスワードはログインできるものを書いておく(あくまでテスト用)
これで yarn generate して firebase serve して、auth ボタンを押すと、apiKey やら firebase auth 側の設定が間違っていなければ、 console に新規作成されたユーザの情報が出るはず。2回おすと、すでにユーザが存在していて作れないとエラーがでるはず。

firebase のコンソールで authentication を見て、ユーザが追加されていれば firebase 関連のコードはちゃんと動いている(はず)。
とりあえず終わり
nuxt bridge を使うと、見た目にはほぼ完全に Nuxt2 のように動くので、Nuxt3 に移行したといいがたい。Nuxt3 で追加された機能をもう少しつかってみるべき。