やること
Firebase Authentication で、メールアドレスを使ってユーザ登録をさせ、アドレスの確認メールを送り、メールにあるURLを踏むと、正式登録されるようにします。
注意:firebase v8 で firebaseui を使用しています。firebase v9 では下記の方法ではできません。firebaseui を使うためには、v9 では compat を使用する必要があります。
準備
- google のアカウント:firebase を使えるようにしておく。参考:Firebase で hello world と表示するページを作る方法
- firebase のプロジェクトをひとつ作成する
- プロジェクト内にアプリケーションを一つ作成して apiKey などの情報を取得しておく。
apiKey 情報の取得方法については下記を参照のこと
手順
- Firebase Authentication でメール/パスワードを有効にする。
- apiKey 情報を取得する
- firebase で hosting の初期化をする
- public ディレクトリ以下にコードを書く
- deploy する (hosting)
基本、これでいけます。
参考:
- [Firebase] Authenticationでメール認証 (Web編) その1
- FirebaseUI でウェブアプリに簡単にログイン機能を追加する
- FirebaseのE-mail認証でアドレスが正しいことを確認する
いつもながら、上の記事を注意深く読めばできんですけど、ゼロ状態から始めるとつまづくところがあるので、その部分を補完したつもりです。
Firebase Authentication の設定
Firebase で作成したプロジェクトを選びます。
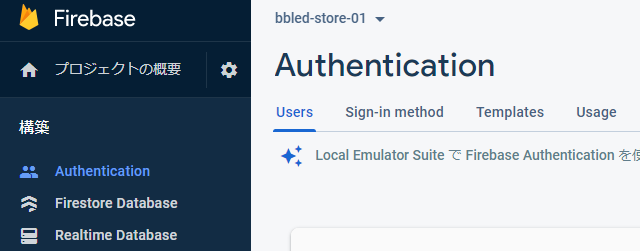
左側のメニューにある Authentication を選びます。
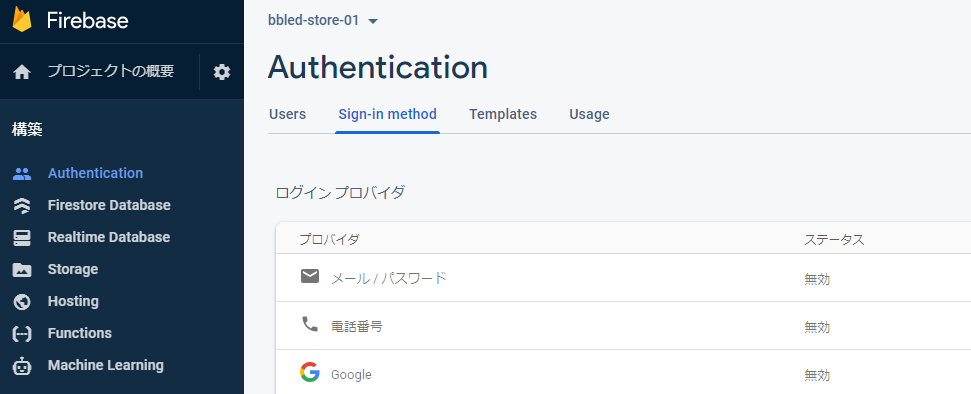
右側の画面で Sign-in method のタブを選びます。表示された中にある「メール/パスワード」というところが「無効」になっているのを、有効にします。
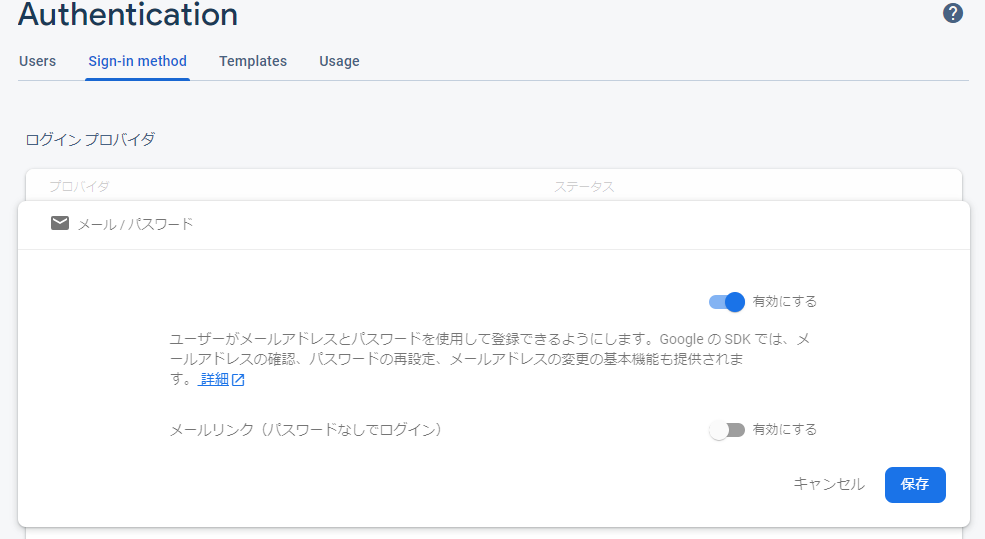
有効にしたら、保存を押します。メールリンクは無効のままで問題ないです。

これで、メール/パスワードのところの表示が「有効」になればOKです。
Firebase で hosting の初期化をする
ローカルマシンの適当なフォルダ内で下記を実行します。ここでは firebase_auth というディレクトリを作ってます。
実行には npm, node, firebase-tools のインストールが必要です。
参考:
- Firebase CLI リファレンス :「Firebase CLI をインストールする」の通りにやります。
- Firebase + Vue.js を WSL2 (Windows10) + Ubuntu 20.04LTS でやる
$ npm -v
7.20.6
$ node -v
v14.17.4
$ firebase --version
9.16.5
$ cd ~
$ mkdir firebase_auth
$ cd firebase_auth
$ firebase init hosting
実行すると、下記のような表示になります。

Use an existing project を選びます。次に、どのプロジェクトを使うか選択するように言われるので、作成したプロジェクトを選びます。
What do you want to use as your public directory? (public)
と聞かれたら、そのまま Enter を押します。public というフォルダ内にあるファイルが deploy されるようになります。

残りの設定はデフォルトのままで問題ないです。
apiKey 等の情報を取得する
下記を参照してください。アプリケーションを一つ作らないと、apiKey が取得できないという部分が、つまりやすいようです。
上気の方法で取得した apiKey (コード)は下記のような感じになります。
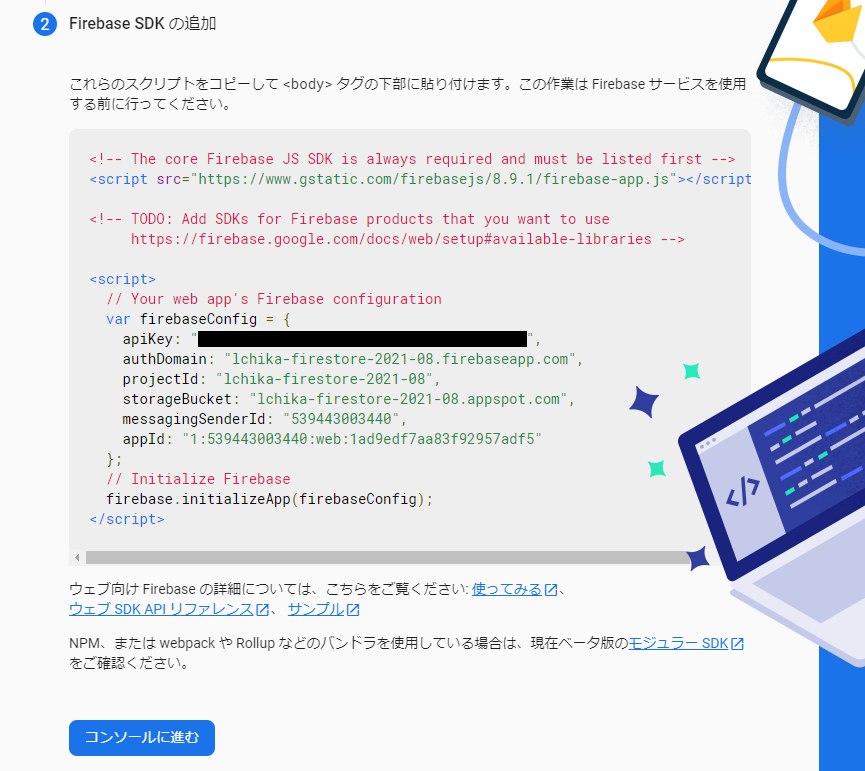
apiKey 部分を黒塗りしてますが、ここにも文字列が入ってるはずです。
コードを書く
下記のコードでは firebase-ui-auth を利用してます(使わなくてもできます)。
ログイン/ユーザ登録するページ (index.html) と、ログイン後のページ (login.html) を分けてますが、一つにまとめることも、もちろんできます。
<!DOCTYPE html>
<html>
  <head>
    <meta charset="utf-8">
    <meta name="viewport" content="width=device-width, initial-scale=1">
    <title>Login / Registration </title>

    <script src="https://www.gstatic.com/firebasejs/8.8.1/firebase-app.js"></script>
    <script src="https://www.gstatic.com/firebasejs/8.8.1/firebase-auth.js"></script>

    <script src="https://www.gstatic.com/firebasejs/ui/4.8.1/firebase-ui-auth.js"></script>
    <link type="text/css" rel="stylesheet" href="https://www.gstatic.com/firebasejs/ui/4.8.1/firebase-ui-auth.css" />
  </head>
  <body>
    <div id="firebaseui-auth-container"></div>

    <script>
      var firebaseConfig = {
        // 上のほうで取得した apiKey 関連のコードをここに張り付ける。
        apiKey: "xxxxxxxxxxxxxxxxxxxxxxxxxxxxxxxxxxxxxxxxx",
        authDomain: "xxxxxxxxxx.firebaseapp.com",
        projectId: "xxxxxxxxxx",
        storageBucket: "xxxxxxxxxx.appspot.com",
        messagingSenderId: "xxxxxxxxxx",
        appId: "xxxxxxxxxx"
      };
      // firebase の初期化
      firebase.initializeApp(firebaseConfig);

      var uiConfig = {
          signInSuccessUrl: '/login.html', // ログインに成功したときに飛ぶページ
          signInOptions: [
            {
              provider: firebase.auth.EmailAuthProvider.PROVIDER_ID
              //メール認証のみ使用する。google 認証などを使う場合はさらに羅列する。
            }
          ],

          tosUrl: '/kiyaku.html',           // 規約とかを描いたページ
          privacyPolicyUrl: '/policy.html'  // プライバシーポリシーを描いたページ
        };

        // firebase auth ui を使用
        var ui = new firebaseui.auth.AuthUI(firebase.auth());
        ui.start('#firebaseui-auth-container', uiConfig);
  </script>
  </body>
</html>
<!DOCTYPE html>
<html>
<head>
  <meta charset="utf-8">
  <title>Firebase Authentication Sample</title>

  <script src="https://www.gstatic.com/firebasejs/8.8.1/firebase-app.js"></script>
  <script src="https://www.gstatic.com/firebasejs/8.8.1/firebase-auth.js"></script>
</head>
<body>
  <h1>読み込み中です。</h1>
  <div id="main"></div>

  <script>
      var firebaseConfig = {
        // 上のほうで取得した apiKey 関連のコードをここに張り付ける。
        apiKey: "xxxxxxxxxxxxxxxxxxxxxxxxxxxxxxxxxxxxxxxxx",
        authDomain: "xxxxxxxxxx.firebaseapp.com",
        projectId: "xxxxxxxxxx",
        storageBucket: "xxxxxxxxxx.appspot.com",
        messagingSenderId: "xxxxxxxxxx",
        appId: "xxxxxxxxxx"
      };

    firebase.initializeApp(firebaseConfig);

    firebase.auth().onAuthStateChanged( user => {
      let h1   = document.querySelector('h1');
      let main = document.querySelector('#main');

      if ( user != null ){
        if ( user.emailVerified == false ){
          h1.innerText   = 'ユーザ登録をしました。';
          main.innerHTML = user.email + 'に確認メールを送信しました。';
          user.sendEmailVerification();
        }else{
          h1.innerText   = 'ログインに成功しました。';
          main.innerHTML = user.displayName + 'さんがログインしています。';
        }

      }else{
        h1.innerText = 'ログインに失敗しました。';
      }
    });
  </script>
privacy.html と kiyaku.html も適当に作っておきます(テストだけなら空のファイルでOK)。ここまでで、ファイル構成は下記のようになってるはずです。
.
├── firebase.json
└── public
    ├── 404.html
    ├── index.html
    ├── kiyaku.html
    ├── login.html
    └── privacy.html
deploy する
$ firebase deploy
firebase deploy

=== Deploying to 'Lchika-sample-2021-0001'...

i  deploying hosting
i  hosting[bbled-store-01]: beginning deploy...
i  hosting[bbled-store-01]: found 2 files in public
✔  hosting[bbled-store-01]: file upload complete
i  hosting[bbled-store-01]: finalizing version...
✔  hosting[bbled-store-01]: version finalized
i  hosting[bbled-store-01]: releasing new version...
✔  hosting[bbled-store-01]: release complete

✔  Deploy complete!

Project Console: https://console.firebase.google.com/project/Lchika-sample-2021-0001/overview
Hosting URL: https://Lchika-sample-2021-0001.web.app
URL にブラウザでアクセスする
deploy 時に最後に表示される Hosting URL https://xxxxxx.web.app にブラウザでアクセスします。

正常に動作していれば、上のような画面になります。ならない場合は、apiKey 関連のコードが間違っているか、Firebase Authentication の設定が間違っている可能性が高いです。

未登録のアドレスを入力すると、自動的に登録モードになります。メールアドレスとパスワードを入れて SAVE を押します。

正常に登録できると、この画面になります。これで、登録したメールアドレスに noreply@xxxx.firebaseapp.com からメールが届きます。メールには確認用の URL が含まれているので、そのURLをブラウザで開きます。
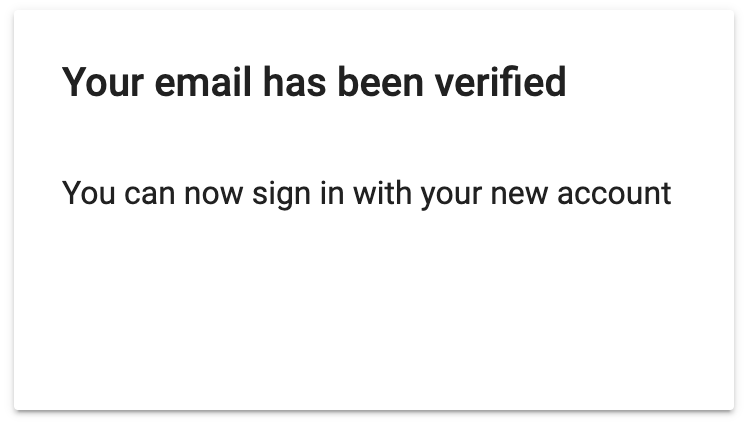
こうなって、登録が完了します。
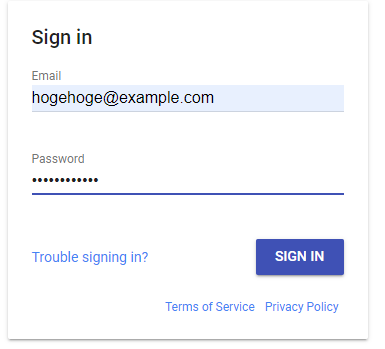
登録された状態でメールアドレスを入力すると、今度はパスワードを求められるだけになります。パスワードまで入力して

認証に成功すると、上のようにログインに成功したという画面が表示されます。
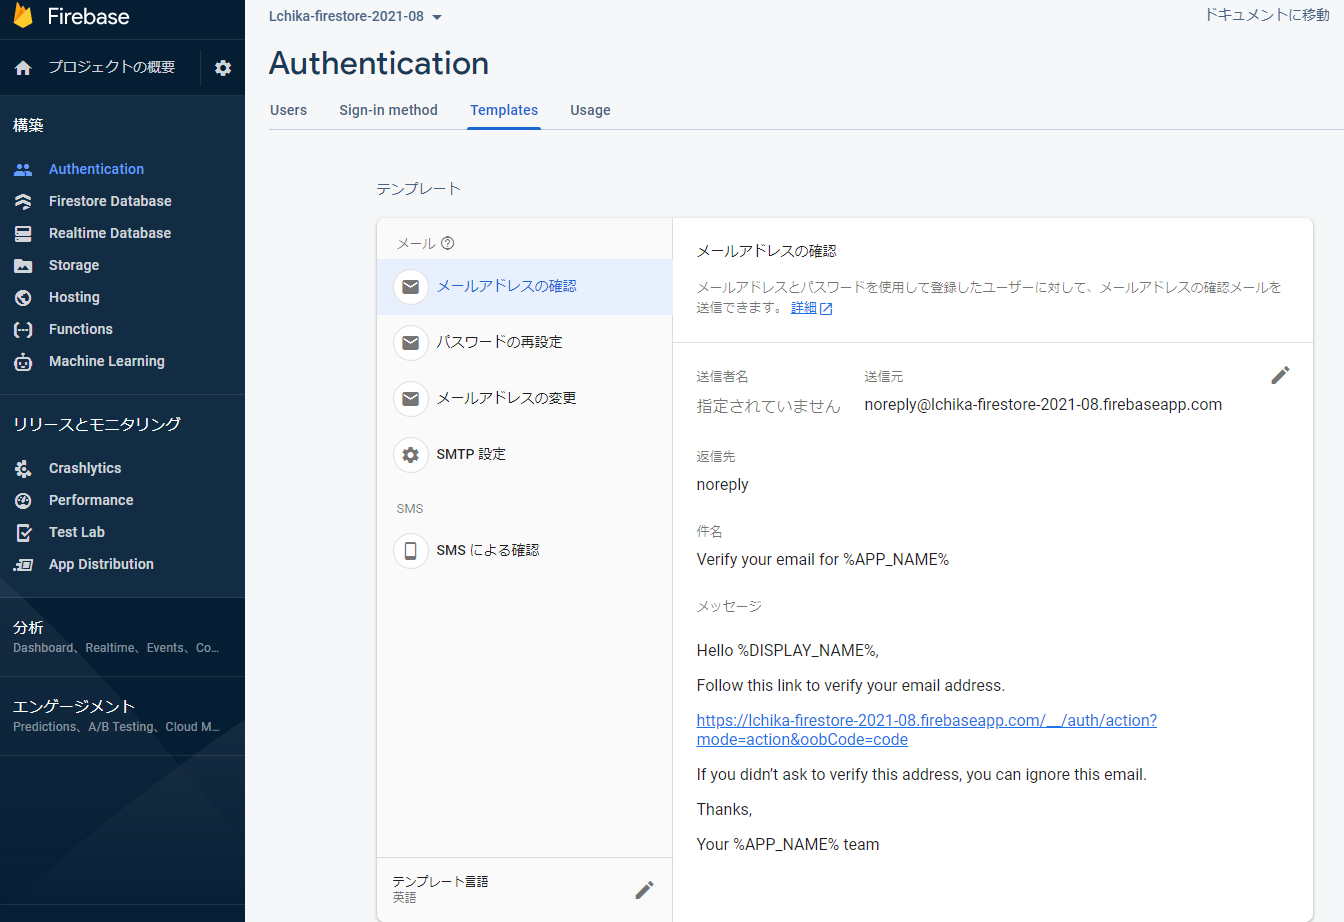
メール確認とかの文面の設定
Firebase のプロジェクトの Authentication の画面の Template のタブのところでいろいろ設定できます。
登録されたユーザの管理
Firebase のプロジェクトの Users のタブ以下に、登録されたユーザ一覧が表示されます。ユーザの削除やパスワードの再設定の要求、無効化、ユーザ追加などは、このタブから直接できます。
あとはわかるな?
コードは最小限なので、このままではいろいろ問題はあります。あくまで、仕組みの理解のためだけのコードです。
とりあえず、メール確認しないままでもログインはできますが、ログインするたびにメールが送られます(多分)。
また、デフォルト状態ではローカルではテストできません。必ず deploy する必要があります(多分)。
ローカルでテストしたい場合は、下記を参照のこと。