基本 firebase v8 を使ってますが、v9 でも emulator 周りは同じです(多分) 嘘でした。v9 対応の方法を追記しました。
以下の記事は firebase のプロジェクトをひとつ作成し、ローカルには firebase-tools がインストール済みである前提で書かれています。
また mac / linux 前提で書いてます。windows では試してません windows でも動きました。ただし firebase コマンドを npx firebase として実行する必要があります。WSL2では mac と同様に動きました。
参考
ほぼ上記の通りですが、コマンドの実行方法や、対応してるエミュレータが変わったりしてるので、主にそのあたりを補足してます。
準備
Firebase Emulator の実行には Java Runtime (JRE) の 1.8 以上、node のバージョン 8.0 以上が必要です。インストールされていないと、インストールを促すメッセージが出たはず。
詳しくは下記を参照のこと:
Emulator の初期化
firebase init emulators します。使用したいエミュレータを最初に選びます。下記では、すべてのエミュレータを選んでます。
$ firebase init emulators
? Which Firebase emulators do you want to set up? Press Space to select emulators, then Enter to confirm your choices. (
Press <space> to select, <a> to toggle all, <i> to invert selection, and <enter> to proceed)
❯◉ Authentication Emulator
 ◉ Functions Emulator
 ◉ Firestore Emulator
 ◉ Database Emulator
 ◉ Hosting Emulator
 ◉ Pub/Sub Emulator
 ◉ Storage Emulator
? Which Firebase emulators do you want to set up? Press Space to select emulators, then Enter to confirm your choices. A
uthentication Emulator, Functions Emulator, Firestore Emulator, Database Emulator, Hosting Emulator, Pub/Sub Emulator, S
torage Emulator
? Which port do you want to use for the auth emulator? 9099
? Which port do you want to use for the functions emulator? 5001
? Which port do you want to use for the firestore emulator? 8080
? Which port do you want to use for the database emulator? 9000
? Which port do you want to use for the hosting emulator? 5000
? Which port do you want to use for the pubsub emulator? 8085
? Which port do you want to use for the storage emulator? 9199
? Would you like to enable the Emulator UI? Yes
? Which port do you want to use for the Emulator UI (leave empty to use any available port)?
? Would you like to download the emulators now? No

i  Writing configuration info to firebase.json...
i  Writing project information to .firebaserc...
i  Writing gitignore file to .gitignore...

✔  Firebase initialization complete!
ポートは、特に理由がなければデフォルトで良いです。初めて使うエミュレータは、設定の途中で自動的にダウンロードされます。
Emulator を使用するためのコードの追加
エミュレータで実行したい場合は、下記のようなコードを埋め込む必要があります。(firebase v8 の場合)
realtime databse とか pubsub とかも使う場合は、それらも追加します。
import firebase from 'firebase/app';
import "firebase/functions";
import "firebase/firestore";
import "firebase/storage";

const firebaseConfig = {
  apiKey: "xxxxxxxxxxxxxxxxxxxxxxxxxxxxxxxxxxxxxxxx",
  authDomain: "xxxxxxxxxxxxxxxxxxxxx.firebaseapp.com",
  projectId: "xxxxxxxxxxxxxxxxxxxxxx",
  storageBucket: "xxxxxxxxxxxxxxxxxxxxxx.appspot.com",
  messagingSenderId: "11111111111111",
  appId: "1:xxxxxxxxxxxxx:web:xxxxxxxxxxxxxxxxxxxxxxxxxxx"
};

// Initialize Firebase
firebase.initializeApp(firebaseConfig);

const isEmulating = window.location.hostname === "localhost";
if (isEmulating) {
  firebase.auth().useEmulator("http://localhost:9099");
  firebase.functions().useEmulator("localhost", 5001);
  firebase.firestore().useEmulator("localhost", 8080);
  firebase.storage().useEmulator('localhost', 9199);
}
この書き方の場合、ブラウザからは http://localhost:5000 に接続する必要があります。http://127.0.0.1:5000 につなぐと、hosting はローカルのエミュレータが使用されますが、firestore や auth などはオンライン側が使用されます。
これがわかっていれば、フロントエンドを depoly しないでローカルでテストし、バックエンドだけオンライン側を使ってテストする、みたいなこともできます(通常の firebase init --only hosting と同じ)。また、コード中で使用するエミュレータを選択することもできます。
ただし、場合によっては CORS エラーに悩まされることにもなります。たとえばダイレクトにオンライン側の URL へアクセスするコード、たとえば functions を呼び出す httpCallable() や storage の getBlob() などが含まれているときは CORS エラーが出ることがあります。そのため、emul;ator の仕組みがよくわかっている上で使う必要があります。
なお apiKey の部分は、firebase のコンソールから取得します。(下記参照)
CDN の場合は、冒頭の import の代わりに下記のような感じにします。当然ですが、使わないライブラリは読み込む必要はないです。
    <script defer src="/__/firebase/9.6.8/firebase-auth-compat.js"></script>
    <script defer src="/__/firebase/9.6.8/firebase-database-compat.js"></script>
    <script defer src="/__/firebase/9.6.8/firebase-firestore-compat.js"></script>
    <script defer src="/__/firebase/9.6.8/firebase-functions-compat.js"></script>
    <script defer src="/__/firebase/9.6.8/firebase-messaging-compat.js"></script>
    <script defer src="/__/firebase/9.6.8/firebase-storage-compat.js"></script>
    <script defer src="/__/firebase/9.6.8/firebase-analytics-compat.js"></script>
    <script defer src="/__/firebase/9.6.8/firebase-remote-config-compat.js"></script>
    <script defer src="/__/firebase/9.6.8/firebase-performance-compat.js"></script>
firebase v8 の場合。
    <script defer src="https://www.gstatic.com/firebasejs/8.8.1/firebase-auth.js"></script>
    <script defer src="https://www.gstatic.com/firebasejs/8.8.1/firebase-database.js"></script>
    <script defer src="https://www.gstatic.com/firebasejs/8.8.1/firebase-firestore.js"></script>
    <script defer src="https://www.gstatic.com/firebasejs/8.8.1/firebase-functions.js"></script>
    <script defer src="https://www.gstatic.com/firebasejs/8.8.1/firebase-messaging.js"></script>
    <script defer src="https://www.gstatic.com/firebasejs/8.8.1/firebase-storage.js"></script>
    <script defer src="https://www.gstatic.com/firebasejs/8.8.1/firebase-analytics.js"></script>
    <script defer src="https://www.gstatic.com/firebasejs/8.8.1/firebase-remote-config.js"></script>
    <script defer src="https://www.gstatic.com/firebasejs/8.8.1/firebase-performance.js"></script>
firebase v9 (not compat) の場合
import を使って、下記のようにします。
import { initializeApp } from 'firebase/app';
import { getFunctions, connectFunctionsEmulator } from "firebase/functions";
import { getFirestore, connectFirestoreEmulator } from "firebase/firestore";
import { getStorage, connectStorageEmulator } from "firebase/storage";
import { getAuth, connectAuthEmulator } from "firebase/auth";

var firebaseConfig = {
    // apiKey 関連のコードをここに張り付ける。
    apiKey: "xxxxxxxxxxxxxxxxxxxxxxxxxxxxxxxxxxxxxxxxx",
    authDomain: "xxxxxxxxxx.firebaseapp.com",
    projectId: "xxxxxxxxxx",
    storageBucket: "xxxxxxxxxx.appspot.com",
    messagingSenderId: "xxxxxxxxxx",
    appId: "xxxxxxxxxx"
};

export const firebase = initializeApp(firebaseConfig);
const isEmulating = window.location.hostname === "localhost";
if (isEmulating) {

    const auth = getAuth();
    connectAuthEmulator(auth, "http://localhost:9099");

    const storage = getStorage();
    connectStorageEmulator(storage, "localhost", 9199);

    const db = getFirestore();
    connectFirestoreEmulator(db, 'localhost', 8080);

    const functions = getFunctions();
    connectFunctionsEmulator(functions, "localhost", 5001);
}
modular 記法を使っているので、単純に V8 からコードを置き替えても動きません。npm なしで開発したい場合は、下記をみてください。
rules 関連
firestore.rules と storage.rules に書きます。書き方はオンラインと全く同じです。ルールを書き換えた場合は、emulator を再起動する必要があります。デフォルトのルールは下記です。auth でログインしている状態でのみ読み書きできます。if 以下を if true とすると無条件に読み書きできます(多分)
rules_version = '2';
service cloud.firestore {
  match /databases/{database}/documents {
    match /{document=**} {
      allow read, write: if false;
    }
  }
}
rules_version = '2';
service firebase.storage {
  match /b/{bucket}/o {
    match /{allPaths=**} {
      allow read, write: if request.auth!=null;
    }
  }
}
ローカルに書いたルールをオンライン側で使う場合は、firebase のコンソール上で、手動でルールを更新(コピペ)するか、deploy する必要があります。
実行
$ firebase emulators:start
...

┌─────────────────────────────────────────────────────────────┐
│ ✔  All emulators ready! It is now safe to connect your app. │
│ i  View Emulator UI at http://127.0.0.1:4001                │
└─────────────────────────────────────────────────────────────┘

┌────────────────┬────────────────┬─────────────────────────────────┐
│ Emulator       │ Host:Port      │ View in Emulator UI             │
├────────────────┼────────────────┼─────────────────────────────────┤
│ Authentication │ 127.0.0.1:9099 │ http://127.0.0.1:4001/auth      │
├────────────────┼────────────────┼─────────────────────────────────┤
│ Functions      │ 127.0.0.1:5001 │ http://127.0.0.1:4001/functions │
├────────────────┼────────────────┼─────────────────────────────────┤
│ Firestore      │ 127.0.0.1:8080 │ http://127.0.0.1:4001/firestore │
├────────────────┼────────────────┼─────────────────────────────────┤
│ Database       │ 127.0.0.1:9000 │ http://127.0.0.1:4001/database  │
├────────────────┼────────────────┼─────────────────────────────────┤
│ Hosting        │ 127.0.0.1:5000 │ n/a                             │
├────────────────┼────────────────┼─────────────────────────────────┤
│ Pub/Sub        │ 127.0.0.1:8085 │ n/a                             │
├────────────────┼────────────────┼─────────────────────────────────┤
│ Storage        │ 127.0.0.1:9199 │ http://127.0.0.1:4001/storage   │
└────────────────┴────────────────┴─────────────────────────────────┘
  Emulator Hub running at 127.0.0.1:4400
  Other reserved ports: 4500
こんな感じになれば起動できてます。
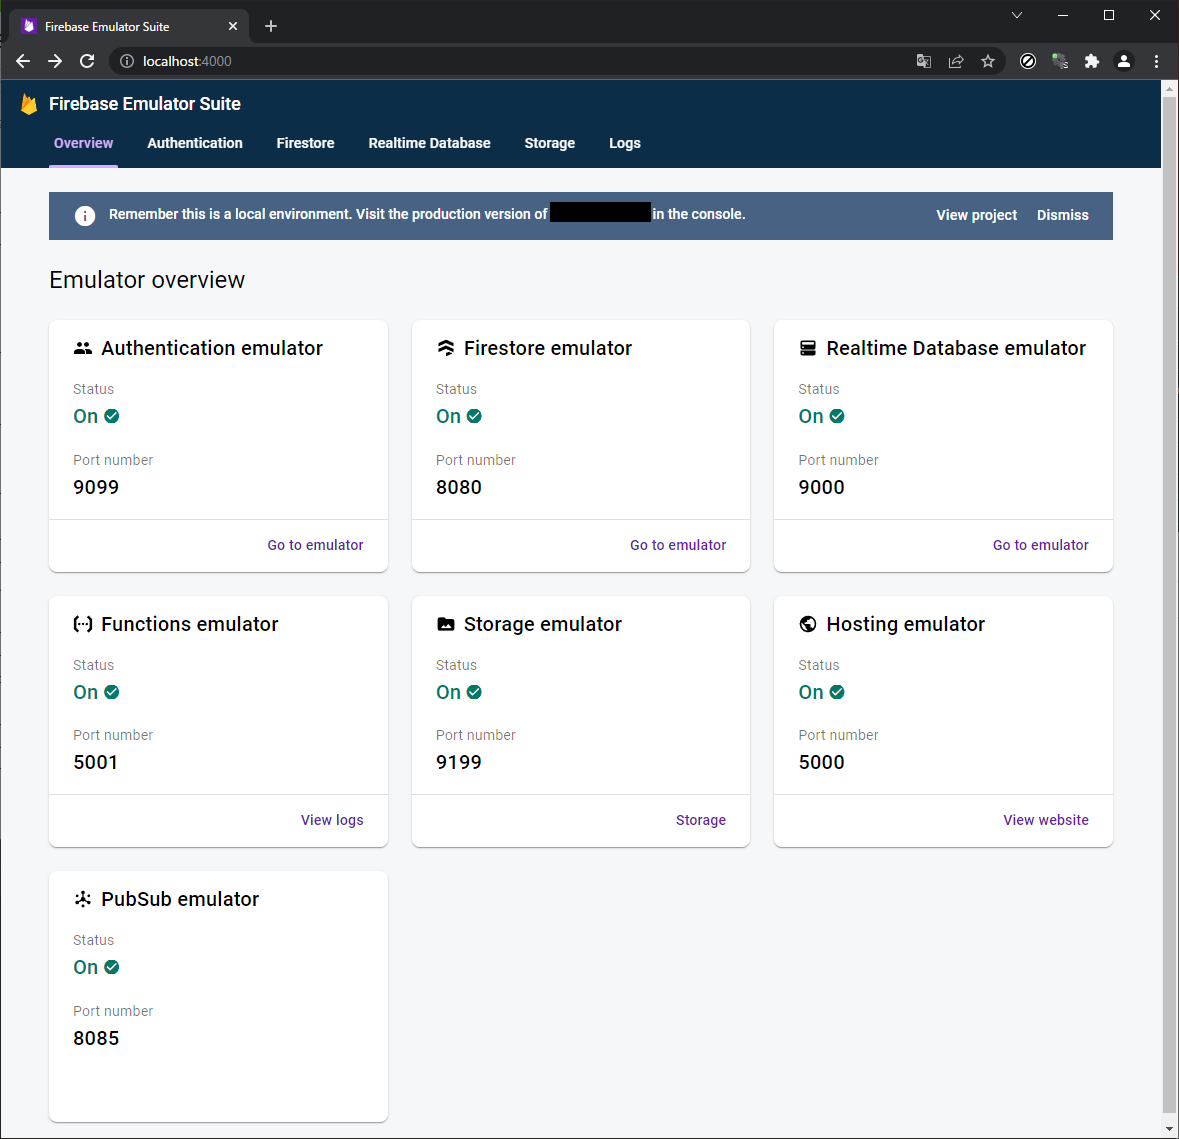
エミュレータの UI
http://localhost:4000 をブラウザで開くと、ローカルエミュレータの設定ができます。auth のユーザの追加、storage のファイルの追加や削除、firestore のデータの追加、削除など、オンラインでできることはだいたいできます。
トラップの回避
firebase 便利だけど、リファレンスとかドキュメントがスカスカよね・・・
初期化まわり
firebase init functions とかしなくても、firebase init emulators の中で functions のエミュレータを初期化できてしまいます。しかし、その状態で firebase emulators:start するとエラーが出て emulator が落ちたりします。
firestore, realtime database, storage は、対応する rules ファイルがないとエラーになります(firebase init すれば生成される)。
データの保存
エミュレータは、落とすと firestore や auth などに登録したデータは全部消えます。保存したい場合は、emulator の実行中に下記を実行します。
$ firebase emulators:export backup_foldername
データは、指定したフォルダ以下に json 形式で保存されます。直接編集することも一応できます(データの整合性がとれなくなるリスクはあり)。
エクスポートしたデータを使ってエミュレータを起動する場合は、下記のようにします。
$ firebase emulators:start --import backup_foldername
Functions 関連
functions については、コードを更新した場合には、エミュレータを再起動する必要があります。
エミュレータ上の function を curl などでダイレクトに叩いてみたいときは、下記のような URL でアクセスできます。
$ curl http://$HOST:$PORT/$PROJECT/$REGION/$NAME
例えば、プロジェクト名などが下記の状態の場合は、
- プロジェクト名: hogehoge-2022
- リージョン: us-central1 (デフォルトならこれのはず)
- 関数名: helloWorld
下記の URL でアクセスできます。
$ curl https://localhost:5001/hogehoge-2022/us-central1/helloWorld
functions のコードが下記の場合(デフォルト)、
const functions = require("firebase-functions");

// // Create and Deploy Your First Cloud Functions
// // https://firebase.google.com/docs/functions/write-firebase-functions
//
exports.helloWorld = functions.https.onRequest((request, response) => {
   functions.logger.info("Hello logs!", {structuredData: true});
   response.send("Hello from Firebase!");
 });
下記のようになります。
$ curl http://localhost:5001/hogehoge-2022/us-central1/helloWorld
Hello from Firebase!
詳細は下記を参照のこと。
emulator で実行しようとして CORS エラーが出るときは、ローカルのURLが localhost になっているか (上記のコードの場合は 127.0.0.1 だとダメ)、呼び出す functions の関数名が正しいか(タイプミスしている)、functions のコードを書き換えた後に emulator を再起動したか等をチェックします。
functions は、エミュレータを使用している場合、functions 内部で使われる admin SDK 経由の firestore, storage, realtime databse などへのアクセスは、それらのエミュレータが有効になっている限り、すべてエミュレータ側へのアクセス(オンライン側ではない)になります。
ローカルで実行される functions からオンラインの firestore, storage などへアクセスする場合は、対応するエミュレータを無効化しておくか、エミュレータを使わず、
$ firebase serve
として hosting と functions のみローカルで起動するようにします。
Firestore
WSL2 で firestore のエミュレータを使うと、データが読みだせない問題が起こることがあるようです。これは修正されてないぽい?
firebase.rules にバグがあると、unknown error とか言われて、エミュレータが落ちてしまうことがあるようです。Firebase Firestore: An unknown error occurred, please check the error payload for server response とかいわれたら、ルールの記述(文法)が間違っている可能性があります。
Storage 関連
Storage のエミュレータについて、現状では CORS 関連のエラーを回避する方法がないようです。getBlob() とか XMLHttpRequest あたりを使ってファイルのダウンロードをしようとすると、この問題が発生します。
具体的には、上記で書かれている CORS の回避方法はエミュレータでは使えません(多分)。storage だけオンライン側を使うとかすれば、一応問題は回避できます(エミュレータ使えてないので回避といえるか謎ですが)。2022年12月現在では、未対応であることが下記に書かれています。もし未来に対応したら、下記ドキュメントの内容が変わっているはず!
Firestore と同様に、Firebase Storage: An unknown error occurred, please check the error payload for server response とかいわれて emulator が落ちたら、storage.rules のルールの記述(文法)が間違っている可能性があります。
間違っていないのにエミュレータが落ちる場合は、下記の問題の可能性があります。
この問題は、10.7.1 で解決されたそうです。一応、参考までに記述は残しておきます。
回避方法としては、ルールを下記のようにフルオープンにすれば良いようです。
rules_version = "2";
service firebase.storage {
  match /b/{bucket}/o {
    match /{allPaths=**} {
      allow read, write: if true;
    }
  }
}
これ以外にも、400KB を超えるサイズのファイルを storage に置こうとすると、エミュレータが落ちることがあるようです。windows では少なくとも再現性がありました。mac はエミュレータは落ちないものの、コンソールにエラーがでます。
上記のサイズ問題も、2022年12月時点では起こらなくなっています(すくなくとも私は遭遇してません)。
auth を使用する emulator 用サンプルコード (v8)
v9 での書き方は下記を見てください。
下記コードで emulator の hosting で動くはずです。public 以下に index.html と login.html を置いて、emulator を起動して http://localhost:5000 にアクセスします。
ログインできれば、login.html に飛んだあとに「ログインしました」と表示されます。エミュレータ上でユーザ登録に成功していれば、エミュレータUI上に登録したユーザが表示されるはずです。
firebaseui を使っています。v8 ではそのまま動きます。v9 で firebaseui を使う場合は compat にする必要があります。
<!DOCTYPE html>
<html>
  <head>
    <meta charset="utf-8">
    <meta name="viewport" content="width=device-width, initial-scale=1">
    <title>Login / Registration </title>

    <script src="https://www.gstatic.com/firebasejs/8.8.1/firebase-app.js"></script>
    <script src="https://www.gstatic.com/firebasejs/8.8.1/firebase-auth.js"></script>
    <script src="https://www.gstatic.com/firebasejs/8.8.1/firebase-storage.js"></script>


    <script src="https://www.gstatic.com/firebasejs/ui/4.8.1/firebase-ui-auth.js"></script>
    <link type="text/css" rel="stylesheet" href="https://www.gstatic.com/firebasejs/ui/4.8.1/firebase-ui-auth.css" />
  </head>
  <body>
    <div id="firebaseui-auth-container"></div>

    <script>
      // Your web app's Firebase configuration
      const firebaseConfig = {
        apiKey: "xxxxxxxxxxxxxxxxxxxxxxxxxxxxxxxxxxxxxxxx",
        authDomain: "xxxxxxxxxxxxxxxxxxxxx.firebaseapp.com",
        projectId: "xxxxxxxxxxxxxxxxxxxxxx",
        storageBucket: "xxxxxxxxxxxxxxxxxxxxxx.appspot.com",
        messagingSenderId: "11111111111111",
        appId: "1:xxxxxxxxxxxxx:web:xxxxxxxxxxxxxxxxxxxxxxxxxxx"
      };
      // firebase の初期化
      firebase.initializeApp(firebaseConfig);
      const isEmulating = window.location.hostname === "localhost";
      if (isEmulating) {
        firebase.auth().useEmulator("http://localhost:9099");
      }


      const uiConfig = {
          signInSuccessUrl: '/login.html', // ログインに成功したときに飛ぶページ
          signInOptions: [
            {
              provider: firebase.auth.EmailAuthProvider.PROVIDER_ID
              //メール認証のみ使用する。google 認証などを使う場合はさらに羅列する。
            }
          ],

          tosUrl: '/kiyaku.html',           // 規約とかを描いたページ
          privacyPolicyUrl: '/policy.html'  // プライバシーポリシーを描いたページ
        };

        // firebase auth ui を使用
        var ui = new firebaseui.auth.AuthUI(firebase.auth());
        ui.start('#firebaseui-auth-container', uiConfig);
  </script>
  </body>
</html>
<!DOCTYPE html>
<html>
<head>
  <meta charset="utf-8">
  <title>Firebase Authentication Sample</title>

  <script src="https://www.gstatic.com/firebasejs/8.8.1/firebase-app.js"></script>
  <script src="https://www.gstatic.com/firebasejs/8.8.1/firebase-auth.js"></script>
</head>
<body>
  <h1>読み込み中です。</h1>
  <div id="main"></div>

  <script>
      var firebaseConfig = {
        // apiKey 関連のコードをここに張り付ける。
        apiKey: "xxxxxxxxxxxxxxxxxxxxxxxxxxxxxxxxxxxxxxxxx",
        authDomain: "xxxxxxxxxx.firebaseapp.com",
        projectId: "xxxxxxxxxx",
        storageBucket: "xxxxxxxxxx.appspot.com",
        messagingSenderId: "xxxxxxxxxx",
        appId: "xxxxxxxxxx"
      };

    firebase.initializeApp(firebaseConfig);
    const isEmulating = window.location.hostname === "localhost";
    if (isEmulating) {
      firebase.auth().useEmulator("http://localhost:9099");
    }

    firebase.auth().onAuthStateChanged( user => {
      let h1   = document.querySelector('h1');
      let main = document.querySelector('#main');

      if ( user != null ){
        h1.innerText   = 'ログインに成功しました。';
        main.innerHTML = user.displayName + 'さんがログインしています。';

      }else{
        h1.innerText = 'ログインに失敗しました。';
      }
    });
  </script>
</body>
</html>