この記事について
Azure AD B2C(AADB2C)はAzure ADのテクノロジーを基盤としたエンドユーザー用IDaaSであり、採用をお勧めしたい強力かつ堅牢なソリューションですが、構築するには難しい点があります。いくつかの点で自身が悩んだポイントを羅列して解説をしたいと思います。
あくまでも「私の理解ではこういうことなのだろう」という憶測に基づいていることをご容赦ください。
ユーザーフローかカスタムポリシーかの選択
AADB2Cはユーザーフローで構築するかカスタムポリシーで構築するか選べます。AADB2Cを使用するときは、実現したいことがまずユーザーフローで可能などうかを試してみてからにしておいたほうが良いでしょう。
ユーザーフローはポータル上の操作で実装が完了するため、便利で簡単に試せるのですが、反面動作のカスタマイズはできません。(画面表示の見た目を制限の範囲内で変えることは可能です)
選択可能なユーザーフローはこちらに限定されており、これらのフローにそもそも目的とするものがないとか、ユーザーエクスペリエンスに動作がマッチしないとかを基準にして判断することになります。
「○○○みたいなことをやりたいけど、どうやらユーザーフローではできなそう」というときには、カスタムポリシーを選択することになります。
カスタムポリシーの基本
スターターパック
ともあれ、ユーザーフローで簡単に実現できないものはカスタムポリシーの構築をすることになり、そのためにはまずスターターパックをダウンロードします。
こちらにあるスターターパックの内容は以下のようになっています。1
-
TrustFrameworkBase.xml
カスタムポリシーの基本定義ファイル。
-
TrustFrameworkExtensions.xml
Baseを拡張したカスタムポリシー本体。行いたい認証フロー動作を<UserJourney>として、UserJourneyから呼び出す技術機能を<TechnicalProfile>として記述する。
-
Relying Parties (RP)
サインインやプロフィール編集など、Extensionsに定義した一連のUserJourneyをB2Cの認証エンドポイントとして公開する。実際にはExtensionsをさらに拡張したもの。スターターパックにはプリセットとしてSignUpOrSignin.xmlなどが入っている。
どう記述すれば
ExtensionsはBaseを拡張したものという扱いで、必要な再定義を記述する(再定義が必要なければBaseの定義がそのまま使われる)といった関係になっています。ここで例を示します。
引用:Baseに定義されたユーザーのプロフィール編集を行うTechnicalProfile(一部インデントなど調整)
<ClaimsProvider>
  <DisplayName>Self Asserted</DisplayName>
  <!-- 略 -->
  <TechnicalProfiles>
    <TechnicalProfile Id="SelfAsserted-ProfileUpdate">
      <DisplayName>User ID signup</DisplayName>
      <Protocol Name="Proprietary" Handler="Web.TPEngine.Providers.SelfAssertedAttributeProvider, Web.TPEngine, Version=1.0.0.0, Culture=neutral, PublicKeyToken=null" />
      <Metadata>
        <Item Key="ContentDefinitionReferenceId">api.selfasserted.profileupdate</Item>
      </Metadata>
      <IncludeInSso>false</IncludeInSso>
      <InputClaims>
        <InputClaim ClaimTypeReferenceId="alternativeSecurityId" />
        <InputClaim ClaimTypeReferenceId="userPrincipalName" />
        <!-- Optional claims. These claims are collected from the user and can be modified. Any claim added here should be updated in the
          ValidationTechnicalProfile referenced below so it can be written to directory after being updateed by the user, i.e. AAD-UserWriteProfileUsingObjectId. -->
        <InputClaim ClaimTypeReferenceId="givenName" />
        <InputClaim ClaimTypeReferenceId="surname" />
      </InputClaims>
      <OutputClaims>
        <!-- Required claims -->
        <OutputClaim ClaimTypeReferenceId="executed-SelfAsserted-Input" DefaultValue="true" />
        <!-- Optional claims. These claims are collected from the user and can be modified. Any claim added here should be updated in the
          ValidationTechnicalProfile referenced below so it can be written to directory after being updateed by the user, i.e. AAD-UserWriteProfileUsingObjectId. -->
        <OutputClaim ClaimTypeReferenceId="givenName" />
        <OutputClaim ClaimTypeReferenceId="surname" />
      </OutputClaims>
      <ValidationTechnicalProfiles>
        <ValidationTechnicalProfile ReferenceId="AAD-UserWriteProfileUsingObjectId" />
      </ValidationTechnicalProfiles>
    </TechnicalProfile>
  </TechnicalProfiles>
</ClaimsProvider>
いわゆるプロフィール編集画面の定義です。簡単に説明するとこんな感じです。
- <Protocol>
- 専用の内部ライブラリの呼び出し
- <MetaData>
- カスタム画面デザインのための静的コンテンツ呼び出しのキー
- <InputClaims>
- 初期表示項目
- <OutputClaims>
- 更新する項目
- <ValidationTechnicalProfiles>
- バリデーションチェック呼び出しのキー
私がここで不明瞭だと思ったのは以下の3点です。
- 変更(再定義)できるものとできない(してはいけない)ものがコメント行での説明しかない。
- ユーザーが入力するのにOutputとはこれいかに。
- 氏名のみが利用項目として定義されているので当然これでは足りないのだが、そもそもどうやって再定義すればいいのかわからない。
3以外ははなんともできないのでそういうものだと思うしかないですが、2についてはTechnicalProfileを一つ一つ処理ブロックのような考え方で表し、それらをチェーンさせて一連のUserJourneyを構築するためにIOという形にしたのだろうとはなんとなく理解できます。ちょっとわかりづらいけど。
わかりやすくするために将来ここが変わってしまうとそれはそれで構築済みのものを直さなくてはいけなくなるのですが。
3の答え
Extensionsに同じ階層同じIDで記述すると、子ノードがリプレースされます。上書きしなくてもいい子ノード(<Protcol>など)は記述しなければBaseのまま利用されます。オブジェクト指向言語のオーバーライドのような使い方です。
使用する属性を変更したプロフィール編集TechnicalProfile
<ClaimsProvider>
  <DisplayName>Self Asserted Override</DisplayName>
  <TechnicalProfiles>
    <TechnicalProfile Id="SelfAsserted-ProfileUpdate">
      <InputClaims>
        <InputClaim ClaimTypeReferenceId="alternativeSecurityId" />
        <InputClaim ClaimTypeReferenceId="userPrincipalName" />
        <InputClaim ClaimTypeReferenceId="surname" />
        <InputClaim ClaimTypeReferenceId="givenName" />
        <InputClaim ClaimTypeReferenceId="postalCode" />
        <InputClaim ClaimTypeReferenceId="state" />
      </InputClaims>
      <OutputClaims>
        <OutputClaim ClaimTypeReferenceId="executed-SelfAsserted-Input" DefaultValue="true" />
        <OutputClaim ClaimTypeReferenceId="surname" Required="true" />
        <OutputClaim ClaimTypeReferenceId="givenName" Required="true" />
        <OutputClaim ClaimTypeReferenceId="postalCode" Required="true" />
        <OutputClaim ClaimTypeReferenceId="state" Required="true" />
      </OutputClaims>
      <ValidationTechnicalProfiles>
        <ValidationTechnicalProfile ReferenceId="My-PostalCode-Validate" />
      </ValidationTechnicalProfiles>
    </TechnicalProfile>
  </TechnicalProfiles>
</ClaimsProvider>
<InputClaims><OutputClaims>全体がリプレース対象となるので、変えてはいけないexecuted-SelfAsserted-Inputなどの属性定義をそのまま残さないといけないというのが注意点です。
そして作ったUserJourneyはそれぞれ認証エンドポイントである
前述のTechnicalProfileは、ProfileEditというUserJourneyの中の1技術要素となりますが、これだけで動かせるわけではありません。プロフィール編集をする前に対象ユーザーを確定させなければならず、ユーザーを確定させるためには結局サインインを必要とします。
これはつまり、AADB2Cを利用する側のアプリケーションからすれば、SignUpOrSignIn、ProfileEditはどちらもOpenIDConnect認証エンドポイントであって、その途中にプロフィール画面が出るかどうかの違いになります。2
スターターパックにプリセットで構成済みのProfileEdit UserJourney
<UserJourney Id="ProfileEdit">
  <OrchestrationSteps>
    <OrchestrationStep Order="1" Type="ClaimsProviderSelection" ContentDefinitionReferenceId="api.idpselections">
      <ClaimsProviderSelections>
        <ClaimsProviderSelection TargetClaimsExchangeId="LocalAccountSigninEmailExchange" />
      </ClaimsProviderSelections>
    </OrchestrationStep>
    <OrchestrationStep Order="2" Type="ClaimsExchange">
      <ClaimsExchanges>
        <ClaimsExchange Id="LocalAccountSigninEmailExchange" TechnicalProfileReferenceId="SelfAsserted-LocalAccountSignin-Email" />
      </ClaimsExchanges>
    </OrchestrationStep>
    <OrchestrationStep Order="3" Type="ClaimsExchange">
      <ClaimsExchanges>
        <ClaimsExchange Id="AADUserReadWithObjectId" TechnicalProfileReferenceId="AAD-UserReadUsingObjectId" />
      </ClaimsExchanges>
    </OrchestrationStep>
    <OrchestrationStep Order="4" Type="ClaimsExchange">
      <ClaimsExchanges>
        <ClaimsExchange Id="B2CUserProfileUpdateExchange" TechnicalProfileReferenceId="SelfAsserted-ProfileUpdate" />
      </ClaimsExchanges>
    </OrchestrationStep>
    <OrchestrationStep Order="5" Type="SendClaims" CpimIssuerTechnicalProfileReferenceId="JwtIssuer" />
  </OrchestrationSteps>
  <ClientDefinition ReferenceId="DefaultWeb" />
</UserJourney>
OrchestrationStepの1から3はプロフィール編集をするユーザーを決定するためのサインイン処理です。ブラウザにセッションが残っている場合は、サインイン画面はスキップされ、プロフィール画面だけ表示されることになります。
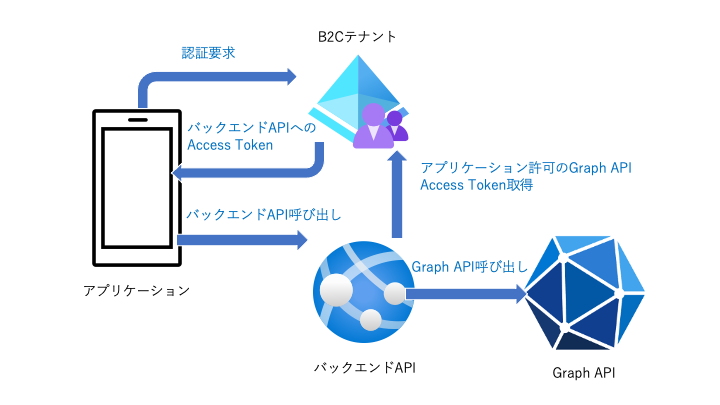
AADB2Cで取得したAccessTokenでGraph APIは実行できない
UserJourneyの最後のステップで返すJwtがAccessTokenとなるのですが、このAccessTokenではIssuerが異なるためGraph APIは実行できません。代替アイデアとして、次の図のようにバックエンドAPIでアプリケーション許可のAccessTokenを取得し直す方法が利用できます。
構築は大変だが良いソリューション
いろいろと癖を掴むまでは大変ですが、理解すればエンドユーザー向けのIDaaSとして強力なソリューションとなります。また、ユーザーフローであれば比較的簡単に構築できるので、新規アプリを素早く作りたい場合には試しに組み込んでみるなども良いでしょう。
カスタムポリシーを利用する場合には、空手で1から組み上げるのは大変なので、こちらにある代表的なシナリオごとのサンプル群を改造して作っていく方が良いでしょう。