https://qiita.com/mk2/items/6091f8eb195fa3237c4e の続き
Lesson 1.3: Model-View-Controller
iOS/Mac開発といえば、MVCだと個人的には思っています。(SwiftUIの登場で考え方も変わるのかもしれませんが…)
View Controller、Model Controllerはなんとなく知っていたのですが、Helper Controllerという考え方があるのは知りませんでした。ただ、この説明を見る限り、ユーティリティ的な感じがしますね。
“Helper Controllers
Helper controllers are useful anytime you want to consolidate related data or functionality so that it can be accessed by other objects in your app. One common example of a helper controller is a NetworkController, which manages all the network requests in a given app.”
抜粋:: Apple Education “Develop in Swift Data Collections”。 Apple Inc. - Education、2020年 Apple Books https://books.apple.com/jp/book/develop-in-swift-data-collections/id1511183970
また、下記のようにソースコード、リソースをグルーピングするのが良いというのはiOS開発をがっつりやったことがないので、へーという感じでした。
“Many developers make groups for the following:
- View controllers
- Views
- Models
- Model controllers
- Other controllers
- Protocols
- Extensions
- Resources
- Storyboards
- Frameworks
”
抜粋:: Apple Education “Develop in Swift Data Collections”。 Apple Inc. - Education、2020年 Apple Books https://books.apple.com/jp/book/develop-in-swift-data-collections/id1511183970
実験
今回は、好きなアスリートを記入できるアプリのようです。最終的に作成したコードを載せておきますね。
import Foundation

struct Athlete {
    var name: String
    var age: Int
    var league: String
    var team: String

    var description: String {
        return "\(name) is \(age) years old and plays for the \(team) in the \(league)."
    }
}
import UIKit

class AthleteTableViewController: UITableViewController {

    struct PropertyKeys {
        static let athleteCell = "AthleteCell"
    }

    var athletes: [Athlete] = []

    override func viewWillAppear(_ animated: Bool) {
        super.viewWillAppear(animated)

        tableView.reloadData()
    }

    // MARK: - Table view data source

    override func tableView(_ tableView: UITableView, numberOfRowsInSection section: Int) -> Int {
        return athletes.count
    }

    override func tableView(_ tableView: UITableView, cellForRowAt indexPath: IndexPath) -> UITableViewCell {
        let cell = tableView.dequeueReusableCell(withIdentifier: PropertyKeys.athleteCell, for: indexPath)

        let athlete = athletes[indexPath.row]
        cell.textLabel?.text = athlete.name
        cell.detailTextLabel?.text = athlete.description

        return cell
    }

    @IBSegueAction func addAthlete(_ coder: NSCoder) -> AthleteFormViewController? {
        return AthleteFormViewController(coder: coder)
    }

    @IBSegueAction func editAthlete(_ coder: NSCoder, sender: Any?) -> AthleteFormViewController? {        let athleteToEdit: Athlete?
        if let cell = sender as? UITableViewCell,
           let indexPath = tableView.indexPath(for: cell) {
            athleteToEdit = athletes[indexPath.row]
        } else {
            athleteToEdit = nil
        }
        return AthleteFormViewController(coder: coder, athlete: athleteToEdit)
    }

    @IBAction func backToTable(_ segue: UIStoryboardSegue) {
        guard let controller = segue.source as? AthleteFormViewController,
              let athlete = controller.athlete else {
            return
        }

        if let selectedIndexPath = tableView.indexPathForSelectedRow {
            athletes[selectedIndexPath.row] = athlete
        } else {
            athletes.append(athlete)
        }
    }
}
import UIKit

class AthleteFormViewController: UIViewController {

    @IBOutlet weak var nameTextField: UITextField!
    @IBOutlet weak var ageTextField: UITextField!
    @IBOutlet weak var leagueTextField: UITextField!
    @IBOutlet weak var teamTextField: UITextField!

    var athlete: Athlete?

    required init?(coder: NSCoder) {
        self.athlete = nil
        super.init(coder: coder)
    }

    init?(coder: NSCoder, athlete: Athlete?) {
        self.athlete = athlete
        super.init(coder: coder)
    }

    override func viewDidLoad() {
        super.viewDidLoad()

        // Do any additional setup after loading the view.
        updateView()
    }

    func updateView() {
        nameTextField.text = athlete?.name
        if let age = athlete?.age {
            ageTextField.text = "\(age)"
        }
        leagueTextField.text = athlete?.league
        teamTextField.text = athlete?.team
    }


    /*
    // MARK: - Navigation

    // In a storyboard-based application, you will often want to do a little preparation before navigation
    override func prepare(for segue: UIStoryboardSegue, sender: Any?) {
        // Get the new view controller using segue.destination.
        // Pass the selected object to the new view controller.
    }
    */

    @IBAction func save(_ sender: Any) {
        guard let name = nameTextField.text,
              let ageString = ageTextField.text,
              let age = Int(ageString),
              let league = leagueTextField.text,
              let team = teamTextField.text
        else {
            return
        }
        athlete = Athlete(name: name, age: age, league: league, team: team)
        performSegue(withIdentifier: "SaveAthlete", sender: self)
    }
}
わかりにくかった点
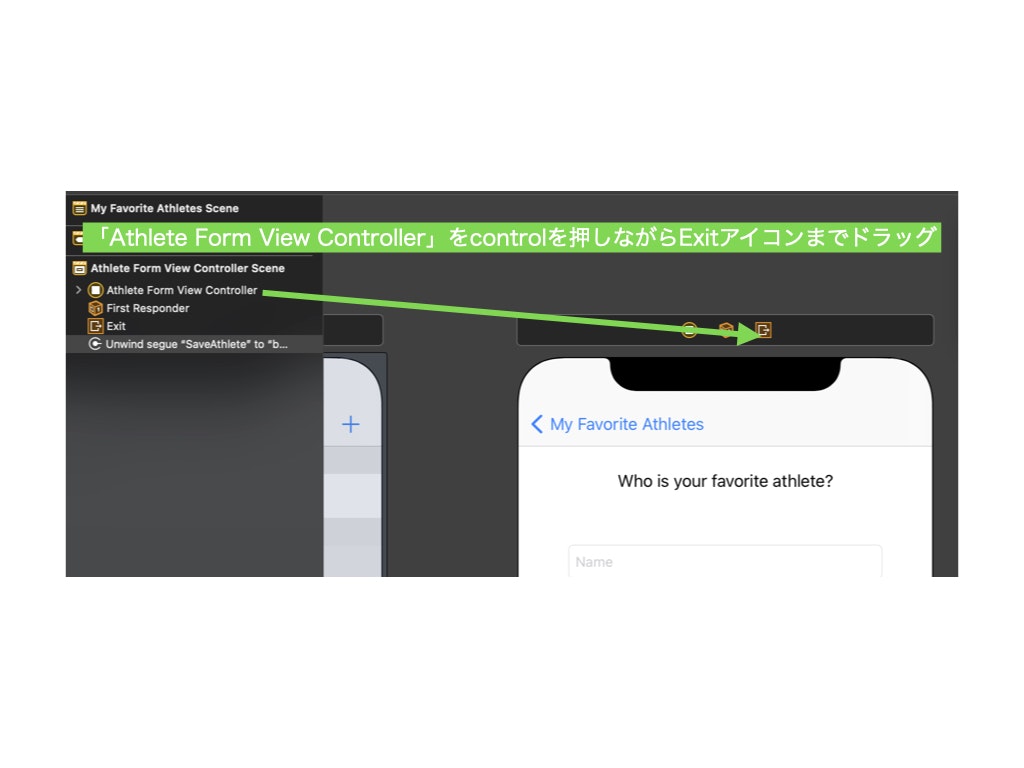
本の通りに進めていけば、多分だいたい完成させられると思うのですが、Step 6 Perform the Unwind Segue in Storyboardの節の下記の記述がよくわからずかなり四苦八苦しました。
“Finally, you need to create the unwind segue. In the storyboard, Control-drag from the athlete form scene in the Document Outline to the view controller's Exit, then choose your unwind segue. Give this segue a name by selecting it in the Document Outline and adding the identifier in the Attributes inspector.”
抜粋:: Apple Education “Develop in Swift Data Collections”。 Apple Inc. - Education、2020年 Apple Books https://books.apple.com/jp/book/develop-in-swift-data-collections/id1511183970
正解は、下のようにAthele Form View ControllerからcontrolドラッグでExitまで接続すれば良い感じでした。
Lesson 1.4: Scroll Views
Scrolling Form
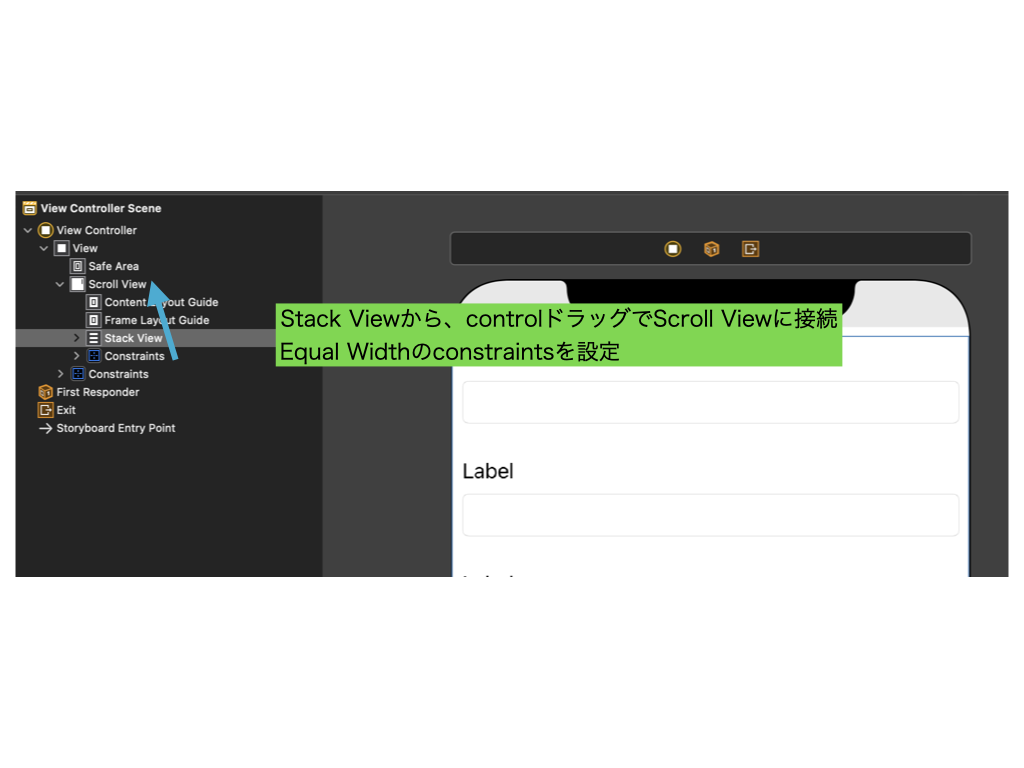
AutoLayoutの設定が難しいですね。自分は5、6回constrainsを全部消してやりなおしました。また、折角なのでiOS各端末で幅を綺麗に表示させたいと思ったのですが、そこが結構大変でした。下のように、Stack Viewの幅を親のScroll Viewのwidthと同じにすれば、各端末で同じにできるようです。
実験
画像をズームできるようにするものでした。
import UIKit

class ViewController: UIViewController, UIScrollViewDelegate {

    @IBOutlet weak var scrollView: UIScrollView!
    @IBOutlet weak var imageView: UIImageView!

    override func viewDidLoad() {
        super.viewDidLoad()
        // Do any additional setup after loading the view.
        scrollView.delegate = self
    }

    override func viewDidAppear(_ animated: Bool) {
        updateZoomFor(size: view.bounds.size)
    }

    func viewForZooming(in scrollView: UIScrollView) -> UIView? {
        return imageView
    }

    func updateZoomFor(size: CGSize) {
        let widthScale = size.width / imageView.bounds.width
        let heightScale = size.height / imageView.bounds.height
        let scale = min(widthScale, heightScale)
        scrollView.minimumZoomScale = scale
        scrollView.zoomScale = scale
    }
}