環境設定
mac版インストール
winではboostやcmake至る所でめんどくさいことに。。。
boost周り
brew install boost
brew install boost-python --with-python3
brew install cmake
X11周り
x-windowが必要なのでダウンロードした
https://www.xquartz.org/releases/index.html
condaに逃げる方法もある。
conda install -c conda-forge dlib=19.4
ともかくpipでdlibが入らなかった。ちがうmacでは入った。何が違うのかよくわからなかった。
入らないmacはこれを元にインストール
https://www.learnopencv.com/install-dlib-on-macos/
brew cask install xquartz
brew install gtk+3 boost
brew install boost-python --with-python3
brew install python python3
brew link python
brew link python3
# check whether Python using homebrew install correctly
which python2   # it should output /usr/local/bin/python2
which python3  # it should output /usr/local/bin/python3
brew install dlib
pip install dlib
$ Xvfb :1 & disown
$ export DISPLAY=:1
Python版
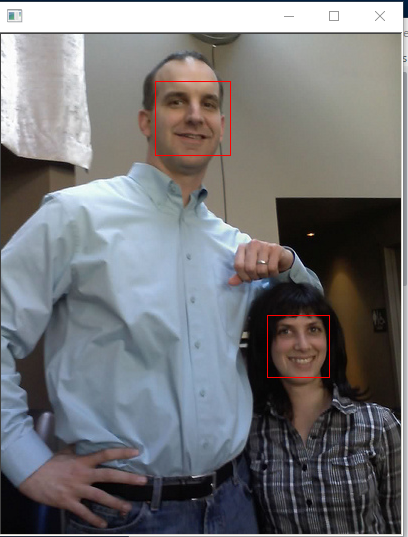
物体検出
学習を回す
座標のxmlファイルを読み込む
  <image file='2007_007763.jpg'>
    <box top='90' left='194' width='37' height='37'/>
    <box top='114' left='158' width='37' height='37'/>
    <box top='89' left='381' width='45' height='44'/>
    <box top='198' left='94' width='37' height='37'/>
    <box top='214' left='178' width='37' height='37'/>
    <box top='86' left='294' width='37' height='37'/>
    <box top='233' left='309' width='45' height='44'/>
  </image>
下記の学習を回す
python train_object_detector.py ../examples/faces/
# !/usr/bin/python
import os
import sys
import glob
import dlib
from skimage import io

if len(sys.argv) != 2:
    print(
        "Give the path to the examples/faces directory as the argument to this "
        "program. For example, if you are in the python_examples folder then "
        "execute this program by running:\n"
        "    ./train_object_detector.py ../examples/faces")
    exit()
faces_folder = sys.argv[1]

options = dlib.simple_object_detector_training_options()
options.add_left_right_image_flips = True
options.C = 5
options.num_threads = 4
options.be_verbose = True
training_xml_path = os.path.join(faces_folder, "training.xml")
testing_xml_path = os.path.join(faces_folder, "testing.xml")
dlib.train_simple_object_detector(training_xml_path, "detector.svm", options)
print("")  # Print blank line to create gap from previous output
print("Training accuracy: {}".format(
    dlib.test_simple_object_detector(training_xml_path, "detector.svm")))
print("Testing accuracy: {}".format(
    dlib.test_simple_object_detector(testing_xml_path, "detector.svm")))
detector = dlib.simple_object_detector("detector.svm")
# We can look at the HOG filter we learned.
win_det = dlib.image_window()
win_det.set_image(detector)

print("Showing detections on the images in the faces folder...")
win = dlib.image_window()
for f in glob.glob(os.path.join(faces_folder, "*.jpg")):
    print("Processing file: {}".format(f))
    img = io.imread(f)
    dets = detector(img)
    print("Number of faces detected: {}".format(len(dets)))
    for k, d in enumerate(dets):
        print("Detection {}: Left: {} Top: {} Right: {} Bottom: {}".format(
            k, d.left(), d.top(), d.right(), d.bottom()))
    win.clear_overlay()
    win.set_image(img)
    win.add_overlay(dets)
    dlib.hit_enter_to_continue()

images = [io.imread(faces_folder + '/2008_002506.jpg'),
          io.imread(faces_folder + '/2009_004587.jpg')]
boxes_img1 = ([dlib.rectangle(left=329, top=78, right=437, bottom=186),
               dlib.rectangle(left=224, top=95, right=314, bottom=185),
               dlib.rectangle(left=125, top=65, right=214, bottom=155)])
boxes_img2 = ([dlib.rectangle(left=154, top=46, right=228, bottom=121),
               dlib.rectangle(left=266, top=280, right=328, bottom=342)])
boxes = [boxes_img1, boxes_img2]
detector2 = dlib.train_simple_object_detector(images, boxes, options)
win_det.set_image(detector2)
dlib.hit_enter_to_continue()
print("\nTraining accuracy: {}".format(
    dlib.test_simple_object_detector(images, boxes, detector2)))
学習をすると直下にdetector.svmができてる。
推定
python face_detector.py ../examples/faces/2009_004587.jpg
# !/usr/bin/python
# face_detector.py ../examples/faces/*.jpg
# classic Histogram of Oriented
#   This face detector is made using the now classic Histogram of Oriented
#   Gradients (HOG) feature combined with a linear classifier, an image
#   pyramid, and sliding window detection scheme.

import sys
import dlib
from skimage import io

detector = dlib.get_frontal_face_detector()
win = dlib.image_window()

for f in sys.argv[1:]:
    print("Processing file: {}".format(f))
    img = io.imread(f)
    dets = detector(img, 1)
    print("Number of faces detected: {}".format(len(dets)))
    for i, d in enumerate(dets):
        print("Detection {}: Left: {} Top: {} Right: {} Bottom: {}".format(
            i, d.left(), d.top(), d.right(), d.bottom()))

    win.clear_overlay()
    win.set_image(img)
    win.add_overlay(dets)
    dlib.hit_enter_to_continue()

if (len(sys.argv[1:]) > 0):
    img = io.imread(sys.argv[1])
    dets, scores, idx = detector.run(img, 1, -1)
    for i, d in enumerate(dets):
        print("Detection {}, score: {}, face_type:{}".format(
            d, scores[i], idx[i]))
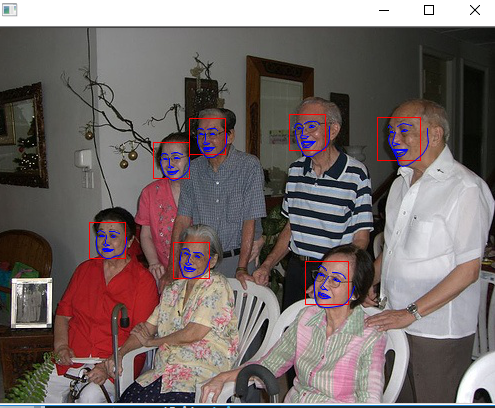
ランドマーク検出
学習データ
  <image file='2007_007763.jpg'>
    <box top='90' left='194' width='37' height='37'>
      <part name='00' x='201' y='107'/>
      <part name='01' x='201' y='110'/>
      <part name='02' x='201' y='113'/>
      <part name='03' x='202' y='117'/>
~略~
      <part name='64' x='217' y='119'/>
      <part name='65' x='213' y='121'/>
      <part name='66' x='211' y='122'/>
      <part name='67' x='209' y='121'/>
    </box>
学習
python train_shape_predictor.py ../examples/faces/
predictor.datが出力された。
import os
import sys
import glob
import dlib
from skimage import io
if len(sys.argv) != 2:
    print(
        "Give the path to the examples/faces directory as the argument to this "
        "program. For example, if you are in the python_examples folder then "
        "execute this program by running:\n"
        "    ./train_shape_predictor.py ../examples/faces")
    exit()
faces_folder = sys.argv[1]
options = dlib.shape_predictor_training_options()
# You should also read Kazemi's paper
# 300が良い数字らしい
options.oversampling_amount = 300
options.nu = 0.05
options.tree_depth = 2
options.be_verbose = True
training_xml_path = os.path.join(faces_folder, "training_with_face_landmarks.xml")
dlib.train_shape_predictor(training_xml_path, "predictor.dat", options)
print("\nTraining accuracy: {}".format(
    dlib.test_shape_predictor(training_xml_path, "predictor.dat")))
testing_xml_path = os.path.join(faces_folder, "testing_with_face_landmarks.xml")
print("Testing accuracy: {}".format(
    dlib.test_shape_predictor(testing_xml_path, "predictor.dat")))
predictor = dlib.shape_predictor("predictor.dat")
detector = dlib.get_frontal_face_detector()

print("Showing detections and predictions on the images in the faces folder...")
win = dlib.image_window()
for f in glob.glob(os.path.join(faces_folder, "*.jpg")):
    print("Processing file: {}".format(f))
    img = io.imread(f)

    win.clear_overlay()
    win.set_image(img)

    dets = detector(img, 1)
    print("Number of faces detected: {}".format(len(dets)))
    for k, d in enumerate(dets):
        print("Detection {}: Left: {} Top: {} Right: {} Bottom: {}".format(
            k, d.left(), d.top(), d.right(), d.bottom()))
        # Get the landmarks/parts for the face in box d.
        shape = predictor(img, d)
        print("Part 0: {}, Part 1: {} ...".format(shape.part(0),
                                                  shape.part(1)))
        # Draw the face landmarks on the screen.
        win.add_overlay(shape)

    win.add_overlay(dets)
    dlib.hit_enter_to_continue()
推定
学習済みモデルも提供されている
wget http://dlib.net/files/shape_predictor_68_face_landmarks.dat.bz2
何かしらで解凍
python face_landmark_detection.py shape_predictor_68_face_landmarks.dat ..\examples\faces\
import sys
import os
import dlib
import glob
from skimage import io

if len(sys.argv) != 3:
    print(
        "Give the path to the trained shape predictor model as the first "
        "argument and then the directory containing the facial images.\n"
        "For example, if you are in the python_examples folder then "
        "execute this program by running:\n"
        "    ./face_landmark_detection.py shape_predictor_68_face_landmarks.dat ../examples/faces\n"
        "You can download a trained facial shape predictor from:\n"
        "    http://dlib.net/files/shape_predictor_68_face_landmarks.dat.bz2")
    exit()

predictor_path = sys.argv[1]
faces_folder_path = sys.argv[2]

detector = dlib.get_frontal_face_detector()
predictor = dlib.shape_predictor(predictor_path)
win = dlib.image_window()

for f in glob.glob(os.path.join(faces_folder_path, "*.jpg")):
    print("Processing file: {}".format(f))
    img = io.imread(f)

    win.clear_overlay()
    win.set_image(img)

    dets = detector(img, 1)
    print("Number of faces detected: {}".format(len(dets)))
    for k, d in enumerate(dets):
        print("Detection {}: Left: {} Top: {} Right: {} Bottom: {}".format(
            k, d.left(), d.top(), d.right(), d.bottom()))
        # Get the landmarks/parts for the face in box d.
        shape = predictor(img, d)
        print("Part 0: {}, Part 1: {} ...".format(shape.part(0),
                                                  shape.part(1)))
        # Draw the face landmarks on the screen.
        win.add_overlay(shape)

    win.add_overlay(dets)
    dlib.hit_enter_to_continue()
C++版
とりま一気にビルドする。
sudo apt-get install libx11-dev #ubuntuの場合
cd examples
mkdir build
cd build
cmake ..
cmake --build . --config Release
SVMを動かす(c++)
以下exampleのbuildフォルダ以下にて実行。
とりま動作確認するのに使ってた。
./svm_ex
単独でビルド(windows)
g++ -std=c++11 -O3 -I.. svm_ex.cpp -o svm_ex_
svm_ex_.exe
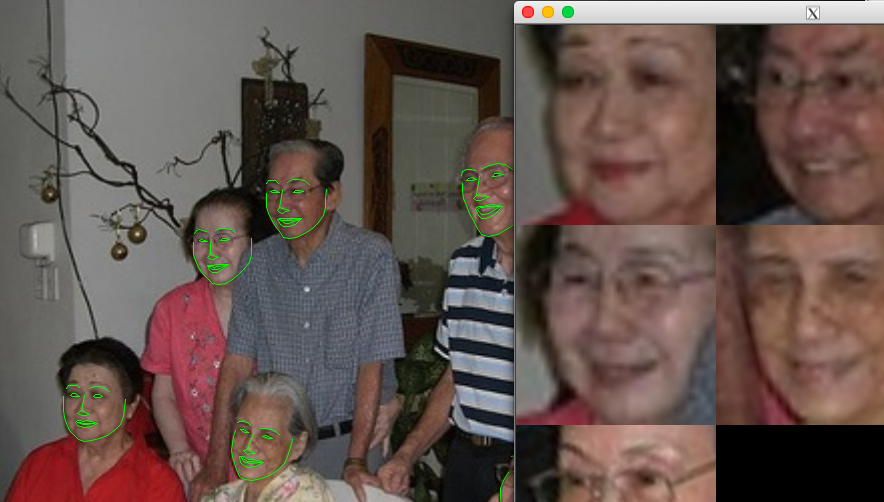
face_landmark_detection(c++)
wget http://dlib.net/files/shape_predictor_68_face_landmarks.dat.bz2
bzip2 -d shape_predictor_68_face_landmarks.dat.bz2
face_landmark_detection_ex shape_predictor_68_face_landmarks.dat ../faces/*.jpg
# include <dlib/image_processing/frontal_face_detector.h>
# include <dlib/image_processing/render_face_detections.h>
# include <dlib/image_processing.h>
# include <dlib/gui_widgets.h>
# include <dlib/image_io.h>
# include <iostream>

using namespace dlib;
using namespace std;

int main(int argc, char** argv)
{
    try
    {
        if (argc == 1)
        {
            cout << "Call this program like this:" << endl;
            cout << "./face_landmark_detection_ex shape_predictor_68_face_landmarks.dat faces/*.jpg" << endl;
            cout << "\nYou can get the shape_predictor_68_face_landmarks.dat file from:\n";
            cout << "http://dlib.net/files/shape_predictor_68_face_landmarks.dat.bz2" << endl;
            return 0;
        }

        frontal_face_detector detector = get_frontal_face_detector();
        shape_predictor sp;
        deserialize(argv[1]) >> sp;
        image_window win, win_faces;
        for (int i = 2; i < argc; ++i)
        {
            cout << "processing image " << argv[i] << endl;
            array2d<rgb_pixel> img;
            load_image(img, argv[i]);
            pyramid_up(img);
            std::vector<rectangle> dets = detector(img);
            cout << "Number of faces detected: " << dets.size() << endl;
            std::vector<full_object_detection> shapes;
            for (unsigned long j = 0; j < dets.size(); ++j)
            {
                full_object_detection shape = sp(img, dets[j]);
                cout << "number of parts: "<< shape.num_parts() << endl;
                cout << "pixel position of first part:  " << shape.part(0) << endl;
                cout << "pixel position of second part: " << shape.part(1) << endl;
                shapes.push_back(shape);
            }
            win.clear_overlay();
            win.set_image(img);
            win.add_overlay(render_face_detections(shapes));
            dlib::array<array2d<rgb_pixel> > face_chips;
            extract_image_chips(img, get_face_chip_details(shapes), face_chips);
            win_faces.set_image(tile_images(face_chips));

            cout << "Hit enter to process the next image..." << endl;
            cin.get();
        }
    }
    catch (exception& e)
    {
        cout << "\nexception thrown!" << endl;
        cout << e.what() << endl;
    }
}
これで動くんだけど、どうやって動いてるのかが不明。
HOG feature combined with a linear classifier, an image pyramid, and sliding window detection scheme.
ってある。
画像→hog→特徴量→ピラミッド型の画像とスライディングウインドウ検出で線形分類器にかける
って感じ?
実装
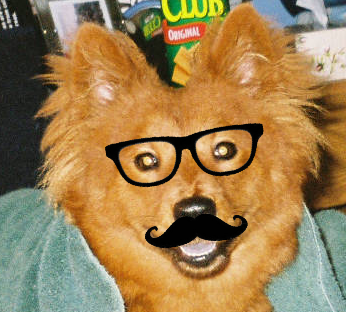
dog_landmark
すごいでかいデータセットを提供してくれてる。
hog svmよりcnnのが精度が良いだろう
wget http://dlib.net/files/mmod_dog_hipsterizer.dat.bz2
bzip2 -d mmod_dog_hipsterizer.dat.bz2
./dnn_mmod_dog_hipsterizer mmod_dog_hipsterizer.dat ../faces/dogs.jpg
ちょっとファイルを増やしたかったのでCMakeLists.txtに追加
add_gui_example(dnn_mmod_find_cars2_ex)の一行を追加してサイドビルドした。
cmake ..
cmake --build . --config Release
エラー編
macでのxwindowシステムまわりの環境も結構ダルイ。
  831 FATAL [1] dlib.gui_core: Unable to connect to the X display.
Traceback (most recent call last):
  File "cnn_face_detector.py", line 54, in <module>
    win = dlib.image_window()
RuntimeError: Failed to initialize X11 resources
$ Xvfb :1 & disown
$ export DISPLAY=:1
dlib ImportError: dlopen Symbol not found: _PyClass_Type
boost系のライブラリの環境がかなり不安定。winでもインストールがかなりダルイ。
$ mv /usr/local/opt/boost-python/lib/libboost_python-mt.dylib /usr/local/opt/boost-python/lib/libboost_python-mt.dylib.bk
$ cp /usr/local/opt/boost-python/lib/libboost_python3-mt.dylib /usr/local/opt/boost-python/lib/libboost_python-mt.dylib
dlib19でhtml5libのバージョンがあってないのか。。
parse() got an unexpected keyword argument 'override_encoding'
pip uninstall html5lib
pip install html5lib==1.0b10
windowsにboostを入れようとするが入らない
これを見るとバッチ叩こうねーってあるけど、バッチも通らなくないかなぁー
http://tatsyblog.sakura.ne.jp/wordpress/programming/python/1308/
公式
http://www.boost.org/doc/libs/1_61_0/more/getting_started/windows.html#get-boost
バージョンごとの資源
https://dl.bintray.com/boostorg/release/1.65.1/source/
win用のバイナリ
https://dl.bintray.com/boostorg/release/1.65.0/binaries/
バイナリ入れたらいけんじゃねとか思っても無理。
set BOOST_ROOT=C:\Program Files\boost_1_57_0\boost
set BOOST_LIBRARYDIR=C:\Program Files\boost_1_57_0\libs
set PATH=%PATH%;%BOOST_ROOT%;%BOOST_LIBRARYDIR%


set BOOST_ROOT=C:\Program Files\boost_1_61_0\boost
set BOOST_LIBRARYDIR=C:\Program Files\boost_1_61_0\libs
set PATH=%PATH%;%BOOST_ROOT%;%BOOST_LIBRARYDIR%
環境変数とかもいじってみたけどダメ。
dlibのIOS版
ビルドしなくてもここのを使えば良い
https://github.com/zweigraf/face-landmarking-ios
ここを見ながらビルドしてもエラーで動かなかった。
swift3でやればすんなりいくのかも知れない。
https://qiita.com/hirokimu/items/d37e01d712a9ca873dee
cd examples
mkdir build
cd build
cmake -G Xcode ..
cmake --build . --config Release
https://i-app-tec.com/ios/avcapturevideodataoutput.html
・Swift + OpenCVでリアルタイムに顔認識してみた1
2014年なので古すぎる
http://giveitashot.hatenadiary.jp/entry/2014/10/19/190505
これもエラー
http://tokyo.supersoftware.co.jp/code/7771
新規で作る場合はこの通りにプロジェクトの設定をすれば良い
http://www.jianshu.com/p/701e8dea887e
OpencvのIOS版
学習データを作る
画像作成ツールをビルド
cd dlib/tools/imglab
mkdir build
cd build
cmake ..
cmake --build . --config Release
sudo make install
画像フォルダを指定して画像XMLを作成
imglab -c output_file.xml target_folder
画像リストXMLを引数にimglabを起動
imglab --parts "1 2 3 4" output_file.xml
・範囲指定
shift+ドラッグ
・キーポイント指定
枠をダブルクリックすると枠の色が変わる。
枠の色が変わった状態で右クリックするとキーポイントを指定できる。
参考