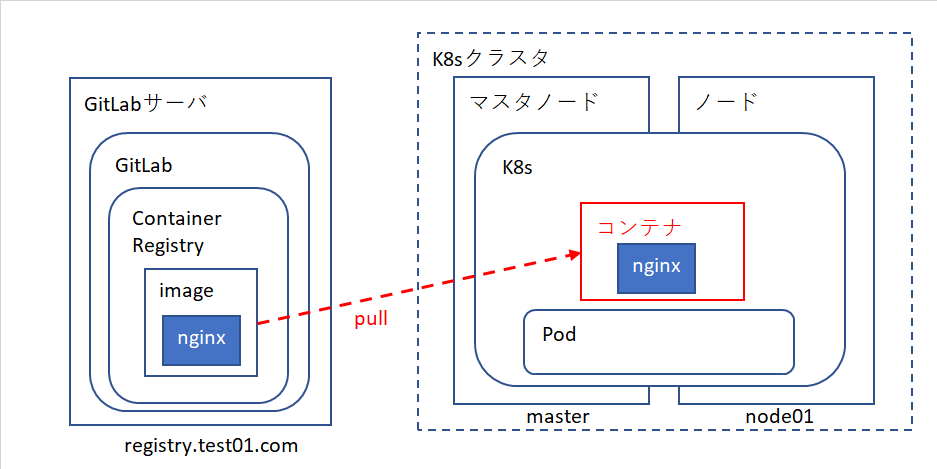
スキル習得のためGitLabのコンテナレジストリのイメージからKubernetesのpodを作成を試した際の手順をまとめます。※下図赤色部分。
試しにpullする対象のイメージはnginxを含むものです。

前提条件
・Kubernetesのクラスタ構築が済んでいる
・GitLabの構築が済んでいる
・試した環境のバージョンは以下
CentOS:7.3
Kubernetes:1.18.2
Calico:3.13.3
Docker:1.13.1-109
GitLab:11.6.8
参考資料
https://docs.docker.com/registry/insecure/
https://kubernetes.io/docs/tasks/configure-pod-container/pull-image-private-registry/
1.DockerとK8sへの事前設定
準備として証明書の配置やコンテナレジストリへのアクセス情報の設定を行います。
Dockerへの証明書の配置
Dockerからコンテナレジストリにアクセスするための証明書を配置します。
# sudo mkdir -p /etc/docker/certs.d/registry.test01.com
# sudo cp cert.crt /etc/docker/certs.d/registry.test01.com/ca.crt
cert.crt ・・・GitLab Container Registryへのアクセスに使用する証明書
Dockerの非セキュアレジストリの設定
配置した証明書が自己署名証明書の場合、Dockerにそれを許可する設定が必要でした。
{
  "insecure-registries": ["registry.test01.com"]
}
反映するためにDockerを再起動します。
systemctl restart docker
K8sへのコンテナレジストリアクセス情報の登録
コンテナレジストリへアクセスする際の情報をK8sに登録します。
まずDockerからコンテナレジストリにログインします。
# docker login registry.test01.com
Username: <コンテナレジストリにアクセスする時のユーザ名>
Password: <上記ユーザ名に対応するパスワード>
Login Succeeded
上記ログインにより生成されるconfig.jsonファイルを確認します。
# cat ~/.docker/config.json
{
	"auths": {
		"registry.test01.com": {
			"auth": "***************************="
		}
	}
認証トークンを含めた cluster 接続用 Secret を作成します。
# kubectl create secret docker-registry regcred --docker-server=registry.test01.com --docker-username=<コンテナレジストリユーザ名> --docker-password=<コンテナレジストリユーザ名に対応するパスワード>
secret/regcred created
2.コンテナレジストリのイメージを使用するpodの作成
コンテナにネットワーク経由でアクセスするためのサービス設定とコンテナイメージを使用するpodの設定を行います。
クラスタ外からアクセスするためのサービス(nodePort)の設定
以下のようにpodへのアクセス情報を作成します。外部の30080ポートとコンテナ側のnginxの80番ポートを紐づけます。
apiVersion: v1
kind: Service
metadata:
  name: testapp01-np
spec:
  selector:
   app: testapp01 ←これをpodの方の定義と一致させる
  ports:
  - targetPort: 80 ←コンテナの受けポート(nginx)
    port: 8080
    nodePort: 30080 ←外部からのアクセス時に使うポート。外部からのアクセス時に「ノードIP:ここで指定したポート番号」と指定する。
    protocol: "TCP"
  type: NodePort
上記ファイルを適用します。
# kubectl apply -f testapp01-svc.yaml
適用結果を確認します。
# kubectl get services testapp01-np
NAME           TYPE       CLUSTER-IP       EXTERNAL-IP   PORT(S)          AGE
testapp01-np   NodePort   xx.xx.xx.xx      <none>        8080:30080/TCP   4d2h
コンテナレジストリのイメージを使用するPodの作成
以下のようにPodのマニュフェストファイルを作成します。
apiVersion: v1
kind: Pod
metadata:
  name: testapp01
  labels:
    app: testapp01 ←サービスと紐づけるためのラベル
spec:
  containers:
  - name: testapp01-container
    image: registry.test01.com/test/testapp01:latest ←適用するイメージ
    ports:
    - containerPort: 80 ←コンテナで使われているアプリポート
  imagePullSecrets:
  - name: regcred ←デプロイ準備で作成したSecret
上記ファイルを適用します。
# kubectl create -f testapp01.yaml
pod/testapp01 created
podが「Running」になることを確認します。
# kubectl get pod testapp01
NAME        READY   STATUS    RESTARTS   AGE
testapp01   1/1     Running   0          4s
最後にアプリにアクセスしてみて動作を確認します。
今回は外部のブラウザから以下のURLにアクセスし確認しました。
http://[podが起動しているノードのIP]:30080
まとめ
自己署名証明書を使用していたことによる対応が必要で調査に時間を要してしまいましたが、比較的簡単にGitLabとコンテナレジストリとK8sの連携ができました。