はじめに
この記事は、Docker入門シリーズ記事3本の2本目です。
Dockerで環境構築するための最低限の概念理解
Dockerで環境構築するための最低限のコマンドを一通り実践する
【Docker Compose】設定内容を1行ずつ理解しながらLaravel環境構築(PHP-FPM、Nginx、MySQL、Redis)
また、WindowsでDockerを利用する際の重要な設定に関する記事もありますのでこちらもご確認ください。
WindowsでDockerを使う時、正しくファイル配置しないと激重になるので注意
前回紹介したこのDocker環境構築フロー図にある操作を
実際に一通りやってみます。
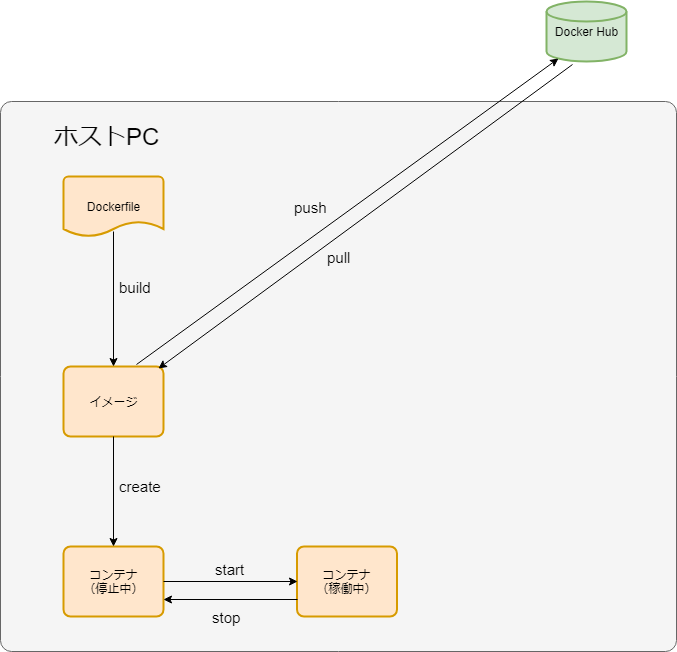
この先で環境構築手順を1つ1つ解説しながら進めますが、
今自分がこの図のどの作業をしているのか
を常に意識していると迷子にならないと思います。
構築するコンテナ
今回は、Apacheコンテナを構築し、
ホストPCから http://localhost でアクセスすると
Apacheのウェルカムページが表示されるようにします。
Dockerのインストール
Docker自体のインストール方法は解説しませんので、
自分のPCにDockerをインストールしたうえで次に進んでください。
コマンドプロンプトやWindows PowerShellなど好きなターミナルを開いて、
このコマンドを実行しバージョンが表示されればOKです。
docker -v
この状態までできたら次の作業に進みます。
今回使う基本コマンド一覧
今回、図にある操作を一通り行うために
使うコマンドの一覧です。
######## イメージの操作########
# イメージ一覧を表示
docker images

# Docker Hubからイメージを取得
docker pull {イメージ名}

# Dockerfileからイメージを作成
docker build {Dockerfileのパス}

# イメージを削除
docker rmi {イメージID}


######## コンテナの操作########
# コンテナ一覧を表示
docker ps -a

# コンテナを作成
docker create {イメージ名}

# コンテナを起動
docker start {コンテナ名}

# コンテナを停止
docker stop {コンテナ名}

# コンテナを削除
docker rm {コンテナ名}

# イメージを取得、コンテナを作成、コンテナを起動
docker run {イメージ名}


######## その他の操作########
# コンテナにログイン
docker exec -it {コンテナ名} bash
この基本コマンドに、
いくつかオプションを付けた形で使っていくことになります。
Docker Hubのイメージを使った構築フロー
まずは、Docker Hubからイメージを取得して
環境構築するフローを一通りやってみます。
Docker Hubからイメージ取得
まずは、Docker Hubからイメージを取得します。
Apacheのイメージは、「httpd」というイメージ名で公開されています。
https://hub.docker.com/_/httpd
現在最新バージョンの2.4を利用します。
このコマンドでApacheのイメージを取得します。
# docker pull {イメージ名}
docker pull httpd:2.4
このコマンドでイメージ一覧を表示し、取得できているか確認します。
docker images
このように表示されればpullできています。
Docker Hubにあったhttpdのイメージが自分のPCに置いてある状態です。
REPOSITORY                        TAG                 IMAGE ID            CREATED             SIZE
httpd                             2.4                 d3a13ec4a0f1        7 days ago          132MB
イメージからコンテナ作成
いま取得したイメージからコンテナを作成します。
# docker create {イメージ名}
docker create httpd:2.4
コンテナ一覧を表示し、ちゃんとできているか確認してみます。
docker ps -a
このように表示されれば正しくコンテナ作成できています。
CONTAINER ID        IMAGE               COMMAND              CREATED             STATUS              PORTS               NAMES
7c3e796f38b2        httpd:2.4           "httpd-foreground"   4 seconds ago       Created                                 confident_curran
コンテナ名を指定する
先ほど作成したコンテナ情報のNAMEをみると、
つけた覚えのないコンテナ名になっています。
コンテナは、作成時にコンテナ名を指定しないとランダムの名前がつけられる
という仕様のためです。
ランダムのコンテナ名では管理しづらいので、
次は好きなコンテナ名をつけてみます。
まずは先ほど作成したコンテナを削除
# docker rm {コンテナ名}
docker rm confident_curran
そして、createコマンドに--nameオプションをつけてコンテナ作成します。
# docker create --name {コンテナ名} {イメージ名}
docker create --name my-httpd-container httpd:2.4
もう一度コンテナ一覧を確認してみると、
NAMEに自分のつけたコンテナ名が表示されています。
CONTAINER ID        IMAGE               COMMAND              CREATED             STATUS              PORTS               NAMES
f4dddf788860        httpd:2.4           "httpd-foreground"   3 seconds ago       Created                                 my-httpd-container
コンテナを起動
コンテナ情報のSTATUSを見ると、
Createdになっています。
これは、まだコンテナが起動していない状態です。
このコマンドでコンテナを起動します。
# docker start {コンテナ名}
docker start my-httpd-container
これでもう一度docker ps -aで状態確認します。
CONTAINER ID        IMAGE               COMMAND              CREATED             STATUS              PORTS               NAMES
f4dddf788860        httpd:2.4           "httpd-foreground"   4 minutes ago       Up 3 seconds        80/tcp              my-httpd-container
STATUSがUpになっているので、
正しくコンテナ起動できています。
ポートを公開する
これでApacheコンテナを作成し、起動している状態なので
http://localhost にアクセスして画面表示したいところですが、
このままではApacheのウェルカムページが表示されません。
理由は、コンテナのポートが公開されていないためです。
ホストPCのブラウザからコンテナにアクセスするには、
コンテナのポートを公開し、ホストPCのポートとつなげる必要があります。
コンテナを作り直す必要があるため、
まずはコンテナを停止、削除します。
# docker stop {コンテナ名}
docker stop my-httpd-container

# docker rm {コンテナ名}
docker rm my-httpd-container
そしてコンテナのポートを公開するため
このように-pオプションをつけてコンテナ作成し、起動します。
# docker create --name {コンテナ名} -p {ホスト側ポート}:{コンテナ側ポート} {イメージ名}
docker create --name my-httpd-container -p 80:80 httpd:2.4

docker start my-httpd-container
この-p 80:80は、
ホスト側の80番ポートとコンテナ側の80番ポートをつなげる
という設定になります。
この状態で
http://localhost
にアクセスしてみます。
このように「It works!」のページが表示されれば
正しくポート公開できています。

コンテナにログインする
コンテナがちゃんと動いている状態になったので、
次にコンテナにログインしてみます。
# docker exec -it {コンテナ名} bash
docker exec -it my-httpd-container bash
コンソールの表示がこのように変われば正しくログインできています。
root@ff46743d8ac1:/usr/local/apache2#
いまこれはApacheのインストールされた
Linux(Debian)サーバにSSH接続しているのと同じような状態です。
このコンテナの中でPHPインストールのコマンドを実行すれば
PHPが使えるようになるし、
Apacheの設定ファイルを書き換えればドキュメントルートを変えたりすることもできます。
コンテナのファイルを編集する
せっかくコンテナにログインしている状態なので、
先ほどの「It works!」のページを書き換えてみます。
このコンテナにはvimが入っていないため、
ファイルを編集するためにまずはvimをインストールします。
# コンテナにログインしている状態
apt-get update
apt-get install -y vim
ドキュメントルートに置いてあるindex.htmlを好きなように編集します。
# コンテナにログインしている状態
vim /usr/local/apache2/htdocs/index.html
これでもう一度 http://localhost にアクセスし、
自分の編集が反映されていることを確認してください。
コンテナ、イメージの削除
次の作業に入る前に、
これまで作ったものを一度削除してきれいにします。
# コンテナ停止
docker stop my-httpd-container

# コンテナ削除
docker rm my-httpd-container

# イメージ削除
docker rmi httpd:2.4
コンテナ一覧とイメージ一覧を見て
ちゃんと削除されていることを確認してください。
runコマンドで一気にコンテナ起動
次に、runコマンドを実行してみます。
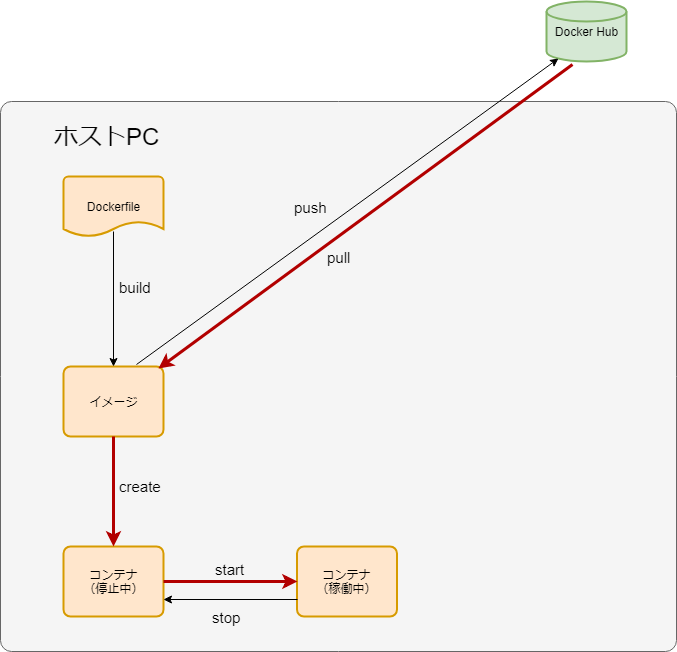
runコマンドは、
先ほどの図で赤色になっている
pull、create、startの操作を一気に実行してくれるコマンドです。
# docker run --name {コンテナ名} -p {ホスト側ポート}:{コンテナ側ポート} {イメージ名}
docker run --name my-httpd-container -p 80:80 httpd:2.4
これで
- Docker Hubからhttpd:2.4のイメージをpullしてくる
- httpd:2.4のイメージからコンテナ(my-httpd-container)をcreateする
- コンテナ(my-httpd-container)を起動する
がすべて実行された状態です。
http://localhost にアクセスすればApacheのウェルカムページが表示できる状態です。
これまでpull、create、startなどひとつひとつ実行してきましたが、
実際にはこのrunコマンド一発で環境構築することが普通になると思います。
これでDocker Hubからイメージを取得し環境構築する、
図で赤色になっているフローは一通り完了です。
また次の作業のためにコンテナ、イメージを削除しておきます。
Dockerfileを使った構築フロー
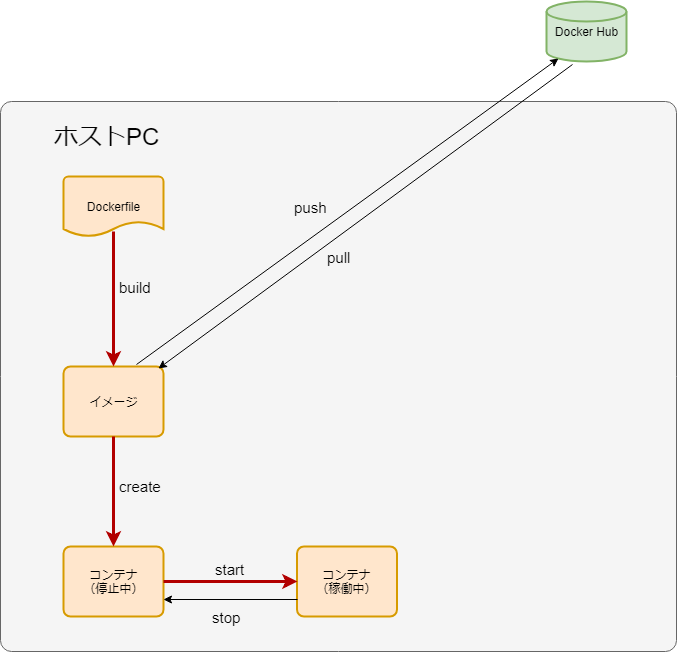
次に、Dockerfileから自分でイメージを作成し、
環境構築するフローを実践してみます。
先ほど作ったコンテナでは、
vimが入っていなかったため
ファイルを編集するために自分でvimをインストールする必要がありました。
今回はApacheのイメージを元に、
そこにvimをインストールする設定をDockerfileに書いて、
apache-vimというオリジナルのイメージを作ってみます。
Dockerfileを作成
まず、自分のPCの好きな場所にapache-vim(任意の名前)というフォルダを作成し、
その中にDockerfileという名前のファイルを作成します。
apache-vim/
   └─ Dockerfile
ファイル内容はこのようにしてください。
FROM httpd:2.4

RUN apt-get update
RUN apt-get install -y vim
先ほど利用したhttpd:2.4のイメージを流用し、
そこにvimインストールのコマンドを追加した状態です。
Dockerfileからイメージを作成
それではこのDockerfileからイメージを作成します。
Dockerfileが置いてあるのと同じディレクトリでターミナルを開き、
このコマンドを実行します。
# docker build -t {イメージ名} {Dockerfileのパス}
docker build -t my-apache-vim-image .
docker imagesでイメージ一覧を確認します。
REPOSITORY                        TAG                 IMAGE ID            CREATED             SIZE
my-apache-vim-image               latest              191acc495e15        2 minutes ago       179MB
このように、自分で作ったイメージが表示されています。
イメージからコンテナ作成、起動
このイメージからコンテナを作成し、起動します。
# docker create --name {コンテナ名} -p {ホスト側ポート}:{コンテナ側ポート} {イメージ名}
docker create --name my-apache-vim-container -p 80:80 my-apache-vim-image

docker start my-apache-vim-container
http://localhost にアクセスしてまたApacheウェルカムページが表示されれば
正しくコンテナ作成できています。
コンテナに入ってvimが使えるかどうか確認します。
# コンテナにログイン
docker exec -it my-apache-vim-container bash

# コンテナにログインしている状態
# vimでファイル編集
vim /usr/local/apache2/htdocs/index.html
これで、vimが最初から使える状態のApacheコンテナが作成できました。
DockerfileからDocker環境構築するフローはこれで完了です。
今作ったコンテナは削除しておきます。
ホスト側のディレクトリをコンテナ側にマウントする
これまででDockerによる環境構築の基本を一通り経験しましたが、
実際に運用するためには必須となる、
マウントという機能だけこのまま解説、実践します。
現状の課題
これまで解説した方法でコンテナを作り、開発をすると考えた場合、
2つ課題があります。
- プログラムソースファイル修正する際に、いちいちコンテナにログインし、vimで編集しないといけない
- コンテナを削除、再作成するとファイルの修正も元に戻ってしまう
という点です。
この課題を解決するためにDockerのマウント機能を利用します。
マウント機能とは
Dockerのマウント機能とは、
ホストPCの特定のディレクトリをコンテナ内の特定のディレクトリにマウントし、
共有することのできる機能です。
簡単に言うと、
ホストPCにindex.htmlを置くと、コンテナ側にもindex.htmlが置かれ、
ホストPCのindex.htmlを編集すると、コンテナ側のindex.htmlにも変更が反映される状態になるということです。
これでいちいちコンテナにログインしなくてもホストPCのファイルを編集すればいいし、
vimじゃなく好きなエディタを使うこともできます。
また、コンテナを削除したとしても、
ホストPC側に編集した状態のindex.htmlが残るので、
コンテナを再作成したら変更した状態のindex.htmlがまた反映されます。
コンテナ作成時に-vオプションをつけることで、
マウントすることができます。
実際にやってみます。
プログラムソースをマウント
まず、ホストPC側にindex.htmlを作成します。
このようにsourceフォルダを作成し、その中にindex.htmlを作成してください。
apache-vim/
   ├─ Dockerfile
   └─ source/
      └─ index.html
このホスト側index.htmlを、
コンテナ側のドキュメントルートにある
/usr/local/apache2/htdocs/index.html
にマウントします。
# docker run --name {コンテナ名} -p {ホスト側ポート}:{コンテナ側ポート} -v {ホスト側ディレクトリ}:{コンテナ側ディレクトリ} {イメージ名}
docker run --name my-apache-vim-container -p 80:80 -v $PWD/source:/usr/local/apache2/htdocs my-apache-vim-image
-v {ホスト側ディレクトリ}:{コンテナ側ディレクトリ}
-v $PWD/source:/usr/local/apache2/htdocs
この部分が追加されたオプションです。
$PWDはホストPCでコマンド実行しているディレクトリを表しています。
この部分は環境によって絶対パスで書かないといけなかったり、
相対パスで.source/と書けばよかったり
上記のように$PWDを使わなくちゃいけなかったりするみたいです。
うまくいかなければ色々試してみてください。
これでhttp://localhost にアクセスると先ほどホスト側に作成したindex.htmlの内容が表示されているはずです。
ホスト側のindex.htmlを編集すればそれが画面に反映されます。
また、一度コンテナを削除し再作成しても、
ホスト側のindex.htmlはそのまま保持されるため、
変更が元に戻ることはありません。
これで先ほど挙げた2つの課題は解決です。
- ファイル修正する際に、いちいちコンテナにログインし、vimで編集しないといけない
- コンテナを削除、再作成するとファイルの修正も元に戻ってしまう
Apache設定ファイルをマウント
プログラムソースファイルはマウントしましたが、
もう1つマウントすべきものとして、
サーバの設定ファイルがあります。
ドキュメントルートを変更したり、
リダイレクト設定を加えたり、
セキュリティ設定を加えたり、
Apacheのhttpd.confを編集する場面はたびたびあると思いますが、
今のコンテナのままではまた同じ問題が発生します。
- ファイル修正する際に、いちいちコンテナにログインし、vimで編集しないといけない
- コンテナを削除、再作成するとファイルの修正も元に戻ってしまう
そのため、Apache設定ファイルもマウントします。
まず、ホストPC側にapacheというディレクトリを作成し、その中にhttpd.confを作成します。
apache-vim/
   ├─ Dockerfile
   ├─ source/
   │  └─ index.html
   └─ apache/
      └─ httpd.conf
ファイル内容は、コンテナの中にある
/usr/local/apache2/conf/httpd.conf
をコピーしてください。
httpd.conf内容
#
# This is the main Apache HTTP server configuration file.  It contains the
# configuration directives that give the server its instructions.
# See <URL:http://httpd.apache.org/docs/2.4/> for detailed information.
# In particular, see
# <URL:http://httpd.apache.org/docs/2.4/mod/directives.html>
# for a discussion of each configuration directive.
#
# Do NOT simply read the instructions in here without understanding
# what they do.  They're here only as hints or reminders.  If you are unsure
# consult the online docs. You have been warned.
#
# Configuration and logfile names: If the filenames you specify for many
# of the server's control files begin with "/" (or "drive:/" for Win32), the
# server will use that explicit path.  If the filenames do *not* begin
# with "/", the value of ServerRoot is prepended -- so "logs/access_log"
# with ServerRoot set to "/usr/local/apache2" will be interpreted by the
# server as "/usr/local/apache2/logs/access_log", whereas "/logs/access_log"
# will be interpreted as '/logs/access_log'.

#
# ServerRoot: The top of the directory tree under which the server's
# configuration, error, and log files are kept.
#
# Do not add a slash at the end of the directory path.  If you point
# ServerRoot at a non-local disk, be sure to specify a local disk on the
# Mutex directive, if file-based mutexes are used.  If you wish to share the
# same ServerRoot for multiple httpd daemons, you will need to change at
# least PidFile.
#
ServerRoot "/usr/local/apache2"

#
# Mutex: Allows you to set the mutex mechanism and mutex file directory
# for individual mutexes, or change the global defaults
#
# Uncomment and change the directory if mutexes are file-based and the default
# mutex file directory is not on a local disk or is not appropriate for some
# other reason.
#
# Mutex default:logs

#
# Listen: Allows you to bind Apache to specific IP addresses and/or
# ports, instead of the default. See also the <VirtualHost>
# directive.
#
# Change this to Listen on specific IP addresses as shown below to
# prevent Apache from glomming onto all bound IP addresses.
#
# Listen 12.34.56.78:80
Listen 80

#
# Dynamic Shared Object (DSO) Support
#
# To be able to use the functionality of a module which was built as a DSO you
# have to place corresponding `LoadModule' lines at this location so the
# directives contained in it are actually available _before_ they are used.
# Statically compiled modules (those listed by `httpd -l') do not need
# to be loaded here.
#
# Example:
# LoadModule foo_module modules/mod_foo.so
#
LoadModule mpm_event_module modules/mod_mpm_event.so
# LoadModule mpm_prefork_module modules/mod_mpm_prefork.so
# LoadModule mpm_worker_module modules/mod_mpm_worker.so
LoadModule authn_file_module modules/mod_authn_file.so
# LoadModule authn_dbm_module modules/mod_authn_dbm.so
# LoadModule authn_anon_module modules/mod_authn_anon.so
# LoadModule authn_dbd_module modules/mod_authn_dbd.so
# LoadModule authn_socache_module modules/mod_authn_socache.so
LoadModule authn_core_module modules/mod_authn_core.so
LoadModule authz_host_module modules/mod_authz_host.so
LoadModule authz_groupfile_module modules/mod_authz_groupfile.so
LoadModule authz_user_module modules/mod_authz_user.so
# LoadModule authz_dbm_module modules/mod_authz_dbm.so
# LoadModule authz_owner_module modules/mod_authz_owner.so
# LoadModule authz_dbd_module modules/mod_authz_dbd.so
LoadModule authz_core_module modules/mod_authz_core.so
# LoadModule authnz_ldap_module modules/mod_authnz_ldap.so
# LoadModule authnz_fcgi_module modules/mod_authnz_fcgi.so
LoadModule access_compat_module modules/mod_access_compat.so
LoadModule auth_basic_module modules/mod_auth_basic.so
# LoadModule auth_form_module modules/mod_auth_form.so
# LoadModule auth_digest_module modules/mod_auth_digest.so
# LoadModule allowmethods_module modules/mod_allowmethods.so
# LoadModule isapi_module modules/mod_isapi.so
# LoadModule file_cache_module modules/mod_file_cache.so
# LoadModule cache_module modules/mod_cache.so
# LoadModule cache_disk_module modules/mod_cache_disk.so
# LoadModule cache_socache_module modules/mod_cache_socache.so
# LoadModule socache_shmcb_module modules/mod_socache_shmcb.so
# LoadModule socache_dbm_module modules/mod_socache_dbm.so
# LoadModule socache_memcache_module modules/mod_socache_memcache.so
# LoadModule watchdog_module modules/mod_watchdog.so
# LoadModule macro_module modules/mod_macro.so
# LoadModule dbd_module modules/mod_dbd.so
# LoadModule bucketeer_module modules/mod_bucketeer.so
# LoadModule dumpio_module modules/mod_dumpio.so
# LoadModule echo_module modules/mod_echo.so
# LoadModule example_hooks_module modules/mod_example_hooks.so
# LoadModule case_filter_module modules/mod_case_filter.so
# LoadModule case_filter_in_module modules/mod_case_filter_in.so
# LoadModule example_ipc_module modules/mod_example_ipc.so
# LoadModule buffer_module modules/mod_buffer.so
# LoadModule data_module modules/mod_data.so
# LoadModule ratelimit_module modules/mod_ratelimit.so
LoadModule reqtimeout_module modules/mod_reqtimeout.so
# LoadModule ext_filter_module modules/mod_ext_filter.so
# LoadModule request_module modules/mod_request.so
# LoadModule include_module modules/mod_include.so
LoadModule filter_module modules/mod_filter.so
# LoadModule reflector_module modules/mod_reflector.so
# LoadModule substitute_module modules/mod_substitute.so
# LoadModule sed_module modules/mod_sed.so
# LoadModule charset_lite_module modules/mod_charset_lite.so
# LoadModule deflate_module modules/mod_deflate.so
# LoadModule xml2enc_module modules/mod_xml2enc.so
# LoadModule proxy_html_module modules/mod_proxy_html.so
LoadModule mime_module modules/mod_mime.so
# LoadModule ldap_module modules/mod_ldap.so
LoadModule log_config_module modules/mod_log_config.so
# LoadModule log_debug_module modules/mod_log_debug.so
# LoadModule log_forensic_module modules/mod_log_forensic.so
# LoadModule logio_module modules/mod_logio.so
# LoadModule lua_module modules/mod_lua.so
LoadModule env_module modules/mod_env.so
# LoadModule mime_magic_module modules/mod_mime_magic.so
# LoadModule cern_meta_module modules/mod_cern_meta.so
# LoadModule expires_module modules/mod_expires.so
LoadModule headers_module modules/mod_headers.so
# LoadModule ident_module modules/mod_ident.so
# LoadModule usertrack_module modules/mod_usertrack.so
# LoadModule unique_id_module modules/mod_unique_id.so
LoadModule setenvif_module modules/mod_setenvif.so
LoadModule version_module modules/mod_version.so
# LoadModule remoteip_module modules/mod_remoteip.so
# LoadModule proxy_module modules/mod_proxy.so
# LoadModule proxy_connect_module modules/mod_proxy_connect.so
# LoadModule proxy_ftp_module modules/mod_proxy_ftp.so
# LoadModule proxy_http_module modules/mod_proxy_http.so
# LoadModule proxy_fcgi_module modules/mod_proxy_fcgi.so
# LoadModule proxy_scgi_module modules/mod_proxy_scgi.so
# LoadModule proxy_uwsgi_module modules/mod_proxy_uwsgi.so
# LoadModule proxy_fdpass_module modules/mod_proxy_fdpass.so
# LoadModule proxy_wstunnel_module modules/mod_proxy_wstunnel.so
# LoadModule proxy_ajp_module modules/mod_proxy_ajp.so
# LoadModule proxy_balancer_module modules/mod_proxy_balancer.so
# LoadModule proxy_express_module modules/mod_proxy_express.so
# LoadModule proxy_hcheck_module modules/mod_proxy_hcheck.so
# LoadModule session_module modules/mod_session.so
# LoadModule session_cookie_module modules/mod_session_cookie.so
# LoadModule session_crypto_module modules/mod_session_crypto.so
# LoadModule session_dbd_module modules/mod_session_dbd.so
# LoadModule slotmem_shm_module modules/mod_slotmem_shm.so
# LoadModule slotmem_plain_module modules/mod_slotmem_plain.so
# LoadModule ssl_module modules/mod_ssl.so
# LoadModule optional_hook_export_module modules/mod_optional_hook_export.so
# LoadModule optional_hook_import_module modules/mod_optional_hook_import.so
# LoadModule optional_fn_import_module modules/mod_optional_fn_import.so
# LoadModule optional_fn_export_module modules/mod_optional_fn_export.so
# LoadModule dialup_module modules/mod_dialup.so
# LoadModule http2_module modules/mod_http2.so
# LoadModule proxy_http2_module modules/mod_proxy_http2.so
# LoadModule lbmethod_byrequests_module modules/mod_lbmethod_byrequests.so
# LoadModule lbmethod_bytraffic_module modules/mod_lbmethod_bytraffic.so
# LoadModule lbmethod_bybusyness_module modules/mod_lbmethod_bybusyness.so
# LoadModule lbmethod_heartbeat_module modules/mod_lbmethod_heartbeat.so
LoadModule unixd_module modules/mod_unixd.so
# LoadModule heartbeat_module modules/mod_heartbeat.so
# LoadModule heartmonitor_module modules/mod_heartmonitor.so
# LoadModule dav_module modules/mod_dav.so
LoadModule status_module modules/mod_status.so
LoadModule autoindex_module modules/mod_autoindex.so
# LoadModule asis_module modules/mod_asis.so
# LoadModule info_module modules/mod_info.so
# LoadModule suexec_module modules/mod_suexec.so
<IfModule !mpm_prefork_module>
        #LoadModule cgid_module modules/mod_cgid.so
</IfModule>
<IfModule mpm_prefork_module>
        #LoadModule cgi_module modules/mod_cgi.so
</IfModule>
# LoadModule dav_fs_module modules/mod_dav_fs.so
# LoadModule dav_lock_module modules/mod_dav_lock.so
# LoadModule vhost_alias_module modules/mod_vhost_alias.so
# LoadModule negotiation_module modules/mod_negotiation.so
LoadModule dir_module modules/mod_dir.so
# LoadModule imagemap_module modules/mod_imagemap.so
# LoadModule actions_module modules/mod_actions.so
# LoadModule speling_module modules/mod_speling.so
# LoadModule userdir_module modules/mod_userdir.so
LoadModule alias_module modules/mod_alias.so
# LoadModule rewrite_module modules/mod_rewrite.so

<IfModule unixd_module>
#
# If you wish httpd to run as a different user or group, you must run
# httpd as root initially and it will switch.
#
# User/Group: The name (or #number) of the user/group to run httpd as.
# It is usually good practice to create a dedicated user and group for
# running httpd, as with most system services.
#
User daemon
Group daemon

</IfModule>

# 'Main' server configuration
#
# The directives in this section set up the values used by the 'main'
# server, which responds to any requests that aren't handled by a
# <VirtualHost> definition.  These values also provide defaults for
# any <VirtualHost> containers you may define later in the file.
#
# All of these directives may appear inside <VirtualHost> containers,
# in which case these default settings will be overridden for the
# virtual host being defined.
#

#
# ServerAdmin: Your address, where problems with the server should be
# e-mailed.  This address appears on some server-generated pages, such
# as error documents.  e.g. admin@your-domain.com
#
ServerAdmin you@example.com

#
# ServerName gives the name and port that the server uses to identify itself.
# This can often be determined automatically, but we recommend you specify
# it explicitly to prevent problems during startup.
#
# If your host doesn't have a registered DNS name, enter its IP address here.
#
# ServerName www.example.com:80

#
# Deny access to the entirety of your server's filesystem. You must
# explicitly permit access to web content directories in other
# <Directory> blocks below.
#
<Directory />
    AllowOverride none
    Require all denied
</Directory>

#
# Note that from this point forward you must specifically allow
# particular features to be enabled - so if something's not working as
# you might expect, make sure that you have specifically enabled it
# below.
#

#
# DocumentRoot: The directory out of which you will serve your
# documents. By default, all requests are taken from this directory, but
# symbolic links and aliases may be used to point to other locations.
#
DocumentRoot "/usr/local/apache2/htdocs"
<Directory "/usr/local/apache2/htdocs">
    #
    # Possible values for the Options directive are "None", "All",
    # or any combination of:
    #   Indexes Includes FollowSymLinks SymLinksifOwnerMatch ExecCGI MultiViews
    #
    # Note that "MultiViews" must be named *explicitly* --- "Options All"
    # doesn't give it to you.
    #
    # The Options directive is both complicated and important.  Please see
    # http://httpd.apache.org/docs/2.4/mod/core.html#options
    # for more information.
    #
    Options Indexes FollowSymLinks

    #
    # AllowOverride controls what directives may be placed in .htaccess files.
    # It can be "All", "None", or any combination of the keywords:
    #   AllowOverride FileInfo AuthConfig Limit
    #
    AllowOverride None

    #
    # Controls who can get stuff from this server.
    #
    Require all granted
</Directory>

#
# DirectoryIndex: sets the file that Apache will serve if a directory
# is requested.
#
<IfModule dir_module>
    DirectoryIndex index.html
</IfModule>

#
# The following lines prevent .htaccess and .htpasswd files from being
# viewed by Web clients.
#
<Files ".ht*">
    Require all denied
</Files>

#
# ErrorLog: The location of the error log file.
# If you do not specify an ErrorLog directive within a <VirtualHost>
# container, error messages relating to that virtual host will be
# logged here.  If you *do* define an error logfile for a <VirtualHost>
# container, that host's errors will be logged there and not here.
#
ErrorLog /proc/self/fd/2

#
# LogLevel: Control the number of messages logged to the error_log.
# Possible values include: debug, info, notice, warn, error, crit,
# alert, emerg.
#
LogLevel warn

<IfModule log_config_module>
    #
    # The following directives define some format nicknames for use with
    # a CustomLog directive (see below).
    #
    LogFormat "%h %l %u %t \"%r\" %>s %b \"%{Referer}i\" \"%{User-Agent}i\"" combined
    LogFormat "%h %l %u %t \"%r\" %>s %b" common

    <IfModule logio_module>
      # You need to enable mod_logio.c to use %I and %O
      LogFormat "%h %l %u %t \"%r\" %>s %b \"%{Referer}i\" \"%{User-Agent}i\" %I %O" combinedio
    </IfModule>

    #
    # The location and format of the access logfile (Common Logfile Format).
    # If you do not define any access logfiles within a <VirtualHost>
    # container, they will be logged here.  Contrariwise, if you *do*
    # define per-<VirtualHost> access logfiles, transactions will be
    # logged therein and *not* in this file.
    #
    CustomLog /proc/self/fd/1 common

    #
    # If you prefer a logfile with access, agent, and referer information
    # (Combined Logfile Format) you can use the following directive.
    #
    #CustomLog "logs/access_log" combined
</IfModule>

<IfModule alias_module>
    #
    # Redirect: Allows you to tell clients about documents that used to
    # exist in your server's namespace, but do not anymore. The client
    # will make a new request for the document at its new location.
    # Example:
    # Redirect permanent /foo http://www.example.com/bar

    #
    # Alias: Maps web paths into filesystem paths and is used to
    # access content that does not live under the DocumentRoot.
    # Example:
    # Alias /webpath /full/filesystem/path
    #
    # If you include a trailing / on /webpath then the server will
    # require it to be present in the URL.  You will also likely
    # need to provide a <Directory> section to allow access to
    # the filesystem path.

    #
    # ScriptAlias: This controls which directories contain server scripts.
    # ScriptAliases are essentially the same as Aliases, except that
    # documents in the target directory are treated as applications and
    # run by the server when requested rather than as documents sent to the
    # client.  The same rules about trailing "/" apply to ScriptAlias
    # directives as to Alias.
    #
    ScriptAlias /cgi-bin/ "/usr/local/apache2/cgi-bin/"

</IfModule>

<IfModule cgid_module>
    #
    # ScriptSock: On threaded servers, designate the path to the UNIX
    # socket used to communicate with the CGI daemon of mod_cgid.
    #
    #Scriptsock cgisock
</IfModule>

#
# "/usr/local/apache2/cgi-bin" should be changed to whatever your ScriptAliased
# CGI directory exists, if you have that configured.
#
<Directory "/usr/local/apache2/cgi-bin">
    AllowOverride None
    Options None
    Require all granted
</Directory>

<IfModule headers_module>
    #
    # Avoid passing HTTP_PROXY environment to CGI's on this or any proxied
    # backend servers which have lingering "httpoxy" defects.
    # 'Proxy' request header is undefined by the IETF, not listed by IANA
    #
    RequestHeader unset Proxy early
</IfModule>

<IfModule mime_module>
    #
    # TypesConfig points to the file containing the list of mappings from
    # filename extension to MIME-type.
    #
    TypesConfig conf/mime.types

    #
    # AddType allows you to add to or override the MIME configuration
    # file specified in TypesConfig for specific file types.
    #
    #AddType application/x-gzip .tgz
    #
    # AddEncoding allows you to have certain browsers uncompress
    # information on the fly. Note: Not all browsers support this.
    #
    #AddEncoding x-compress .Z
    #AddEncoding x-gzip .gz .tgz
    #
    # If the AddEncoding directives above are commented-out, then you
    # probably should define those extensions to indicate media types:
    #
    AddType application/x-compress .Z
    AddType application/x-gzip .gz .tgz

    #
    # AddHandler allows you to map certain file extensions to "handlers":
    # actions unrelated to filetype. These can be either built into the server
    # or added with the Action directive (see below)
    #
    # To use CGI scripts outside of ScriptAliased directories:
    # (You will also need to add "ExecCGI" to the "Options" directive.)
    #
    #AddHandler cgi-script .cgi

    # For type maps (negotiated resources):
    #AddHandler type-map var

    #
    # Filters allow you to process content before it is sent to the client.
    #
    # To parse .shtml files for server-side includes (SSI):
    # (You will also need to add "Includes" to the "Options" directive.)
    #
    #AddType text/html .shtml
    #AddOutputFilter INCLUDES .shtml
</IfModule>

#
# The mod_mime_magic module allows the server to use various hints from the
# contents of the file itself to determine its type.  The MIMEMagicFile
# directive tells the module where the hint definitions are located.
#
# MIMEMagicFile conf/magic

#
# Customizable error responses come in three flavors:
# 1) plain text 2) local redirects 3) external redirects
#
# Some examples:
# ErrorDocument 500 "The server made a boo boo."
# ErrorDocument 404 /missing.html
# ErrorDocument 404 "/cgi-bin/missing_handler.pl"
# ErrorDocument 402 http://www.example.com/subscription_info.html
#

#
# MaxRanges: Maximum number of Ranges in a request before
# returning the entire resource, or one of the special
# values 'default', 'none' or 'unlimited'.
# Default setting is to accept 200 Ranges.
# MaxRanges unlimited

#
# EnableMMAP and EnableSendfile: On systems that support it,
# memory-mapping or the sendfile syscall may be used to deliver
# files.  This usually improves server performance, but must
# be turned off when serving from networked-mounted
# filesystems or if support for these functions is otherwise
# broken on your system.
# Defaults: EnableMMAP On, EnableSendfile Off
#
# EnableMMAP off
# EnableSendfile on

# Supplemental configuration
#
# The configuration files in the conf/extra/ directory can be
# included to add extra features or to modify the default configuration of
# the server, or you may simply copy their contents here and change as
# necessary.

# Server-pool management (MPM specific)
# Include conf/extra/httpd-mpm.conf

# Multi-language error messages
# Include conf/extra/httpd-multilang-errordoc.conf

# Fancy directory listings
# Include conf/extra/httpd-autoindex.conf

# Language settings
# Include conf/extra/httpd-languages.conf

# User home directories
# Include conf/extra/httpd-userdir.conf

# Real-time info on requests and configuration
# Include conf/extra/httpd-info.conf

# Virtual hosts
# Include conf/extra/httpd-vhosts.conf

# Local access to the Apache HTTP Server Manual
# Include conf/extra/httpd-manual.conf

# Distributed authoring and versioning (WebDAV)
# Include conf/extra/httpd-dav.conf

# Various default settings
# Include conf/extra/httpd-default.conf

# Configure mod_proxy_html to understand HTML4/XHTML1
<IfModule proxy_html_module>
Include conf/extra/proxy-html.conf
</IfModule>

# Secure (SSL/TLS) connections
# Include conf/extra/httpd-ssl.conf
#
# Note: The following must must be present to support
#       starting without SSL on platforms with no /dev/random equivalent
#       but a statically compiled-in mod_ssl.
#
<IfModule ssl_module>
SSLRandomSeed startup builtin
SSLRandomSeed connect builtin
</IfModule>
これで先ほどのプログラムソースマウント用の-vオプションに加えてもう一つ
httpd.confマウント用に
-v $PWD/apache/httpd.conf:/usr/local/apache2/conf/httpd.conf
も追加してdocker runします。
docker run --name my-apache-vim-container -p 80:80 -v $PWD/source:/usr/local/apache2/htdocs -v $PWD/apache/httpd.conf:/usr/local/apache2/conf/httpd.conf my-apache-vim-image
これでホスト側のhttpd.confをコンテナ側のhttpd.confにマウントしている状態です。
実際にホスト側ファイルを編集して反映されるか試してみます。
今回は例としてHTTPレスポンスヘッダーに
Apacheのバージョンが表示されないようにする設定を入れてみます。
セキュリティの基本としてよくあるやつです。
まずはChromeデベロッパーツールのNetworkタブで現状を確認します。
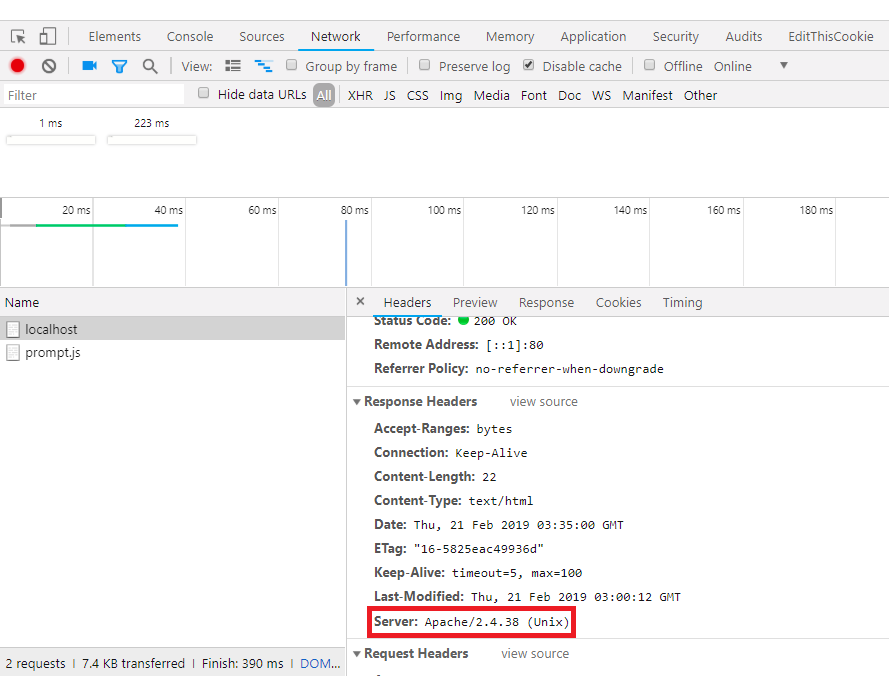
このようにレスポンス情報にApacheのバージョンが表示されています。
セキュリティ上好ましくない状態なので、
これが表示されないように設定変更します。
ホストPCにあるhttpd.confの最後にこの1行を追記します。
ServerTokens Prod
この時点でコンテナ側のhttpd.confにも変更が反映されていますが、
Apacheの設定変更はApacheを再起動しないと反映されません。
このコマンドでコンテナ自体を再起動しちゃいます。
docker restart my-apache-vim-container
これでもう一度 http://localhost にアクセスし、
Chromeデベロッパーツールで確認します。
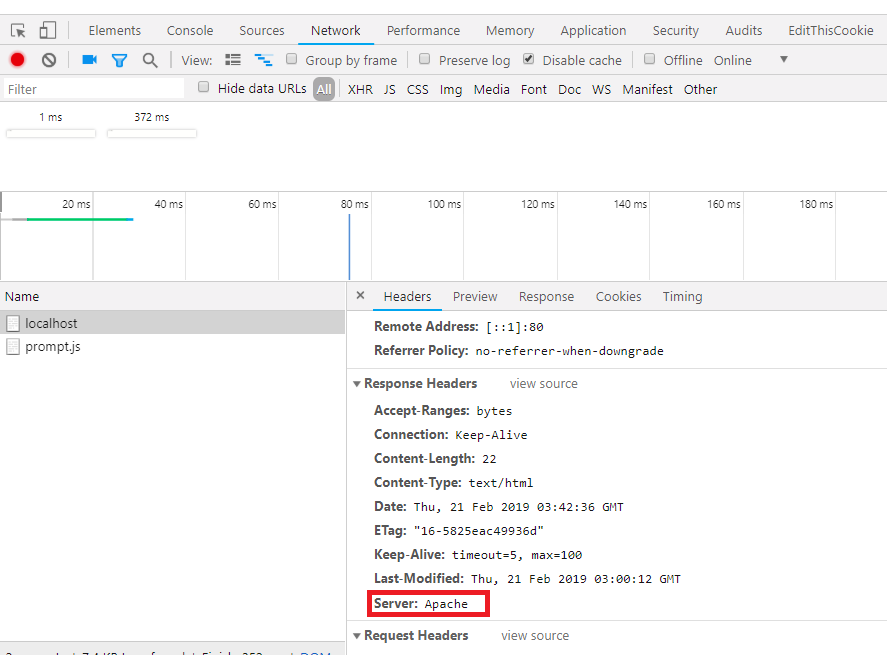
先ほどは表示されていたApacheバージョン情報が表示されていません。
これでApache設定ファイルのマウント作業も完了です。
まとめ
これでDockerによる環境構築の基本フロー一通りと、
プログラムソース、サーバ設定ファイルのマウントを実践できました。
現在自分のPCに置いてあるファイルは、
- Dockerfile
- プログラムソースファイル
- サーバ設定ファイル
です。
実際にDockerを使ってチームで開発を進める際には、
この3つを共有できる状態にすることを基本の形とするといいです。
次回
今回はコンテナ1つだけでいろいろ実践してみましたが、
実際のシステム開発では
DBサーバ用のコンテナを作ったり、
公開側システムと管理側システムでそれぞれコンテナを用意したり、
複数のコンテナを管理する必要が出てきます。
今回は最終的にdocker runコマンドに色々とオプションをつけて
すごく見づらく複雑なコマンドになっていましたが、
それをさらに複数コンテナ用に用意し管理していくのは非常に大変です。
そのような
複雑なオプションの複数のコンテナ管理
をわかりやすく簡単にしてくれるのが、
Docker Composeというツールです。
次回はこのDocker Composeを使って、
実際に複数コンテナを管理してみます。
(次に進む前に、LGTMしてもらえるとうれしいです)
【Docker Compose】設定内容を1行ずつ理解しながらLaravel環境構築(PHP-FPM、Nginx、MySQL、Redis)
