はじめに
WordPressのREST APIを使用して画像付きの記事を自動で投稿してみます。
環境
サーバー側
WordPress 5.2.4
クライアント側
Python 3.7.4
pip list
requests 2.22.0
Jinja2 2.10.3
事前準備
WordPressの認証には種類がいくつかありますが、今回はアプリケーションパスワードを使用します。
まずプラグインとしてApplication PasswordをWordPressにインストールします。
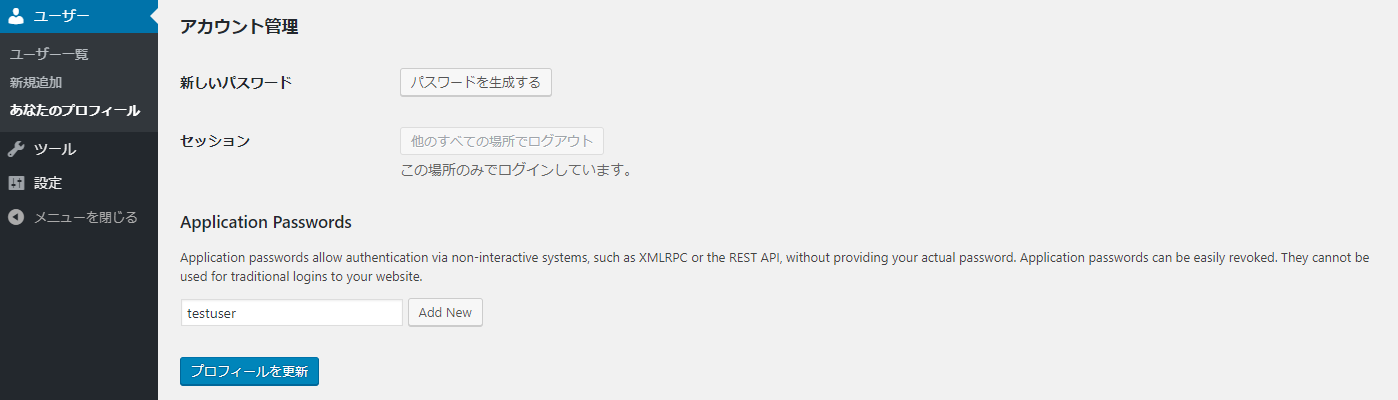
「ユーザ管理」→「あなたのプロフィール」画面で「Application Passwords」の項目が存在することを確認して投稿者権限を有するユーザ名を入力後、「Add User」ボタンを押下します。
パスワードが生成されるので控えておきます。
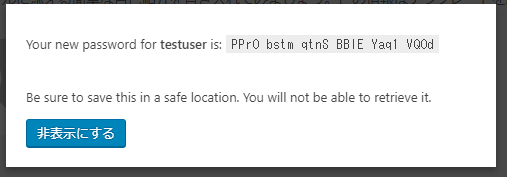
このユーザとパスワードの組み合わせでRESTAPIは動作しますが、ユーザ管理画面にはログインできません。また、管理画面から上記のパスワードをRevokeで取り消すことができます。
クライアントの実装例
まず、WordPressを操作するモジュールを用意します。
wordpress_ctrl.py
"""WORDPRESSの操作"""
import json
import os
import base64
import requests


class WordPressError(Exception):
    """WordPressのエラー情報"""
    def __init__(self, ctrl, status_code, reason, message):
        super(WordPressError, self).__init__()
        self.ctrl = ctrl
        self.status_code = status_code
        self.reason = reason
        self.message = message


class WordPressCtrl:
    """WordPressの操作"""

    def __init__(self, url, user, password):
        """初期化処理"""
        self.url = url
        auth_str = f"{user}:{password}"
        auth_base64_bytes = base64.b64encode(auth_str.encode(encoding='utf-8'))
        self.auth = auth_base64_bytes.decode(encoding='utf-8')

    def check_response(self, res, success_code):
        """WordPressからの応答をチェック"""
        try:
            json_object = json.loads(res.content)
        except ValueError as ex:
            raise WordPressError(self, res.status_code, res.reason, str(ex))
        if res.status_code != success_code:
            raise WordPressError(self, res.status_code, res.reason, json_object['message'])
        return json_object

    def add_post(self, title, content, categorie_ids=[], tag_ids=[]):
        """WordPressに記事を投稿"""
        headers = {
            'Authorization': 'Basic ' + self.auth
        }
        data = {
            'title': title,
            'content': content,
            'format': 'standard',
            'categories' : categorie_ids,
            'tags' : tag_ids
        }
        res = requests.post(f'{self.url}/wp-json/wp/v2/posts', json=data, headers=headers)
        return self.check_response(res, 201)

    def update_post(self, id, title, content, categorie_ids=[], tag_ids=[]):
        """WordPressの既存記事を更新"""
        headers = {
            'Authorization': 'Basic ' + self.auth
        }
        data = {
            'title': title,
            'content': content,
            'format': 'standard',
            'categories' : categorie_ids,
            'tags' : tag_ids
        }
        res = requests.post(f'{self.url}/wp-json/wp/v2/posts/{id}', json=data, headers=headers)
        return self.check_response(res, 200)

    def upload_media(self, path, content_type):
        """メディアのアップロード"""
        file_name = os.path.basename(path)
        headers = {
            'Authorization': 'Basic ' + self.auth,
            'Content-Type': content_type,
            'Content-Disposition' : 'attachiment; filename={filename}'.format(filename=file_name)
        }
        with open(path, 'rb') as media_file:
            data = media_file.read()
        res = requests.post(f'{self.url}/wp-json/wp/v2/media', data=data, headers=headers)
        return self.check_response(res, 201)

    def upload_png(self, path):
        """メディアにPNG画像を追加"""
        return self.upload_media(path, 'image/png')

    def upload_jpeg(self, path):
        """メディアにJPEG画像を追加"""
        return self.upload_media(path, 'image/jpeg')
つづいて、WORDPRESSに画像をアップロードして記事を追加するサンプルを以下に示します。
WordPressCtrlにはWORDPRESSのURL、ユーザー名、事前準備で作成したパスワードを指定してください。
from jinja2 import Template
from wordpress_ctrl import WordPressCtrl,WordPressError

data = {
    'data_list' : [
        {
            'name': '阿多田太郎',
            'age' : 15,
            'image_path' : 'test1.png'
        },
        {
            'name': 'アロハ太郎',
            'age' : 34,
            'image_path' : 'test2.png'
        }
    ]
}

wpctrl = WordPressCtrl('https://ワードプレスのURL', 'testuser', 'APIキー')

# 画像のアップロード
for item in data['data_list']:
    try:
        wpres = wpctrl.upload_png(item['image_path'])
        item['img_url'] = wpres['source_url']
    except WordPressError as ex:
        print(ex.status_code, ex.reason, ex.message)


html = """
<h2>結果</h2>
<table border=1>
    <tr>
      <th>名前</th>
      <th>年齢</th>
      <th>画像</th>
    </tr>
    {% for item in data_list %}
        <tr>
        <td>{{ item.name | e}}</td>
        <td>{{ item.age | e}}</td>
        <td><img src="{{ item.img_url | e}}" width=150/></td>
        </tr>
    {% endfor %}
</table>
"""
try:
    # 新規投稿
    wpres = wpctrl.add_post('タイトル', Template(html).render(data), [1], [3])
    print(wpres['id'])
    # 既存投稿の更新
    wpres = wpctrl.update_post(wpres['id'], 'タイトル(更新)', Template(html).render(data), [1,2], [3,4])
    print(wpres['id'], wpres['title'])

except WordPressError as ex:
    print(ex.status_code, ex.reason, ex.message)
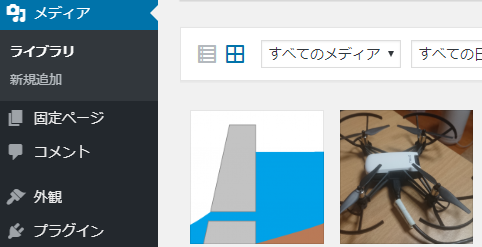
上記のプログラムを実行するとメディアに2つ画像が追加されます。
また投稿一覧に記事が1つ追加されます。

記事のプレビューは下記の通りです。
