はじめに
以前、こちらの記事でZoom Appsの"はじめて"記事を展開していましたが、Marketplaceのリニューアルなども経て、少し情報をアップデートするべく、2025年版 はじめてシリーズ の2025年最後の記事としてZoom Appsをお届けしたいと思います。
この記事はこれから Zoom Apps の開発を始める方向けに、2025年の最新Marketplaceフローに基づいたチュートリアルをお届けします。
Zoom Apps とは?
Zoom Appsは、Zoomクライアント内に 独自のWebアプリケーションを埋め込み 、Zoom Workplaceのサービス内外で利用できる機能です。
今回は実際にZoom Apps SDKを使って、サポートされているAPIの一覧を表示し、さらに バーチャル前景(Virtual Foreground)を設定するサンプルアプリ を作成していきます。
この記事で作るもの
- Zoom Apps SDKの初期化と利用可能なAPIの表示
-
setVirtualForegroundを使った前景画像の設定 - Zoom Apps内で動作するデバッグパネルの実装
対象読者
- Zoom Apps開発に興味がある方
- Node.js/Expressの基本的な知識がある方
- Zoomの開発者アカウントをお持ちの方
Zoom Appsの特徴
Zoom Appsには以下の特徴があります:
- Zoomクライアント内WebView: Zoomクライアント内にWebアプリケーションを表示
- Zoom Apps SDK: クライアント側でZoomの情報取得やアクション実行が可能
- 様々なSurface対応: Meetings, Contact Center, Events, Mailなど複数の環境で動作可能
事前準備
必要なもの
- Zoom開発者アカウント: Zoom Marketplaceでアカウント作成
- Node.js: v18以上推奨
- ngrok: HTTPSトンネリングツール(ローカル開発時のみ)
ngrokのセットアップ
ngrokは、ローカルサーバーをインターネットに公開するためのツールです。
# インストール(macOS/Homebrew)
brew install ngrok

# アカウント登録後、認証トークンを設定
ngrok config add-authtoken YOUR_AUTH_TOKEN
ngrokの無料プランでも、アカウントを作成すると固定URL(Static Domain)が1つ払い出されます。これにより、毎回URLが変わる問題を回避できます。
# 固定ドメインで起動(アカウント作成後に利用可能)
ngrok http 3000 --domain=your-subdomain.ngrok-free.app
固定ドメインは ngrok Dashboard から確認・設定できます。
Zoom Marketplaceでのアプリ作成
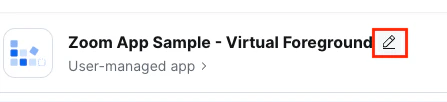
1. アプリの作成
- Zoom Marketplaceにサインイン
- 右上の「Develop」プルダウンから「Build App」を選択
- General Appを選択し、「Create」をクリック
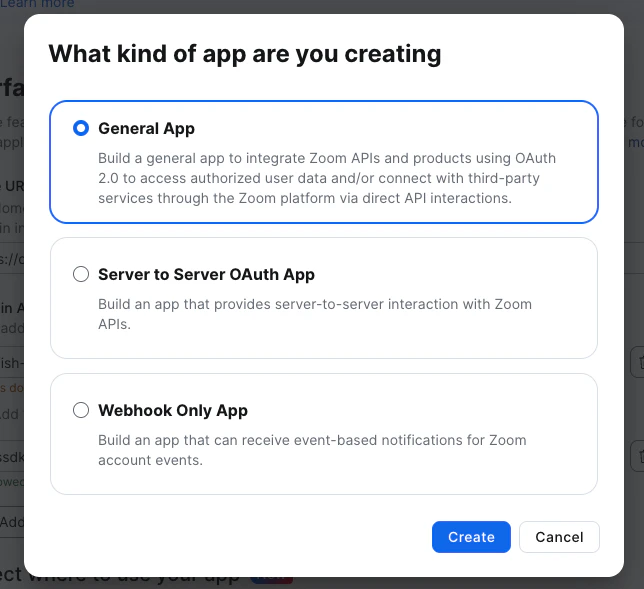
2. アプリ種別の選択
-
Choose app type:
User-managed appを選択- 個別ユーザーが追加・管理できるアプリタイプです
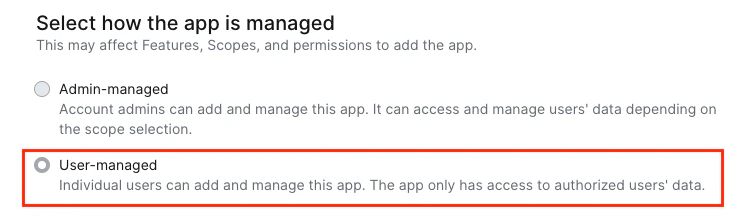
- 個別ユーザーが追加・管理できるアプリタイプです
-
App Name: 任意の名前(例:
My First Zoom App)- General Appsのアプリ名は、Create後の画面で変更可能です
- General Appsのアプリ名は、Create後の画面で変更可能です
3. App Credentials(認証情報)の設定
アプリ作成後、以下の設定を行います。
OAuth設定
| 項目 | 設定値 |
|---|---|
| Home URL | https://your-subdomain.ngrok-free.app/ |
| Redirect URL for OAuth | https://your-subdomain.ngrok-free.app/oauth |
💡 Point: Redirect URLを入力すると、OAuth Allow Listに自動で追加されます。手動での追加は不要です。
Domain Allow List
以下のドメインを追加します:
-
your-subdomain.ngrok-free.app(あなたのngrok URL) -
appssdk.zoom.us(Zoom Apps SDKのCDN)
その他、アプリで使用する外部ドメインがあれば必要に応じて追加してください。
4. Basic Information(基本情報)
| 項目 | 説明 |
|---|---|
| Short description | アプリの簡単な説明(150文字以内) |
| Long description | アプリの詳細な説明 |
| Company Name | 会社名または個人名 |
| Developer Contact Information | 連絡先情報 |
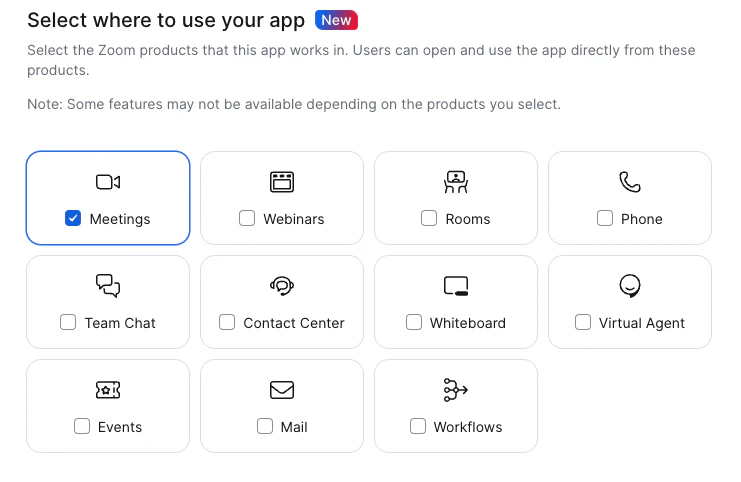
5. Features(Surface設定)
Surfaceの設定は、Zoom Appsがどの環境で動作するかを定義します。
Surface選択
- 左メニューから「Features」→「Surface」を選択
- 「Meetings」にチェック(ミーティング中にアプリを使用するため)
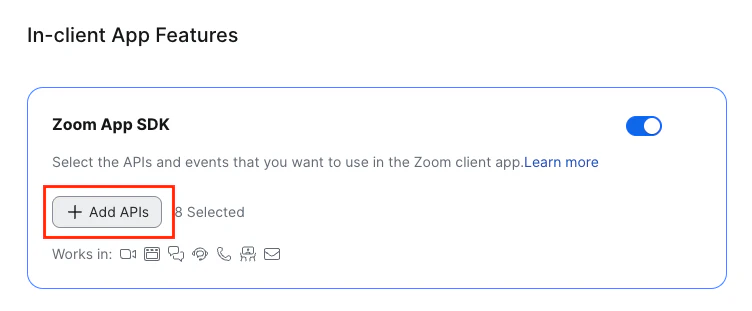
Zoom App SDK APIs
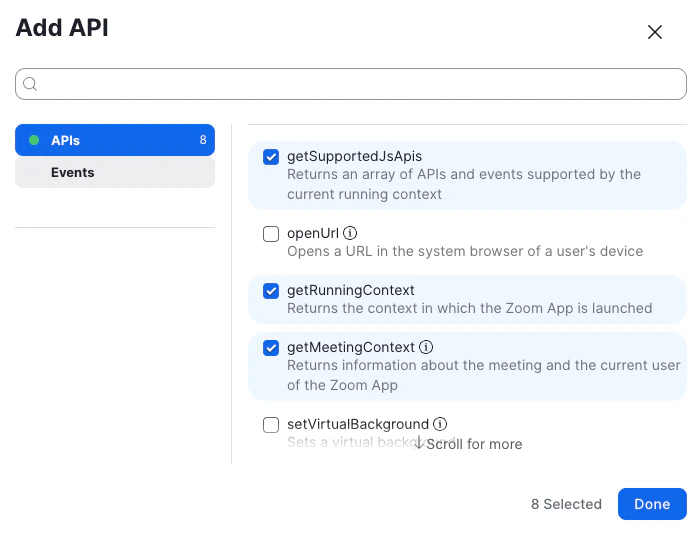
「+ Add APIs」をクリックして、以下のAPIを有効化します:
必須API(コンテキスト取得用)
-
getSupportedJsApis- 利用可能なAPIの一覧を取得 -
getRunningContext- 現在のコンテキスト(inMeeting等)を取得 -
getMeetingContext- ミーティング情報を取得(Host/Co-host限定) -
getUserContext- ユーザー情報を取得 -
getMeetingUUID- ミーティングUUIDを取得 -
getAppContext- アプリコンテキストを取得
Virtual Foreground用(今回の機能実装用)
-
setVirtualForeground- バーチャル前景を設定 -
removeVirtualForeground- バーチャル前景を削除
6. Scopes(権限設定)
Scopeとは?
ScopeはZoom REST APIを使用する際に必要な権限です。
-
Zoom Apps SDK のみ使用する場合: デフォルトの
zoomapp:inmeetingのみでOK -
Zoom REST APIも使用する場合: 必要なScopeを追加(例:
meeting:readなど)
今回の記事ではZoom Apps SDKのみを使用するため、Scopeの追加は不要です。デフォルトのまま進んでください。
RTMSを使う場合は meeting:read:meeting_audio などのScopeが必要になります。詳しくはRTMS公式ドキュメントや以下の記事を参照してください。
7. 設定の保存
全ての設定が完了したら、左メニューの「Local Test」から動作確認の準備を行います(後述)。
サーバーサイドの実装
プロジェクト構造
zoom-apps-sample/
├── server.js           # メインサーバー
├── package.json
├── .env                # 環境変数
└── public/
    ├── index.html      # メインUI
    ├── app.js          # クライアントロジック
    └── style.css       # スタイル
Step 1: プロジェクトの初期化
mkdir zoom-apps-sample && cd zoom-apps-sample
npm init -y
npm install express cors dotenv
Step 2: 環境変数の設定
.envファイルを作成します:
# Server Configuration
PORT=3000
Step 3: メインサーバーの作成
サーバーの準備
server.jsを作成します。
// server.js

// Must be set before any require statements (for ngrok SSL issues in development)
process.env.NODE_TLS_REJECT_UNAUTHORIZED = '0';

require('dotenv').config();
const express = require('express');
const cors = require('cors');
const path = require('path');

const app = express();
const port = process.env.PORT || 3000;
ローカルでテストする際、Zoom Apps側がSelf-Signedを許容しない場合があるため、ローカル開発時にのみ process.env.NODE_TLS_REJECT_UNAUTHORIZED = '0';を入れておく必要があります。本番では絶対に使わないでください。
OWASPヘッダーの設定と静的ファイルのホスト
// ============================================================
// OWASP Security Headers - MUST BE FIRST!
// These headers are REQUIRED for Zoom Apps.
// If placed after express.static, they won't be applied to static files!
// ============================================================
app.use((req, res, next) => {
  res.setHeader('Strict-Transport-Security', 'max-age=31536000; includeSubDomains');
  res.setHeader('X-Content-Type-Options', 'nosniff');
  res.setHeader('X-Frame-Options', 'SAMEORIGIN');
  res.setHeader('X-XSS-Protection', '1; mode=block');
  res.setHeader('Referrer-Policy', 'strict-origin-when-cross-origin');
  res.setHeader('Permissions-Policy', 'geolocation=(), microphone=(), camera=()');
  res.setHeader('Content-Security-Policy', [
    "default-src 'self'",
    "script-src 'self' 'unsafe-inline' 'unsafe-eval' https://appssdk.zoom.us",
    "style-src 'self' 'unsafe-inline'",
    "connect-src 'self' wss: ws: https://appssdk.zoom.us",
    "frame-ancestors 'self' https://*.zoom.us",
    "frame-src 'self'"
  ].join('; '));
  next();
});

// Other middleware AFTER OWASP headers
app.use(express.json());
app.use(cors());

// Static files AFTER OWASP headers
app.use(express.static(path.join(__dirname, 'public')));
OWASPセキュリティヘッダーは必ず最初に設定してください。express.staticより後に書くと、静的ファイルにヘッダーがつきません。またOWASPセキュリティヘッダーが存在しない場合、Zoom AppsのWebViewとして表示できません 。
参考:デバッグコンソールの追加
Zoom Apps内では開発者ツールが使えません。そのため、必須ではありませんがデバッグ用にAppsのUIやサーバ側で、クライアントからのログを受け取るエンドポイントを追加しておくと便利です。
// ============================================================
// Client-side Debug Log Receiver
// ============================================================
app.post('/api/log', (req, res) => {
  const { level, message, data, timestamp } = req.body;
  const logPrefix = `[CLIENT ${level.toUpperCase()}] [${timestamp}]`;

  if (data) {
    console.log(logPrefix, message, JSON.stringify(data, null, 2));
  } else {
    console.log(logPrefix, message);
  }

  res.json({ received: true });
});
2025/12/24 追記:すみません。実は方法がありました。Zoomクライアント内のアプリのWebViewインスタンスで開発者ツールを有効にするには、以下の手順に従ってください。
まず、 Zoom クライアントを一旦終了 した上で、次の操作を実行します。
Windowsの場合: %appdata%/Zoom/data ディレクトリにある zoom.us.ini ファイルに以下の行を追加します。このファイルは にあります。
[ZoomChat]
webview.context.menu=true
Macの場合:
defaults write ZoomChat webview.context.menu true
その後、再度 Zoom クライアントを起動し、改めてZoom Appsを表示すると、 右クリックでデバッグコンソールが表示されるようになります。(すいませんスクショ撮るの忘れました)
OAuth認証リダイレクト先エンドポイント
OAuth認証のリダイレクト先を追加します:
// ============================================================
// OAuth Redirect Handler
// ============================================================
app.get('/oauth', (req, res) => {
if (req.query.code) {
console.log('OAuth code received:', req.query.code);
}
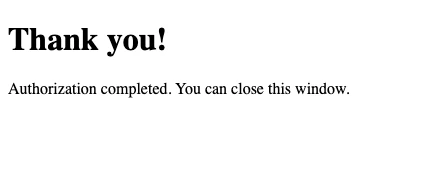
res.send(`
<!DOCTYPE html>
<html>
<head><title>Authorization Complete</title></head>
<body>
<h1>Thank you!</h1>
<p>Authorization completed. You can close this window.</p>
</body>
</html>
`);
});
サーバー待受
最後にサーバーを起動します:
// ============================================================
// Start Server
// ============================================================
app.listen(port, () => {
  console.log(`Zoom Apps Sample Server running on port ${port}`);
});
クライアントサイドの実装
Step 4: HTMLの作成
public/index.htmlを作成します:
<!DOCTYPE html>
<html lang="en">
<head>
  <meta charset="UTF-8">
  <meta name="viewport" content="width=device-width, initial-scale=1.0">
  <title>Zoom Apps Sample</title>
  <link rel="stylesheet" href="style.css">
</head>
<body>
  <div class="container">
    <h1>Zoom Apps Sample</h1>

    <!-- Status Indicator -->
    <div id="status" class="status loading">
      Initializing Zoom SDK...
    </div>

    <!-- Running Context -->
    <section class="section">
      <h2>📍 Running Context</h2>
      <div id="running-context" class="info-box">-</div>
    </section>

    <!-- Supported APIs -->
    <section class="section">
      <h2>📋 Supported JS APIs</h2>
      <div id="supported-apis" class="info-box scrollable">-</div>
    </section>

    <!-- Virtual Foreground Controls -->
    <section class="section">
      <h2>🖼️ Virtual Foreground</h2>
      <div class="button-group">
        <button id="btn-set-foreground" class="btn btn-primary" disabled>
          Set Virtual Foreground
        </button>
        <button id="btn-remove-foreground" class="btn btn-secondary" disabled>
          Remove Virtual Foreground
        </button>
      </div>
      <div id="foreground-status" class="info-box">-</div>
    </section>

    <!-- Debug Panel -->
    <section class="section">
      <h2>⚡️ Debug Panel</h2>
      <div class="debug-controls">
        <button id="btn-toggle-debug" class="btn btn-small">Toggle Details</button>
        <button id="btn-clear-debug" class="btn btn-small">Clear</button>
      </div>
      <div id="debug-panel" class="debug-panel">
        <div id="debug-content"></div>
      </div>
      <p class="hint">
        💡To Copy the client log, use Ctrl+C/Cmd+C.
      </p>
    </section>
  </div>

  <!-- Zoom Apps SDK -->
  <script src="https://appssdk.zoom.us/sdk.js"></script>
  <script src="app.js"></script>
</body>
</html>
Step 5: Virtual Foreground機能の追加
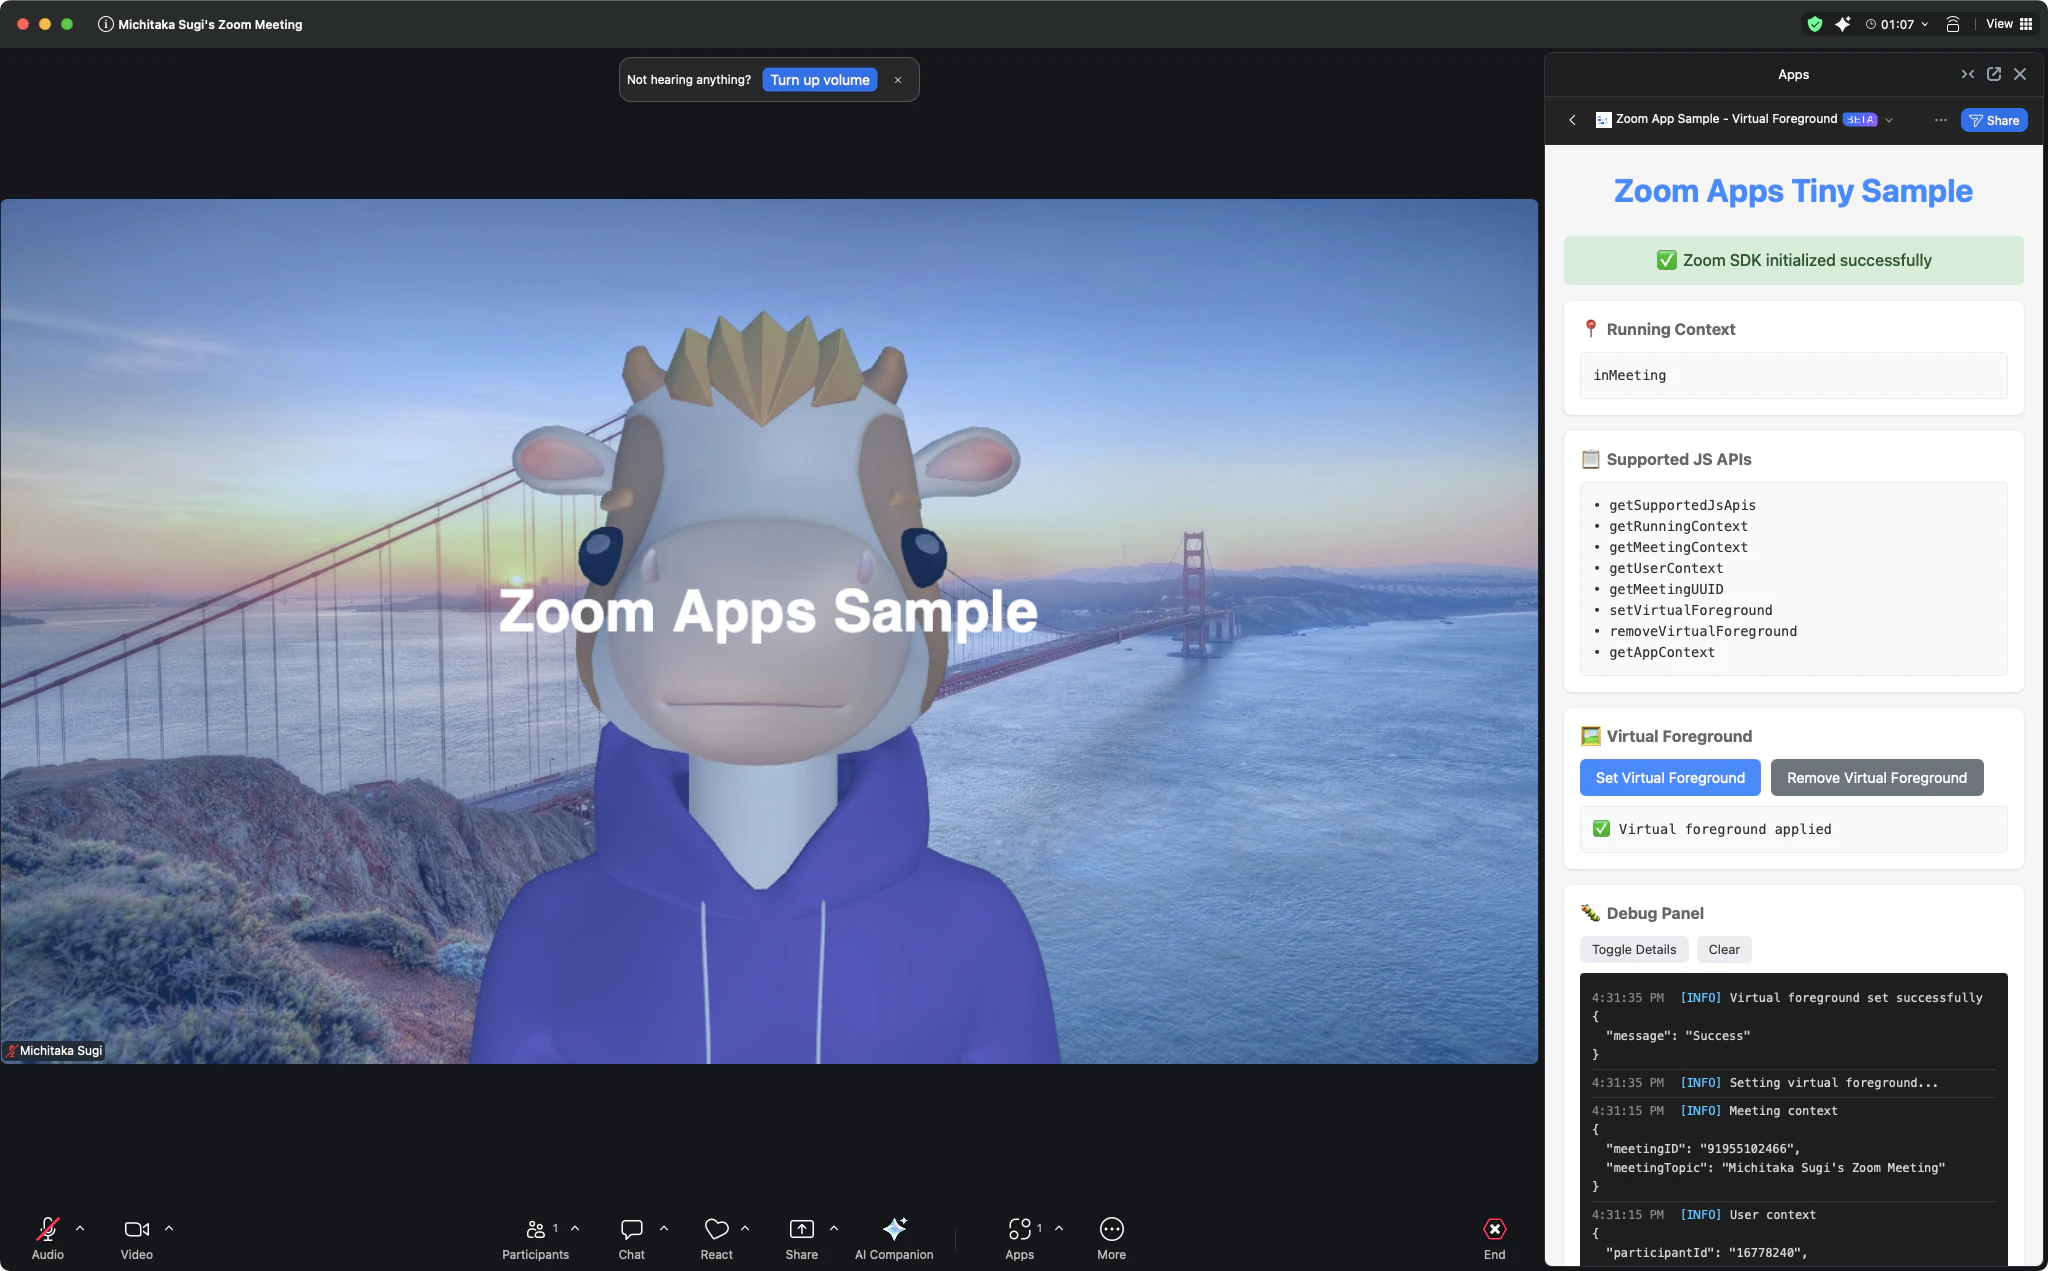
先ほどAppsのScopeに入れた、Virtual ForegroundのAPIを呼び出す処理を追加します。今回はなんでも良いのですが、ひとまず全体を覆う形で半透明なcanvasを追加して、その上にテキストを置いてみることにします。
// ============================================================
// Virtual Foreground Functions
// ============================================================
async function setVirtualForeground() {
  debug('info', 'Setting virtual foreground...');

  try {
    // Create a simple semi-transparent overlay image
    const canvas = document.createElement('canvas');
    canvas.width = 1280;
    canvas.height = 720;
    const ctx = canvas.getContext('2d');

    // Draw semi-transparent background
    ctx.fillStyle = 'rgba(45, 140, 255, 0.3)';
    ctx.fillRect(0, 0, canvas.width, canvas.height);

    // Add text
    ctx.fillStyle = 'white';
    ctx.font = 'bold 48px sans-serif';
    ctx.textAlign = 'center';
    ctx.fillText('#ZoomAhead', canvas.width / 2, canvas.height / 2);

    // Get image data
    const imageData = ctx.getImageData(0, 0, canvas.width, canvas.height);

    // Call Zoom SDK
    const result = await zoomSdk.setVirtualForeground({ imageData });

    debug('info', 'Virtual foreground set successfully', result);
    setForegroundStatus('✅ Virtual foreground applied');
  } catch (error) {
    debug('error', 'Failed to set virtual foreground', {
      message: error.message,
      code: error.code
    });
    setForegroundStatus(`❌ Error: ${error.message}`);
  }
}

async function removeVirtualForeground() {
  debug('info', 'Removing virtual foreground...');

  try {
    const result = await zoomSdk.removeVirtualForeground();
    debug('info', 'Virtual foreground removed', result);
    setForegroundStatus('✅ Virtual foreground removed');
  } catch (error) {
    debug('error', 'Failed to remove virtual foreground', {
      message: error.message,
      code: error.code
    });
    setForegroundStatus(`❌ Error: ${error.message}`);
  }
}
Zoom SDKの初期化処理を追加します:
// ============================================================
// Initialize Zoom SDK
// ============================================================
async function initializeZoomSDK() {
  debug('info', 'Initializing Zoom Apps SDK...');

  try {
    // Configure SDK with required capabilities
    const configResponse = await zoomSdk.config({
      version: '0.16.31',
      capabilities: [
        // Context APIs
        'getSupportedJsApis',
        'getRunningContext',
        'getMeetingContext',
        'getUserContext',
        'getMeetingUUID',
        'getAppContext',
        // Virtual Foreground APIs
        'setVirtualForeground',
        'removeVirtualForeground'
      ]
    });

    debug('info', 'SDK configured', configResponse);

    // Get supported APIs
    // Note: The response has "supportedApis" property (not "apis")
    const response = await zoomSdk.getSupportedJsApis();
    const supportedApis = response.supportedApis || [];
    debug('info', 'Supported APIs retrieved', { count: supportedApis.length });
    setSupportedApis(supportedApis);

    // Get running context
    const runningContext = await zoomSdk.getRunningContext();
    debug('info', 'Running context', runningContext);
    setRunningContext(runningContext.context || 'Unknown');

    // Get user context
    try {
      const userContext = await zoomSdk.getUserContext();
      debug('info', 'User context', userContext);
    } catch (e) {
      debug('warn', 'getUserContext failed (may require authentication)', { message: e.message });
    }

    // Get meeting context (host only)
    try {
      const meetingContext = await zoomSdk.getMeetingContext();
      debug('info', 'Meeting context', meetingContext);
    } catch (e) {
      debug('warn', 'getMeetingContext failed (host/co-host only)', { message: e.message });
    }

    // Success!
    setStatus('success', '✅ Zoom SDK initialized successfully');
    enableButtons();

  } catch (error) {
    debug('error', 'SDK initialization failed', {
      message: error.message,
      code: error.code
    });
    setStatus('error', `❌ SDK Error: ${error.message}`);
  }
}
最後にイベントリスナーを設定します:
// ============================================================
// Event Listeners
// ============================================================
document.addEventListener('DOMContentLoaded', () => {
  // Initialize SDK
  initializeZoomSDK();

  // Button handlers
  document.getElementById('btn-set-foreground').addEventListener('click', setVirtualForeground);
  document.getElementById('btn-remove-foreground').addEventListener('click', removeVirtualForeground);

  // Debug panel controls
  document.getElementById('btn-toggle-debug').addEventListener('click', () => {
    const panel = document.getElementById('debug-panel');
    panel.style.display = panel.style.display === 'none' ? 'block' : 'none';
  });

  document.getElementById('btn-clear-debug').addEventListener('click', () => {
    debugLog.length = 0;
    updateDebugPanel();
  });
});
テストの手順
1. サーバーの起動
node server.js
2. ngrokの起動
別のターミナルで:
# 固定ドメインを使用する場合
ngrok http 3000 --domain=your-subdomain.ngrok-free.app

# または通常起動
ngrok http 3000
3. Zoom Marketplaceでのテスト設定
- Zoom Marketplaceで作成したアプリの設定画面を開く
- 「Local Test」をクリック
- 「Add」ボタンをクリックしてアプリを追加→ローカルサーバが認証完了を表示
4. Zoomミーティングでのテスト
- Zoomデスクトップクライアントでミーティングを開始
- ミーティングツールバーの「Apps」をクリック
- 追加したアプリを選択
- アプリが起動し、サポートされているAPIの一覧が表示されることを確認
- 「Set Virtual Foreground」ボタンをクリックして動作を確認
トラブルシューティング
OWASPヘッダーの警告が消えない / 画面が真っ白になる
症状: Marketplaceの設定画面で「Home URL is missing required OWASP response header(s)」と表示される。または、Zoom Apps内で画面が真っ白になる。
原因: OWASPセキュリティヘッダーが正しく設定されていない、またはExpressのミドルウェアの順序が間違っている。
OWASPヘッダーはexpress.staticより前に設定する必要があります:
app.use((req, res, next) => {
  res.setHeader('Strict-Transport-Security', '...');
  // ...
  next();
});
app.use(express.static(path.join(__dirname, 'public')));
ヘッダーの確認方法:
curl -I https://your-ngrok-url.ngrok-free.app/
エラー: fetch failed (SELF_SIGNED_CERT_IN_CHAIN)
原因: ngrok経由でのSSL証明書検証エラー
対処法: 開発環境では、server.jsの最初に以下を追加:
// Must be FIRST, before any require statements
process.env.NODE_TLS_REJECT_UNAUTHORIZED = '0';

require('dotenv').config();
// ...
何度も言いますが、この設定は開発環境でのみ使用してください。
エラー: 80004 (app_not_support)
原因: Zoom Apps SDKで必要なAPIがMarketplaceで許可されていない
対処法:
- Zoom Marketplaceでアプリの設定画面を開く
- 「Features」→「Surface」を選択
- 「Zoom App SDK」セクションで「+ Add APIs」をクリック
- 使用するAPIにチェックを入れて「Done」をクリック
ミーティング外で起動した場合
症状: getRunningContextがinMainClientを返し、一部のAPIが使えない
原因: ミーティングに参加していない状態でアプリを起動している
対処法:
- ミーティングに参加してからアプリを起動
-
getRunningContextの結果を確認して、inMeetingでない場合は適切なメッセージを表示
const runningContext = await zoomSdk.getRunningContext();
if (runningContext.context !== 'inMeeting') {
  setStatus('warn', 'Please join a meeting to use all features');
}
Guest Modeでの制限
症状: 一部のAPIが80012 (require_meeting_role)エラーを返す
原因: ゲストユーザー(アカウント外ユーザー)には一部のAPIが制限されている
制限されるAPI:
-
getMeetingContext- Host/Co-hostのみ -
getMeetingParticipants- 認証ユーザーのみ
対処法:
- エラーハンドリングを追加して、ゲストユーザーでも基本機能が動作するようにする
-
getUserContextでstatus: "unauthenticated"をチェック
const userContext = await zoomSdk.getUserContext();
if (userContext.status === 'unauthenticated') {
  debug('info', 'Guest mode detected - some features may be limited');
}
Client ID/Secretの混乱(Development vs Production)
症状: アプリが認証エラーで動作しない、または別のアプリが起動する
原因: MarketplaceにはDevelopmentタブとProductionタブがあり、それぞれ異なるClient ID/Secretが発行される。両方でAdd Appした場合、Zoomクライアントのアプリリストには同じ名前で2つ表示されるため混乱しやすい。
.envにどちらの環境のCredentialsを使っているかコメントを記載しておくなど、忘れないようにしてください。
# App: My First Zoom App (Development mode)
# Marketplace URL: https://marketplace.zoom.us/develop/applications/xxxxx
ZOOM_CLIENT_ID=your_development_client_id
ZOOM_CLIENT_SECRET=your_development_client_secret
APIがSupportedに含まれているのに動作しない
原因: Marketplaceでの設定とコード上のcapabilitiesの不一致
対処法:
-
zoomSdk.config()のcapabilitiesに使用するAPIを追加 - MarketplaceのZoom App SDK APIsで同じAPIを有効化
- アプリを再追加(Local Test → Remove → Add)
番外編: Contact CenterとEngagement API
先ほどの画像にも合った通り、Zoom Meeting以外にもさまざまなプロダクトで利用可能です。例えば、Zoom Contact Center(ZCC)でもZoom Appsを活用できます。
Surface設定の追加
- Marketplaceの「Features」→「Surface」を開く
- 「Contact Center」にチェックを入れる
Engagement APIの有効化
Contact Centerで顧客との対話(Engagement)情報を取得するには、以下のAPIを追加します:
- 「+ Add APIs」をクリック
- 検索ボックスに「engagement」と入力
- 以下のAPIを有効化:
-
getEngagementContext- Engagementコンテキストを取得 -
getEngagementSecurableStatus- メディアリダイレクションの可否を確認 -
getEngagementStatus- 現在のEngagementステータスを取得 -
getEngagementVariableValue- 変数値を取得
-
コード例
// SDK configにEngagement APIを追加
const configResponse = await zoomSdk.config({
  version: '0.16.31',
  capabilities: [
    // ... 既存のcapabilities
    'getEngagementContext',
    'getEngagementSecurableStatus',
    'getEngagementStatus',
    'getEngagementVariableValue'
  ]
});

// Engagement情報の取得
async function getEngagementInfo() {
  try {
    const context = await zoomSdk.getEngagementContext();
    console.log('Engagement Context:', context);

    const status = await zoomSdk.getEngagementStatus();
    console.log('Engagement Status:', status);
  } catch (error) {
    console.error('Engagement API error:', error);
  }
}
まとめ
この記事では、2025年版のZoom Apps開発の基本的な流れを解説しました。Zoomクライアントの状態に応じてさまざまな情報を取得でき、かつ WebViewという立ち位置を活かして外部連携なども可能 なため、外部とのリアルタイムな連携に活用することができるツールです。RTMSなどのツールもこのZoom Appsと連携することで(必須ではありません)さまざまな活用方法が考えられます。
是非一度お試しください。
参考リンク