動機
姿勢推定AIというものをご存じでしょうか?
画像認識AIの中でも人間の位置を抽出するものは有名ですが、AIはさらに検出した人の頭や手・足などの部位の特定まで行うことができます。一見ハードルが高そうなのですが、今回の記事では姿勢推定AIが意外と簡単に実現できるよ~ということに加えて、姿勢推定AIを利用した様々なアプリケーションを紹介し、姿勢推定AIの応用可能性についてお伝えできれば良いかなと思います。
使用ソフトウェアとバージョン
- Python 3.6
- Tensorflow 2.2.0
- その他OpenCV等のライブラリ
動作サンプルとソースコード

(出演:みきをさん @michelle0915)
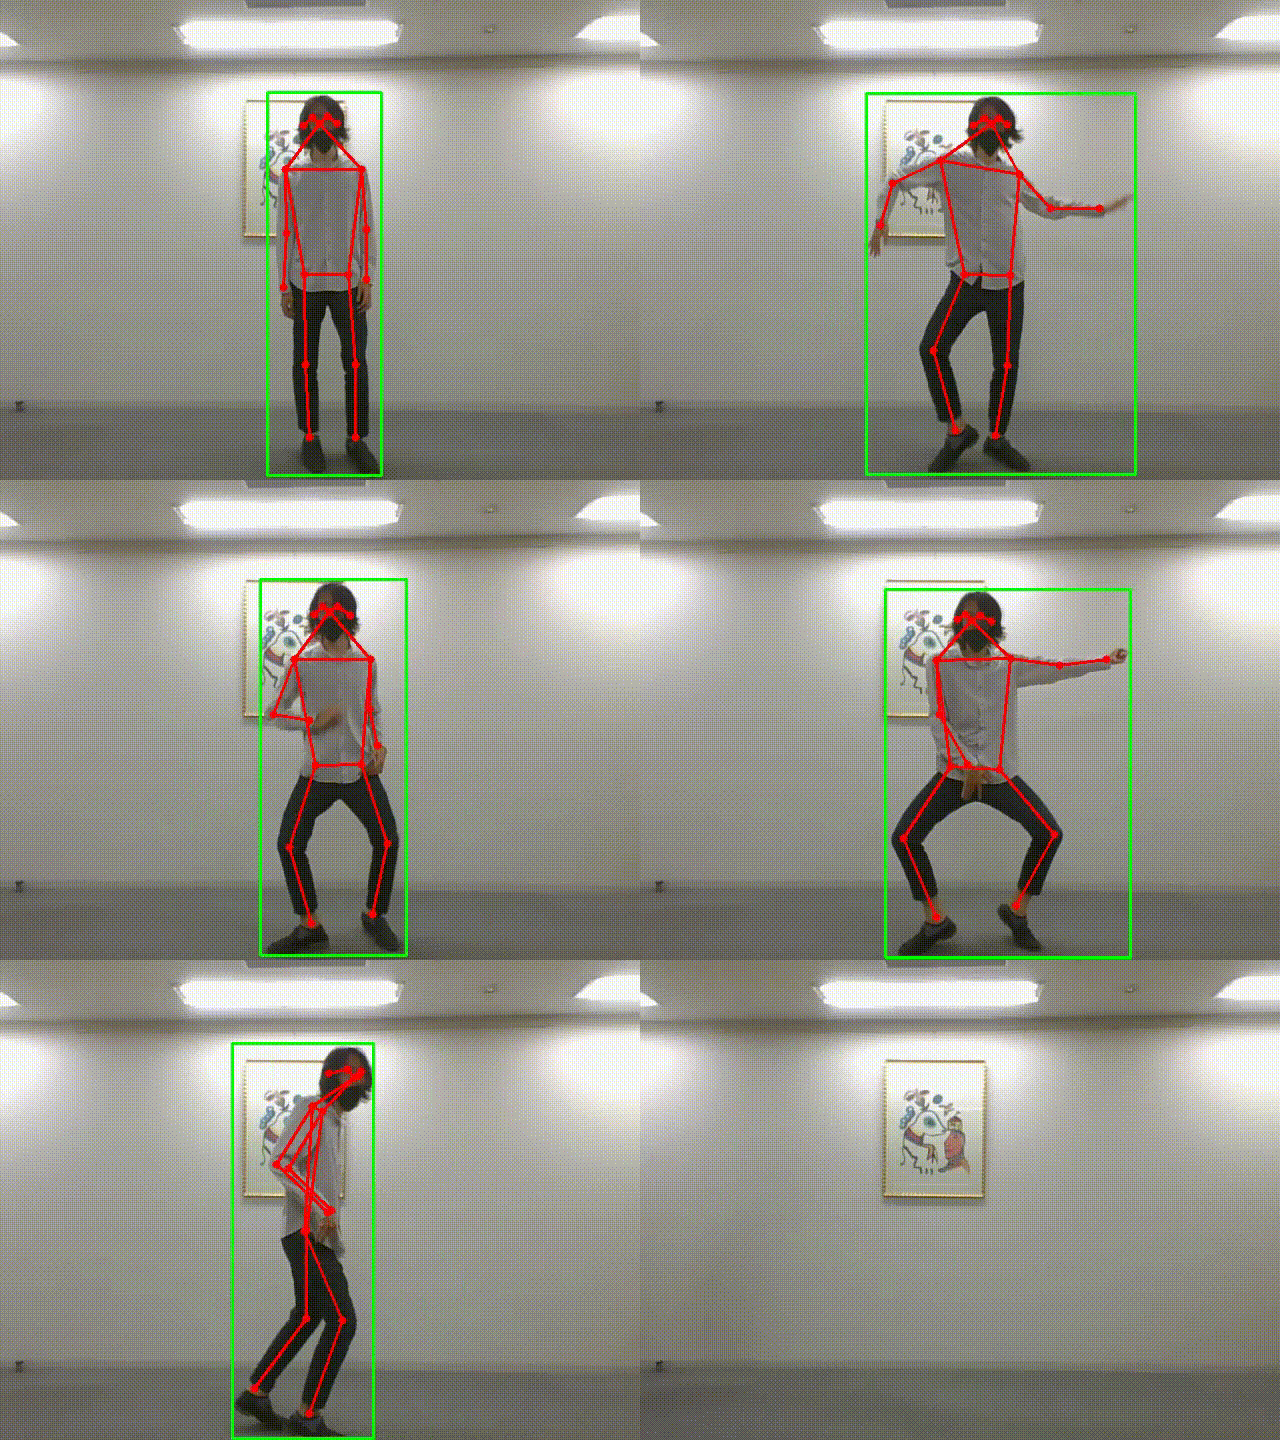
まずは姿勢推定AIの実行結果です。
今回使用したAIモデルはMoveNet1と呼ばれるモデルで、検出した人の領域から17点のキーポイント(鼻、目、肘、手首、膝など)を抽出します。仕様上最大6人までの推定が可能です。静止画に対して推論可能ですが、自分の場合はPCのカメラで撮影した動画の各フレームにAI処理を加えてリアルタイム表示しています。
以下、今回使用したソースコードです。
import cv2
import numpy as np

import tensorflow as tf
import tensorflow_hub as hub

KEYPOINT_THRESHOLD = 0.2

def main():
    # Tensorflow Hubを利用してモデルダウンロード
    model = hub.load('https://tfhub.dev/google/movenet/multipose/lightning/1')
    movenet = model.signatures['serving_default']

    # カメラ設定
    cap = cv2.VideoCapture(0)
    cap.set(cv2.CAP_PROP_BUFFERSIZE, 1)

    while(True):
        ret, frame = cap.read()
        if not ret:
            break

        # 推論実行
        keypoints_list, scores_list, bbox_list = run_inference(movenet, frame)

        # 画像レンダリング
        result_image = render(frame, keypoints_list, scores_list, bbox_list)

        cv2.namedWindow("image", cv2.WINDOW_FULLSCREEN)
        cv2.imshow('image', result_image)
        key = cv2.waitKey(1) & 0xFF
        # Q押下で終了
        if key == ord('q'):
            break

    cap.release()

def run_inference(model, image):
    # 画像の前処理
    input_image = cv2.resize(image, dsize=(256, 256))
    input_image = cv2.cvtColor(input_image, cv2.COLOR_BGR2RGB)
    input_image = np.expand_dims(input_image, 0)
    input_image = tf.cast(input_image, dtype=tf.int32)

    # 推論実行・結果取得
    outputs = model(input_image)
    keypoints = np.squeeze(outputs['output_0'].numpy())

    image_height, image_width = image.shape[:2]
    keypoints_list, scores_list, bbox_list = [], [], []

    # 検出した人物ごとにキーポイントのフォーマット処理
    for kp in keypoints:
        keypoints = []
        scores = []
        for index in range(17):
            kp_x = int(image_width * kp[index*3+1])
            kp_y = int(image_height * kp[index*3+0])
            score = kp[index*3+2]
            keypoints.append([kp_x, kp_y])
            scores.append(score)
        bbox_ymin = int(image_height * kp[51])
        bbox_xmin = int(image_width * kp[52])
        bbox_ymax = int(image_height * kp[53])
        bbox_xmax = int(image_width * kp[54])
        bbox_score = kp[55]

        keypoints_list.append(keypoints)
        scores_list.append(scores)
        bbox_list.append([bbox_xmin, bbox_ymin, bbox_xmax, bbox_ymax, bbox_score])

    return keypoints_list, scores_list, bbox_list

def render(image, keypoints_list, scores_list, bbox_list):
    render = image.copy()
    for i, (keypoints, scores, bbox) in enumerate(zip(keypoints_list, scores_list, bbox_list)):
        if bbox[4] < 0.2:
            continue

        cv2.rectangle(render, (bbox[0], bbox[1]), (bbox[2], bbox[3]), (0,255,0), 2)

        # 0:nose, 1:left eye, 2:right eye, 3:left ear, 4:right ear, 5:left shoulder, 6:right shoulder, 7:left elbow, 8:right elbow, 9:left wrist, 10:right wrist,
        # 11:left hip, 12:right hip, 13:left knee, 14:right knee, 15:left ankle, 16:right ankle
        # 接続するキーポイントの組
        kp_links = [
            (0,1),(0,2),(1,3),(2,4),(0,5),(0,6),(5,6),(5,7),(7,9),(6,8),
            (8,10),(11,12),(5,11),(11,13),(13,15),(6,12),(12,14),(14,16)
        ]
        for kp_idx_1, kp_idx_2 in kp_links:
            kp_1 = keypoints[kp_idx_1]
            kp_2 = keypoints[kp_idx_2]
            score_1 = scores[kp_idx_1]
            score_2 = scores[kp_idx_2]
            if score_1 > KEYPOINT_THRESHOLD and score_2 > KEYPOINT_THRESHOLD:
                cv2.line(render, tuple(kp_1), tuple(kp_2), (0,0,255), 2)

        for idx, (keypoint, score) in enumerate(zip(keypoints, scores)):
            if score > KEYPOINT_THRESHOLD:
                cv2.circle(render, tuple(keypoint), 4, (0,0,255), -1)

    return render

if __name__ == '__main__':
    main()
AIモデルの準備や推論のためのコードはほんの数行です。ほとんどのコードはAI出力後のキーポイントの処理に充てられていますね。
姿勢推定AIを応用したデモアプリ
姿勢推定AIの動作イメージが掴めたところで、これを応用したデモアプリを紹介します。基本的には出力されたキーポイントに後処理を加えることで実現できるものばかりです。
挙手判定アプリ
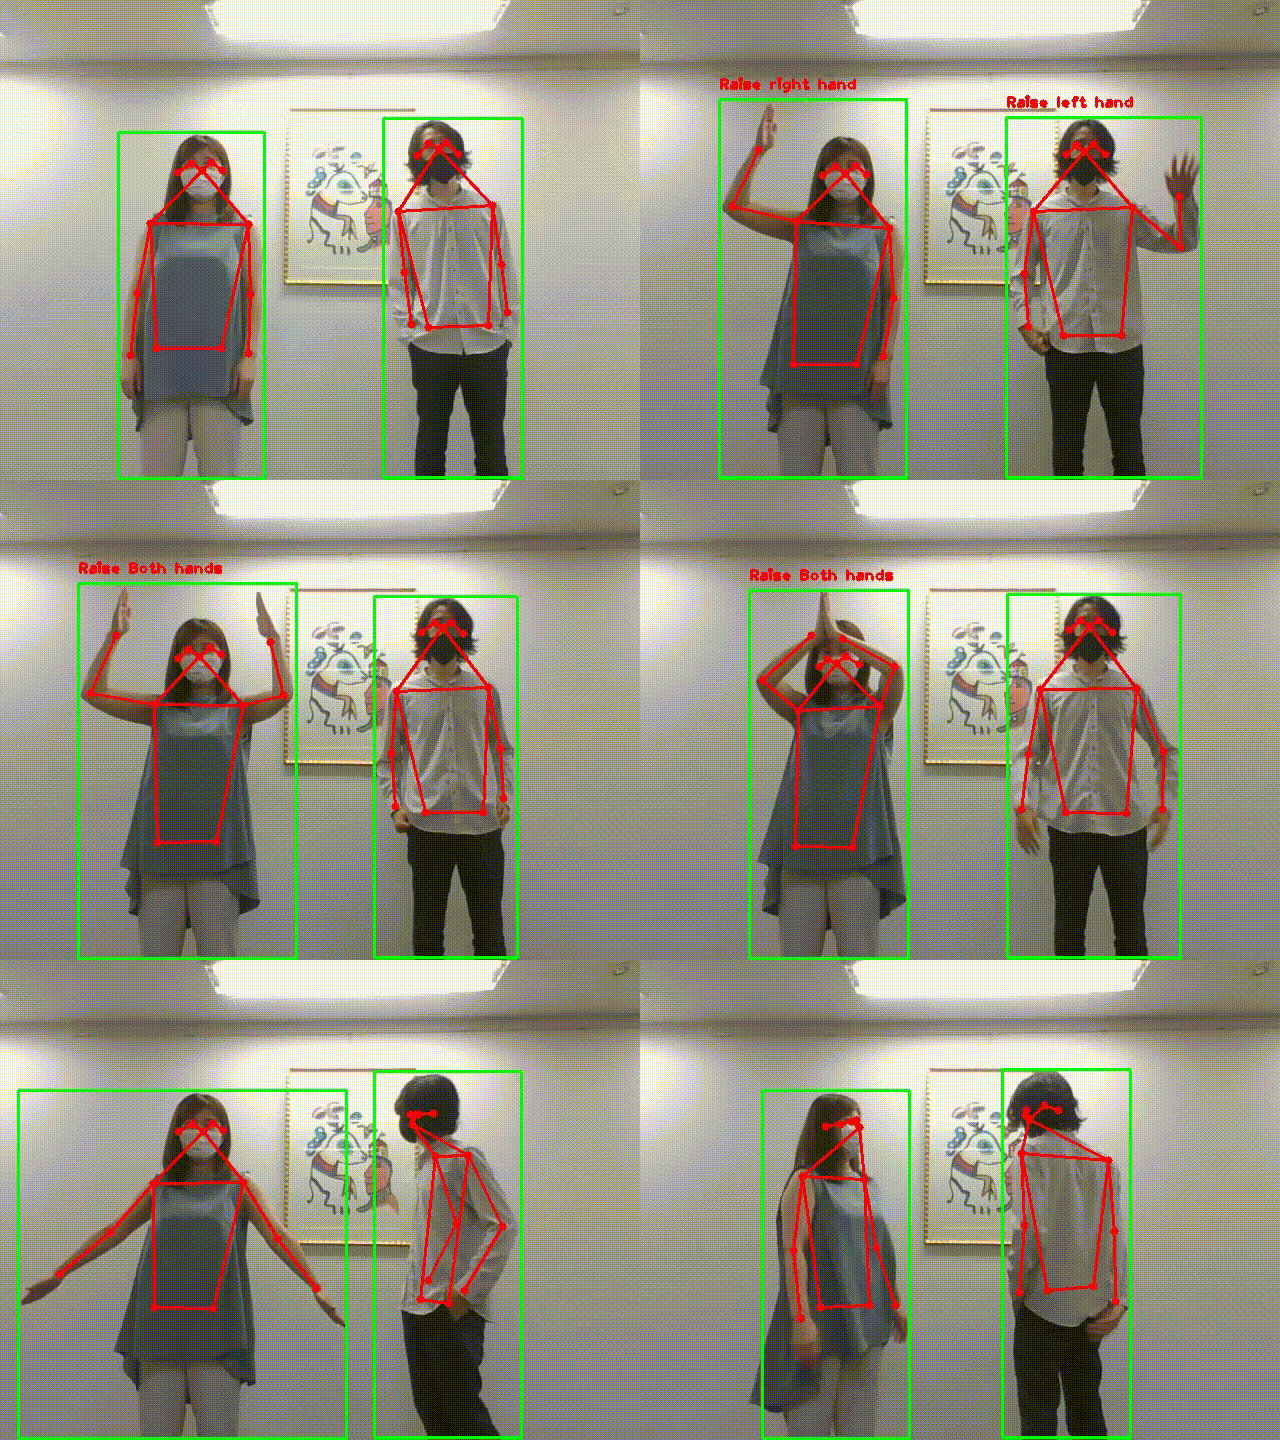
右手を挙げている/左手を挙げている/両手を挙げているの3パターンを認識して表示するアプリケーションです。工場内での非接触なシステム起動用スイッチとして使えそうですね。
また、興味深いなと思ったのは、体の向きを反転させた場合でも正しく右手/左手が認識できているところです。

(出演:@tech_lady731(左)、みきをさん @michelle0915(右))
シンクロ判定アプリ
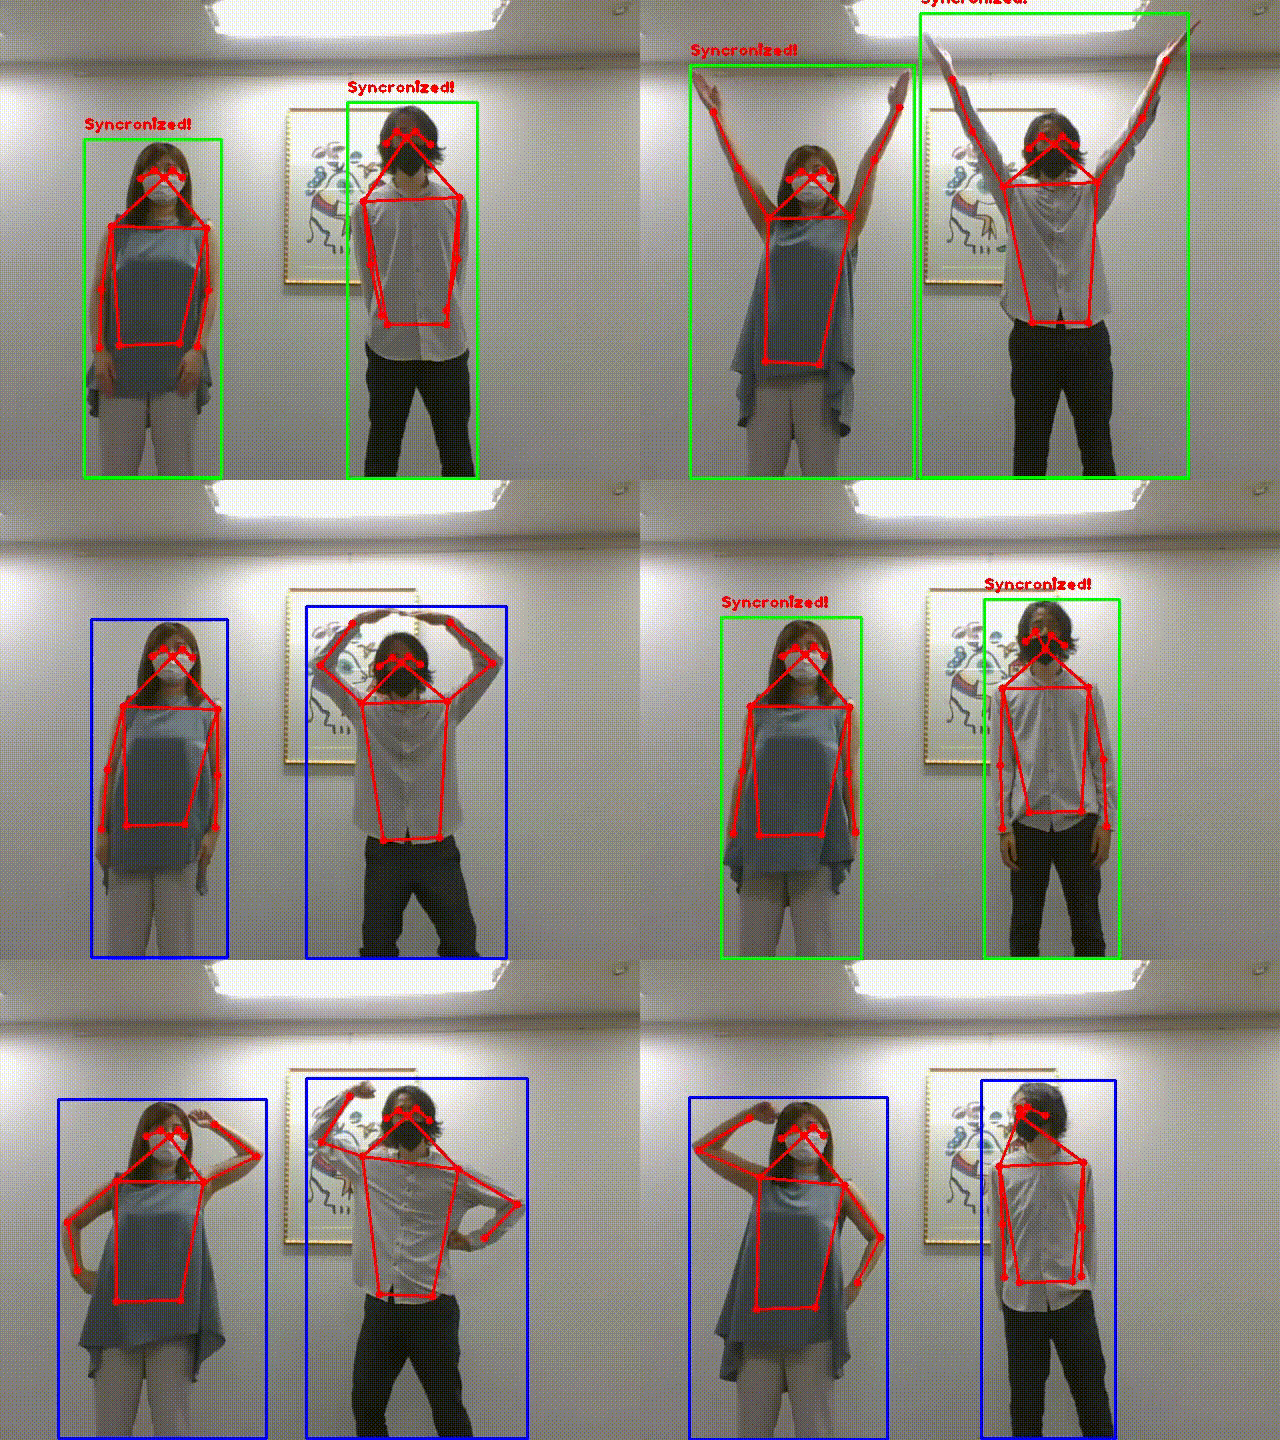
こちらは遊びで作ってみました。画面内に2人検出された時、2人が同じ姿勢かどうかを判別し、表示します2。詳細は割愛しますが、キーポイントの位置関係の類似度を判定基準に使っています。

(出演:@tech_lady731(左)、みきをさん @michelle0915(右))
まとめ
自分自身、以前は高級で難しそうな印象を持っていた姿勢推定AIという技術ですが、実際触ってみれば簡単にセットアップ・動作でき、カスタマイズもできることに驚きました。実際ビジネスシーンでも広く応用されてきているので、興味のある方は是非AI Dynamics Japanにお問い合わせください。
読んでいただきありがとうございました!
-
撮影後に気づきましたが、シンクロの正しいスペルは "Synchronized" でした。恥ずかしい。。。 ↩