
はじめに
TPSゲームの感度設定みたいなものを作りたいと思い,手動制御可能なTPSカメラをcinemachineを用いて作成しました.そこで学んだcinemachineのFreeLookカメラの使い方とTPSカメラの完成までに遭遇したトラブルの備忘録です.
開発環境
- Unity : 6000.4.0f1
- OS : Windows11
1. CinemachineFreeLookの基本的な仕様
CinemachineFreeLookは,top,middle,bottomの3つのリングとそれらを結ぶ曲線で構成されています.3つのリングをスムーズに移動するカメラを制御することで視点の変更を行います.
- Y axis : 上下の移動,3つのリング間を移動する
- X axis : カメラの回転,左右移動ではなくリング上を回転する
リングごとに距離や高さが設定できるので,視点に応じてプレイヤーとの距離を変更するみたいなことができる.
2.必要な設定と手順
1.プレイヤーを追従させたいカメラにCinemachineBrainコンポーネントをアタッチ,インスペクタの「Live Camera」に次の手順で作成するカメラを設定
2.Hierarchyを右クリックしてCinemachineからFreeLook Cameraを作成
3.FreeLook CameraのインスペクタにあるFollow,LookAtの項目にそれぞれ追従させたいオブジェクト(TPSならプレイヤー),注視させたいオブジェクト(TPSならプレイヤー)を設定
4.スクリプトでカメラを制御する場合はインスペクタの「Input Axis Name」を空欄にする
5.インスペクタの「Orbits」の項目にある「Binding Mode」を「World Space」に変更
6.同じく「Orbits」にある3つのリングの位置を設定
3.スクリプトによる制御
これまでの手順で正しい位置にカメラが設置できたので,スクリプトから挙動を制御します.今回はInputSystemからのコントローラー入力を反映するので,テストとして以下のようなコードで制御します.
using Cinemachine;
using UnityEngine;
using UnityEngine.InputSystem;

public class CameraTest : MonoBehaviour
{
    public CinemachineFreeLook freeLookCamera;
    private PlayerInputActions inputActions;
    private InputAction cameraMoveAction;
    public float sensitivityX = 100;//水平感度
    public float sensitivityY = 1;//垂直感度
    //水平移動速度が垂直移動速度に比べて大幅に
    //小さいので,Xを高く設定

    void Awake()
    {
        //inputSystemの有効化
        inputActions = new PlayerInputActions();
        inputActions.player.Enable();
    }

    void Start()
    {
        //カメラ制御用のアクションを取得
        cameraMoveAction = InputSystem.actions.FindAction("LookControll");
    }

    // Update is called once per frame
    void Update()
    {
        //入力された値を取得
        Vector2 cameraMoveValue = cameraMoveAction.ReadValue<Vector2>();

        //感度倍の速度で回転
        freeLookCamera.m_XAxis.Value += cameraMoveValue.x * sensitivityX * Time.deltaTime;
        freeLookCamera.m_YAxis.Value += cameraMoveValue.x * sensitivityY * Time.deltaTime;
    }
}
「freeLookCamera」には,手順2で作成したカメラを入れる.
以下にAction mapを載せるが,詳しくは他の資料を参照.
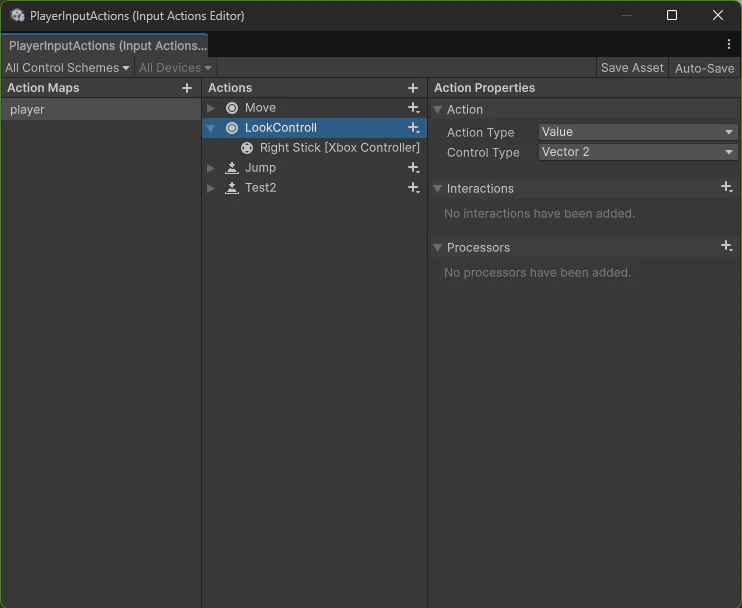
詰まったポイント兼トラブルシューティング
-
カメラが無限に回転する
入力終了後もカメラが回転し続ける現象.プレイヤーにカメラの正面を向き続ける処理を実装した際に発生.プレイヤーの正面を基準に回ろうとするCinemachineカメラの設定が無限ループを引き起こしていた.
これが起きている場合は手順5の設定忘れの可能性があるので確認する. -
プレイヤーを見上げる形にならない
おそらく一番下のリングの高さがしっかりプレイヤーの下になっていない.高さを調整しよう. -
実行すると定点カメラ化する
別のカメラもしくは仮想カメラのPriorityステータスが高く設定されている.もしくは「Follow」や「LookAt」の参照が外れている.確認しよう.