はじめに
Lavavelで開発をするにあたって使用が必要になる場面が多いオブジェクトストレージ。
S3やR2といった従量課金系のオブジェクトストレージばかりで課金は青天井になるかも...個人利用には少しハードルが高いよう...でもオブジェクトストレージは使いたい...
そんな要望にお答えして、月額545円(100GBあたり)・容量無制限・データ転送料金無料など、控えめにいって神なConoha VPSのオブジェクトストレージをLaravelで使えるようにしてみました。
前提
- Laravel 11を用いる
- Conoha VPSのアカウントがある
Conoha VPSを準備する
Conoha VPSの契約などは各々で行なっていただき、アカウントコンソールに入れている想定とします。
Conoha VPSにもバージョン2.0と3.0があるのですが、
今回は2.0としました。
まずはAPIユーザの作成を行いましょう。
APIユーザの登録後にオブジェクトストレージの申し込みが可能になります。
この辺りの記事を元に導入を行なってください。
オブジェクトストレージにキーを設定する
今回は一時URLを発行して公開するやり方を採用するため
のAPIに記載があるようにキーの登録を行っていきます。
APIを叩ければcURLやPOSTMANなど、なんでもOKです。
今回はPOSTMANで記載します。
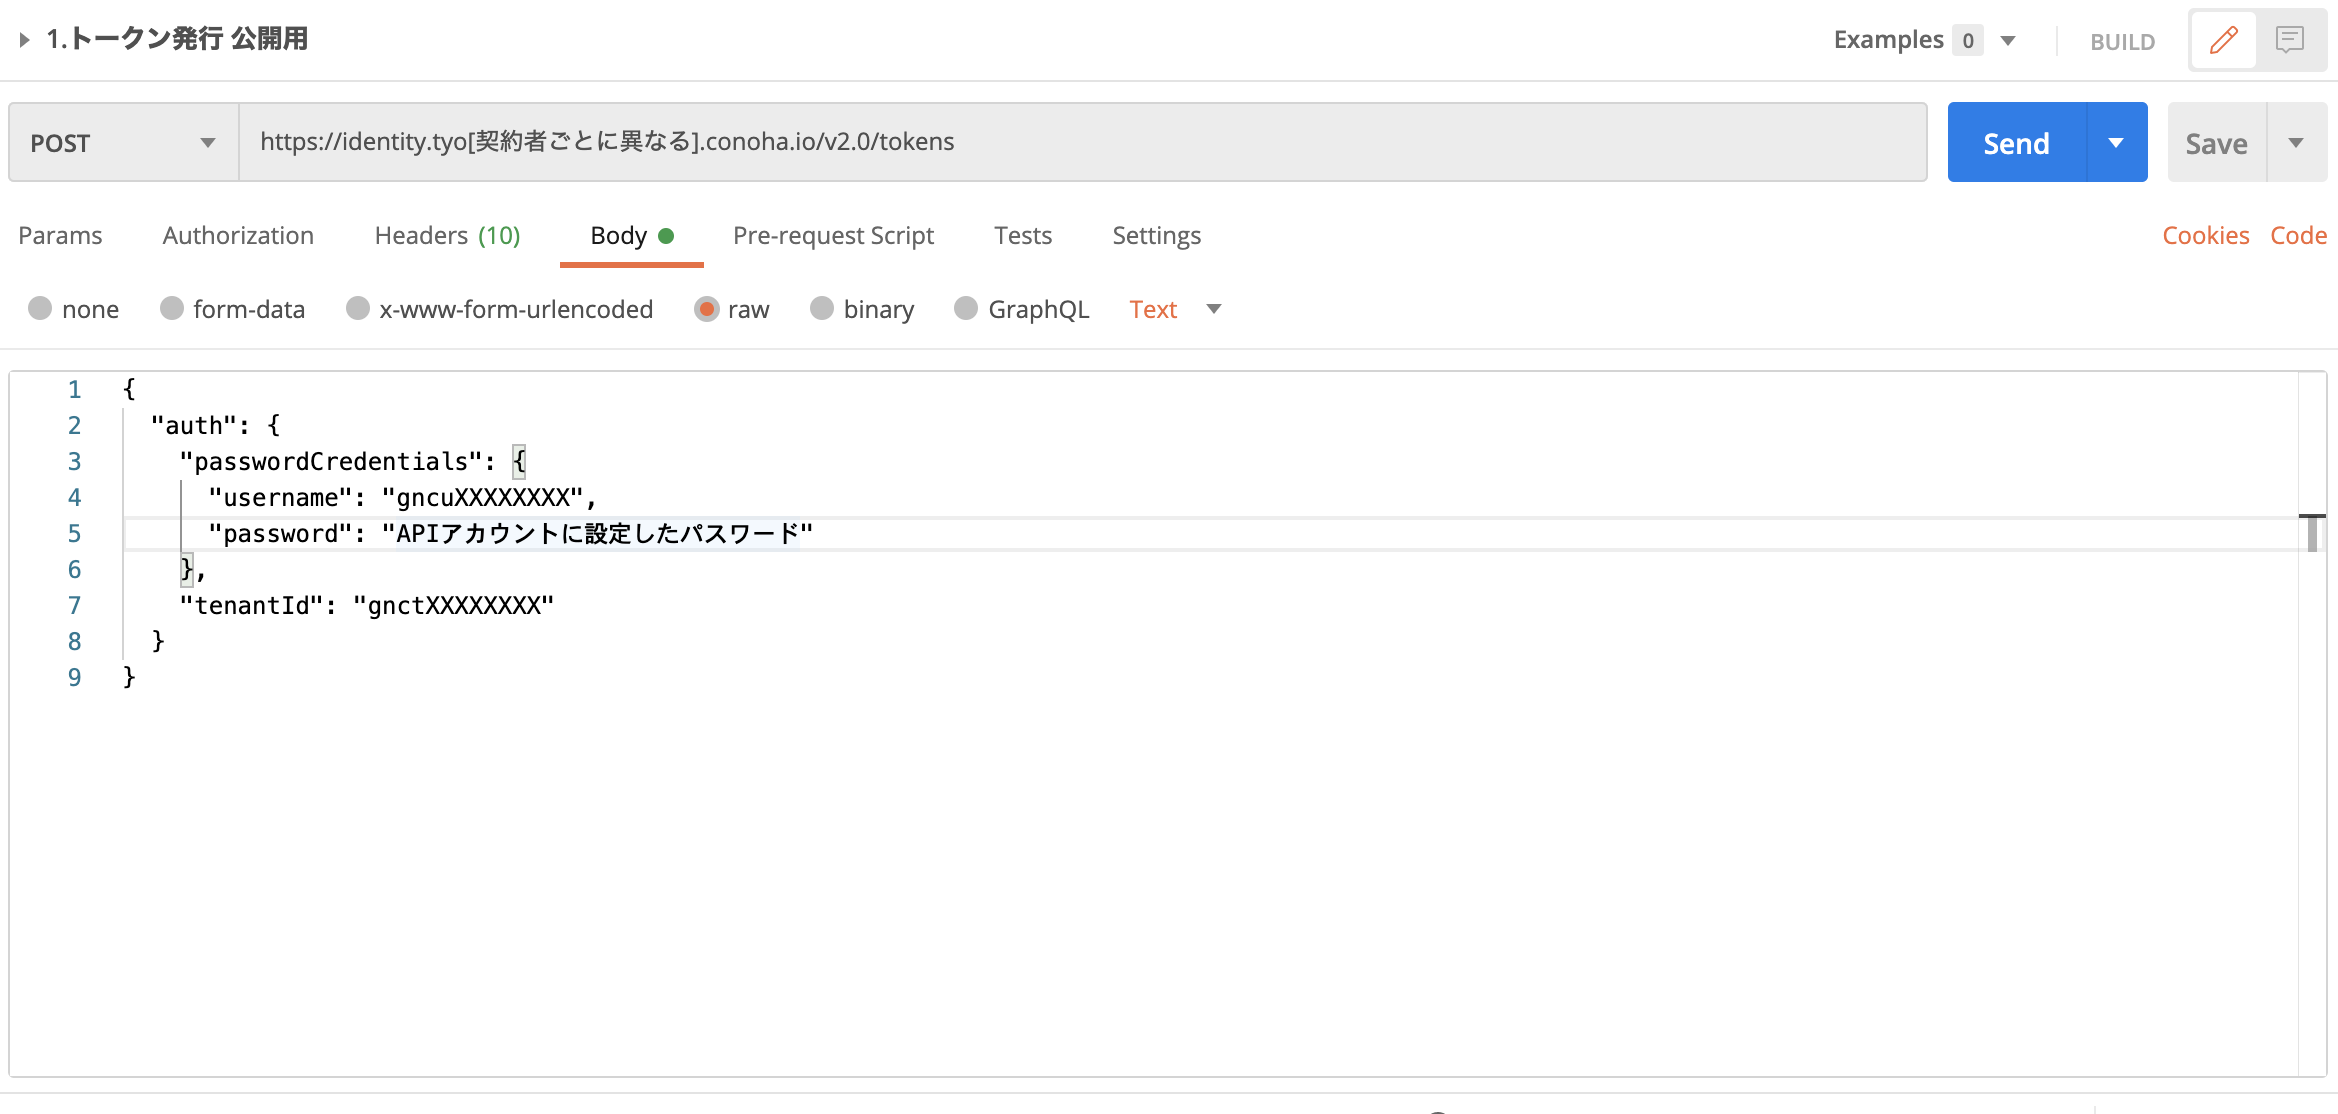
認証用トークン発行
URL:https://identity.tyo[契約者毎に異なる].conoha.io/v2.0/tokens
入力してsendをすると、トークンを取得することができます。
キーの登録
続いてキー登録のAPIを実行していきます。
リクエストヘッダー内へ
-
X-Auth-TOKEN:トークンから採取したID -
X-Account-Meta-Temp-URL-Key:設定したいキー値
を設定して
URL:https://object-storage.tyo[契約者ごとに異なる].conoha.io/v1/nc_[コンテナID]
へPOSTMANで設定のリクエストを送信します
ここまででConoha VPS側の準備は完了です。
Laravel側
OpenStackのライブラリをインストール
Conoha VPSのオブジェクトストレージはOpenStackと呼ばれるクラウドツールで構築されています。phpのライブラリも出ているのでインストールしていきます。
composer require php-opencloud/openstack
.env, filesystems.phpの追加
CUSTOM_FILESYSTEM_URL_AUTH=  # 認証APIのURL
CUSTOM_FILESYSTEM_URL_OBJECT_STORAGE=   # オブジェクトストレージ用APIのURL
CUSTOM_FILESYSTEM_URL_OBJECT_STORAGE_VERSION= # オブジェクトストレージ用APIのバージョン
CUSTOM_FILESYSTEM_REGION= # リージョン
CUSTOM_FILESYSTEM_TENANT_NAME= # テナント名
CUSTOM_FILESYSTEM_TENANT_ID= # テナントID
CUSTOM_FILESYSTEM_CONTAINER= # トップコンテナ名(AWSでいうバケット名となる値)
CUSTOM_FILESYSTEM_USERNAME= # APIユーザのユーザID
CUSTOM_FILESYSTEM_PASSWORD=  # APIユーザのパスワード
CUSTOM_FILESYSTEM_TEMPORARY_URL_KEY= # 先述の手順で登録したキー
    'disks' => [
        'openstack' => [
            'driver' => 'openstack',
            'auth' => env('CUSTOM_FILESYSTEM_URL_AUTH'),
            'region' => env('CUSTOM_FILESYSTEM_REGION'),
            'container' => env('CUSTOM_FILESYSTEM_CONTAINER'),
            'tenant_name' => env('CUSTOM_FILESYSTEM_TENANT_NAME'),
            'tenant_id' => env('CUSTOM_FILESYSTEM_TENANT_ID'),
            'username' => env('CUSTOM_FILESYSTEM_USERNAME'),
            'password' => env('CUSTOM_FILESYSTEM_PASSWORD'),
            'object_storage' => [
                'url' => env('CUSTOM_FILESYSTEM_URL_OBJECT_STORAGE'),
                'version' => env('CUSTOM_FILESYSTEM_URL_OBJECT_STORAGE_VERSION'),
            ],
            'temporary_url_key' => env('CUSTOM_FILESYSTEM_TEMPORARY_URL_KEY')
        ]
    ],
クラスの実装
今回はシンプルにインスタンスを生成して呼び出す想定にします。
Laravel準拠のStorageクラスに対応したメソッド構成で呼び出せる形に実装しました。
<?php

namespace App\Facades\Utility;

use Carbon\Carbon;
use Illuminate\Contracts\Filesystem\FileNotFoundException;
use Illuminate\Support\Facades\Log;
use Illuminate\Http\UploadedFile;
use League\Flysystem\UnableToDeleteFile;
use League\Flysystem\UnableToWriteFile;
use OpenStack\Common\Error\BadResponseError;
use OpenStack\OpenStack;
use Throwable;

class ConohaObjectStorageService
{
   protected $client;
   protected $container;
   protected $identityV2;
   protected $objectStoreV1;
   protected $config;

   public function __construct($config = [])
   {
       $this->config = $config;
       $openstack = new OpenStack([
           'authUrl' => $config['auth'],
           'username' => $config['username'],
           'password' => $config['password'],
           'tenantName' => $config['tenant_name'],
       ]);
       $this->container = $config['container'];
       $this->identityV2 = $openstack->identityV2([
           'username' => $config['username'],
           'password' => $config['password']
       ]);
       $this->objectStoreV1 = $openstack->objectStoreV1([
           'identityService' => $this->identityV2,
           'catalogName' => 'Object Storage Service',
           'region' => $config['region'],
       ]);
   }

   /**
    * ファイルのアップロード
    * @param string $path
    * @param UploadedFile $contents
    * @param array $options
    * @return false|string
    * @throws BadResponseError
    * @throws FileNotFoundException
    */
   public function putFile(string $path, UploadedFile $contents, array $options = []): false|string
   {
       $filePath = sprintf("%s/%s.%s",
           $path,
           $this->fileNameFormat(),
           $contents->extension()
       );
       return $this->upload($filePath, $contents);
   }

   /**
    * ファイルをアップロードする
    *
    * @param $path
    * @param UploadedFile $contents
    * @return false|string
    * @throws BadResponseError
    * @throws FileNotFoundException
    */
   private function upload($path, UploadedFile $contents) : false|string
   {
       try {
           $containerPath = $this->containerPath($path);
           $directories = $this->directories($containerPath);

           // ファイル名
           $fileName = $this->fileName($containerPath);

           // コンテナが存在しない場合は作成
           $container = '';
           foreach ($directories as $index => $directory) {
               $container .= ($index === 0)
                   ? $directory
                   : '/' . $directory;
               $exist = $this->objectStoreV1->containerExists($container);
               if (!$exist) {
                   $this->objectStoreV1->createContainer(['name' => $container]);
               }
           }

           // アップロード
           $this->objectStoreV1->getContainer($container)
               ->createObject([
                   'name' => $fileName,
                   'content' => $contents->get(),
               ]);

           // ルートコンテナ名を除いてアップロードしたファイルのパスを返す
           return $this->relativePath($container.'/'.$fileName);

       }catch (UnableToWriteFile $e) {
           Log::error($e->getMessage());
       }

       return false;
   }

   /**
    * ファイル名のフォーマット
    * @return string
    */
   private function fileNameFormat(): string
   {
       $userid = auth()->id();
       if ($userid) {
           $userid = 'anonymous';
       }

       return sprintf('%s_%s',
           Carbon::now()->format('YmdHis'),
           $userid,
       );
   }

   /**
    * コンテナのフルパスに変換する
    * @param $path
    * @return string
    */
   private function containerPath($path): string
   {
       return $this->container . '/' . $path;
   }

   /**
    * コンテナのルートパスを除いた相対パスに変換する
    * @param $path
    * @return string
    */
   private function relativePath($path): string
   {
       $containerRoot = $this->container . '/';
       return str_replace($containerRoot, '', $path);
   }

   /**
    * ファイル名を取得
    * @param $path
    * @return string
    */
   private function fileName($path): string
   {
       $path = explode('/', $path);
       return end($path);
   }

   /**
    * ディレクトリを取得
    * @param $path
    * @return array
    */
   private function directories($path): array
   {
       $path = explode('/', $path);
       array_pop($path);
       return $path;
   }
}
これで実装自体はできているので、
アップロードする際は以下のようにインスタンスを生成して
呼び出ししてあげればアップロードができるかなと。
    /**
     * 新規登録画面表示
     */
    public function create(Request $request): View
    {
        $file = $request->file('file');
        if ($file) {
            $conohaStorageService = new $ConohaStorageService;
            $conohaStorageService->putFileAs('upload',$file, 'icon.jpg');
        }

        return view('test');
    }
まとめ
LaravelでConohaのオブジェクトストレージを使ってみました。
定額課金でご安全な開発を!\ヨシッ/
参考
告知
最後にお知らせとなりますが、イーディーエーでは一緒に働くエンジニアを
募集しております。詳しくは採用情報ページをご確認ください。
みなさまからのご応募をお待ちしております。

