こんにちは。広瀬マサルです。
Flutter上で動作する統合フレームワークMasamuneを随時更新しています。
今回はGoogleI/O2024で発表されたFirebase上でPostgreSQLを利用可能になるFirebaseDataConnectをMasamuneフレームワーク上から利用できるパッケージを新しく追加したので紹介します。
masamune_model_firebase_data_connect
はじめに
Masamuneフレームワークは「CLIによるコード生成」と「build_runnnerによるコードの自動生成」を用いて可能な限りコードの記述量を減らし、アプリ開発の安定性と高速性を高めるFlutter上のフレームワークです。
データベースに関してもFirestoreをベースにしたNoSQLデータベースを利用し、わずか1行の更新でランタイムDBと端末ローカルDB、Firestoreを切り替えることが可能な仕組みを提供しています。
GoogleI/O2024で発表されたFirebase上でPostgreSQLを利用可能になるFirebaseDataConnectが2024年10月にパブリックプレビューとなりFlutterでも利用できるようになりました。
Masamuneフレームワークではこれに合わせてFirebaseDataConnectを簡単に利用できるようなパッケージを追加しましたので紹介します。
Firestoreや端末ローカルDBでの利用と同じ様に下記のような定義でスキーマを定義できます。
/// Value for model.
@freezed
@formValue
@immutable
@firebaseDataConnect
// TODO: Set the path for the collection.
@CollectionModelPath(
  "user",
  permission: [
    AllowReadModelPermissionQuery.allUsers(),
    AllowWriteModelPermissionQuery.allUsers(),
  ],
)
abstract class UserModel with _$UserModel {
  const factory UserModel({
    // TODO: Set the data schema.
    @Default("Guest") String name,
    int? age,
  }) = _UserModel;
  const UserModel._();

  ~~~~
}
以前下記の記事でModelAdapterを各データモデルごとに設定可能になったと書きました。
これを利用することでFirebaseDataConnectとFirestoreを連携することが可能になります。
実際にやってみよう
それでは実際の実装を行っていきたいと思います。
今回は簡易的にECショップの商品やカテゴリーをスプレッドシートに定義し、それを購入して履歴に残すデモアプリを作成していきます。
Flutterプロジェクトの作成
まずkatana createでFlutterプロジェクトを作成します。
katana create net.mathru.dataconnecttest
少し待てばプロジェクトファイルが作成されます。
Firebaseのプロジェクト作成
Firebaseのプロジェクトを作成します。
以前のこの記事に記載している通りの方法でプロジェクト作成までを行います。
FirebaseDataConnectを有効化
Firebaseのプロジェクト作成後FirebaseDataConnectを有効化していきます。
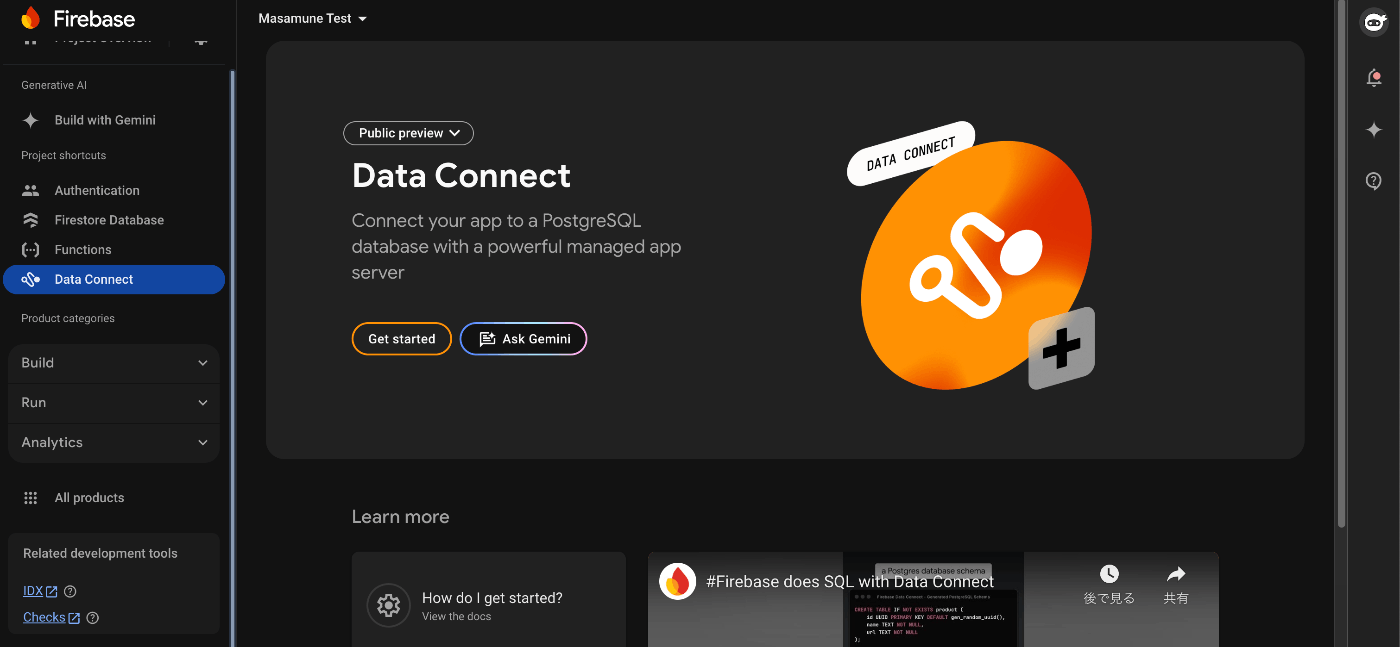
Data Connectを開きます。
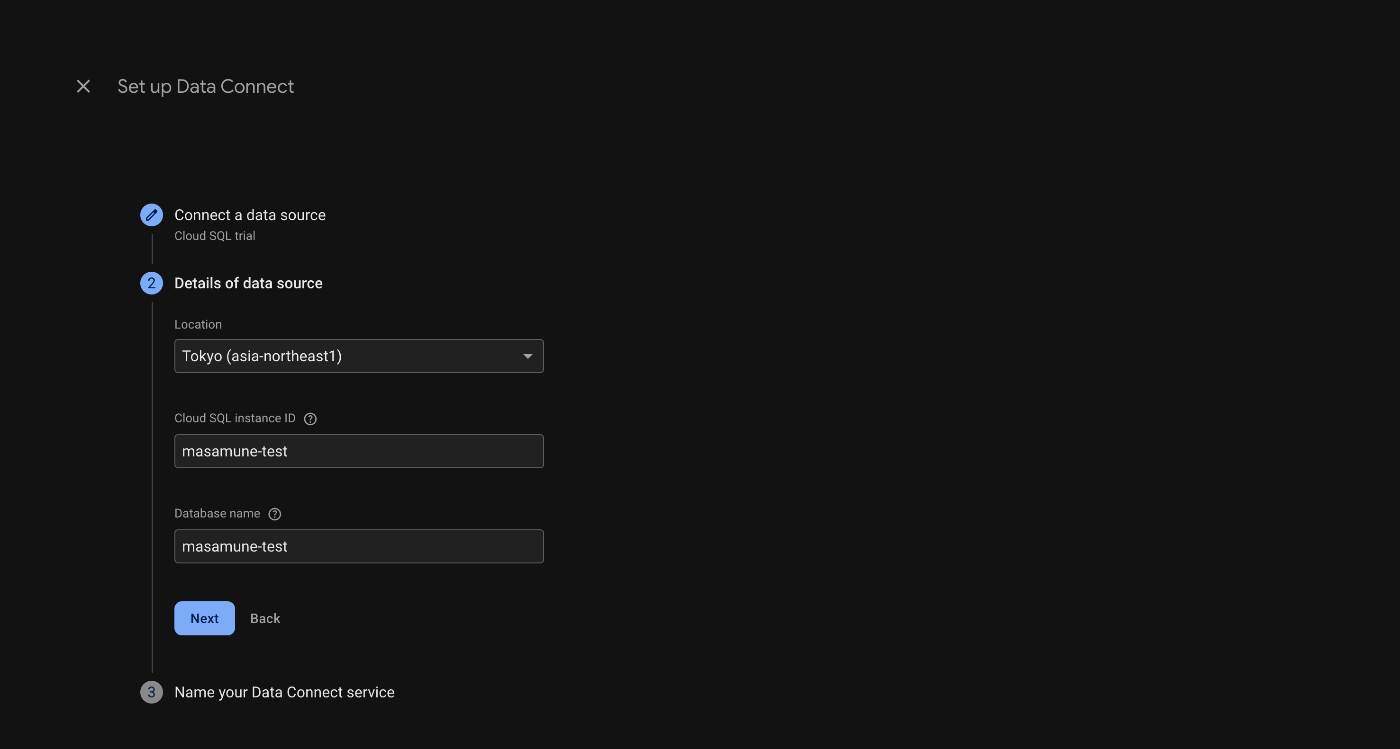
新しくCloudSQLのインスタンスを作成しても既存のものを利用するかを選びます。
LocationとインスタンスID、データベース名を決定します。
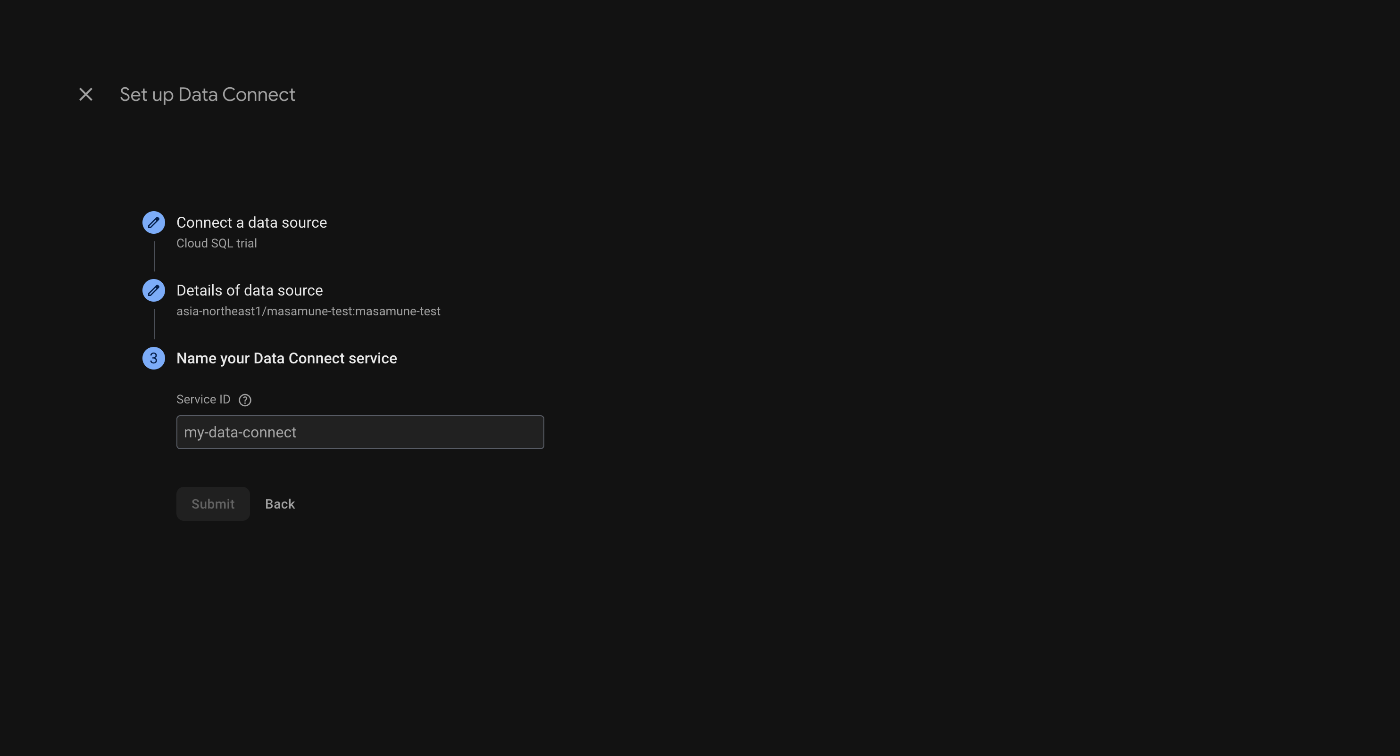
DataConnectのサービス名を決定します。
DataConnectが利用可能になります。
FlutterプロジェクトでのFirebaseの初期設定
katana.yamlの下記部分のFirebaseのプロジェクトIDとFirebaseDataConnectの有効化の設定を追記します。
# This section contains information related to Firebase.
# Firebase関連の情報を記載します。
firebase:
  # Set the Firebase project ID.
  # FirebaseのプロジェクトIDを設定します。
  project_id: masamune-test

  # Enable Firebase Firestore.
  # Firebase Firestoreを有効にします。
  firestore:
    enable: false

  # Enable Firebase Data Connect.
  # Firebase Data Connectを有効にします。
  dataconnect:
    enable: true # false -> true
katana applyでkatana.yamlを反映させます。
katana apply
これで準備は完了です。
データモデルの作成
引き続きデータモデルを作成していきましょう。
今回はメッセージ(記事)データ、カテゴリーデータ、ユーザーデータをそれぞれ作成していきましょう。
まず下記のコマンドでユーザーデータを作成します。
katana code collection user
lib/models/user.dartが作成されるので@firebaseDataConnectアノテーションをクラスに付与しましょう。
また、@CollectionModelPathのpermissionにテーブルへのアクセス権を付与します。
アクセス権については後述します。今回は全ユーザーが読み取り/書き取り可能な状態にしておきます。
最後に各フィールドを規定します。
// lib/models/user.dart

/// Value for model.
@freezed
@formValue
@immutable
@firebaseDataConnect
// TODO: Set the path for the collection.
@CollectionModelPath(
  "user",
  permission: [
    AllowReadModelPermissionQuery.allUsers(),
    AllowWriteModelPermissionQuery.allUsers(),
  ],
)
abstract class UserModel with _$UserModel {
  const factory UserModel({
    // TODO: Set the data schema.
    @Default("Guest") String name,
    int? age,
  }) = _UserModel;
  const UserModel._();

  factory UserModel.fromJson(Map<String, Object?> json) =>
      _$UserModelFromJson(json);

  /// Query for document.
  ///
  /// ```dart
  /// appRef.model(UserModel.document(id));       // Get the document.
  /// ref.app.model(UserModel.document(id))..load();  // Load the document.
  /// ```
  static const document = _$UserModelDocumentQuery();

  /// Query for collection.
  ///
  /// ```dart
  /// appRef.model(UserModel.collection());       // Get the collection.
  /// ref.app.model(UserModel.collection())..load();  // Load the collection.
  /// ref.app.model(
  ///   UserModel.collection().data.equal(
  ///     "data",
  ///   )
  /// )..load(); // Load the collection with filter.
  /// ```
  static const collection = _$UserModelCollectionQuery();

  /// Query for form value.
  ///
  /// ```dart
  /// ref.app.form(UserModel.form(UserModel()));    // Get the form controller in app scope.
  /// ref.page.form(UserModel.form(UserModel()));    // Get the form controller in page scope.
  /// ```
  static const form = _$UserModelFormQuery();
}
続いて下記のコマンドでカテゴリーデータを作成します。
katana code collection category
lib/models/category.dartが作成されるのでユーザーデータと同様の記述を行い各フィールドを規定します。
// lib/models/cateogry.dart

/// Value for model.
@freezed
@formValue
@immutable
@firebaseDataConnect
// TODO: Set the path for the collection.
@CollectionModelPath(
  "category",
  permission: [
    AllowReadModelPermissionQuery.allUsers(),
    AllowWriteModelPermissionQuery.allUsers(),
  ],
)
abstract class CategoryModel with _$CategoryModel {
  const factory CategoryModel({
    // TODO: Set the data schema.
    required String name,
    String? description,
  }) = _CategoryModel;
  const CategoryModel._();

  factory CategoryModel.fromJson(Map<String, Object?> json) =>
      _$CategoryModelFromJson(json);

  /// Query for document.
  ///
  /// ```dart
  /// appRef.model(CategoryModel.document(id));       // Get the document.
  /// ref.app.model(CategoryModel.document(id))..load();  // Load the document.
  /// ```
  static const document = _$CategoryModelDocumentQuery();

  /// Query for collection.
  ///
  /// ```dart
  /// appRef.model(CategoryModel.collection());       // Get the collection.
  /// ref.app.model(CategoryModel.collection())..load();  // Load the collection.
  /// ref.app.model(
  ///   CategoryModel.collection().data.equal(
  ///     "data",
  ///   )
  /// )..load(); // Load the collection with filter.
  /// ```
  static const collection = _$CategoryModelCollectionQuery();

  /// Query for form value.
  ///
  /// ```dart
  /// ref.app.form(CategoryModel.form(CategoryModel()));    // Get the form controller in app scope.
  /// ref.page.form(CategoryModel.form(CategoryModel()));    // Get the form controller in page scope.
  /// ```
  static const form = _$CategoryModelFormQuery();
}
最後に下記のコマンドでメッセージ(記事)データを作成します。
katana code collection post
lib/models/post.dartが作成されるのでユーザーデータと同様の記述を行い各フィールドを規定します。
フィールドを規定しますが、メッセージ(記事)データについては作成者としてのユーザーデータと記事のカテゴリーとしてのカテゴリーデータをそれぞれ参照として紐づけます。
// lib/models/post.dart

/// Value for model.
@freezed
@formValue
@immutable
@firebaseDataConnect
// TODO: Set the path for the collection.
@CollectionModelPath(
  "post",
  permission: [
    AllowReadModelPermissionQuery.allUsers(),
    AllowWriteModelPermissionQuery.allUsers(),
  ],
)
abstract class PostModel with _$PostModel {
  const factory PostModel({
    // TODO: Set the data schema.
    required String title,
    String? body,
    @Default(ModelTimestamp()) ModelTimestamp createdTime,
    @refParam UserModelRef user,
    @refParam CategoryModelRef category,
  }) = _PostModel;
  const PostModel._();

  factory PostModel.fromJson(Map<String, Object?> json) =>
      _$PostModelFromJson(json);

  /// Query for document.
  ///
  /// ```dart
  /// appRef.model(PostModel.document(id));       // Get the document.
  /// ref.app.model(PostModel.document(id))..load();  // Load the document.
  /// ```
  static const document = _$PostModelDocumentQuery();

  /// Query for collection.
  ///
  /// ```dart
  /// appRef.model(PostModel.collection());       // Get the collection.
  /// ref.app.model(PostModel.collection())..load();  // Load the collection.
  /// ref.app.model(
  ///   PostModel.collection().data.equal(
  ///     "data",
  ///   )
  /// )..load(); // Load the collection with filter.
  /// ```
  static const collection = _$PostModelCollectionQuery();

  /// Query for form value.
  ///
  /// ```dart
  /// ref.app.form(PostModel.form(PostModel()));    // Get the form controller in app scope.
  /// ref.page.form(PostModel.form(PostModel()));    // Get the form controller in page scope.
  /// ```
  static const form = _$PostModelFormQuery();
}
下記コマンドでモデル用のコードを自動生成します。
katana code generate
これによりDataConnectのGraphQLスキーマ定義やFirebaseDataConnectModelAdapterの中身、DataConnectのDart側のコードがまとめて生成されます。
作成されたスキーマのデプロイ
自動生成されたスキーマをサーバー上にデプロイする必要があります。その場合は下記コマンドを実行してください。
katana deploy
デプロイ中にマイグレーションが必要な状態になることがあります。その場合はfirebaseフォルダに入り下記コマンドを実行してください。
# firebase
firebase dataconnect:sql:migrate
これで自由に各データモデルを扱えるようになりました。
データを扱うページの作成
定義したモデルを扱うためのページを作成していきましょう。
lib/pages/home.dartを下記のように編集して、データの作成や編集を行えるようにしましょう。
// pages/home.dart

// ignore: unused_import, unnecessary_import
import 'package:dataconnecttest/models/category.dart';
import 'package:dataconnecttest/models/post.dart';
import 'package:dataconnecttest/models/user.dart';
import 'package:flutter/material.dart';
// ignore: unused_import, unnecessary_import
import 'package:masamune/masamune.dart';
import 'package:masamune_universal_ui/masamune_universal_ui.dart';

// ignore: unused_import, unnecessary_import
import '/main.dart';

part 'home.page.dart';

@immutable
@PagePath("/")
class HomePage extends PageScopedWidget {
  const HomePage({
    super.key,
  });

  /// Used to transition to the HomePage screen.
  ///
  /// ```dart
  /// router.push(HomePage.query(parameters));    // Push page to HomePage.
  /// router.replace(HomePage.query(parameters)); // Replace page to HomePage.
  /// ```
  @pageRouteQuery
  static const query = _$HomePageQuery();

  @override
  Widget build(BuildContext context, PageRef ref) {
    // Describes the process of loading
    // and defining variables required for the page.
    const userId = "user1";
    final user = ref.app.model(UserModel.document(userId))..load();
    final posts = ref.app.model(PostModel.collection())..load();
    final categories = ref.app.model(CategoryModel.collection())..load();

    // Describes the structure of the page.
    return UniversalScaffold(
      appBar: UniversalAppBar(title: Text(l().appTitle)),
      body: UniversalListView(
        children: [
          const ListTile(
            title: Text(
              "User Data",
              style: TextStyle(fontWeight: FontWeight.bold),
            ),
          ),
          Divider(color: theme.color.outline.withOpacity(0.25)),
          if (user.value != null)
            ListTile(
              title: Text(user.value?.name ?? ""),
              subtitle: Text(user.value?.age?.toStringAsFixed(0) ?? ""),
              trailing: SizedBox(
                width: 80,
                child: FormNumField(
                  initialValue: user.value?.age,
                  onChanged: (value) async {
                    await user.save(
                      user.value?.copyWith(age: value?.toInt()),
                    );
                  },
                  picker: const FormNumFieldPicker(
                    begin: 1,
                    end: 100,
                    interval: 1,
                  ),
                ),
              ),
            )
          else
            ListTile(
              leading: const Icon(Icons.add),
              title: const Text("Create user data"),
              onTap: () async {
                await user
                    .save(
                      UserModel(
                        name: "User at ${DateTime.now().yyyyMMddHHmmss()}",
                        age: 20,
                      ),
                    )
                    .showIndicator(context);
              },
            ),
          const Divider(),
          const ListTile(
            title: Text(
              "Post Data",
              style: TextStyle(fontWeight: FontWeight.bold),
            ),
          ),
          Divider(color: theme.color.outline.withOpacity(0.25)),
          ...posts.mapListenable((post) {
            return ListTile(
              title: Text(post.value?.title ?? ""),
              subtitle: Text(
                "${post.value?.category?.value?.name ?? ""} @${post.value?.user?.value?.name ?? ""}",
              ),
            );
          }),
          Divider(color: theme.color.outline.withOpacity(0.25)),
          ...categories.map((category) {
            return ListTile(
              leading: const Icon(Icons.add),
              title: Text(category.value?.name ?? ""),
              onTap: () async {
                final newPost = posts.create();
                await newPost
                    .save(
                      PostModel(
                        title: "Post at ${DateTime.now().yyyyMMddHHmmss()}",
                        category: category,
                        user: user,
                      ),
                    )
                    .showIndicator(context);
              },
            );
          }),
          ListTile(
            leading: const Icon(Icons.add),
            title: const Text("Create category data"),
            onTap: () async {
              final category = categories.create();
              await category
                  .save(
                    CategoryModel(
                      name: "Category at ${DateTime.now().yyyyMMddHHmmss()}",
                    ),
                  )
                  .showIndicator(context);
            },
          ),
        ],
      ),
    );
  }
}
デフォルトのModelAdapterの変更
デフォルトのModelAdapterを新しく自動生成されたFirebaseDataConnectModelAdapterに変更します。
lib/adapter.dartを開き下記を編集してください。
/// App Model.
///
/// By replacing this with another adapter, the data storage location can be changed.
// TODO: Change the database.
const modelAdapter = firebaseDataConnectModelAdapter;
// final modelAdapter = RuntimeModelAdapter();
これで実装完了です。
アプリの実行
アプリを実行して確認してみましょう。
Create user dataをタップするとユーザーデータが作成されます。
DataConnectのコンソールからデータを見てみるとデータが入っていることがわかります。
ドロップダウンで1を選択するとageが1に変わっていることがわかります。
フィルタークエリの作り方
バージョン2.1.8から条件を指定したクエリを作成することができるようになりました。
CollectionModelPathのqueryにModelDatabaseQueryGroupを作成することで実現可能です。
試しにPostModelを改修しcreatedTimeでフィルタできるクエリを作成してみましょう。
lib/models/post.dartを開き下記のように編集します。
ModelDatabaseQueryGroupにはクエリ自体の名前とクエリの条件を記載します。
// lib/models/post.dart

/// Value for model.
@freezed
@formValue
@immutable
@firebaseDataConnect
// TODO: Set the path for the collection.
@CollectionModelPath(
  "post",
  permission: [
    AllowReadModelPermissionQuery.allUsers(),
    AllowWriteModelPermissionQuery.allUsers(),
  ],
  query: [
    ModelDatabaseQueryGroup(
      name: "createdTime",
      conditions: [
        ModelDatabaseConditionQuery.greaterThanOrEqualTo("createdTime"),
      ],
    ),
  ],
)
abstract class PostModel with _$PostModel {
  const factory PostModel({
    // TODO: Set the data schema.
    required String title,
    String? body,
    @Default(ModelTimestamp()) ModelTimestamp createdTime,
    @refParam UserModelRef user,
    @refParam CategoryModelRef category,
  }) = _PostModel;
  const PostModel._();

  factory PostModel.fromJson(Map<String, Object?> json) =>
      _$PostModelFromJson(json);

  /// Query for document.
  ///
  /// ```dart
  /// appRef.model(PostModel.document(id));       // Get the document.
  /// ref.app.model(PostModel.document(id))..load();  // Load the document.
  /// ```
  static const document = _$PostModelDocumentQuery();

  /// Query for collection.
  ///
  /// ```dart
  /// appRef.model(PostModel.collection());       // Get the collection.
  /// ref.app.model(PostModel.collection())..load();  // Load the collection.
  /// ref.app.model(
  ///   PostModel.collection().data.equal(
  ///     "data",
  ///   )
  /// )..load(); // Load the collection with filter.
  /// ```
  static const collection = _$PostModelCollectionQuery();

  /// Query for form value.
  ///
  /// ```dart
  /// ref.app.form(PostModel.form(PostModel()));    // Get the form controller in app scope.
  /// ref.page.form(PostModel.form(PostModel()));    // Get the form controller in page scope.
  /// ```
  static const form = _$PostModelFormQuery();
}
下記コマンドでモデル用のコードを自動生成します。
するとGraphQLにクエリが追加され、Dartコードにもクエリを実行するためのメソッドとそれに対応するFirebaseDataConnectModelAdapterの実装が追加されます。
katana code generate
それではpages/home.dartを編集して追加した条件でデータを取得してみましょう。
PostModel.collection()からcreatedTimeQueryというメソッドが利用可能になっているのでそれを指定します。
createdTimeGreaterThanOrEqualToにはこの時間からデータを表示するための閾値を指定してください。ひとまず2024年11月25日を指定します。こうすることで2024年11月25日以前のデータが表示されなくなります。
// pages/home.dart

// ignore: unused_import, unnecessary_import
import 'package:dataconnecttest/models/category.dart';
import 'package:dataconnecttest/models/post.dart';
import 'package:dataconnecttest/models/user.dart';
import 'package:flutter/material.dart';
// ignore: unused_import, unnecessary_import
import 'package:masamune/masamune.dart';
import 'package:masamune_universal_ui/masamune_universal_ui.dart';

// ignore: unused_import, unnecessary_import
import '/main.dart';

part 'home.page.dart';

@immutable
@PagePath("/")
class HomePage extends PageScopedWidget {
  const HomePage({
    super.key,
  });

  /// Used to transition to the HomePage screen.
  ///
  /// ```dart
  /// router.push(HomePage.query(parameters));    // Push page to HomePage.
  /// router.replace(HomePage.query(parameters)); // Replace page to HomePage.
  /// ```
  @pageRouteQuery
  static const query = _$HomePageQuery();

  @override
  Widget build(BuildContext context, PageRef ref) {
    // Describes the process of loading
    // and defining variables required for the page.
    const userId = "user1";
    final user = ref.app.model(UserModel.document(userId))..load();
    final posts = ref.app.model(PostModel.collection().createdTimeQuery(
      createdTimeGreaterThanOrEqualTo: const ModelTimestamp.dateTime(2024, 11, 25),
    ))
      ..load();
    final categories = ref.app.model(CategoryModel.collection())..load();

    // Describes the structure of the page.
    return UniversalScaffold(
      appBar: UniversalAppBar(title: Text(l().appTitle)),
      body: UniversalListView(
        children: [
          const ListTile(
            title: Text(
              "User Data",
              style: TextStyle(fontWeight: FontWeight.bold),
            ),
          ),
          Divider(color: theme.color.outline.withOpacity(0.25)),
          if (user.value != null)
            ListTile(
              title: Text(user.value?.name ?? ""),
              subtitle: Text(user.value?.age?.toStringAsFixed(0) ?? ""),
              trailing: SizedBox(
                width: 80,
                child: FormNumField(
                  initialValue: user.value?.age,
                  onChanged: (value) async {
                    await user.save(
                      user.value?.copyWith(age: value?.toInt()),
                    );
                  },
                  picker: const FormNumFieldPicker(
                    begin: 1,
                    end: 100,
                    interval: 1,
                  ),
                ),
              ),
            )
          else
            ListTile(
              leading: const Icon(Icons.add),
              title: const Text("Create user data"),
              onTap: () async {
                await user
                    .save(
                      UserModel(
                        name: "User at ${DateTime.now().yyyyMMddHHmmss()}",
                        age: 20,
                      ),
                    )
                    .showIndicator(context);
              },
            ),
          const Divider(),
          const ListTile(
            title: Text(
              "Post Data",
              style: TextStyle(fontWeight: FontWeight.bold),
            ),
          ),
          Divider(color: theme.color.outline.withOpacity(0.25)),
          ...posts.mapListenable((post) {
            return ListTile(
              title: Text(post.value?.title ?? ""),
              subtitle: Text(
                "${post.value?.category?.value?.name ?? ""} @${post.value?.user?.value?.name ?? ""}",
              ),
            );
          }),
          Divider(color: theme.color.outline.withOpacity(0.25)),
          ...categories.map((category) {
            return ListTile(
              leading: const Icon(Icons.add),
              title: Text(category.value?.name ?? ""),
              onTap: () async {
                final newPost = posts.create();
                await newPost
                    .save(
                      PostModel(
                        title: "Post at ${DateTime.now().yyyyMMddHHmmss()}",
                        category: category,
                        user: user,
                      ),
                    )
                    .showIndicator(context);
              },
            );
          }),
          ListTile(
            leading: const Icon(Icons.add),
            title: const Text("Create category data"),
            onTap: () async {
              final category = categories.create();
              await category
                  .save(
                    CategoryModel(
                      name: "Category at ${DateTime.now().yyyyMMddHHmmss()}",
                    ),
                  )
                  .showIndicator(context);
            },
          ),
        ],
      ),
    );
  }
}
ModelDatabaseQueryGroupのconditionsに複数条件を指定することで複雑なクエリを実行可能です。(2024年11月27日現在はAND条件のみ)
また、ModelDatabaseQueryGroupを複数指定すると様々な条件を設定することができます。
Firestoreとの連携
それではFirestoreとFirebaseDataConnectの連携を試してみましょう。
FirebaseDataConnect上で作成したUserModelをPostModelに紐づけ、FirestoreのリアルタイムアップデートでPostModelを常時更新できるようにしましょう。
Firestoreを有効化
まずFirestoreを有効化しましょう。
以前のこの記事に記載している通りの方法でFirestoreの有効化を行います。
FlutterプロジェクトでのFirestoreの初期設定
katana.yamlの下記部分のFirestoreの有効化の設定を追記します。
# This section contains information related to Firebase.
# Firebase関連の情報を記載します。
firebase:
  # Set the Firebase project ID.
  # FirebaseのプロジェクトIDを設定します。
  project_id: masamune-test

  # Enable Firebase Firestore.
  # Firebase Firestoreを有効にします。
  firestore:
    enable: true # false -> true

  # Enable Firebase Data Connect.
  # Firebase Data Connectを有効にします。
  dataconnect:
    enable: true
katana applyでkatana.yamlを反映させます。
katana apply
ModelAdapterの変更
UserModelにFirebaseDataConnectModelAdapterを設定しベースのModelAdapterにリアルタイムアップデート可能なListenableFirestoreModelAdapterを設定します。
まずlib/models/user.dartを開き、CollectionModelPathのadapterにfirebaseDataConnectModelAdapterを設定します。
// lib/models/user.dart

/// Value for model.
@freezed
@formValue
@immutable
@firebaseDataConnect
// TODO: Set the path for the collection.
@CollectionModelPath(
  "user",
  permission: [
    AllowReadModelPermissionQuery.allUsers(),
    AllowWriteModelPermissionQuery.allUsers(),
  ],
  adapter: firebaseDataConnectModelAdapter, // Add here
)
abstract class UserModel with _$UserModel {
  const factory UserModel({
    // TODO: Set the data schema.
    @Default("Guest") String name,
    int? age,
  }) = _UserModel;
  const UserModel._();
さらにlib/adapter.dartを開き下記を編集してください。
/// App Model.
///
/// By replacing this with another adapter, the data storage location can be changed.
// TODO: Change the database.
final modelAdapter = ListenableFirestoreModelAdapter(
  options: DefaultFirebaseOptions.currentPlatform,
);
// const modelAdapter = firebaseDataConnectModelAdapter;
// final modelAdapter = RuntimeModelAdapter();
最後にUserModelのCollectionModelPathへの変更を反映するためにコードの自動生成を行います。
katana code generate
これで実装完了です。
アプリの実行
アプリを実行して確認してみましょう。
カテゴリーを作ります。
作ったカテゴリーからポストを作成します。
ユーザーが紐づけられて表示されていることがわかります。
Firestoreのデータとしては下記のようになっています。
titleを変えてみましょう。
アプリ内をなにも触らずとも下記のようにPostDataのタイトルが「Changed Title」になっていることが確認できます。
このようにFirebaseDataConnectのデータに紐づけながらFirestoreのデータを扱うことができました。
おわりに
FirebaseにDataConnectがやってきたおかげでFirebase内でも気軽にRDBを触ることができるようになりました。
Masamuneフレームワークを用いることでそれをさらに扱いやすくFirestore等と連携しやすいようにすることができます。
自分で使う用途で作ったものですが実装の思想的に合ってそうならぜひぜひ使ってみてください!
また、こちらにソースを公開しているのでissueやPullRequestをお待ちしてます!
また仕事の依頼等ございましたら、私のTwitterやWebサイトで直接ご連絡をお願いいたします!
GitHub Sponsors
スポンサーを随時募集してます。ご支援お待ちしております!


