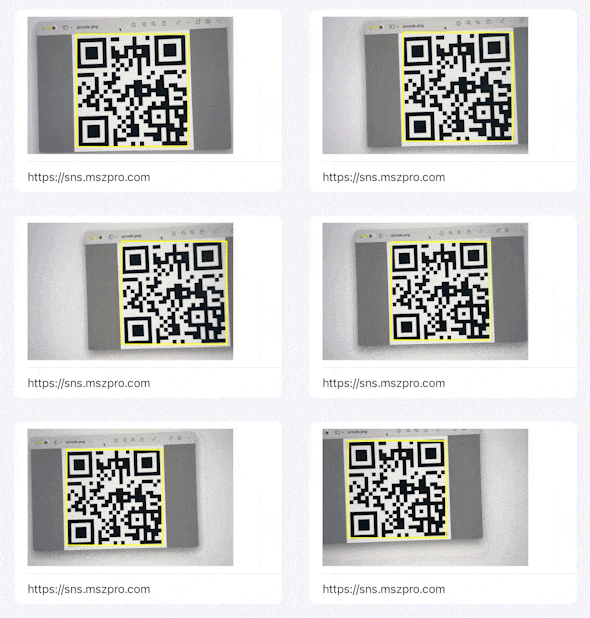
この記事では、カメラからのビデオストリームを表示し、
QRコード(または他のタイプのコード)を検出し、
その周りに矩形を表示することによってコードを強調するビューを作成することについて話します。
また、SwiftUI互換のビューを作成し、SwiftUIのビュー内で使用できるようにします。
変数を用意する
まず、スキャンした結果とカメラプレビューレイヤーを保存するために、以下の変数を追加します。
@Binding var scannedCode: String?
var viewSize: CGSize

private var captureSession = AVCaptureSession()
private var qrCodeFrameView = UIView()
var videoPreviewLayer: AVCaptureVideoPreviewLayer
viewSize はカメラプレビューレイヤーのサイズを表します。
プレビューレイヤーと検出されたQRコードのオーバーレイビューを初期化
videoPreviewLayer = AVCaptureVideoPreviewLayer(session: captureSession)
videoPreviewLayer.videoGravity = AVLayerVideoGravity.resizeAspectFill
videoPreviewLayer.frame = .init(origin: .zero, size: viewSize)
qrCodeFrameView.layer.borderColor = UIColor.green.cgColor
qrCodeFrameView.layer.borderWidth = 2
ビデオプレビューレイヤーを初期化し、サイズを設定します。
qrCodeFrameView は、検出されたQRコードに重ねて表示される (オーバーレイ) ビューです。
現在はフレームを持ちません。
しかし、QRコードを検出したときに、そのビューの位置とサイズを設定することになります。
ビデオ撮影用カメラデバイスを取得
ビデオキャプチャーのためのデフォルトのカメラデバイスを取得します。
そして、ビデオキャプチャセッションにカメラ入力を追加します。
guard let captureDevice = AVCaptureDevice.default(for: AVMediaType.video) else {
    print("Failed to get the camera device")
    return
}

// Get an instance of the AVCaptureDeviceInput class using the previous device object.
let input = try AVCaptureDeviceInput(device: captureDevice)

// Set the input device on the capture session.
captureSession.addInput(input)
** do と catch ブロックの使い分けを忘れないように。
メタデータ出力の追加(QRコード検出用)
バーコードや物体検出にもVisionフレームワークを利用することができます。
しかし、この機能はすでにAVFoundationフレームワークの中で提供されているので、代わりにAVCaptureMetadataOutputを使用することにします。
AVCaptureMetadataOutput を使用すると、検出されたメタデータオブジェクトは setMetadataObjectsDelegate 関数で定義されたデリゲートに報告されます。
let captureMetadataOutput = AVCaptureMetadataOutput()
captureSession.addOutput(captureMetadataOutput)
captureMetadataOutput.setMetadataObjectsDelegate(self, queue: DispatchQueue.main)
captureMetadataOutput.metadataObjectTypes = [.qr]
metadataObjectTypes は、QRコードを探すためのコードを定義していますが、
バーコードや他の多くの種類を検出するように設定することも可能です。
ビデオセッションを開始
ビデオのプレビューをレイヤーとしてビューに追加します(ユーザーは何がスキャンされているのか見ることができます)。
その後、ビデオセッションの実行を開始します。
また、qrCodeFrameView をビューに追加します。
また、他のビューの上にオーバーレイビューを表示 (bringSubviewToFront) しています
この時点では、サイズを持たないので、qrCodeFrameViewが画面には表示されません。
mainView.layer.addSublayer(videoPreviewLayer)

// Start running the video session
DispatchQueue.global(qos: .background).async {
    captureSession.startRunning()
}

// Prepare the view that highlights any detected QR code
mainView.addSubview(qrCodeFrameView)
mainView.bringSubviewToFront(qrCodeFrameView)
メタデータ出力デリゲートを設定
func metadataOutput(_ output: AVCaptureMetadataOutput, didOutput metadataObjects: [AVMetadataObject], from connection: AVCaptureConnection) {

    // Get the metadata object.
    if let metadataObj = metadataObjects.first as? AVMetadataMachineReadableCodeObject,
       metadataObj.type == .qr {
        // QR code detected
        if let barCodeObject = videoPreviewLayer?.transformedMetadataObject(for: metadataObj) {
            qrCodeFrameView.frame = barCodeObject.bounds
            qrCodeFrameView.layer.borderColor = UIColor.green.cgColor
            if self.scannedCode != metadataObj.stringValue {
                self.scannedCode = metadataObj.stringValue
            }
        }
    } else {
        // No QR code detected
        qrCodeFrameView.frame = CGRect.zero
        qrCodeFrameView.layer.borderColor = UIColor.yellow.cgColor
    }

}

private func updatePreviewLayer(layer: AVCaptureConnection, orientation: AVCaptureVideoOrientation) {
    layer.videoOrientation = orientation
}
QRコードのメタデータが検出されたら、
qrCodeFrameView のフレームを検出されたバーコードオブジェクトのバウンドに設定し、
ビューの境界の色を緑に設定することができます。
コードが検出されない場合は、
フレームを0に設定してビューを非表示にすることができます。
** ここで、デバイスの向きの変更も検知し、それを利用してプレビューの向きを変更する必要の場合があります。
SwiftUIでUIKitのビューを対応させる
SwiftUIでUIKitの UIView を互換性のあるものにするために、
UIViewRepresentableを使用することにします。
初期化するために func makeUIView(context: Context) -> UIView 関数が必要です。
デリゲート関数は Coordinator クラス内に配置されることになる。 class Coordinator: NSObject, AVCaptureMetadataOutputObjectsDelegate
そして、func makeCoordinator() -> QRCodeScanner.Coordinator 関数内で Coordinator を初期化します。
また、変数の更新に基xづいてUIKitビューを更新する関数 func updateUIView(_ view: UIView, context: Context) を用意する必要があります。
ここでは、スキャンしたQRコードの値を更新しているので、その関数内では何もする必要がありません。
完成したSwiftUI互換のビューはこちらです。
import SwiftUI
import AVFoundation

struct QRCodeScanner: UIViewRepresentable {

    @Binding var scannedCode: String?
    var viewSize: CGSize

    private var captureSession = AVCaptureSession()
    private var qrCodeFrameView = UIView()
    var videoPreviewLayer: AVCaptureVideoPreviewLayer

    init(scannedCode: Binding<String?>, viewSize: CGSize) {
        self._scannedCode = scannedCode
        self.viewSize = viewSize
        videoPreviewLayer = AVCaptureVideoPreviewLayer(session: captureSession)
        videoPreviewLayer.videoGravity = AVLayerVideoGravity.resizeAspectFill
        videoPreviewLayer.frame = .init(origin: .zero, size: viewSize)
    }

    func makeUIView(context: Context) -> UIView {

        let mainView = UIView(frame: .init(origin: .zero, size: viewSize))

        guard let captureDevice = AVCaptureDevice.default(for: AVMediaType.video) else {
            print("Failed to get the camera device")
            return mainView
        }

        do {
            // Get an instance of the AVCaptureDeviceInput class using the previous device object.
            let input = try AVCaptureDeviceInput(device: captureDevice)

            // Set the input device on the capture session.
            captureSession.addInput(input)

            // Initialize a AVCaptureMetadataOutput object and set it as the output device to the capture session.
            let captureMetadataOutput = AVCaptureMetadataOutput()
            captureSession.addOutput(captureMetadataOutput)
            captureMetadataOutput.setMetadataObjectsDelegate(context.coordinator, queue: DispatchQueue.main)
            captureMetadataOutput.metadataObjectTypes = [.qr]

        } catch {
            print(error)
        }

        mainView.layer.addSublayer(videoPreviewLayer)

        // Start running the video session
        DispatchQueue.global(qos: .background).async {
            captureSession.startRunning()
        }

        // Prepare the view that highlights any detected QR code
        qrCodeFrameView.layer.borderColor = UIColor.green.cgColor
        qrCodeFrameView.layer.borderWidth = 2
        mainView.addSubview(qrCodeFrameView)
        mainView.bringSubviewToFront(qrCodeFrameView)

        return mainView
    }

    func makeCoordinator() -> QRCodeScanner.Coordinator {
        return Coordinator(qrCodeFrameView: self.qrCodeFrameView, videoPreviewLayer: self.videoPreviewLayer, scannedCode: $scannedCode)
    }

    func updateUIView(_ view: UIView, context: Context) {

    }

    class Coordinator: NSObject, AVCaptureMetadataOutputObjectsDelegate {

        var qrCodeFrameView: UIView
        var videoPreviewLayer: AVCaptureVideoPreviewLayer?
        @Binding var scannedCode: String?

        init(qrCodeFrameView: UIView, videoPreviewLayer: AVCaptureVideoPreviewLayer?, scannedCode: Binding<String?>) {
            self.qrCodeFrameView = qrCodeFrameView
            self.videoPreviewLayer = videoPreviewLayer
            self._scannedCode = scannedCode
        }

        func metadataOutput(_ output: AVCaptureMetadataOutput, didOutput metadataObjects: [AVMetadataObject], from connection: AVCaptureConnection) {

            // Get the metadata object.
            if let metadataObj = metadataObjects.first as? AVMetadataMachineReadableCodeObject,
               metadataObj.type == .qr {
                // QR code detected
                if let barCodeObject = videoPreviewLayer?.transformedMetadataObject(for: metadataObj) {
                    qrCodeFrameView.frame = barCodeObject.bounds
                    qrCodeFrameView.layer.borderColor = UIColor.green.cgColor
                    if self.scannedCode != metadataObj.stringValue {
                        // new code scanned
                        self.scannedCode = metadataObj.stringValue
                        UINotificationFeedbackGenerator().notificationOccurred(.success)
                    }
                }
            } else {
                // No QR code detected
                qrCodeFrameView.frame = CGRect.zero
                qrCodeFrameView.layer.borderColor = UIColor.yellow.cgColor
            }

        }

        private func updatePreviewLayer(layer: AVCaptureConnection, orientation: AVCaptureVideoOrientation) {
            layer.videoOrientation = orientation
        }

    }

}
このコードをSwiftUIで使用するために
QRCodeScanner(scannedCode: $scannedCode, viewSize: .init(width: 300, height: 250))
    .frame(width: 300, height: 250)
    .onChange(of: scannedCode) { newValue in
        print(newValue)
    }
また、Info.plistファイル内にカメラの使用の説明テキストを追加することを忘れないでください。
お読みいただきありがとうございました。
☺️ サイト https://MszPro.com

Written by MszPro~

