AWS FireLensをfluent-bitで組み合わせてログを取得・整形した時の知見を覚え書きの形でまとめます。
今回は、Nginx、uWSGIの二つのコンテナから取得するログをいい感じにAthenaで見れるようにすることが目標。
前提として、Fargate上で、サイドカー構成でNginxのコンテナとfluent-bitのコンテナを一つのTask内で動かすものとします。
いい感じとは、
- Nginxのアクセスログの内容がkey-value形式のjsonで表示できる
- ヘルスチェックのログなどいらないやつはS3にまで送られずにfluent-bit側で弾かれている
- エラーログはすぐに見たいのでS3だけでなくdatadog/cloudwatchにも送る
こんな感じのを目指す。
この記事ではNginxだけについて書きます。後は同じようなやり方で簡単に追加できると思うので。
##fluent-bitに関する必要知識
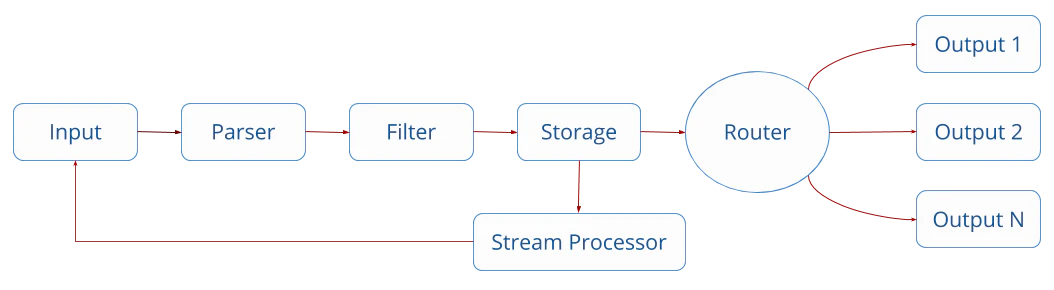
- FireLensで集めたログには全て
*-firelens-*のタグがついている - Stream Processorを経たデータは一度ライフサイクルの一番最初に戻る
- FILTERでは不要なキーを削除したり、正規表現でfirehoseに送信する/しないログを指定できる
- FILTERは上から順番に実行される
今回のやり方
- まず、FILTERで、手順2のためにcontainer_nameから正規表現でコンテナ名だけを抽出して余計な情報を除く
2.*-firelens-*のタグと1で加工したcontainer_nameの値を元に、Stream Processorを経たデータ後に専用のFILTERを使用できるように、Stream Processorにて、コンテナ別にTAGを付与する - 1で付与したタグを使って、コンテナ別に専用のFILTERを適用し、それぞれいらないデータ(例えば、Nginxコンテナならヘルスチェック)を削除したり、見やすいように加工する
- タグ毎に、firehose、datadogに送る
以下、Nginxのアクセスログ加工を例にしてやります。
手順
fluent-bit_custom.confというファイルを自分で作成して、それを使用します。
そのファイル名をtask definitionで指定しましょう。Fargateの場合、fileしか選択できないことに注意してください。
	{
		"name": "fluent-bit",
		"image": "<IMAGE3>",
		"essential": true,
		"logConfiguration": {
			"logDriver": "awslogs",
			"options": {
			  "awslogs-create-group": "true",
			  "awslogs-group": "/ecs/aaaaa-fargate-firelens",
			  "awslogs-region": "ap-northeast-1",
			  "awslogs-stream-prefix": "firelens"
			}
		},
		"firelensConfiguration": {
			"type": "fluentbit",
			"options": {
			  "config-file-type": "file",
			  "config-file-value": "/fluent-bit/etc/fluent-bit_custom.conf"
			}
		},
        .....
Fargate 起動タイプを使用するタスクの場合、サポートされる config-file-type の値は file のみです。
https://docs.aws.amazon.com/ja_jp/AmazonECS/latest/developerguide/using_firelens.html#firelens-taskdef
# AWS公式fluent-bitイメージ`amazon/aws-for-fluent-bit`を使用するときは、INPUTが予め登録されているので何も書かない。
# ちなみに、このファイル名をfluent-bit.confにすると公式のイメージで使用されているファイルを上書きしてしまうのでその名前は使わないこと。

[SERVICE]
    Flush 1
    Grace 30
    Log_Level info
    Parsers_File parsers.conf #parsers であることに注意
    Parsers_File parsers_custom.conf #自分で作ったparserを使用したいときはこのように指定する
    Streams_File stream_processor.conf #ここでStreamの設定ファイルを指定する。STREAM_TASKは同じファイルには書けないので注意。
FROM amazon/aws-for-fluent-bit:latest

COPY conf/fluent-bit/fluent-bit_custom.conf /fluent-bit/etc/fluent-bit_custom.conf
COPY conf/fluent-bit/stream_processing.conf /fluent-bit/etc/stream_processing.conf
COPY conf/fluent-bit/parsers_custom.conf /fluent-bit/etc/parsers_custom.conf
まず、こちらの記事を参考に、以下のようにparserを作って、コンテナの名前だけを抽出できるようにする。
[PARSER]
    Name container
    Format regex
    Regex ^\/(?<task_name>(ecs-TaskDefName))-(?<task_revision>\d+)-(?<container_name>.+)-(?<target_name>.+)$
用意したParserの名前をFILTERで指定して使う。Match *としているので、全てのデータに適用される。
[FILTER]
    Name parser
    Match *
    Key_Name container_name
    Parser container
    Reserve_Data true
これで、当初以下のようにコンテナ名以外の情報も含まれていたが、
"container_name":"/ecs-TaskDefName-151-nginx-f4cefae7a0bae7f47500"
上手くコンテナ名を抜き出すことができた。
"container_name":"nginx"
次に、Stream Processorを使用してコンテナ毎にタグをつけて、コンテナ別にそれぞれ異なるFILTERを適用できるようにする。
[STREAM_TASK] #Name, Execが必要
    Name nginx
    Exec CREATE STREAM nginx WITH (tag='combine.nginx') AS SELECT * FROM TAG:'*-firelens-*' WHERE container_name = 'nginx';
# nginx というストリームを作成し、それにcombin.nginxというタグを付与する
WITHステートメントで新しいタグを設定しているので、fluent-bitのデータパイプラインを初めから再び通ることになる。これで、コンテナ別にそれぞれ異なるFILTERを適用できるようになる。
New stream created can be optionally re-ingested back into Fluent Bit pipeline if the property Tag is set in the WITH statement.
https://docs.fluentbit.io/manual/stream-processing/getting-started/fluent-bit-sql より
上のFILTERでこれでNginxのコンテナにだけFILTERを適用することができるようになった。
Fluent-bitは、デフォルトでいくつかのParserを用意してくれている。
https://github.com/fluent/fluent-bit/blob/master/conf/parsers.conf
上記のリンクから確認できるように、Nginxも含まれているのでありがたく使わせてもらう。
parserの名前がnginxなので、以下のようにFILTERでその名前を指定する。
[SERVICE]
    Flush 1
    Grace 30
    Log_Level info
    Parsers_File parsers.conf #parsers であることに注意
    Parsers_File parsers_custom.conf #自分で作ったparserを使用したいときはこのように指定する

[FILTER]
    Name parser
    Match combine.nginx
    Key_Name log
    Parser nginx
    Reserve_Data true
いらない項目を削除する
record_modifier
record_modifierという機能があるのでそれを使えばできます。結構不要な情報もログに出てくるので知っておくと便利です。
[FILTER]
    Name record_modifier
    Match *
    Remove_key container_id
    Remove_key ecs_cluster
    Remove_key ecs_task_arn
    Remove_key ecs_task_definition
    Remove_key target_name
    Remove_key task_name
正規表現
[FILTER]
    Name grep
    Match combine.nginx
    Exclude log ^(?=.*ELB-HealthChecker\/2\.0).*$
データストアに送信する
[OUTPUT]
    Name firehose
    Match combine.nginx
    region ap-northeast-1
    delivery_stream firehose-nginx
あとはcloudwatchなり、firehoseに送ってそこからS3にログを貯めるなり、エラーログはdatadogに送って検知できるようにするなりできます。
エラーログはStreamでタグを新たに付与してそのタグを元にdatadogへ送るとかできそうです。
[OUTPUT]
    Name datadog
    Match       nginx.error
    Host        http-intake.logs.datadoghq.com
    TLS         on
    compress    gzip
    apikey      <my-datadog-api-key>
    dd_service  <my-app-service>
    dd_source   <my-app-source>
    dd_tags     team:logs,foo:bar
最終的なfluent-bit_custom.conf
[SERVICE]
    Flush 1
    Grace 30
    Log_Level info
    Parsers_File parsers.conf #parsers であることに注意
    Parsers_File parsers_custom.conf #自分で作ったparserを使用したいときはこのように指定する

[FILTER]
    Name parser
    Match *
    Key_Name container_name
    Parser container
    Reserve_Data true

[FILTER]
    Name record_modifier
    Match *
    Remove_key container_id
    Remove_key ecs_cluster
    Remove_key ecs_task_arn
    Remove_key ecs_task_definition
    Remove_key target_name
    Remove_key task_name

[FILTER]
    Name grep
    Match combine.nginx
    Exclude log ^(?=.*ELB-HealthChecker\/2\.0).*$

[FILTER]
    Name parser
    Match combine.nginx
    Key_Name log
    Parser nginx
    Reserve_Data true

[OUTPUT]
    Name firehose
    Match combine.nginx
    region ap-northeast-1
    delivery_stream firehose-nginx

[OUTPUT]
    Name datadog
    Match       nginx.error
    Host        http-intake.logs.datadoghq.com
    TLS         on
    compress    gzip
    apikey      <my-datadog-api-key>
    dd_service  <my-app-service>
    dd_source   <my-app-source>
    dd_tags     team:logs,foo:bar
おまけ Athenaのテーブル作成クエリ
CREATE EXTERNAL TABLE IF NOT EXISTS db.table_name (
    container_name string,
    log string,
    source string,
    task_revision string
)
PARTITIONED BY (dt string)

  ROW FORMAT  serde 'org.openx.data.jsonserde.JsonSerDe'
  LOCATION 's3://container-log/logs/';

MSCK REPAIR TABLE table_name;
以上です。
参考
https://aws.amazon.com/jp/blogs/opensource/splitting-application-logs-multiple-streams-fluent/
https://qiita.com/flatnyat/items/3cad79fc5a323ae3245c
One of the powerful features of Fluent Bit Stream Processor is that allows to create new streams of data using the results from a previous SQL query, these results are re-ingested back into the pipeline to be consumed again for the Stream Processor (if desired) or routed to output destinations such any common record by using Tag/Matching rules (tip: stream processor results can be Tagged!)
https://docs.fluentbit.io/manual/stream-processing/overview より
Parsers_File
Path for a parsers configuration file. Multiple Parsers_File entries can be defined within the section.
CREATE STREAM Statement
Synopsis
CREATE STREAM stream_name
[WITH (property_name=value, [...])]
AS select_statement
Description
Create a new stream of data using the results from the SELECT statement. New stream created can be optionally re-ingested back into Fluent Bit pipeline if the property Tag is set in the WITH statement.