この記事は JX通信社Advent Calendar の 20 日目です。
JX通信社で機械学習エンジニアをしている mapler です。
最近 PyTorch ユーザーとして嬉しいことが多いですね。月初に PyTorch が 1.0 正式リリース されたばかりで、先週土曜日 PyTorch の上に実装された PyText という自然言語処理のフレームワーク がリリースされました。会社にもっと PyTorch ユーザーが増えればいいなと思っています。
今回は PyText を利用して、日本語のテキスト分類のモデルを作った話をしようと思います。
準備
開発環境
社内に開発研究用の GPU Server がありますので、それを利用することにします。GPU Server 上には deepo というあらゆる機械学習のフレームワークが全部インストールされている Docker Container が動いています。社内機械学習関連の試験作業は基本にこの Container の上で動く Jupyter Notebook で行っています。
> import torch
> torch.__version__
'1.0.0'
> torch.cuda.is_available()
True
PyTorch 1.0 がインストール済みで、 GPU が利用可能の状態です。
PyText をインストール
> pip install pytext-nlp
データの準備
データ内容はニュース記事のタイトル。
カテゴリーはエンタメ (entertainment) 、グルメ (gourmet)、国内 (national )、国際 (world)、政治 (politics)、経済 (money)、スポーツ (sports)、テクノロジー (technology) の8つがあります。
> import pandas as pd
> df = pd.read_csv('/workspace/data/corpus.csv')
> len(df)
52156
> df.sample(5)
id		label	title
171775	sports	モウリーニョがFA杯チェルシー戦を前にぼやき「練習する時間が取れない。ELの方が大切」
648917	politics	安倍首相「自由貿易のルール、世界に」=TPP特別委で集中審議
215768	sports	イチロー「1番・DH」で4戦連続先発 打率&出塁率はチーム最高成績
760965	national	運転手「ぼうっとしてた」=トレーラー衝突、1人死亡36人負傷―香川
727516	entertainment	上沼恵美子、舛添東京都知事をバッサリ「こんなケチなおっさん、どこがよかったんやろ」
> df['label'].unique()
array(['entertainment', 'national', 'sports', 'world', 'money',
       'politics', 'technology', 'gourmet'], dtype=object)
前処理
Mecab(NEologd) で形態素解析して、半角スペースで繋げます。(PyText の中にも Featurizer という前処理用の Class を定義することができます)
> df['title'] = df['title'].progress_apply(lambda x: ' '.join(tokenize_jp(x)))
> df['title'].head(10)
0                       知英 ジヨン 切ない 片思い 相談 思わず アツ く なる
1                                 男鹿 水族館 アザラシ 間近 ぷかぷか
2                               アロンソ 現在 フェラーリ サインツ 語る
3    スター・ウォーズ 新作 2週 連続 首位 三谷幸喜 新作 登場 3位 週間 レンタル ランキング
4                         エディ・レッドメイン 次回作 原始人 声優 チャレンジ
Name: title, dtype: object
学習データとテストデータを分割
train_df, test_df = train_test_split(df)
eval_df, test_df = train_test_split(test_df)
PyText 用の tsv に出力
train_df.to_csv('/workspace/playground/pytext/train_data.tsv', sep='\t', columns=['label', 'title'], index=False, header=False)
test_df.to_csv('/workspace/playground/pytext/test_data.tsv', sep='\t', columns=['label', 'title'], index=False, header=False)
eval_df.to_csv('/workspace/playground/pytext/eval_data.tsv', sep='\t', columns=['label', 'title'], index=False, header=False)
※ PyText の実装済みの DocClassificationTask クラスを直接利用したいので、学習データはそちらに合わせて tsv に整形しています。自前の Task を定義すれば、他の形の入力もカスタマイズできると思います。
学習
PyText のモデルの学習のパイプラインにある Task, Trainer, Model, DataHandler, Exporter などすべてのクラスは Component というクラスを継承しています。

(image src: https://pytext-pytext.readthedocs-hosted.com/en/latest/overview.html)
Component は JSON 形の Config ファイルを読み取って、学習の中で使う input や、learning rate などのパラメータを設定することが可能で、モデルや入力、出力など、コードの実装はほぼ必要ないです。
今回は公式チュートリアルにあるテキスト分類のサンプル config ファイルを Path だけ編集して利用します。
> cat docnn.json
{
  "task": {
    "DocClassificationTask": {
      "data_handler": {
        "train_path": "/workspace/playground/pytext/train_data.tsv",
        "eval_path": "/workspace/playground/pytext/eval_data.tsv",
        "test_path": "/workspace/playground/pytext/test_data.tsv"
      }
    }
  }
}
学習を実行
> pytext train < docnn.json
コマンド一行で、学習パイプラインが走り始めます。
学習が始まったら、各 Component の Config が最初に出力されます。config ファイルに定義してない部分は PyText のデフォルト値になります。
===Starting training...

Parameters: PyTextConfig:
    task: DocClassificationTask.Config:
        features: ModelInputConfig:
        featurizer: SimpleFeaturizer.Config:
        data_handler: DocClassificationDataHandler.Config:
            columns_to_read: ['doc_label', 'text', 'dict_feat']
            shuffle: True
            sort_within_batch: True
            train_path: /workspace/playground/pytext/train_data.tsv
            eval_path: /workspace/playground/pytext/eval_data.tsv
            test_path: /workspace/playground/pytext/test_data.tsv
            train_batch_size: 128
            eval_batch_size: 128
            test_batch_size: 128
            max_seq_len: -1
        trainer: Trainer.Config:
        optimizer: OptimizerParams:
        scheduler: Scheduler.Config:
        exporter: None
        model: DocModel.Config:
        labels: DocLabelConfig:
        metric_reporter: ClassificationMetricReporter.Config:
    use_cuda_if_available: True
    distributed_world_size: 1
    load_snapshot_path:
    save_snapshot_path: /tmp/model.pt
    export_caffe2_path: /tmp/model.caffe2.predictor
    modules_save_dir:
    save_module_checkpoints: False
    use_tensorboard: True
    test_out_path: /tmp/test_out.txt
    debug_path: /tmp/model.debug


    # for debug of GPU
    use_cuda_if_available: True
    device_id: 0
    world_size: 1
    torch.cuda.is_available(): True
    cuda_utils.CUDA_ENABLED: True
    cuda_utils.DISTRIBUTED_WORLD_SIZE: 1

...
学習と評価の結果も epoc ごとに出力します
Rank 0 worker: Starting epoch #5
Learning rate(s): 0.001, 0.001
Rank 0 worker: Running epoch for Stage.TRAIN

Stage.TRAIN
loss: 0.450399
Accuracy: 84.89

Macro P/R/F1 Scores:
	Label               	Precision 	Recall    	F1        	Support

	politics            	82.13     	83.89     	83.00     	12393
	sports              	92.37     	93.61     	92.98     	12330
	technology          	86.80     	87.12     	86.96     	12410
	money               	77.13     	76.17     	76.65     	12379
	gourmet             	94.28     	96.05     	95.16     	12390
	national            	76.24     	71.85     	73.98     	12276
	entertainment       	88.13     	89.25     	88.68     	12321
	world               	81.18     	81.15     	81.17     	12387
	Overall macro scores	84.78     	84.89     	84.82

...

Stage.EVAL
loss: 0.593269
Accuracy: 81.89

Macro P/R/F1 Scores:
	Label               	Precision 	Recall    	F1        	Support

	world               	79.47     	78.62     	79.05     	3097
	money               	78.32     	67.15     	72.31     	3099
	entertainment       	80.11     	88.37     	84.04     	3113
	politics            	82.69     	78.72     	80.66     	3064
	technology          	80.53     	84.80     	82.61     	3019
	gourmet             	91.53     	96.22     	93.81     	3065
	national            	70.61     	68.42     	69.50     	3160
	sports              	90.83     	93.23     	92.02     	3104
	Overall macro scores	81.76     	81.94     	81.75

...
評価セットに対して、より精度が高いモデルがでたら、自動で指定された場所(指定しなければデフォルトの /tmp/model.pt に)に保存されます。
Rank 0 worker: Found a better model! Saving the model state.

=== Saving model to: /tmp/model.pt
Saving pytorch model to: /tmp/model.pt
デフォルト epoch は 10 ですので、10 回の cross-validation したあと、テストデータに対して、評価の出力をします。(社内 GPU Server の場合、学習は 3分 ぐらいかかります)
Stage.TEST
loss: 0.575501
Accuracy: 82.55

Macro P/R/F1 Scores:
	Label               	Precision 	Recall    	F1        	Support

	technology          	85.54     	85.46     	85.50     	1052
	sports              	92.39     	91.60     	91.99     	1047
	gourmet             	91.17     	97.66     	94.31     	1026
	money               	74.92     	69.09     	71.89     	1003
	national            	69.59     	64.59     	67.00     	1045
	world               	82.73     	82.15     	82.44     	997
	entertainment       	81.08     	89.21     	84.95     	1047
	politics            	80.91     	80.27     	80.59     	1024
	Overall macro scores	82.29     	82.50     	82.33
...
saving result to file /tmp/test_out.txt
総合的に 80% ぐらいの精度が出ています。
Confusion Matrix
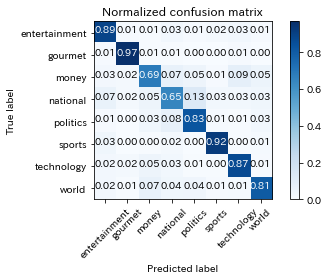
精度はそこそこ悪くないと思いますが
- 経済 (
money) は 国内 (national) と テクノロジー (technology) に間違って判定することが多い - 国内 (
national) は 政治 (politics) に間違って判定することが多い
(そもそも人間から見てもこれらのクラスは間違いやすいと感じます。)
Model Export
学習済みのモデルをあとで再利用できるように、export command を利用して ONNX 形式の Caffe2 モデルに変換することができます。
> pytext export < docnn.json
ここでは、上記の Config の(デフォルト)出力に記載していた save_snapshot_path にある model.pt が exported_model.c2 に変換されます。
Saving caffe2 model to: exported_model.c2
モデルの利用
Caffe2 のモデルを呼び出す
> config = pytext.load_config(config_file)  # 上記の docnn.json
> predictor = pytext.create_predictor(config, model_file)  # Caffe2 モデル保存箇所 ./exported_model.c2
> text = "ソフトバンク上場、大幅安の船出 通信障害などで逆風"
> tokenized_text = tokenize_jp(text)
> print(tokenized_text)
"ソフトバンク 上場 大幅 安 船出 通信 障害 など 逆風"
> result = predictor({"raw_text": tokenized_text})
> print(result)
{'doc_scores:entertainment': array([-10.99021], dtype=float32), 'doc_scores:gourmet': array([-9.075607], dtype=float32), 'doc_scores:money': array([-0.6837206], dtype=float32), 'doc_scores:national': array([-5.292539], dtype=float32), 'doc_scores:politics': array([-7.7856865], dtype=float32), 'doc_scores:sports': array([-9.889949], dtype=float32), 'doc_scores:technology': array([-0.76206535], dtype=float32), 'doc_scores:world': array([-3.775038], dtype=float32)}
> result = max(result, key=result.get)  # 最大値を取る
> print(result)
doc_scores:money
テクノロジー になるかを心配したけど、正しく 経済 に分類されました。
まとめ
今回は PyText というフレームワークでテキスト分類のモデルを作成できました。学習データと形態素解析などの前処理だけ時間がかかってしまいましたが、モデルの学習などはコード書かなくでも作成できました。今回は内製の記事分類モデルを利用しましたが、これからは自前の Task Component をカスタマイズして、他の Model も試してみようと思います。