▽ 初めに
本記事は「Unity Advent Calendar 2018」の7日目の記事です。
前日は @nkjzm さんの「Unityで鏡を実装する方法」でした。
今回話す内容はUnityのECS(EntityComponentSystem)に関するネタです。
※注意点として記事中で触れるECSについてはPureECSを前提としたものとなります。(Hybridについては触れません)
ネタ自体は2018/10/23に開催された「Unity ECS完全に理解した」と言う勉強会にて自分が発表した内容の一部となりますが、スライド中では大雑把な説明しか出来ていなかったので、こちらの方で改めてコード等を添えつつ詳細について触れていければと思います。
※注意点
- (ECSがPreviewの為に毎度記載しておりますが...)以下、この記事に於ける注意点だけ先行して記載しておきます。
- この記事中ではECSの基礎的な部分についての説明は致しません。(例 : そもそもEntityComponentSystemとは何か?と言った話など)
- ※「ECS初学者に向けてのTips集」のまとめページに「初学者向け おすすめ資料リンク集」を載せてあります。先ずはこちら等がおすすめです。
- 内容としては手探りな部分も多々あります。その為に確実に正しい実装や考え方かと言われると微妙な部分もあるかもしれないので、あくまで実装の一例程度に留めて頂けると幸いです。。
- ECS自体についてもまだまだPreviewな状態であり、将来的には実装が変わってくる可能性もあります。その点を踏まえて参考にして頂ければと思います。
- この記事中ではECSの基礎的な部分についての説明は致しません。(例 : そもそもEntityComponentSystemとは何か?と言った話など)
▽ 概要
(上記の講演資料中にも記載している内容にはなりますが...)
先ずは前提としてUnityのECSに於けるアニメーションの事情から説明していくと、こちらはまだ公式ではサポートされていない機能となるので、細かく制御を行う必要があるなら何かしらの機能を自作する必要があります。1
今回お話する内容としてはそれを自作してみたお話になります。
実装としてはシェーダーでアニメーションを行うアプローチとなっており、大まかに言ってしまうとテラシュールブログさんの以下の記事にて紹介されている内容をECSで制御出来るようにしたと言った内容になります。
今回実装したサンプルとしては単純な切り替えしか出来ない簡単なもの2ではありますが、制御の一例と言った形でご参考にして頂けると幸いです。
サンプルプロジェクト一式はGitHubにアップしてあります。
↑ サンプルの実行画面
ECS側でEntity毎のキーフレーム/再生アニメーションと言ったデータを管理しつつ、Shader側(具体的に言うと頂点シェーダー)でECS(C#)側より渡された再生情報と予めTextureにベイクされたアニメーション情報を参照する形でアニメーション再生を行ってます。
※実行例としては「ダッシュ → スライディング → 待機」アニメーションの終了タイミングを検知して順次切り替えていってる物となります。制御の詳細については後述。
ちなみに、GitHub側にあるGifの方では 知る人ぞ知る墓から掘り起こしてきた懐かしの 配管工が元気に動き回っておりますが、実際にアップしているサンプルの方では上記のGif同様にローポリユニティちゃんが動きます。(一部のアニメーションの種類こそ違えどやっている事自体は変わらず)
行方不明になったはずの彼が最新である2018.3を舞台に大量のクローンを引き連れて動き回っているのは大変エモいものがあります。
■ 動作環境
- Unity2018.3.0b12
- Entities 0.0.12-preview.21
▽ MonoBehaviour側について
MonoBehaviour側では主にECSの初期設定やデータの設定などを行っております。
▼ ECSの初期設定
こちらはECSの初期設定に関する部分です。(ソースは一部を引用したもの)
AnimationMeshに表示するMeshと後述のアニメーションデータを設定したMaterialを登録しておき、今回の主題となるAnimationInstancingSystemにコンストラクタ経由で参照を渡しております。
それ以外についてはArchetypeに必要なComponentDataを登録し、それを元にEntityを量産していってる感じです。(初期アニメーションや表示位置についてはこの時に決定している)
※ちなみに、ソース中で何気なく使っているPrefabと言う機能について軽く補足しておくと、こちらは「Entityを生成する際のベースとなるEntity」を定義しておくための特殊なEntityとなります。
詳細については以下の記事について解説しているので宜しければご覧ください。
(個人的には現時点でのECSに於いてはかなり便利な機能だと思っているので、覚えておくと幸せになれるかもしれません。)
// 再生アニメーションデータ
[Serializable]
public sealed class AnimationMesh
{
    public Mesh Mesh;
    public Material AnimationMaterial;
}

public sealed class Bootstrap : MonoBehaviour
{
    // ------------------------------
    #region // Private Members(Editable)

    // 最大Entity数
    [SerializeField] int _maxObjectNum = 10000;

    // 再生アニメーションデータ
    [SerializeField] AnimationMesh[] _animationMeshes = null;

    // ランダムな位置取得時の表示領域
    [SerializeField] float _randomBoundSize = 64f;

    #endregion // Private Members(Editable)


    // ----------------------------------------------------
    #region // Unity Events

    // MonoBehaviour.Start
    void Start()
    {
        // World Settings
        World.Active = new World("Sample World");
        var entityManager = World.Active.CreateManager<EntityManager>();
        World.Active.CreateManager(typeof(EndFrameTransformSystem));
        World.Active.CreateManager(typeof(AnimationInstancingSystem), new ConstructorParameter { AnimationMeshes = this._animationMeshes });
        ScriptBehaviourUpdateOrder.UpdatePlayerLoop(World.Active);

        // Create Archetypes
        var archetype = entityManager.CreateArchetype(
            // アニメーションの再生情報
            ComponentType.Create<AnimationPlayData>(),
            // Prefab Entity
            ComponentType.Create<Prefab>(),
            // Transforms
            ComponentType.Create<Position>(), ComponentType.Create<Rotation>(), ComponentType.Create<LocalToWorld>());

        // Create Prefab Entity
        var prefabEntity = entityManager.CreateEntity(archetype);
        for (int i = 0; i < this._maxObjectNum; ++i)
        {
            var entity = entityManager.Instantiate(prefabEntity);

            // 座標の初期設定
            entityManager.SetComponentData(
                entity,
                new Position
                {
                    Value = this.GetRandomPosition()
                });
            entityManager.SetComponentData(
                entity,
                new Rotation
                {
                    Value = Quaternion.Euler(-90f, 0, 0)
                });

            // アニメーション再生情報の設定
            // → AnimationTypeはとりあえずは順番に割り当てておく
            entityManager.SetComponentData(
                entity,
                new AnimationPlayData
                {
                    CurrentKeyFrame = 0,
                    AnimationType = (AnimationType)(i % 3)
                });
        }
    }

    // MonoBehaviour.OnDestroy
    void OnDestroy()
    {
        World.DisposeAllWorlds();
    }

    #endregion // Unity Events

    // ----------------------------------------------------
    #region // Private Methods

    // ランダムな位置の取得
    float3 GetRandomPosition()
    {
        float3 boundSize = new float3(this._randomBoundSize);
        var halfX = boundSize.x / 2;
        var halfY = boundSize.y / 2;
        var halfZ = boundSize.z / 2;
        return new float3(
            UnityRandom.Range(-halfX, halfX),
            UnityRandom.Range(-halfY, halfY),
            UnityRandom.Range(-halfZ, halfZ));
    }

    #endregion // Private Methods
}
▼ アニメーションの仕組みについて
アニメーションデータの設定の話に入る前にアニメーションの仕組みについて簡単に触れておくと、やっている事としては頂点シェーダーにてMVP変換を行う前のローカル空間座標に有る頂点を動かすことでアニメーションさせております。
その際に参照するアニメーションデータとしては既存のAnimationClipを適用したモデルの頂点の動き(位置/法線)をTextureにベイクし、それをVTF(Vertex Texture Fetch)で参照する形で取得しております。


※出力したアニメーションデータとなるTextureの例。上がPosition(位置)で下がNormal(法線)の情報。
冒頭でも軽く触れましたが、使っている技術としてはテラシュールブログさんの「【Unity】シェーダーで3Dモデルのアニメーションを行う Animation Texture Baker」と言う記事にて紹介されている物と同じです。
その上でAnimationClipを適用したモデルの動きをTextureにベイクするシステム及びShader側でアニメーションを行う際のベースとしては記事中でもご紹介されている「sugi-cho/Animation-Texture-Baker」を使わせていただきました。
※補足として、テラシュールブログさんの記事中では「Legacy Animation」よりTextureのベイクを行っておりますが、「sugi-cho/Animation-Texture-Baker」の更新でAnimatorからもTextureをベイク出来るようになっておりました。(サンプルのローポリユニティちゃんはAnimatorよりベイク)
■ Shaderについて
以下のはアニメーションを行うShaderコードの一部引用となります。
内容としては「sugi-cho/Animation-Texture-Baker」にある「TextureAnimPlayer.shader」をベースにC#側からデータを渡せるように変更を加えたものとなります。
// アニメーションの再生情報
struct playData
{
    // 現在の再生キーフレーム
    float currentKeyFrame;
    // モデル変換行列
    float4x4 localToWorld;
};

sampler2D _MainTex, _PosTex, _NmlTex;
float4 _PosTex_TexelSize;
float _Length;

// C#側から渡されるEntity毎のアニメーション情報
StructuredBuffer<playData> _PlayDataBuffer;

v2f vert (appdata v, uint vid : SV_VertexID, uint instanceID : SV_InstanceID)
{
    UNITY_SETUP_INSTANCE_ID(v);
    UNITY_INITIALIZE_VERTEX_OUTPUT_STEREO(o);

    float t = _PlayDataBuffer[instanceID].currentKeyFrame / _Length;
#if ANIM_LOOP
    t = fmod(t, 1.0);
#else
    t = saturate(t);
#endif
    float x = (vid + 0.5) * ts.x;
    float y = t;
    float4 pos = tex2Dlod(_PosTex, float4(x, y, 0, 0));
    float3 normal = tex2Dlod(_NmlTex, float4(x, y, 0, 0));

    v2f o;
    o.vertex = UnityObjectToClipPos(mul(_PlayDataBuffer[instanceID].localToWorld, pos));
    o.normal = UnityObjectToWorldNormal(mul(_PlayDataBuffer[instanceID].localToWorld, normal));
    o.uv = v.uv;
    return o;
}
_PlayDataBuffer[instanceID].currentKeyFrameからインスタンスごとのキーフレームを取得し、そこで得たindexから該当する位置/法線情報をTexutreより取得して最後に以下の2行辺りで座標変換を行うことでアニメーションを行っております。
o.vertex = UnityObjectToClipPos(mul(_PlayDataBuffer[instanceID].localToWorld, pos));
o.normal = UnityObjectToWorldNormal(mul(_PlayDataBuffer[instanceID].localToWorld, normal));
ちなみに、C#からShader(Material)にデータを渡す箇所については以下の部分が関わってきます。
こちらについては後半のComponentSystemの項目辺りで再度触れます。
struct playData
{
    // 現在の再生キーフレーム
    float currentKeyFrame;
    // モデル変換行列
    float4x4 localToWorld;
};

// C#側から渡されるEntity毎のアニメーション情報
StructuredBuffer<playData> _PlayDataBuffer;
▼ アニメーションデータの設定
前置きが少し長くなりましたが、以上のがアニメーションのざっくりとした仕組みの説明になります。
それを踏まえた上でMaterialに設定する項目としては以下のようになります。
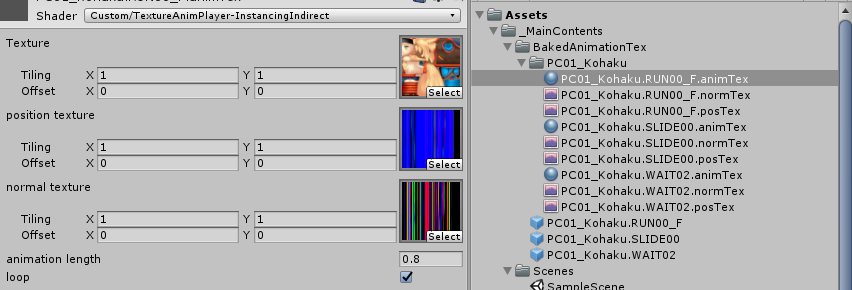
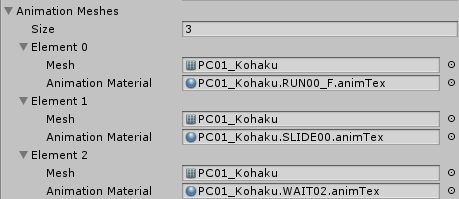
後はこちらをECSの初期設定クラスであるBootstrap にAnimationMeshをシリアライズ可能なフィールドとして持たせ、Inspectorから必要な分だけ登録してます。
// 再生アニメーションデータ
[Serializable]
public sealed class AnimationMesh
{
    public Mesh Mesh;
    public Material AnimationMaterial;
}
▽ ECS側について
次にECSの説明に入っていこうと思います。
一部を引用しつつ説明していくので、ECSに関するソース全体については「AnimationSystem.cs」をご確認下さい。
▼ ComponentDataについて
先に必要となるComponentDataについて解説していきます。
今回独自定義で用意しているComponentDataとしては以下のAnimationPlayDataのみとなります。
値についてはコメントの通りです。
// アニメーションタイプ
public enum AnimationType
{
    Run = 0,
    Slide,
    Wait,
}

/*
var archetype = entityManager.CreateArchetype(
    // 独自定義のComponentData
    ComponentType.Create<AnimationPlayData>(),

    // ※以下の4つはEntitiesパッケージにデフォルトで入っているComponentData
    ComponentType.Create<Prefab>(),
    ComponentType.Create<Position>(), ComponentType.Create<Rotation>(), ComponentType.Create<LocalToWorld>());
*/

// 再生情報
public struct AnimationPlayData : IComponentData
{
    // 現在の再生キーフレーム
    public float CurrentKeyFrame;
    // アニメーションタイプ
    public AnimationType AnimationType;
}
▼ ComponentSystemについて
次にComponentSystemの説明に入っていきます。
全体のコードが少し長いために、何分割かに分けて説明していければと思います。
■ コンストラクタについて
コンストラクタでは各アニメーションデータ(AnimationMesh)の参照を受け取ってフィールドに保持したり、その情報を元に必要なバッファの確保などを行っております。(バッファの詳細については後述)
public AnimationInstancingSystem(ConstructorParameter data)
{
    this._animationMeshes = data.AnimationMeshes;

    // 最大アニメーション数分のバッファを確保
    int maxAnimationNum = this._animationMeshes.Length;
    this._sendBuffers = new SendBuffers[maxAnimationNum];
    this._animationLengthList = new NativeArray<float>(maxAnimationNum, Allocator.Persistent);

    // バッファの初期化及び各アニメーションの再生時間を保持
    int animLengthID = Shader.PropertyToID("_Length");
    for (int i = 0; i < maxAnimationNum; ++i)
    {
        this._sendBuffers[i] = new SendBuffers();
        this._animationLengthList[i] = this._animationMeshes[i].AnimationMaterial.GetFloat(animLengthID);
    }

    this._maxAnimationType = Enum.GetNames(typeof(AnimationType)).Length;
    this._playDataBufferID = Shader.PropertyToID("_PlayDataBuffer");
}
■ ComponentGroupについて
OnCreateManagerにてComponentGroupの設定を行っております。
ComponentGroupについてざっくりと説明すると、こちらはEntityを取得する際のフィルター的なものであり、以下の例で言うとアーキタイプに 「AnimationPlayData(アニメーションデータ)」と「LocalToWorld(モデル変換行列)」を持つEntity全てを取得します。
protected override void OnCreateManager()
{
    this._rendererGroup = GetComponentGroup(
        ComponentType.Create<AnimationPlayData>(),
        ComponentType.Create<LocalToWorld>());
}
■ OnUpdate(前半)
毎フレーム更新となるJobHandle JobComponentSystem.OnUpdate(JobHandle inputDeps)についての説明です。
全体が少し長いために前半と後半に分けて説明していきます。
前半でやっている事を纏めると以下の点となります。
- ComponentDataをNativeArrayにコピーするためのメモリ確保及び破棄
- ComponentDataをNativeArrayにコピー(Jobで実行)
- アニメーションタイプ毎に再生情報を振り分け
- 再生情報の更新
前半の2点についてはComponentDataArrayを直接参照するよりは一度NativeArrayにコピーした方が効率的とのことなのでやっている処理です。
肝となるのは後半の2点であり、内部で回しているJobについては次で説明します。
protected override JobHandle OnUpdate(JobHandle inputDeps)
{
    this.DisposeBuffers();
    var handle = inputDeps;

    // ----------------------------------------------
    // Allocate Memory
    var groupLength = this._rendererGroup.CalculateLength();
    this._localToWorlds = new NativeArray<LocalToWorld>(groupLength, Allocator.TempJob, NativeArrayOptions.UninitializedMemory);
    this._animationPlayData = new NativeArray<AnimationPlayData>(groupLength, Allocator.TempJob, NativeArrayOptions.UninitializedMemory);

    // ----------------------------------------------
    // CopyComponentData
    handle = new CopyComponentData<LocalToWorld>
    {
        Source = this._rendererGroup.GetComponentDataArray<LocalToWorld>(),
        Results = this._localToWorlds,
    }.Schedule(groupLength, 32, handle);
    handle = new CopyComponentData<AnimationPlayData>
    {
        Source = this._rendererGroup.GetComponentDataArray<AnimationPlayData>(),
        Results = this._animationPlayData,
    }.Schedule(groupLength, 32, handle);

    // ----------------------------------------------
    // アニメーションタイプ毎に再生情報を振り分けていく
    // FIXME: 今回の実装でNativeMultiHashMapで確保しているメモリはサンプルのために適当。
    //        → ここらの仕様は最大描画数などを考慮した上で、どれくらい必要なのかすり合わせた方が良いかと思われる。
    var playDataMap = new NativeMultiHashMap<int, SendPlayData>(1000000, Allocator.TempJob);
    handle = new MapAnimationPlayDataJob
    {
        LocalToWorlds = this._localToWorlds,
        AnimationPlayData = this._animationPlayData,
        SendPlayDataMap = playDataMap.ToConcurrent(),
    }.Schedule(groupLength, 32, handle);

    // ----------------------------------------------
    // 再生情報の更新
    handle = new PlayAnimationJob
    {
        DeltaTime = Time.deltaTime,
        AnimationLengthList = this._animationLengthList,
        MaxAnimationType = this._maxAnimationType,
    }.Schedule(this, handle);
    handle.Complete();

    // ※ 後半へ続く...
●「アニメーションタイプ毎に再生情報を振り分け」について
こちらはアニメーションタイプごとに再生情報をNativeMultiHashMapに振り分けていくJobとなります。
NativeMultiHashMapの要素としては「<アニメーションタイプ、Shaderに渡す再生情報>」となっており、 アニメーションタイプをKeyにしてValueには対応する「キーフレーム」と「モデル変換行列」を SendPlayDataと言う再生情報管理用の構造体に入れる形で保持していってます。
一つ例を挙げると、待機モーションのEntityが200体居たとしたらNativeMultiHashMapには<AnimationType.Wait, 200体分のSendPlayData>が入ります。
// Shaderに渡すアニメーションの再生情報
// 「Custom/TextureAnimPlayer-InstancingIndirect -> playData」が該当
struct SendPlayData
{
    // 現在の再生キーフレーム
    public float CurrentKeyFrame;
    // モデル変換行列
    public float4x4 LocalToWorld;
}

// アニメーションタイプ毎に再生情報を振り分けるJob
[BurstCompile]
struct MapAnimationPlayDataJob : IJobParallelFor
{
    // 再生情報
    [ReadOnly] public NativeArray<AnimationPlayData> AnimationPlayData;
    // モデル変換行列
    [ReadOnly] public NativeArray<LocalToWorld> LocalToWorlds;

    // 振り分けた結果を格納するHashMap
    // <アニメーションタイプ、シェーダーに渡す再生情報>
    public NativeMultiHashMap<int, SendPlayData>.Concurrent SendPlayDataMap;

    public void Execute(int index)
    {
        var playData = AnimationPlayData[index];
        var data = new SendPlayData
        {
            CurrentKeyFrame = playData.CurrentKeyFrame,
            LocalToWorld = LocalToWorlds[index].Value,
        };
        SendPlayDataMap.Add((int)playData.AnimationType, data);
    }
};
SendPlayDataと言う構造体についても軽く補足しておくと、こちらは前述した以下のShader側で定義している構造体と一致している物となり、「ComputeBuffer.SetData」及び「Material.SetBuffer」を経由してStructuredBuffer<playData> _PlayDataBufferに値が送られます。
struct playData
{
    // 現在の再生キーフレーム
    float currentKeyFrame;
    // モデル変換行列
    float4x4 localToWorld;
};

// C#側から渡されるEntity毎のアニメーション情報
StructuredBuffer<playData> _PlayDataBuffer;
●「再生情報の更新」について
以下のJobは再生情報の更新を行う物であり、やっている事を簡単に纏めるとキーフレームを進めたりアニメーションを切り替えたりするJobになります。
今回の実行例としては冒頭でも記載した通り「ダッシュ → スライディング → 待機」アニメーションの終了タイミングを検知して順次切り替えていくと言った簡易的なサンプルとなっておりますが、コメントにもある通りゲームを作る想定であればEntityが持つステータス(例えばライフポイントなど)を見る形にする事で状況に応じて切り替えると言った応用なども出来るかと思われます。(実用はまだなので要検証)
/// <summary>
/// 再生情報の更新
/// </summary>
[BurstCompile]
struct PlayAnimationJob : IJobProcessComponentData<AnimationPlayData>
{
    // Time.deltaTime
    [ReadOnly] public float DeltaTime;
    // 各アニメーションの再生時間
    [ReadOnly] public NativeArray<float> AnimationLengthList;
    // 最大アニメーションタイプ数
    [ReadOnly] public int MaxAnimationType;

    public void Execute(ref AnimationPlayData data)
    {
        // 最終フレームまで再生したらアニメーションを切り替える
        int currentAnimType = (int)data.AnimationType;
        if (data.CurrentKeyFrame >= this.AnimationLengthList[currentAnimType])
        {
            int nextType = currentAnimType + 1;
            data.AnimationType = (AnimationType)(nextType % this.MaxAnimationType);
            data.CurrentKeyFrame = 0f;
            return;
        }

        // フレームを進めるだけ。
        data.CurrentKeyFrame += this.DeltaTime;

        // TIPS.
        // 今回の実装としては上記の通り単純に順番通りに再生していくだけの物となるが、
        // 例えばゲームを実装する上ではEntityのステータスなどを取得し、
        // それを条件式で見てその時に応じたアニメーションに切り替えたりすると言った事も出来るかと思われる。
        // → e.g. 体力が入っているComponentDataも取得/参照して残り体力に応じたアニメーションに切り替えるなど。
    }
}
■ OnUpdate(後半)
更新処理の後半の説明に入っていきます。
以下のコードは後半全体の流れであり、これだけ見ると少しゴチャゴチャとしておりますが...やっている事自体は描画周りメインの処理となります。
先に要点を纏めます。
- 再生されているAnimationType毎のComputeBufferを生成。データとしては先程アニメーションタイプ毎に再生情報を振り分けた
NativeMultiHashMapのValueを格納- ※再生情報以外にも下記の「DrawMeshInstancedIndirect」で必要となる「bufferWithArgs」に渡す値も設定。
- 「Graphics.DrawMeshInstancedIndirect」でアニメーションタイプ毎にEntityを一括で描画。
- ※上記の
bufferWithArgs含めて渡さなければならない値などがあります。詳細についてはドキュメントを御覧ください。
- ※上記の
protected override JobHandle OnUpdate(JobHandle inputDeps)
{
    this.DisposeBuffers();
    var handle = inputDeps;

    // ※前半

    // ----------------------------------------------
    // GPU Instancing
    // ※ this._maxAnimationType = Enum.GetNames(typeof(AnimationType)).Length;
    for (int i = 0; i < this._maxAnimationType; ++i)
    {
        // アニメーションタイプに応じた再生情報の取得
        var buffer = new NativeArray<SendPlayData>(groupLength, Allocator.Temp);
        SendPlayData sendPlayData; NativeMultiHashMapIterator<int> it; int instanceCount = 0;
        // ※ iの値はAnimationTypeに該当
        if (!playDataMap.TryGetFirstValue(i, out sendPlayData, out it)) { continue; }
        do
        {
            // 同一のアニメーションが再生されているインスタンスの再生情報をbufferに確保していく。
            buffer[instanceCount] = sendPlayData;
            ++instanceCount;
        } while (playDataMap.TryGetNextValue(out sendPlayData, ref it));


        // Materialに対し再生するアニメーションデータなど(ComputeBuffer)を設定していく。
        var renderer = this._animationMeshes[i];
        var computeBuffers = this._sendBuffers[i];
        // 初回 or 同一のアニメーションが再生されているインスタンス数に変更があったらバッファを初期化
        if (computeBuffers.CurrentInstance <= 0 || computeBuffers.CurrentInstance != instanceCount)
        {
            if (computeBuffers.SendPlayBuffer != null) { computeBuffers.SendPlayBuffer.Release(); }
            computeBuffers.SendPlayBuffer = new ComputeBuffer(instanceCount, Marshal.SizeOf(typeof(SendPlayData)));
            if (computeBuffers.GPUInstancingArgsBuffer != null) { computeBuffers.GPUInstancingArgsBuffer.Release(); }
            computeBuffers.GPUInstancingArgsBuffer = new ComputeBuffer(1, this._GPUInstancingArgs.Length * sizeof(uint), ComputeBufferType.IndirectArguments);
            computeBuffers.CurrentInstance = instanceCount;
        }

        // 再生情報の設定
        var bufferSlice = buffer.Slice(0, instanceCount);
        var copyArray = new NativeArray<SendPlayData>(bufferSlice.Length, Allocator.Temp);
        bufferSlice.CopyTo(copyArray);
        // ※ComputeBufferにはNativeArrayを渡すことが可能。(内部的にもポインタ渡ししていた覚え)
        computeBuffers.SendPlayBuffer.SetData(copyArray);
        // ※this._playDataBufferID = Shader.PropertyToID("_PlayDataBuffer");
        renderer.AnimationMaterial.SetBuffer(this._playDataBufferID, computeBuffers.SendPlayBuffer);

        // 「Graphics.DrawMeshInstancedIndirect -> bufferWithArgs」の設定
        // ※Buffer with arguments, bufferWithArgs, has to have five integer numbers at given argsOffset offset: index count per instance, instance count, start index location, base vertex location, start instance location.
        this._GPUInstancingArgs[0] = (uint)renderer.Mesh.GetIndexCount(0);        // index count per instance
        this._GPUInstancingArgs[1] = (uint)instanceCount;                         // instance count
        this._GPUInstancingArgs[2] = (uint)renderer.Mesh.GetIndexStart(0);        // start index location
        this._GPUInstancingArgs[3] = (uint)renderer.Mesh.GetBaseVertex(0);        // base vertex location
        computeBuffers.GPUInstancingArgsBuffer.SetData(this._GPUInstancingArgs);

        // 描画
        Graphics.DrawMeshInstancedIndirect(
            renderer.Mesh,
            0,
            renderer.AnimationMaterial,
            new Bounds(Vector3.zero, 1000000 * Vector3.one),
            computeBuffers.GPUInstancingArgsBuffer);

        buffer.Dispose();
        copyArray.Dispose();
    }
    playDataMap.Dispose();
    return handle;
}
イメージ的には以下のスライドの様な感じになります。
このスライドを例に取ると、全Entityが1万体居るとして、その中で「歩行アニメーション」を行っているEntityが5000体居るとした場合、先ずは「歩行モーション」を行うEntity5000体分のComputeBufferを生成してデータには5000体分の再生情報を設定します。
その上で設定が完了したらDrawMeshInstancedIndirectで5000体分を一括描画します。
→以降は上記の手順をアニメーションタイプ毎に繰り返すだけ。

次に幾つか要素を噛み砕いて説明していきます。
● アニメーションタイプ毎に振り分けた再生情報をNativeArrayにコピー
以下の処理はNativeMultiHashMapに入っているValueをNativeArrayにコピーする処理です。
for文で使用しているiの値についてはAnimationTypeの値と同等になっているので、そちらをNativeMultiHashMapのKeyとして扱い、NativeArrayに値を詰めるのと同時にValueに入っている要素数 == インスタンス数もカウントしてます。(カウントした値は後で使います)
var groupLength = this._rendererGroup.CalculateLength();

// ※ this._maxAnimationType = Enum.GetNames(typeof(AnimationType)).Length;
for (int i = 0; i < this._maxAnimationType; ++i)
{
    // アニメーションタイプに応じた再生情報の取得
    var buffer = new NativeArray<SendPlayData>(groupLength, Allocator.Temp);
    SendPlayData sendPlayData; NativeMultiHashMapIterator<int> it; int instanceCount = 0;
    // ※ iの値はAnimationTypeに該当
    if (!playDataMap.TryGetFirstValue(i, out sendPlayData, out it)) { continue; }
    do
    {
        // 同一のアニメーションが再生されているインスタンスの再生情報をbufferに確保していく。
        buffer[instanceCount] = sendPlayData;
        ++instanceCount;
    } while (playDataMap.TryGetNextValue(out sendPlayData, ref it));
● Shader(Material)に渡すComputeBufferの生成
以下の処理はShader(Material)に渡す為のComputeBufferの初期化周りです。
ここではインスタンスの数を見て「初期値の時」又は「インスタンスの数に変更があった時」にバッファを確保し直すようにしております。
「Graphics.DrawMeshInstancedIndirect」で必ず渡さなくてはならない値を含めて、必要となるComputeBufferについてはSendBuffersと言うデータクラスに纏める形で管理してます。
// Materialに渡す情報
sealed class SendBuffers
{
    // Shaderに渡すアニメーションの再生情報
    public ComputeBuffer SendPlayBuffer = null;
    // Graphics.DrawMeshInstancedIndirect -> bufferWithArgs
    public ComputeBuffer GPUInstancingArgsBuffer = null;
    // 現在のインスタンス数
    public int CurrentInstance = -1;
}
// 再生アニメーションデータ
AnimationMesh[] _animationMeshes;
// Materialに渡す情報
SendBuffers[] _sendBuffers;

...................................................

for (int i = 0; i < this._maxAnimationType; ++i)
{
    ...................................................

    // Materialに対し再生するアニメーションデータなど(ComputeBuffer)を設定していく。
    AnimationMesh renderer = this._animationMeshes[i];
    SendBuffers computeBuffers = this._sendBuffers[i];
    // 初回 or 同一のアニメーションが再生されているインスタンス数に変更があったらバッファを初期化
    if (computeBuffers.CurrentInstance <= 0 || computeBuffers.CurrentInstance != instanceCount)
    {
        if (computeBuffers.SendPlayBuffer != null) { computeBuffers.SendPlayBuffer.Release(); }
        computeBuffers.SendPlayBuffer = new ComputeBuffer(instanceCount, Marshal.SizeOf(typeof(SendPlayData)));
        if (computeBuffers.GPUInstancingArgsBuffer != null) { computeBuffers.GPUInstancingArgsBuffer.Release(); }
        computeBuffers.GPUInstancingArgsBuffer = new ComputeBuffer(1, this._GPUInstancingArgs.Length * sizeof(uint), ComputeBufferType.IndirectArguments);
        computeBuffers.CurrentInstance = instanceCount;
    }
● Bufferを設定して描画
最後の項目です。
前の項目で生成したSendBuffersが持つ各種ComputeBuffer及び再生に用いるMaterialに対して最終的な値を設定していきます。
おさらいとしてマテリアルに渡すデータ及びAPIに渡すデータを纏め直すと以下の項目があります。
-
Custom/TextureAnimPlayer-InstancingIndirect -> _PlayDataBuffer
- ※「Material.SetBuffer」で設定
- 「アニメーションタイプ毎に振り分けた再生情報をNativeArrayに移動」の項目で
NativeMultiHashMapから入れ直した再生情報となるNativeArray<SendPlayData>を設定。
-
Graphics.DrawMeshInstancedIndirect -> bufferWithArgs
- Graphics.DrawMeshInstancedIndirect -> bufferWithArgsの値。APIの引数として渡す。
諸々の設定が終わったらGraphics.DrawMeshInstancedIndirectで描画する事で表示されます。
    // 再生情報の設定
    var bufferSlice = buffer.Slice(0, instanceCount);
    var copyArray = new NativeArray<SendPlayData>(bufferSlice.Length, Allocator.Temp);
    bufferSlice.CopyTo(copyArray);
    // ※ComputeBufferにはNativeArrayを渡すことが可能。(内部的にもポインタ渡ししていた覚え)
    computeBuffers.SendPlayBuffer.SetData(copyArray);

    // ※this._playDataBufferID = Shader.PropertyToID("_PlayDataBuffer");
    // ※AnimationMesh renderer = this._animationMeshes[i];
    renderer.AnimationMaterial.SetBuffer(this._playDataBufferID, computeBuffers.SendPlayBuffer);

    // 「Graphics.DrawMeshInstancedIndirect -> bufferWithArgs」の設定
    // ※Buffer with arguments, bufferWithArgs, has to have five integer numbers at given argsOffset offset: index count per instance, instance count, start index location, base vertex location, start instance location.
    this._GPUInstancingArgs[0] = (uint)renderer.Mesh.GetIndexCount(0);        // index count per instance
    this._GPUInstancingArgs[1] = (uint)instanceCount;                         // instance count
    this._GPUInstancingArgs[2] = (uint)renderer.Mesh.GetIndexStart(0);        // start index location
    this._GPUInstancingArgs[3] = (uint)renderer.Mesh.GetBaseVertex(0);        // base vertex location
    computeBuffers.GPUInstancingArgsBuffer.SetData(this._GPUInstancingArgs);

    // 描画
    Graphics.DrawMeshInstancedIndirect(
        renderer.Mesh,
        0,
        renderer.AnimationMaterial,
        new Bounds(Vector3.zero, 1000000 * Vector3.one),
        computeBuffers.GPUInstancingArgsBuffer);
▽ 最後に
ざっくりとした説明ではありますが、以上が実装までの手順になります。
試しに作ってみたレベルの物 & 実践導入自体もまだなので改良の余地は色々あるかと思われますが...部分的にでも参考になる箇所があれば幸いです。
(実践で使うとした場合には...単調な動き(例えばザコ敵のワンパターンな動きなど)ぐらいであれば対応はできるかもしれません。。多分。。)
明日は @tomori_hikage さんの「おすすめリポジトリの紹介をします!」です。
▽ 参考/関連サイト
-
ECS初学者に向けてのTips集
- 「Unity ECS完全に理解した」と言う勉強会にて登壇した際の発表資料。
▼ GitHub
-
sugi-cho/Animation-Texture-Baker
- アニメーションに於ける頂点の位置と法線をTextureに保存するもの。
- ※今回のサンプルプロジェクトにて使わせて頂きました。
- 参考 : 【Unity】シェーダーで3Dモデルのアニメーションを行う Animation Texture Baker
- アニメーションに於ける頂点の位置と法線をTextureに保存するもの。
-
Unity-Technologies/UniteAustinTechnicalPresentation
- 他の一例としてご紹介。キャラのアニメーション周りはAnimationInstancingで実装されている模様。
- 参考 : 【Unity】ECSを使用した大規模なデモプロジェクト "Unite Austin Technical Presentation" -> キャラクターアニメーションは頂点シェーダー
▼ その他 ECS記事
- 【Unity】PureECSの描画周りについて解説してみる
-
【Unity】PureECSの衝突判定周りについて解説してみる
- 表題の通り描画と衝突判定についての解説記事。衝突判定は公式の物がまだなので自作している。
-
【Unity】ECSの「Disabled ComponentData」と「Prefab ComponentData」について解説してみる
- 個人的にPrefab Componentについては便利なので覚えておくと幸せになれる印象がある。
※サンプル/ゲームを作ってみた系
-
【Unity】ECSで弾幕STGを作ってみたので技術周りについて解説
- ※一部古い実装となっているので注意。近い内に書き直す予定。
- 【Unity】ECS + JobSystemでライフゲームを実装してみた
-
逆に細かい制御を行う必要が無い場合(少し言い換えるとキーフレーム制御を行う必要が無い単純なループアニメーションとか)であれば頂点シェーダーアニメーションで対応する事が可能だったりも。例として公式が公開している「Unity-Technologies/EntityComponentSystemSamples」にある「Wiggle.shader」と言うBoidExampleの魚の描画に用いられているshaderでは頂点アニメーションでうねうねさせていたりします。 ↩
-
例えばクロスフェード処理と言った切り替えは未対応。 ↩