最近、React + Redux + TypescriptでWebアプリを作成することが多いので、忘れないうちにメモを。
create-react-appインストール
Reactはアプリを作成する際にはBabelやWebpackといったライブラリの設定を変更するなど、事前準備が結構大変です。そのへんの面倒な設定を良しなにテンプレート作成してくれるのが「create-react-app」です。
インストール手順は、次のとおり。
npm install -g create-react-app
プロジェクト作成
プロジェクトの作成は、次のとおり。「--typescript」のオプションを付けると、typescript用のテンプレートを作成してくれます。
create-react-app my-react-app --typescript
「my-react-app」が作成するプロジェクト名
とりあえず、作成したプロジェクトに移動して実行してみると、localhost:3000でサービスが起動し、Webアプリの動作を確認できます。
cd my-react-app
npm start
こんな感じの画面が出ます。
Reduxの導入
次に、Reduxを入れます。
Reduxとは、 Stateを管理するフレームワークです。Facebookが提唱しているFluxアーキテクチャの概念を拡張して扱いやすく設計されたライブラリです。
Fluxのコンセプトはこの辺を見てください。
Reactはpropとstateを持ちますが、アプリケーションの規模が大きくなると、コンポーネント間のstate管理が難しくなります。Fluxアーキテクチャはこの問題を解決してくれます。
簡単に説明すると、以下のようなA〜Zまでのコンポーネントがあったとします。(雑な図ですみません。。。)
開発途中で、コンポーネントCとZのstateを共通化したくなった場合にstateをコンポーネントAに移植する必要がありますが、その場合、propsを渡すために依存関係のあるB、D〜Yまでのすべてのコンポーネントを修正する必要が出てきます。
そういった依存関係の問題を解決してくれるのがFluxアーキテクチャであり、それを扱いやすく実装してくれているのがReduxです。
Redux3原則
実装を始める前に、Reduxの簡単な説明を。Reduxの特徴は以下の3原則にまとめられています。
- Single source of truth
- アプリケーション内でStoreは1つのみ。Stateは単独のオブジェクトとしてStoreに保持。
- State is read-only
- Stateを直接変更することはできない。Stateの変更は、ActionをStoreへDispatchすることでのみ可能。
- Mutations are written as pure functions
- Stateを変更する関数は副作用のないピュア関数であること。
この原則をまもって実装することで、各コンポーネントが疎結合となり、テスタブルで拡張性の高いコンポーネント実装をすることができます。
フローデータ
以下は、アプリケーションのデータフローの図です。
- ViewはDispatcherにActionを送る
- DispatcherはすべてのStoreにアクションを送る
- StoreはViewにデータを送り、表示データの更新をする
これにより各コンポーネントが疎結合な関係となり、拡張性の高い実装ができるようになります。
では、Reduxの説明はここまでにして、アプリ作成に入っていきましょう。
Reduxのインストール
npm install --save redux react-redux
npm install --save-dev @types/react-redux
reduxはredux自身に型定義がされているので、@types/reduxのインストールは不要です。
reduxはreduxそのもの、react-reduxはreactとreduxをつなぐライブラリです
typescript-fsaのインストール
npm install --save typescript-fsa typescript-fsa-reducers
fsaは「Flux Standard Action」の略で、Fluxにおけるアクションの形式を規定するものです。このfsaをTypescriptでシンプルに記述ができるライブラリが、typescript-fsa typescript-fsa-reducersです。typescript-fsaはAction側、typescript-fsa-reducersがReducer側で利用するライブラリです。
redux-thunkのインストール
redux-thunkは、非同期処理を含むアクションを簡単に扱えるようにしてくれるライブラリです。コードを見ると非常にシンプルながら、これを使うことでかなりスッキリしたコードを書くことができます。非同期用のライブラリとしてredux-sagaというのもありますがそちらは別の機会に。
npm install --save redux-thunk
npm install --save-dev @types/redux-thunk
開発ツール(redux-devtools)のインストール
redux-devtoolsは、Reduxで開発する際に利用できる便利な開発ツールで、アクション実行時のstoreの状態を確認するのに利用します。必須ではありませんが、入れておきたいと思います。
npm install --save-dev redux-devtools
このツールを入れると、Chromeの拡張機能でRedux DevToolsを追加すると以下のような開発者ツールがアドオンされます。
このツールでRedux上のStoreの状態が確認でき、非常にデバッグしやすくなります。オススメです。

コードを書く
それでは、コードを書いていきます。今回はテキストボックスやチェックボックスなど各種コンポーネントを配置した簡易なWebフォームのサンプルを作っていきたいと思います。
Store, Reducerの作成
まずは、アプリケーション内で唯一となるStoreと空のReducerを作成します。(Reducerは後ほど、コンポーネントにアクションを追加する際に実装を加えて行きます。)
import { combineReducers, createStore, compose, applyMiddleware} from 'redux'
import { Reducer, State } from './reducer'
import thunk from "redux-thunk"

export type AppState = {
  state: State
}

const storeEnhancers = (window as any).__REDUX_DEVTOOLS_EXTENSION_COMPOSE__ || compose;

const store = createStore(
    combineReducers<AppState>({
      state: Reducer
    }),
    storeEnhancers(applyMiddleware(thunk))
)

export default store
import { reducerWithInitialState } from 'typescript-fsa-reducers'

export interface State {
//ここにstoreが持つstateを書く

}

export const initialState: State = {
//ここにstateの初期値を書く

}

export const Reducer = reducerWithInitialState(initialState)
次にコンポーネントを作成します。他の方のコードを見るても、コンポーネントの切り方については色々と好みが分かれるところではありますが、私はこちらのRedux公式にしたがってViewのみのPresentational ComponentsとMarkupを持たないコントローラとしてのContainer Componentsに分けて実装します。
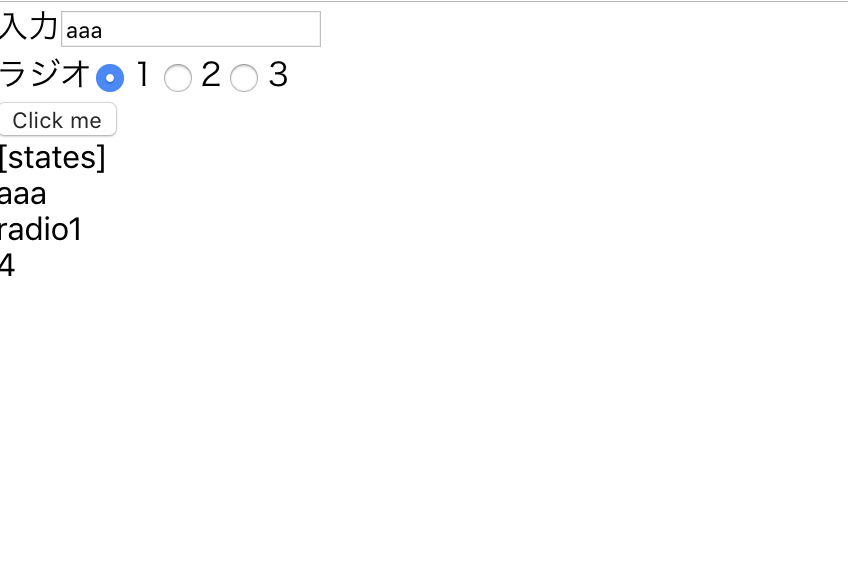
今回は入力テキスト、ラジオボタン、ボタンを持つ簡易なページを作ってみます。
(画面デザインをキレイにするには、material-uiとかありますが、今回は省略)
まずは、create-react-appで最初に作成されたテンプレートのindex.tsxとApp.tsxを修正します。
import React from 'react';
import ReactDOM from 'react-dom';
import { Provider } from 'react-redux';
import App from './App';
import './index.css';
import store from './store';

ReactDOM.render(
    <Provider store={store}>
        <App />
    </Provider>
    , document.getElementById('root'));
import React from 'react';
import './App.css';
import TopPageContainer from './containers/TopPageContainer';

const App: React.FC = () => {
  return (
    <React.Fragment>
      <TopPageContainer/>
    </React.Fragment>
  );
}

export default App;
続いて、各コンポーネントを作成していきます。
入力テキスト
import React from 'react';

interface OwnProps {
    title: string
    inputValue: string
    onChangeValue: Function
}

type Props = OwnProps

export const TextInput: React.FC<Props> = props => {
    return (
        <div>
            <span>{props.title}</span>
            <input name={props.title} type='text' value={props.inputValue} onChange={(e) => props.onChangeValue(e.target.value)}></input>
        </div>
    )
}
ラジオボタン
import React from 'react'

interface OwnProps {
    title: string
    selectedValue: string
    onChangeValue: Function
}

type Props = OwnProps
export const RadioInput : React.FC<Props> = props => {
    return(
        <div>
            <span>{props.title}</span>
            <input type='radio' id='1' name='radio-group' value='radio1' onChange={(e) => props.onChangeValue(e.target.value)}/><label>1</label>
            <input type='radio' id='2' name='radio-group' value='radio2' onChange={(e) => props.onChangeValue(e.target.value)}/><label>2</label>
            <input type='radio' id='3' name='radio-group' value='radio3' onChange={(e) => props.onChangeValue(e.target.value)}/><label>3</label>
        </div>
    )
}
ボタン
import React from 'react'

interface OwnProps {
    title: string
    onClick: Function
}
type Props = OwnProps
export const SubmitButton : React.FC<Props> = props => {
    return(
        <div>
            <button onClick={() => props.onClick()}>{props.title}</button>
        </div>
    )
}
各種stateを見る場所
import React from 'react'

interface OwnProps {
    inputValue: string
    selectedValue: string
    clickCount: number
}

type Props = OwnProps
export const ShowState : React.FC<Props> = props => {
    return(
        <div>
            <label>[states]</label>
            <div>{props.inputValue}</div>
            <div>{props.selectedValue}</div>
            <div>{props.clickCount}</div>
        </div>
    )
}
これら上述をまとめるためのコンポーネント
import React from 'react'
import { TextInput } from './TextInput';
import { TopPageHandler } from '../containers/TopPageContainer';
import { RadioInput } from './RadioInput';
import { ShowState } from './ShowState';
import { SubmitButton } from './SubmitButton';

interface OwnProps {
    inputValue: string
    selectedValue: string
    clickCount: number

}
type Props =  OwnProps & TopPageHandler
export class TopPageForm extends React.Component<Props> {
    render(){
        return(
            <React.Fragment>
                <TextInput title='入力' inputValue={this.props.inputValue} onChangeValue={this.props.handleOnChangeValue}/>
                <RadioInput title='ラジオ' selectedValue={this.props.selectedValue} onChangeValue={this.props.handleOnSelectValue}/>
                <SubmitButton title='Click me' onClick={this.props.handleOnClick}/>
                <ShowState inputValue={this.props.inputValue} selectedValue={this.props.selectedValue} clickCount={this.props.clickCount}/>

            </React.Fragment>
        )
    }
}
続いて、コンテナーを実装します。
import { connect } from "react-redux";
import { Dispatch } from "redux";
import { TextInputActions } from "../actions";
import { TopPageForm } from "../components/TopPageForm";
import { AppState } from "../store";

export interface TopPageHandler {
    handleOnChangeValue(value: string): void
    handleOnSelectValue(value: string): void
    handleOnClick(): void
}

const mapStateToProps = (appState: AppState) => {
    return {
        inputValue: appState.state.inputValue,
        selectedValue: appState.state.selectedValue,
        clickCount: appState.state.clickCount
    }
}

const mapDispatchToProps = (dispatch: Dispatch) => {
    return {
        handleOnChangeValue: (value: string) => { dispatch(TextInputActions.updateTextInputValue(value)) },
        handleOnSelectValue: (value: string) => { dispatch(TextInputActions.updateSelectedValue(value)) },
        handleOnClick: () => { dispatch(TextInputActions.updateClickCount()) }
    }
}
export default connect(mapStateToProps, mapDispatchToProps)(TopPageForm)
actionを定義します。
import { actionCreatorFactory } from '../node_modules/typescript-fsa';

const actionCreator = actionCreatorFactory()

export const TextInputActions = {
    updateTextInputValue: actionCreator<string>('ACTIONS_UPDATE_TEXT_INPUT_VALUE'),
    updateSelectedValue: actionCreator<string>('ACTION_UPDATE_SELECTED_VALUE'),
    updateClickCount: actionCreator('ACTION_UPDATE_CLICK_COUNT')
}
各アクションのactionCreatorの引数はReducerが処理を識別するためのFunctionの名前です。何でも良いですが、識別できる名前にしておきましょう。
reducerを実装します。
import { reducerWithInitialState } from '../node_modules/typescript-fsa-reducers';
import { TextInputActions } from './actions';

export interface State {
    inputValue: string
    selectedValue: string
    clickCount: number
}

export const initialState: State = {
    inputValue: '',
    selectedValue: '',
    clickCount: 0
}

export const Reducer = reducerWithInitialState(initialState)
    .case(TextInputActions.updateTextInputValue, (state, inputValue) => {
        return { ...state, inputValue }
    })
    .case(TextInputActions.updateSelectedValue, (state, selectedValue) => {
        return { ...state, selectedValue }
    })
    .case(TextInputActions.updateClickCount, (state) => {
        return { ...state, clickCount: state.clickCount + 1 }
    })
長い道のりでしたが、ようやく完成です。
Webアプリを起動すると以下のような画面が表示されます。
非同期処理部分(redux-thunk)については、今回は力尽きてしまい、またの機会に。。。
なお、Reduxの公式でもYou Might Not Need Redux(Redux使わんでよくね?)と記述されていますが、Reduxを必要としない場合(りや規模の小さい場合など)をあえて使う必要はありません。開発するアプリケーションの要件に合わせて用法、用量を守って正しくお使いくださいませ。


