VSCodeでJavaのWebアプリケーション開発ができるように開発環境を整えたい。
開発したものはVSCodeからコンパイルして実行したい。デバッグもしたい。テストもしたい。
と色々調べ、使用しているもの全てにおいて初心者なので苦労しましたが、
なんとか実行可能な環境が完成したのでまとめます。
少しでも同じようなことをしたい方の助けになれば幸いです。
この記事内では紹介しておりませんが、Tomcatを使用してデバッグも可能です。
動作環境
・macOS Catalina 10.15.2
・Visual Studio Code 1.41.1
・AdoptOpenJDK 1.8.0_232
・Maven 3.6.3
・Tomcat 9.0.30
JAVA_HOME設定
これまでOracle提供のJDK1.8.0_221を利用していたのですが、
このタイミングでAdopt提供のOpenJDK1.8.0_232をインストールしたのでまずはこちらを使うためにパスを通します。
$ open ~/.bash_profile
環境変数を記述する.bash_profileを開きます。
export PATH=$PATH:/Library/Java/JavaVirtualMachines/adoptopenjdk-8.jdk/Contents/Home/bin
export JAVA_HOME=/Library/Java/JavaVirtualMachines/adoptopenjdk-8.jdk/Contents/Home
PATHとJAVA_HOMEの設定を記述して保存します。
$ source ~/.bash_profile
.bash_profileの変更を反映させます。
$ javac -version
$ java -version
ターミナル再起動後、設定が反映されたか確認します。
...設定したjdkが表示されればOKだと思います。
Apache Tomcatダウンロード
下記URLからダウンロードした圧縮ファイルを解凍して任意の場所に配置します。
自分はApplications配下に配置してます。
http://tomcat.apache.org/
Apache Mavenダウンロード
下記URLからダウンロードした圧縮ファイルを解凍して任意の場所に配置します。
自分はApplications配下に配置してます。
https://maven.apache.org/download.cgi
VSCodeの拡張機能をインストール
■Java Extension Pack(下記の拡張機能がまとまってる)
・Language Support for Java™ by Red Hat
・Debugger for Java
・Java Test Runner
・Maven for Java
・Java Dependency Viewer
・Visual Studio IntelliCode
■Tomcat For Java
■Generator Junit File(自分はJunitのファイルをワンクリックで作りたかったので入れました。)
VSCodeでJAVA_HOMEの設定
VSCodeでJavaが使えるように設定します。

F1を押し、検索ボックスに画像の様に入力します。
 java.homeの`User Setting`を選択
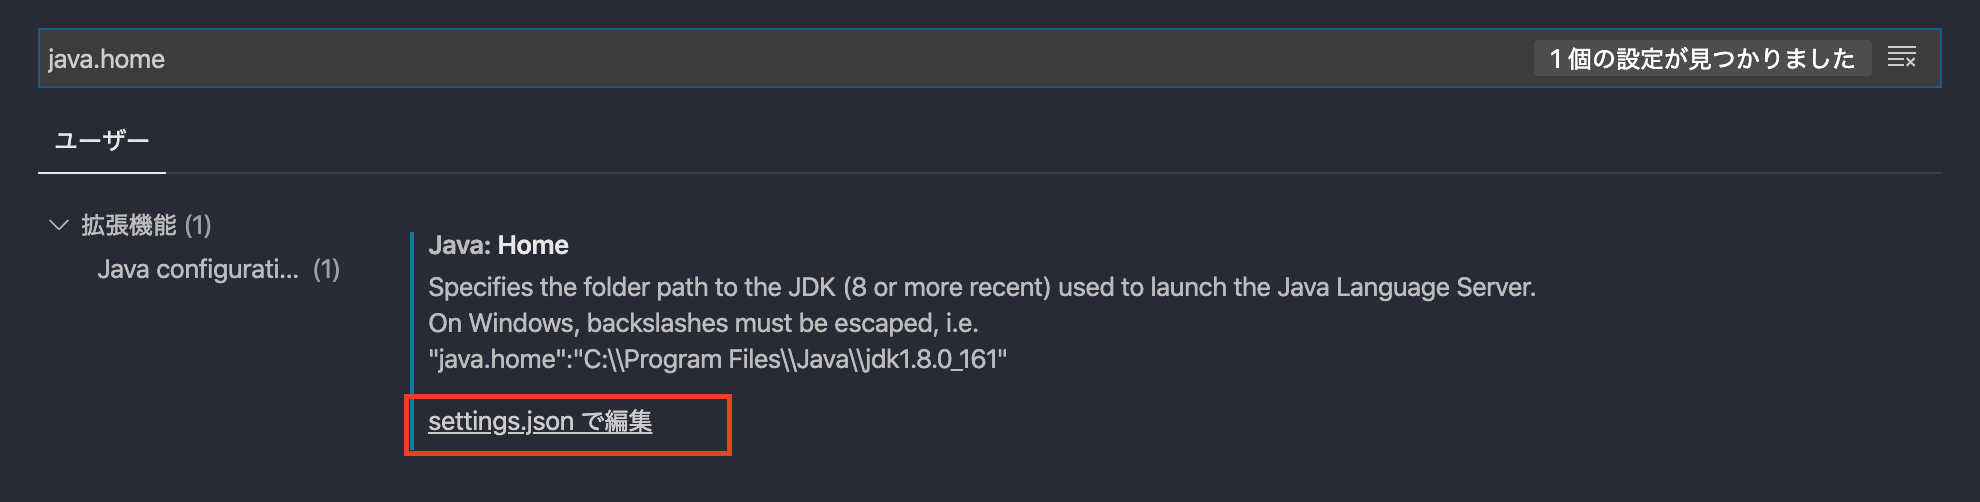 settings.jsonで編集を選択
 `"java.home":`の後ろにJAVA_HOMEの場所を記述してVSCodeを再起動
Mavenでstruts2のプロジェクト作成
$ mkdir MavenProject
$ cd MavenProject
$ mvn archetype:generate
アプリケーション作成用のフォルダ作成
作成したフォルダに移動
mavenプロジェクトを作成するコマンド
...........省略
2545: remote -> us.fatehi:schemacrawler-archetype-maven-project (-)
2546: remote -> us.fatehi:schemacrawler-archetype-plugin-command (-)
2547: remote -> us.fatehi:schemacrawler-archetype-plugin-dbconnector (-)
2548: remote -> us.fatehi:schemacrawler-archetype-plugin-lint (-)
2549: remote -> ws.osiris:osiris-archetype (Maven Archetype for Osiris)
2550: remote -> xyz.luan.generator:xyz-gae-generator (-)
2551: remote -> xyz.luan.generator:xyz-generator (-)
2552: remote -> za.co.absa.hyperdrive:component-archetype (-)
Choose a number or apply filter (format: [groupId:]artifactId, case sensitive contains): 1467:
struts2と入力してenter
...........省略
: Choose archetype:
1: remote -> br.com.address.archetypes:struts2-archetype (an archetype web 3.0 + struts2 (bootstrap + jquery) + JPA 2.1 with struts2 login system)
2: remote -> br.com.address.archetypes:struts2-base-archetype (An Archetype with JPA 2.1; Struts2 core 2.3.28.1; Jquery struts plugin; Struts BootStrap plugin; json Struts plugin; Login System using Session and Interceptor)
3: remote -> com.amazonaws.serverless.archetypes:aws-serverless-struts2-archetype (-)
4: remote -> com.jgeppert.struts2.jquery:struts2-jquery-archetype-base (This Archetype provides a Webapp Configuration ready for the Struts2 jQuery Plugin.)
5: remote -> com.jgeppert.struts2.jquery:struts2-jquery-archetype-mobile (This Archetype provides a Webapp Configuration ready for the Struts2 jQuery Mobile Plugin.)
6: remote -> com.jgeppert.struts2.jquery:struts2-jquery-bootstrap-archetype-grid (This Archetype provides a Webapp Configuration ready for the Struts2 jQuery Grid Plugin and the Struts2
        Bootstrap Plugin.)
7: remote -> org.apache.struts:struts2-archetype-angularjs (-)
8: remote -> org.apache.struts:struts2-archetype-blank (-)
9: remote -> org.apache.struts:struts2-archetype-convention (-)
10: remote -> org.apache.struts:struts2-archetype-dbportlet (-)
11: remote -> org.apache.struts:struts2-archetype-plugin (-)
12: remote -> org.apache.struts:struts2-archetype-portlet (-)
13: remote -> org.apache.struts:struts2-archetype-starter (-)
Choose a number or apply filter (format: [groupId:]artifactId, case sensitive contains): :8
8を入力してENTER
Choose org.apache.struts:struts2-archetype-blank version:
1: 2.2.1
2: 2.2.1.1
3: 2.2.3
4: 2.2.3.1
5: 2.3.3
6: 2.3.4
7: 2.3.4.1
8: 2.3.7
9: 2.3.8
10: 2.3.12
11: 2.3.14
12: 2.3.14.1
13: 2.3.14.2
14: 2.3.14.3
15: 2.3.15
16: 2.3.15.1
17: 2.3.15.2
18: 2.3.15.3
19: 2.3.16
20: 2.3.16.1
21: 2.3.16.2
22: 2.3.16.3
23: 2.3.20
24: 2.3.20.1
25: 2.3.20.3
26: 2.3.24
27: 2.3.24.1
28: 2.3.24.3
29: 2.3.28
30: 2.3.28.1
31: 2.3.29
32: 2.3.30
33: 2.3.31
34: 2.3.32
35: 2.3.33
36: 2.3.34
37: 2.3.35
38: 2.3.36
39: 2.3.37
40: 2.5-BETA1
41: 2.5-BETA2
42: 2.5-BETA3
43: 2.5
44: 2.5.1
45: 2.5.2
46: 2.5.5
47: 2.5.14
Choose a number: 47:39
struts2のバージョンの番号を入力してENTER
Define value for property 'groupId': Hello
Define value for property 'artifactId': exsample
Define value for property 'version' 1.0-SNAPSHOT: :
Define value for property 'package' Hello: :
Confirm properties configuration:
groupId: Hello
artifactId: exsample
version: 1.0-SNAPSHOT
package: Hello
 Y: :
groupId...Javaのパッケージ的なものの名前を任意で指定する。
artifactId...プロジェクト名を任意で指定する。
version...そのままENTER
package...そのままENTER
Y: :...そのままENTER
[INFO] ----------------------------------------------------------------------------
[INFO] Using following parameters for creating project from Archetype: struts2-archetype-blank:2.3.37
[INFO] ----------------------------------------------------------------------------
[INFO] Parameter: groupId, Value: Hello
[INFO] Parameter: artifactId, Value: exsample
[INFO] Parameter: version, Value: 1.0-SNAPSHOT
[INFO] Parameter: package, Value: Hello
[INFO] Parameter: packageInPathFormat, Value: Hello
[INFO] Parameter: package, Value: Hello
[INFO] Parameter: version, Value: 1.0-SNAPSHOT
[INFO] Parameter: groupId, Value: Hello
[INFO] Parameter: artifactId, Value: exsample
[INFO] Project created from Archetype in dir: /MavenProject/exsample
[INFO] ------------------------------------------------------------------------
[INFO] BUILD SUCCESS
[INFO] ------------------------------------------------------------------------
[INFO] Total time:  12:24 min
[INFO] Finished at: 2020-01-13T18:54:18+09:00
[INFO] ------------------------------------------------------------------------
Mavenプロジェクト作成完了
作成されたプロジェクトのディレクトリ構造
MavenProject/
└── exsample
    ├── pom.xml
    └── src
        ├── main
        │   ├── java
        │   │   └── Hello
        │   │       └── example
        │   │           ├── ExampleSupport.java
        │   │           ├── HelloWorld.java
        │   │           └── Login.java
        │   ├── resources
        │   │   ├── Hello
        │   │   │   └── example
        │   │   │       ├── Login-validation.xml
        │   │   │       ├── package.properties
        │   │   │       └── package_es.properties
        │   │   ├── example.xml
        │   │   ├── log4j2.xml
        │   │   └── struts.xml
        │   └── webapp
        │       ├── WEB-INF
        │       │   ├── example
        │       │   │   ├── HelloWorld.jsp
        │       │   │   ├── Login.jsp
        │       │   │   ├── Menu.jsp
        │       │   │   ├── Missing.jsp
        │       │   │   ├── Register.jsp
        │       │   │   └── Welcome.jsp
        │       │   └── web.xml
        │       └── index.html
        └── test
            └── java
                └── Hello
                    └── example
                        ├── ConfigTest.java
                        ├── HelloWorldTest.java
                        └── LoginTest.java
このままビルドして実行しても、デフォルトで用意されているページは表示されていますが、今回はstruts2を利用した簡単なHelloWorldアプリケーションを作成します。
作成したプロジェクトをVSCodeで開く
 作成したexsampleプロジェクトフォルダをワークスペースに追加します。

追加されました。
簡単なHelloWorldアプリケーションの作成
プロジェクトの内容を、かんたんなHelloWorld表示アプリケーションに変更します。
MavenProject
└── exsample
    ├── pom.xml
    └── src
        ├── main
        │   ├── java
        │   │   └── Hello
        │   │       └── example
        │   │           └── HelloStrutsAction.java
        │   ├── resources
        │   │   └── struts.xml
        │   └── webapp
        │       ├── WEB-INF
        │       │   └── web.xml
        │       ├── hello.jsp
        │       └── index.jsp
        └── test
            └── java
                └── Hello
                    └── example
package Hello.example;
import com.opensymphony.xwork2.ActionSupport;

public class HelloStrutsAction extends ActionSupport{
  /**
   *
   */
  private static final long serialVersionUID = 1L;

  public String execute() {
	  return SUCCESS;
  }
}
<?xml version="1.0" encoding="UTF-8"?>
<!DOCTYPE struts PUBLIC
  "-//Apache Software Foundation//DTD Struts Configuration 2.3//EN"
  "http://struts.apache.org/dtds/struts-2.3.dtd">

  <struts>
    <constant name = "struts.devMode" value = "true"/>
    <package name = "Hello.example" extends = "struts-default">
      <action name = "HelloStrutsAction" class = "Hello.example.HelloStrutsAction" method = "execute">
        <result name = "success">hello.jsp</result>
      </action>

    </package>
  </struts>
<?xml version="1.0" encoding="UTF-8"?>
<web-app xmlns:xsi="http://www.w3.org/2001/XMLSchema-instance" xmlns="http://xmlns.jcp.org/xml/ns/javaee" xsi:schemaLocation="http://xmlns.jcp.org/xml/ns/javaee http://xmlns.jcp.org/xml/ns/javaee/web-app_3_1.xsd" id="WebApp_ID" version="3.1">

  <display-name>WebProj</display-name>
  <welcome-file-list>
    <welcome-file>index.jsp</welcome-file>
  </welcome-file-list>

  <filter>
    <filter-name>struts2</filter-name>
    <filter-class>org.apache.struts2.dispatcher.ng.filter.StrutsPrepareAndExecuteFilter</filter-class>
  </filter>
  <filter-mapping>
    <filter-name>struts2</filter-name>
    <url-pattern>/*</url-pattern>
  </filter-mapping>
</web-app>
<%@ page language="java" contentType="text/html; charset=UTF-8"
    pageEncoding="UTF-8"%>
<%@ taglib prefix = "s" uri = "/struts-tags" %>

<!DOCTYPE html>
<html>
<head>
  <meta charset="UTF-8">
  <title>HelloStruts</title>
</head>
<body>
  <h2>HelloStruts2!</h2>
</body>
</html>
<%@ page language="java" contentType="text/html; charset=UTF-8"
    pageEncoding="UTF-8"%>
<%@ taglib prefix = "s" uri = "/struts-tags" %>
<!DOCTYPE html>
<html>
<head>
<meta charset = "UTF-8">
<title>INDEX</title>
</head>
<body>
  <s:form action = "HelloStrutsAction">
    <s:submit value = "HelloStruts"/>
  </s:form>

</body>
</html>
TOMCAT SERVERSの設定
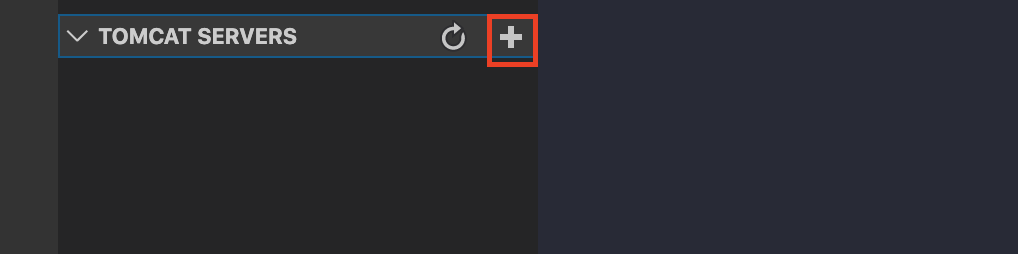 +ボタンから、Tomcatの保存先を選択すると、下記のようにTomcatサーバーが設定できます。

pom.xlmの設定
Mavenでは、pom.xlmという設定ファイル内に、プロジェクトの定義情報が書かれています。
少し設定を変更します。
・・・・・・・・・・・・・・・省略
  <plugin>
    <artifactId>maven-compiler-plugin</artifactId>
      <version>3.3</version>
      <configuration>
        <encoding>UTF-8</encoding>
          <source>1.5</source>
          <target>1.5</target>
      </configuration>
  </plugin>
・・・・・・・・・・・・・・・省略
デフォルトでは、使用するJDKが、jdk1.5に設定されています。
・・・・・・・・・・・・・・・省略
  <plugin>
    <artifactId>maven-compiler-plugin</artifactId>
      <version>3.3</version>
      <configuration>
        <encoding>UTF-8</encoding>
          <source>1.8</source>
          <target>1.8</target>
      </configuration>
  </plugin>
・・・・・・・・・・・・・・・省略
今回はjdk1.8を使用するように変更します。
・・・・・・・・・・・・・・・省略
  <dependency>
    <groupId>mysql</groupId>
    <artifactId>mysql-connector-java</artifactId>
      <version>5.1.48</version>
  </dependency>
・・・・・・・・・・・・・・・省略
今回は必要ありませんが、MySQLなど、他のプラグインを入れるにはこのように書きます。
MAVEN PROJECTSの設定
 maven installをします。
pom.xlmで定義されたプラグインなどがインストールされます。
maven installをします。
pom.xlmで定義されたプラグインなどがインストールされます。
コンパイル
 コンパイルします。
パッケージの作成
 warファイルが作成されます。
MavenProjct
└── exsample
    ├── pom.xml
    ├── src
    │   ├── main
    │   │   ├── java
    │   │   │   └── Hello
    │   │   │       └── example
    │   │   │           └── HelloStrutsAction.java
    │   │   ├── resources
    │   │   │   ├── log4j2.xml
    │   │   │   └── struts.xml
    │   │   └── webapp
    │   │       ├── WEB-INF
    │   │       │   └── web.xml
    │   │       ├── hello.jsp
    │   │       └── index.jsp
    │   └── test
    │       └── java
    │           └── Hello
    │               └── example
    └── target
        ├── classes
        │   ├── Hello
        │   │   └── example
        │   │       └── HelloStrutsAction.class
        │   ├── log4j2.xml
        │   └── struts.xml
        ├── exsample-1.0-SNAPSHOT
        │   ├── META-INF
        │   ├── WEB-INF
        │   │   ├── classes
        │   │   │   ├── Hello
        │   │   │   │   └── example
        │   │   │   │       └── HelloStrutsAction.class
        │   │   │   └── struts.xml
        │   │   ├── lib
        │   │   │   ├── asm-3.3.jar
        │   │   │   ├── asm-commons-3.3.jar
        │   │   │   ├── asm-tree-3.3.jar
        │   │   │   ├── commons-fileupload-1.4.jar
        │   │   │   ├── commons-io-2.2.jar
        │   │   │   ├── commons-lang3-3.2.jar
        │   │   │   ├── freemarker-2.3.28.jar
        │   │   │   ├── javassist-3.11.0.GA.jar
        │   │   │   ├── log4j-api-2.3.jar
        │   │   │   ├── log4j-core-2.3.jar
        │   │   │   ├── ognl-3.0.21.jar
        │   │   │   ├── struts2-config-browser-plugin-2.3.37.jar
        │   │   │   ├── struts2-core-2.3.37.jar
        │   │   │   └── xwork-core-2.3.37.jar
        │   │   └── web.xml
        │   ├── hello.jsp
        │   └── index.jsp
        ├── exsample-1.0-SNAPSHOT.war
        ├── generated-sources
        │   └── annotations
        ├── maven-archiver
        │   └── pom.properties
        └── maven-status
            └── maven-compiler-plugin
                ├── compile
                │   └── default-compile
                │       ├── createdFiles.lst
                │       └── inputFiles.lst
                └── testCompile
                    └── default-testCompile
                        └── inputFiles.lst
全て終わると、上記のようなプロジェクト構造に変化します。
※pom.xlmで設定されている情報を基に、ライブラリも追加されています。
※srcの内容を編集すると、コンパイル時にtargetの内容に反映されます。
tergetディレクトリが作られ、配下に、exsample-1.0-SNAPSHOT.warが作成されます。
プロジェクト実行
 warファイルを右クリックして、`Run on Tomcat Server`を選択します。
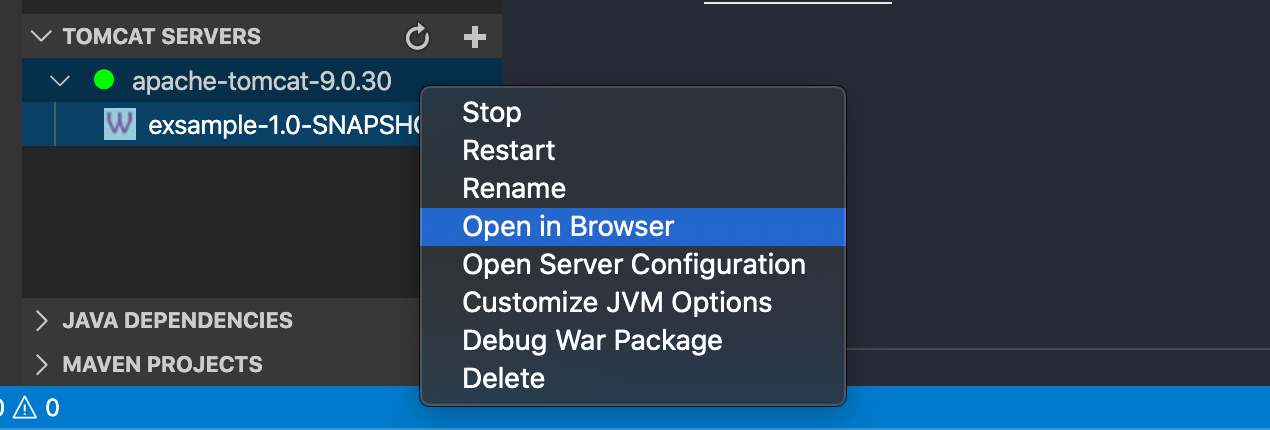
Tomcat上で右クリックOpen in Browserを選択すると、ブラウザで下の画面が開かれます。

プロジェクト名をクリックします。

index.jspが表示されました! 「HelloStruts」ボタンをクリックすると...
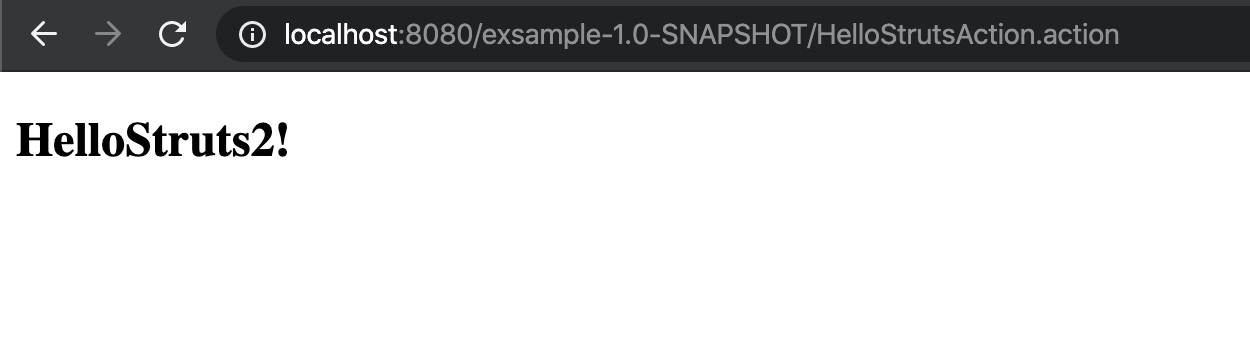
hello.jspに遷移しました!