10
5

Delete article

Deleted articles cannot be recovered.

Draft of this article would be also deleted.

Are you sure you want to delete this article?

More than 3 years have passed since last update.

ラズパイへのssh接続を有効化する方法(2020年版)

Last updated at Posted at 2020-08-10

ラズパイへのssh接続を有効化する方法

Raspberry Piへssh接続するためには、sshサーバーが有効化されている必要があります。
デフォルトでは無効になっているので、以下のいずれかの手順を行って有効化してください。

なお、GUIなし版のOS(Raspbian Stretch Lite)をインストールした場合は、2番目の方法(CUI上で設定する方法)のみが使用できます。

GUI上で設定する方法

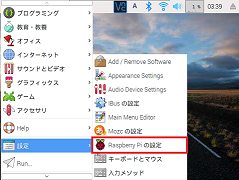
  1. 左上のメニューから「設定」→「Raspberry Piの設定」を選択
    ssh_raspi_gui1.png

  2. 「インターフェイス」タブを開く
    ssh_raspi_gui2.png

  3. 「SSH」について「有効」にチェックを入れる
    ssh_raspi_gui3.png

  4. 右下の「OK」ボタンをクリックする

以上でsshサーバーが有効になりました。

CUI上で設定する方法(GUIが使えない場合)

  1. 管理者権限でraspi-configを実行

    $ sudo raspi-config
    
  2. 「5 Interfacing Options」→「P2 SSH」を順に矢印キーとEnterキーで選択・決定
    (バージョンによっては「8 Advanced Options」→「A4 SSH」の場合があるので注意)
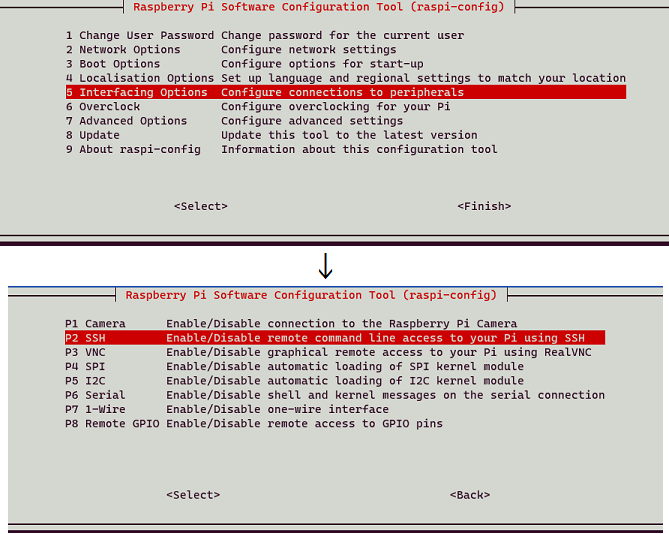
    ssh_raspi_raspiconfig.png

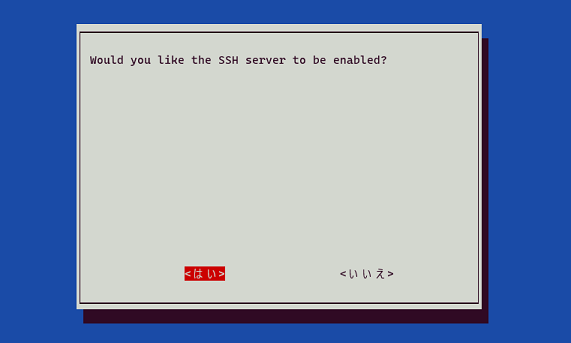
  3. 「<はい>」を選択してEnterキーを押す
    ssh_raspi_raspiconfig2.png

以上でsshサーバーが有効になりました。


※経緯: 別記事の執筆中にssh有効化方法を参照しようとしたところ、どれもGUI/CUIの片方しか紹介がなかったりraspi-configの設定項目が古いままだったりして不親切になりそうだったので、n番煎じですが新しくこの記事を書きました。
10
5
0

Register as a new user and use Qiita more conveniently

  1. You get articles that match your needs
  2. You can efficiently read back useful information
  3. You can use dark theme
What you can do with signing up
10
5

Delete article

Deleted articles cannot be recovered.

Draft of this article would be also deleted.

Are you sure you want to delete this article?