このレシピの生い立ち
スマートスピーカー、使ってますか?
弊社のオフィスでは、開発用、兼、業務アシスタントとしてGoogle Homeを利用しています。
話しかけなくても情報をお知らせしてくれるように社内コミュニケーションツールであるところのSlackと連携させているのですが、開発用だけあって環境をつくりなおす機会が多いため、必要なときすぐ設定できるように手順をまとめました。
コツ・ポイント
![]() 注意点
注意点
この記事は最小限の手順で環境を構築することを目的としており、セキュリティ面の考慮を含みません。
外部の第三者もURLへアクセスできることに注意してください。
本格運用の際はgoogle-home-notifier、Google Apps Scriptへ認証処理を追加することを強くおすすめします。
材料
- Google Home ...1台
- Raspberry Pi ...1台
- SSH接続できるもの。
- Mac ...1台
- Google ChromeとGoogle Apps Script(拡張機能)を入れておきましょう。
- Windowsの場合はお好みのSSHクライアントを用意してください。
下ごしらえとしてこれらを同じネットワークに接続しておきます。
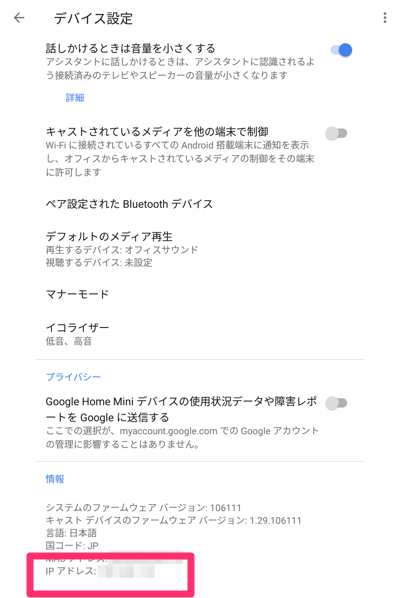
また、Google HomeアプリでGoogle HomeのIPアドレスを控えておいてください。
レシピ
Raspberry Piでgoogle-home-notifierを立ち上げる
![]() ターミナルからRaspberry Piへ接続します。
ターミナルからRaspberry Piへ接続します。
ssh <ユーザ名>@<Raspberry PiのIPアドレス>
![]() 最新のNode.jsと、google-home-notifierの導入に必要となるパッケージをインストールします。
最新のNode.jsと、google-home-notifierの導入に必要となるパッケージをインストールします。
![]() NodeSource Node.js and io.js Binary Distributions
NodeSource Node.js and io.js Binary Distributions
![]() google-home-notifier
google-home-notifier
curl -sL https://deb.nodesource.com/setup_9.x | sudo -E bash -
sudo apt-get install -y nodejs
sudo apt-get install -y git-core libnss-mdns libavahi-compat-libdnssd-dev
![]() google-home-notifierのリポジトリを取得します。
google-home-notifierのリポジトリを取得します。
git clone https://github.com/noelportugal/google-home-notifier
![]() google-home-notifierの動作に必要となるNode.jsパッケージをインストールします。
google-home-notifierの動作に必要となるNode.jsパッケージをインストールします。
cd google-home-notifier
npm install
![]() example.jsを書き換えます。
example.jsを書き換えます。
sed -i -e "s/192.168.1.20/<Google HomeのIPアドレス>/g" example.js
sed -i -e "s/'pl'/'ja'/g" example.js
sed -i -e "s/googlehome.ip(ip, language);/googlehome.ip(ip, language);\n  googlehome.device(deviceName, language);/g" example.js
![]() google-home-notifierを立ち上げます。
google-home-notifierを立ち上げます。
node example.js
起動後、エンドポイントURLとリクエストの例がコンソールに出力されます。
![]() httpsからはじまるURLを控えておきましょう。
httpsからはじまるURLを控えておきましょう。
Endpoints:
    http://<Raspberry PiのIPアドレス>:<受信ポート>/google-home-notifier
    https://<ngrokドメイン>/google-home-notifier
GET example:
curl -X GET https://<ngrokドメイン>/google-home-notifier?text=Hello+Google+Home
POST example:
curl -X POST -d "text=Hello Google Home" https://<ngrokドメイン>/google-home-notifier
ちなみに、プロセスをデーモン化するときはforeverを使うと便利です。
![]() Node.jsでforeverを使ってスクリプトの起動を永続化する
Node.jsでforeverを使ってスクリプトの起動を永続化する
Google Apps Scriptを作成する
![]() ChromeでGoogleドライブを開き、Google Apps Scriptプロジェクトを新規作成します。
ChromeでGoogleドライブを開き、Google Apps Scriptプロジェクトを新規作成します。

![]() コード.gsに次のコードを貼り付けてプロジェクトを保存します。プロジェクト名はなんでもOKです。
コード.gsに次のコードを貼り付けてプロジェクトを保存します。プロジェクト名はなんでもOKです。
function doPost(e) {
  var text = e.parameter.text;
  if (e.parameter.user_name) {
    text = e.parameter.user_name + 'さんからのメッセージです。' + text;
  }
  UrlFetchApp.fetch(
    'https://<ngrokドメイン>/google-home-notifier', // google-home-notifierのエンドポイント
    {
    'method': 'POST',
    'contentType': 'application/x-www-form-urlencoded',
    'payload': {'text' : text}
    }
  );
}
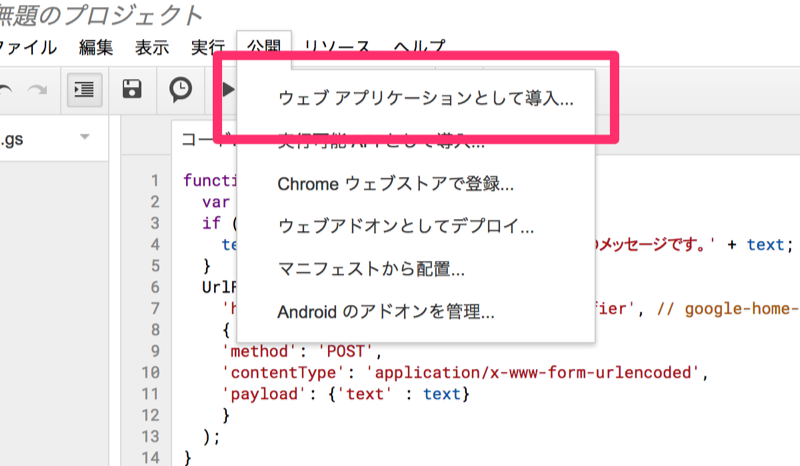
![]() プロジェクトを公開します。
プロジェクトを公開します。
[公開]-[ウェブ アプリケーションとして導入]を選択

「次のユーザーとしてアプリケーションを実行」を「自分」、
「アプリケーションにアクセス出来るユーザー」を「全員(匿名ユーザーを含む)」として
「導入」をクリック

![]() 「現在のウェブ アプリケーションのURL」を控えておきましょう。
「現在のウェブ アプリケーションのURL」を控えておきましょう。

SlackにOutgoing WebHooksを追加する
![]() ChromeでSlackのAppディレクトリを開きます。
ChromeでSlackのAppディレクトリを開きます。
AppディレクトリのURLは https://<ワークスペース名>.slack.com/apps です。
![]() 検索ボックスで「Outgoing Webhooks」を検索し、選択します。
検索ボックスで「Outgoing Webhooks」を検索し、選択します。
日本語表示の場合は「発信 Webフック」という名前です。(以下は日本語表示でのイメージとします)
![]() Outgoing WebHooksを追加します。
Outgoing WebHooksを追加します。
「設定を追加」をクリック

インテグレーションの設定で
「チャンネル」をメッセージを監視する対象のチャンネル、
「引き金となる言葉」を任意のキーワード、
「URL」を先程控えたGoogle Apps Scriptの「現在のウェブ アプリケーションのURL」として
「設定を保存する」をクリック
以上で完成です!指定したキーワードではじまるメッセージをSlackから送ってみましょう!![]()
参考
この記事の作成にあたっては、次の記事も参考にさせていただきました。
![]() GoogleHomeスピーカーに外部からプッシュして自発的に話してもらいます
GoogleHomeスピーカーに外部からプッシュして自発的に話してもらいます
![]() Google Homeで受付システム作ってみた
Google Homeで受付システム作ってみた

