概要
golangの開発環境は数多く存在すれど、B2Bの現場では例えばintellijの導入を許可されておらず、ソフトウェアのインストールにハードルがあって、使いたいIDEを導入できない場合がある。その中でも比較的導入しやすいvimに、golangの開発環境を設定し、必要最小限でgolangの開発環境を整えてみた。
vim-goは公式からインストールすることにします。
本記事では、仮想環境上にvim-goを導入する手順を示す。
前提
- 仮想環境上にgolangがインストールされている。こちらで環境を構築する
手順
1. 前提にあるように、こちらの手順で環境を構築する。
2. terminalからvagrantへsshする
$ cd /path/to/vagrant/golang/vagrant
$ vagrant ssh
3. NeoBundleをインストールする
[vagrant@develop ~]$ curl https://raw.githubusercontent.com/Shougo/neobundle.vim/master/bin/install.sh > install.sh
[vagrant@develop ~]$ sh ./install.sh
[vagrant@develop ~]$ rm -rf install.sh
4. ホームディレクトリに、.vimrcを作成する。
[vagrant@develop ~]$ vi ~/.vimrc
set encoding=utf-8
set fileencodings=iso-2022-jp,euc-jp,sjis,utf-8
set fileformats=unix,dos,mac

" Note: Skip initialization for vim-tiny or vim-small.
if 0 | endif

if &compatible
  set nocompatible               " Be iMproved
endif

" Required:
set runtimepath^=~/.vim/bundle/neobundle.vim/

" Required:
call neobundle#begin(expand('~/.vim/bundle/'))

" Let NeoBundle manage NeoBundle
" Required:
NeoBundleFetch 'Shougo/neobundle.vim'

" My Bundles here:
" Refer to |:NeoBundle-examples|.
" Note: You don't set neobundle setting in .gvimrc!

call neobundle#end()

" Required:
filetype plugin indent on

" If there are uninstalled bundles found on startup,
" this will conveniently prompt you to install them.
NeoBundleCheck
5. vimを起動する。
[vagrant@develop ~]$ vim
6. インストールが始まるので、yをタイプする。
Not installed bundles:  ['vim-go']
Install bundles now?
(y)es, [N]o:
7. 完了後、 :qでvimを終了する。
8. .vimrcの「" Note: You don't set neobundle setting in .gvimrc!」の下に以下の行を追加し保存する。
NeoBundle 'fatih/vim-go'
9. 再度vimを起動すると、vim-goのインストールを聞かれるので「y」を入力し、インストールを開始する。
Not installed bundles:  ['vim-go']
Install bundles now?
(y)es, [N]o:
10. 完了後、:qでvimを終了し、再度vimを起動する。
11. vim内で「:GoInstallBinaries」を入力し、goパッケージのインストールを開始する。以下のようにインストールが開始される。
vim-go: gocode not found. Installing github.com/nsf/gocode to folder /home/vagrant/go/bin/

vim-go: gometalinter not found. Installing github.com/alecthomas/gometalinter to folder /h
ome/vagrant/go/bin/
vim-go: goimports not found. Installing golang.org/x/tools/cmd/goimports to folder /home/v
agrant/go/bin/
vim-go: godef not found. Installing github.com/rogpeppe/godef to folder /home/vagrant/go/b
in/
vim-go: oracle not found. Installing golang.org/x/tools/cmd/oracle to folder /home/vagrant
/go/bin/
vim-go: gorename not found. Installing golang.org/x/tools/cmd/gorename to folder /home/vag
rant/go/bin/
vim-go: golint not found. Installing github.com/golang/lint/golint to folder /home/vagrant
/go/bin/
vim-go: errcheck not found. Installing github.com/kisielk/errcheck to folder /home/vagrant
/go/bin/
vim-go: gotags not found. Installing github.com/jstemmer/gotags to folder /home/vagrant/go
/bin/
vim-go: asmfmt not found. Installing github.com/klauspost/asmfmt/cmd/asmfmt to folder /hom
e/vagrant/go/bin/
Press ENTER or type command to continue
完了です。
動作確認
1. 以下のコマンドでgoファイルを新規作成する。
vim main.go
2. 以下のフォーマットめちゃくちゃなコード内容を記述する
package        main

import              "fmt"

func   main() {

}
3. 以下のコマンドを実行すると
:GoFmt
フォーマットがかかります。
package main

import "fmt"

func main() {
}
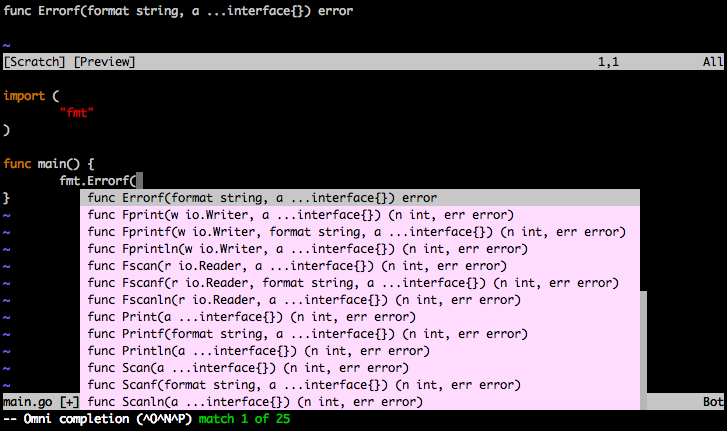
4. main関数内で「fmt.」と入力し、そのままcontrolキーを押しながら、x, oと入力すると、以下のように入力補完が起動します。
5. 以下のコマンドを実行すると
:GoRun
実行できます
vim main.go

Hello vim-go!

Press ENTER or type command to continue
おつかれさまでした!
