概要
Canvasオブジェクトの関数の一つに getImageData 関数というものがあります。ImageDataは、1ピクセルを(赤, 緑, 青, 透明度) の4つの要素で表わし、配列の総数は、4 × 幅 width × 高さ height です。この値を書き換えることで、Canvasに描画されている内容を変えることができます。
仕組みは簡単ですが、実際処理を書こうとすると配列番号をいろいろ考える必要がありスマートではなかったので、より簡単に書けるクラスを作りました。
クラス
SimpleImageData.js
class SimpleImageData{
	constructor(canvasId, x = 0, y = 0, width, height){
		const canvas = document.getElementById(canvasId);
		this._context = canvas.getContext("2d")

		this._offset = {x: x, y: y};
		if(typeof width  === "undefined") width  = canvas.width;
		if(typeof height === "undefined") height = canvas.height;

		this._image = this._context.getImageData(x, y, width, height);
		this._x = -1;
		this._y = 0;
	}
	get hasNext(){
		if(++this._x >= this.width){
			this._x = 0;
			this._y++;
		}
		return this._y < this.height;
	}
	get r(){
		return this._image.data[this._index + 0];
	}
	set r(newValue){
		this._image.data[this._index + 0] = newValue;
	}
	get g(){
		return this._image.data[this._index + 1];
	}
	set g(newValue){
		this._image.data[this._index + 1] = newValue;
	}
	get b(){
		return this._image.data[this._index + 2];
	}
	set b(newValue){
		this._image.data[this._index + 2] = newValue;
	}
	get a(){
		return this._image.data[this._index + 3];
	}
	set a(newValue){
		this._image.data[this._index + 3] = newValue;
	}
	setRGB(r, g, b){
		this.r = r;
		this.g = g;
		this.b = b;
	}
	load(){
		this._context.putImageData(this._image, this._offset.x, this._offset.y);
	}
	get x(){
		return this._x;
	}
	get y(){
		return this._y;
	}
	get width(){
		return this._image.width;
	}
	get height(){
		return this._image.height;
	}
	get _index(){// private
		return (this._x + this._y * this.width) * 4;
	}
}
使い方
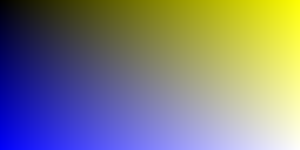
例として、黄色(#FFFF00)を X軸、青色(#0000FF)を Y軸の増加に沿ってグラデーションしてみましょう。for文よりも、hasNextとwhile文を用いた方が短縮できます。
javascript.js
const data = new SimpleImageData("canvas");
while(data.hasNext){
	const yellow = data.x / data.width;
	const blue = data.y / data.height;

	data.r = 255 * yellow;
	data.g = 255 * yellow;
	data.b = 255 * blue;
	data.a = 255;
}
data.load();
結果はこのようになります。
もしこのコードをクラスなしで書くとしたら。このようになります。
javascript.js
const canvas = document.getElementById("canvas");
const image = canvas.getContext("2d").getImageData(0, 0, canvas.width, canvas.height);
const data = image.data;

for(let i=0; i<data.length; i+=4){

	const index = i / 4;
	const x = index % image.width;
	const y = Math.floor(index / image.width);

	const yellow = x / image.width;
	const blue = y / image.height;

	data[i + 0] = 255 * yellow;
	data[i + 1] = 255 * yellow;
	data[i + 2] = 255 * blue;
	data[i + 3] = 255;
}
canvas.getContext("2d").putImageData(image, 0, 0);