Raspberry PiにF#で作ったアプリを実行する環境を作ったのでLチカをやってみた。
開発環境
以前にUbuntuにF#の開発環境を作っていたので、プログラムはUbuntuでビルドしてRaspberry Piに転送した。
UbuntuとVisual Studio CodeでF#の開発環境の構築 + デバッグ方法
回路
回路はこのようにした。
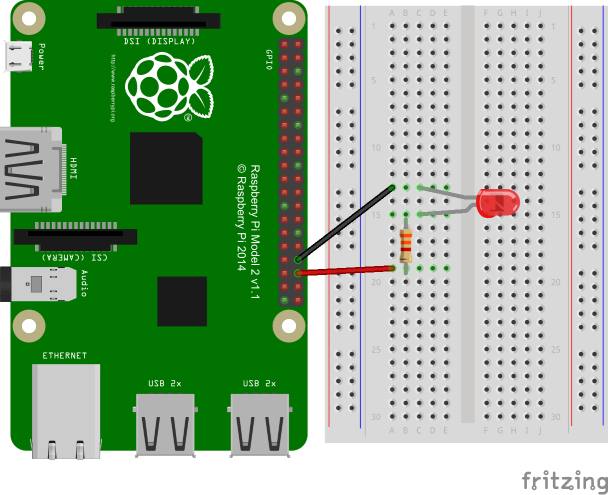
LEDのアノードとGPIO27(ピン36)、カソードとGround(ピン34)が接続されるようにして、アノードとGPIO27との間に3.3KΩの抵抗を入れた。
作業用ディレクトリの作成
Lチカ用のディレクトリを作って移動しておく。
$ mkdir ~/dev/
$ cd ~/dev/
ライブラリのインストール
F#やC#からRaspberry PiのGPIOにアクセスするためにraspberry-sharp-ioというライブラリを使った。
raspberry-sharp/raspberry-sharp-io
このライブラリはRaspberry.IO.GeneralPurpose, Raspberry.IO.InterIntegratedCircuit, Raspberry.IO.SerialPeripheralInterface, Raspberry.IO.Componentsの4つのライブラリに分かれている。
今回はRaspberry.IO.GeneralPurposeを使うのでNuGetでインストールした。
$ sudo apt-get install nuget
$ nuget install Raspberry.IO.GeneralPurpose
プロジェクトの作成
"LedTick"という名前のプロジェクトを、以前にまとめた方法で作成した。
作成したら、Raspberry.IO.GeneralPurposeのライブラリへの参照をプロジェクトファイル("LedTick.fsproj")に追加する。
  ...
  <ItemGroup>
    <Reference Include="mscorlib" />
    <Reference Include="FSharp.Core, Version=$(TargetFSharpCoreVersion), Culture=neutral, PublicKeyToken=b03f5f7f11d50a3a">
      <Private>True</Private>
    </Reference>
    <Reference Include="System" />
    <Reference Include="System.Core" />
    <Reference Include="System.Numerics" />
    <!-- この要素を追加 -->
    <Reference Include="Raspberry.IO.GeneralPurpose">
      <HintPath>../Raspberry.IO.GeneralPurpose.2.3.0/lib/net40/Raspberry.IO.GeneralPurpose.dll</HintPath>
    </Reference>
  </ItemGroup>
  ...
ソースコード
LedTick.fsに500ms間隔で点灯と消灯を10回繰り返すプログラムを書く。
module LedTick

open System.Threading;
open Raspberry.IO.GeneralPurpose;

[<EntryPoint>]
let main argv =
    let led = ConnectorPin.P1Pin36.ToProcessor()
    let driver = GpioConnectionSettings.DefaultDriver
    try
        driver.Allocate(led, PinDirection.Output)

        for i in [1..10] do
            driver.Write(led, true)
            Thread.Sleep(500)
            driver.Write(led, false)
            Thread.Sleep(500)
    finally
        driver.Release(led)
    0
ビルド
プロジェクトファイルがあるディレクトリに移動してビルドする。
$ xbuild /p:Configuration=Release
実行ファイルは"bin/Release/"に生成される。
実行
実行ファイルとライブラリのDLLをRaspberry Piに転送する。
- LedTick/bin/Release/LedTick.exe
- Raspberry.IO.GeneralPurpose.2.3.0/lib/net40/Raspberry.IO.GeneralPurpose.dll
- Raspberry.IO.GeneralPurpose.2.3.0/lib/net40/Raspberry.IO.Interop.dll
- Raspberry.System.2.0.0/lib/net40/Raspberry.System.dll
Raspberry.System.dllはRaspberry.IO.GeneralPurposeと一緒にインストールされている。
$ cd ~/dev/
$ scp [上のファイルのパス] pi@[Raspberry PiのIPアドレス]:~/
転送できたらRaspberry Piで実行してみる。sudoが必要なことに注意する。
$ cd ~
$ sudo mono LedTick.exe
無事にLEDが10回点滅した。