用意したYOLO環境に自前で用意した画像より、「人」の認識を行いたいと思います。
手順としては、
- BBoxツールでのバウンディングボックス情報の用意
- 機械学習のデータセット画像枚数を増やす方法を参考に、画像数の水増し
- BBoxツールのデータ形式からYOLOのデータ形式に変換
- train.txtとtest.txtを用意
- トレーニング
- 確認
BBoxツールでのバウンディングボックス情報の用意
YOLOの学習に必要なデータセットの準備のためにBBox-Label-Toolを使用します。
今回は250枚の画像をこのツールを使用して、データセットを作成します。
BBox-label-toolのインストール
Python Tkinterで実装された画像のバウンディングボックスとラベル付けを行うためのツールです。
これを使用して、YOLOに必要な学習セットを作成します。MAC OS Sierraにこのツールのインストールを行います。
環境要件
- python 2.7
- python PIL (Pillow)
Pillowはpyenvで環境を作らず、グローバルな環境にインストールを行います。
pythonのバージョンを確認
python --version
# Python 2.7.10
Pillowのインストール
sudo pip install pillow
BBox-label-toolの起動
cd ~/Desktop
git clone https://github.com/puzzledqs/BBox-Label-Tool.git
cd BBox-Label-Tool
python main.py
jpgファイルの用意
BBox-Label-Toolにjpg画像を認識させるために、mogrifyコマンドで変換を行います。またインストールされていない場合は別途インストールを行います。
brew install imagemagick
諸々変更を行い、不要ファイルを削除する
mogrify -format jpg *.png
mogrify -format jpg *.jpeg
find . -name "*.png"|xargs rm
find . -name "*.jpeg"|xargs rm
main.pyのJPEGをjpgに変換
https://github.com/puzzledqs/BBox-Label-Tool/blob/master/main.py
のファイル内にあるJPEGをjpgに変換します。
使い方
- images配下に000といった形でlabaelと対応するフォルダと画像を作成
- 画面内のdirにラベル番号を指定し(0, or 1)loadの実行
- マウスでバウンディングボックスを作成し、「next」ボタンで保存次の画像を表示
これでどんどん、保存を行います。
画像の数の水増し
機械学習のデータセット画像枚数を増やす方法を参考に、画像の水増しを行います。水増しスクリプトはpython3なため、こちらのスクリプトはpython3で実行します。またこのスクリプトは、指定の画像しか水増しすることができないため、ディレクトリ単位で水増しできるように調整を行います。数は250枚から5000ほどまで増やします。
参考スクリプト
increase_picture.py
BBoxツールのデータ形式からYOLOのデータ形式に変換
BBox-Label-Toolで作成したデータフォーマットはYOLOでは使用できないため変換を行います。
BBox Label Tool フォーマット
[category number]
[bounding box left X] [bounding box top Y] [bounding box right X] [bounding box bottom Y]
YOLOフォーマット
[category number] [object center in X] [object center in Y] [object width in X] [object width in Y]
変換用スクリプトであるconvert.pyを用意します。
# -*- coding: utf-8 -*-
"""
Created on Wed Dec  9 14:55:43 2015
This script is to convert the txt annotation files to appropriate format needed by YOLO
@author: Guanghan Ning
Email: gnxr9@mail.missouri.edu
"""

import os
from os import walk, getcwd
from PIL import Image

classes = ["001"]

def convert(size, box):
    dw = 1./size[0]
    dh = 1./size[1]
    x = (box[0] + box[1])/2.0
    y = (box[2] + box[3])/2.0
    w = box[1] - box[0]
    h = box[3] - box[2]
    x = x*dw
    w = w*dw
    y = y*dh
    h = h*dh
    return (x,y,w,h)


"""-------------------------------------------------------------------"""

""" Configure Paths"""
mypath = "labels/000/"
outpath = "Images/000/"

cls = "001"
if cls not in classes:
    print('exit')
    exit(0)
cls_id = classes.index(cls)

wd = getcwd()
list_file = open('%s/%s_list.txt'%(wd, cls), 'w')

""" Get input text file list """
txt_name_list = []
for (dirpath, dirnames, filenames) in walk(mypath):
    txt_name_list.extend(filenames)
    break
print(txt_name_list)

""" Process """
for txt_name in txt_name_list:
    # txt_file =  open("Labels/stop_sign/001.txt", "r")

    """ Open input text files """
    txt_path = mypath + txt_name
    print("Input:" + txt_path)
    txt_file = open(txt_path, "r")
    lines = txt_file.read().split('\r\n')   #for ubuntu, use "\r\n" instead of "\n"

    """ Open output text files """
    txt_outpath = outpath + txt_name
    print("Output:" + txt_outpath)
    txt_outfile = open(txt_outpath, "w")


    """ Convert the data to YOLO format """
    ct = 0
    for line in lines:
        print('lenth of line is: ')
        print(len(line))
        print('\n')
        if(len(line) >= 2):
            ct = ct + 1
            print(line + "\n")
            elems = line.split(' ')
            print(elems)
            xmin = elems[0].replace('\n','')
            xmax = elems[2].replace('\n','')
            ymin = elems[1].replace('\n','')
            ymax = elems[3].replace('\n','')

            img_path = str('%s/images/%s/%s.JPEG'%(wd, cls, os.path.splitext(txt_name)[0]))
            #t = magic.from_file(img_path)
            #wh= re.search('(\d+) x (\d+)', t).groups()
            im=Image.open(img_path)
            w= int(im.size[0])
            h= int(im.size[1])
            #w = int(xmax) - int(xmin)
            #h = int(ymax) - int(ymin)
            # print(xmin)
            print(w, h)
            print(xmin, xmax, ymin, ymax)
            b = (float(xmin), float(xmax), float(ymin), float(ymax))
            bb = convert((w,h), b)
            print(bb)
            txt_outfile.write(str(cls_id) + " " + " ".join([str(a) for a in bb]) + '\n')

    """ Save those images with bb into list"""
    if(ct != 0):
        list_file.write('%s/images/%s/%s.JPEG\n'%(wd, cls, os.path.splitext(txt_name)[0]))

list_file.close()
以下で実行
自分の環境では改行コードが入っており、うまく扱えなかった為、改行コードを削除する処理を入れています。
python convert.py
フォーマット変換されたitem-*.txtファイルが出来上がります。
YOLOトレーニングデータの用意
process.pyを用意し、学習とテスト用のデータに分けます。
import glob, os

# Current directory
current_dir = os.path.dirname(os.path.abspath(__file__))

# Directory where the data will reside, relative to 'darknet.exe'
path_data = 'data/obj/'

# Percentage of images to be used for the test set
percentage_test = 10;

# Create and/or truncate train.txt and test.txt
file_train = open('train.txt', 'w')
file_test = open('test.txt', 'w')

# Populate train.txt and test.txt
counter = 1
index_test = round(100 / percentage_test)
for pathAndFilename in glob.iglob(os.path.join(current_dir, "*.jpg")):
    title, ext = os.path.splitext(os.path.basename(pathAndFilename))

    if counter == index_test:
        counter = 1
        file_test.write(path_data + title + '.jpg' + "\n")
    else:
        file_train.write(path_data + title + '.jpg' + "\n")
        counter = counter + 1
YOLO設定ファイルの準備
YOLOの設定ファイルである
- cfg/obj.data
- cfg/obj.names
- cfg/yolo-obj.cfg
の調整を行います。はじめにobj.dataの作成を行います。
classes= 1
train  = train.txt
valid  = test.txt
names = obj.names
backup = backup/
各記述内容は以下になります。
classes: 分類を行いたい数を設定します。
train: トレーニングデータを指定します。
valid: 検証データを用意します。
names: ラベルづけされたファイルを用意します。
backup: backupフォルダを指定します。
次にobj.namesを作成します。中身はラベル名を並べたリストになります。
person_area
最後にyolo-obj.cfgをyolo-voc.cfgから複製し、以下の行を編集します。
- Line3 batch=64に設定。
- Line4 subdivisions=8に設定。
- Line 244: classes=1 検出したいカテゴリーの数
- Line 237: filters=30に設定 計算式 filters=(classes + 5)*5
トレーニングの精度をあげるために以下のファイルを落としておく。
convolutional weights
トレーニングを行う
ここまでの準備ができたらトレーニングを実行します。darknetのコマンドが通っている箇所で以下のコマンドを貼り付けて実行します。あとで学習内容を確認が行えるようにログファイルに書き込みを行っておきます。
./darknet detector train cfg/obj.data cfg/yolo-obj.cfg darknet19_448.conv.23 1>> log.txt
以下が結果
Loaded: 0.000028 seconds
Region Avg IOU: 0.883605, Class: 1.000000, Obj: 0.459857, No Obj: 0.001373, Avg Recall: 1.000000,  count: 6
Region Avg IOU: 0.856211, Class: 1.000000, Obj: 0.427905, No Obj: 0.001446, Avg Recall: 1.000000,  count: 6
Region Avg IOU: 0.911241, Class: 1.000000, Obj: 0.621359, No Obj: 0.001779, Avg Recall: 1.000000,  count: 4
Region Avg IOU: 0.848814, Class: 1.000000, Obj: 0.570112, No Obj: 0.001852, Avg Recall: 1.000000,  count: 5
Region Avg IOU: 0.878883, Class: 1.000000, Obj: 0.419991, No Obj: 0.001094, Avg Recall: 1.000000,  count: 2
Region Avg IOU: 0.869041, Class: 1.000000, Obj: 0.323514, No Obj: 0.001114, Avg Recall: 1.000000,  count: 3
Region Avg IOU: 0.730271, Class: 1.000000, Obj: 0.246117, No Obj: 0.001753, Avg Recall: 1.000000,  count: 4
Region Avg IOU: 0.891162, Class: 1.000000, Obj: 0.676539, No Obj: 0.001985, Avg Recall: 1.000000,  count: 4
20000: 2.996337, 2.595317 avg, 0.001000 rate, 11.981406 seconds, 1280000 images
1000~3000ほどで結果がでるともネットの記事ではありましたが、今回は20000イテレーションまで回し、学習を終了しました。
わかっているログの見方としては、
- Region Avg IOU: 高いほど良い
- Avg Recall: 高いほど良い
- 2.595317 avg: 0.006以下が望ましい
なのでIOUとRecallは良い結果が出ていますが、「2.595317」は目標の値より少し悪いです。
計測時間の確認
-rw-r--r--  1 root root 202314764 Oct 14 06:35 yolo-obj.backup
-rw-r--r--  1 root root 202314764 Oct 13 11:20 yolo-obj_100.weights
-rw-r--r--  1 root root 202314764 Oct 13 20:56 yolo-obj_10000.weights
-rw-r--r--  1 root root 202314764 Oct 13 11:26 yolo-obj_200.weights
-rw-r--r--  1 root root 202314764 Oct 14 06:35 yolo-obj_20000.weights
-rw-r--r--  1 root root 202314764 Oct 13 11:32 yolo-obj_300.weights
-rw-r--r--  1 root root 202314764 Oct 13 11:37 yolo-obj_400.weights
-rw-r--r--  1 root root 202314764 Oct 13 11:44 yolo-obj_500.weights
-rw-r--r--  1 root root 202314764 Oct 13 11:51 yolo-obj_600.weights
-rw-r--r--  1 root root 202314764 Oct 13 11:57 yolo-obj_700.weights
-rw-r--r--  1 root root 202314764 Oct 13 12:03 yolo-obj_800.weights
-rw-r--r--  1 root root 202314764 Oct 13 12:09 yolo-obj_900.weights
-rw-r--r--  1 root root 202314764 Oct 14 06:35 yolo-obj_final.weights
backupフォルダのweights書き込み時間を確認します。タイムゾーンが日本ではないため、9時間プラスで時刻を見ています。
計測開始時刻(yolo-obj_100.weights): 10/13 20:20
計測完了時刻(yolo-obj_final.weights): 10/14 15:35
19時間ほどかかっています。
テスト
実際に判断できているかテストを行います。
./darknet detector test cfg/obj.data cfg/yolo-obj.cfg backup/yolo-obj_final.weights test.jpg

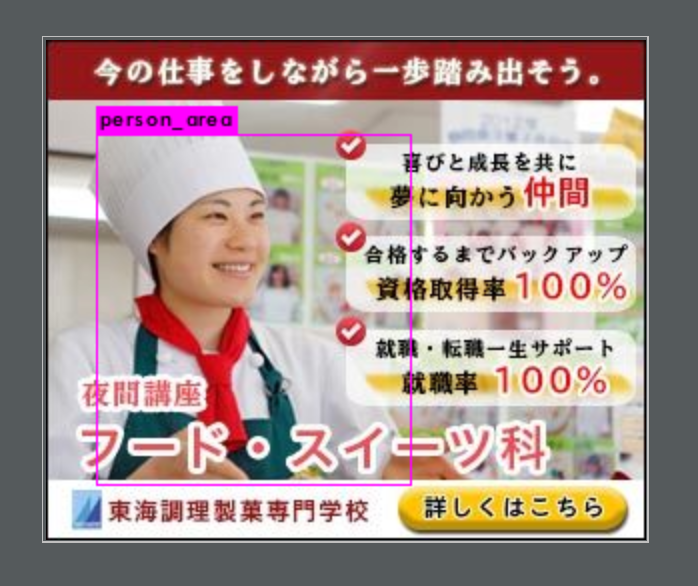

わかりやすいデータですが、人が写っているエリアを囲ってくれています。