5
3

Delete article

Deleted articles cannot be recovered.

Draft of this article would be also deleted.

Are you sure you want to delete this article?

VNCとSSHトンネルでOCI Linuxインスタンスに接続する方法

Last updated at Posted at 2022-06-15

本ブログは、オラクル・クラウドの個人ブログの1つです。

初めに

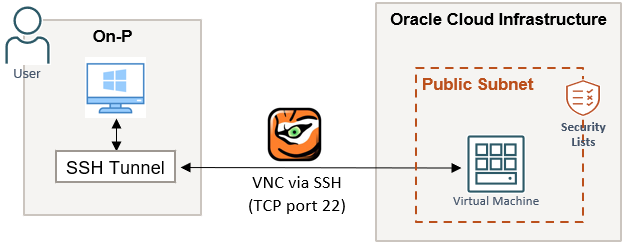
OCIでOracle Linuxインスタンスを作成した後、デフォルトではGUIデスクトップとVNCサービスがインストールされません。これから、「SSHトンネル+VNC接続」をセットアップする方法を紹介したいと思います。この接続パターンは、TCP 5901ポートをOCIセキュリティ・リスト(またはNSG)に追加する必要はありません。 入力ルールにはSSHポート(TCP 22)のみを許可すればOKです。

検証環境

項目 内容
サーバ OS Oracle Linux 8 (OCI Compute Instance)
クライアント OS Windows Server 2019,2022
VNC ソフト TigerVNC (v1.12)
SSH ソフト OpenSSH

今回の接続対象のインスタンスは、直接アクセスできるパブリック・サブネットにあります。もし、インスタンスがプライベート・サブネットにある場合。「OCI Bastion + SSHトンネル + VNC」のようなソリューションで接続できます。プライベート・サブネット内のインスタンスまたは他のOCIサービスに接続する方法については、私の「OCI Bastion関連のシリーズ・ブログ」をご参照ください。

ステップ

1. GNOMEデスクトップのインストール

インストール
コマンド: sudo dnf groupinstall "Server with GUI" -y
数分間かかります。

グラフィカル・モードをデフォルトのタイプとして設定します。
コマンド: sudo systemctl set-default graphical

[opc@linux8 ~]$ sudo systemctl set-default graphical
Removed /etc/systemd/system/default.target.
Created symlink /etc/systemd/system/default.target → /usr/lib/systemd/system/graphical.target.
[opc@linux8 ~]$

サーバーを再起動します(OCIコンソールから再起動することをお勧めします)。

設定ファイルの編集
再起動後、インスタンスにログインし、ファイル「/etc/gdm/custom.conf」の次の行のコメントを解除します。その目的は、VNCがWaylandの代わりにX.orgを使用するようにします。
WaylandEnable=False

編集後は、次のようになります(opcユーザーで編集する時、sudoを付けてください)。

[opc@linux8 ~]$ sudo cat /etc/gdm/custom.conf
# GDM configuration storage

[daemon]
# Uncomment the line below to force the login screen to use Xorg
WaylandEnable=false

[security]

[xdmcp]

[chooser]

[debug]
# Uncomment the line below to turn on debugging
#Enable=true

[opc@linux8 ~]$

2. TigerVNCのインストールと設定

インストール
sudo dnf install tigervnc-server tigervnc-server-module -y

[opc@linux8 ~]$ sudo dnf install tigervnc-server tigervnc-server-module -y
......
Installed:
  tigervnc-selinux-1.12.0-4.el8.noarch     tigervnc-server-1.12.0-4.el8.x86_64     tigervnc-server-module-1.12.0-4.el8.x86_64

Complete!
[opc@linux8 ~]$

VNCパスワードの設定

[opc@linux8 ~]$ vncpasswd
Password:
Verify:
Would you like to enter a view-only password (y/n)? n
A view-only password is not used
[opc@linux8 ~]$

VNCサービスの設定
VNCサービスのディスプレイ番号とユーザー名をファイル「/etc/tigervnc/vncserver.users」に追加します。
:1=username

編集後は、次のようになります(opcユーザーで編集する時、sudoを付けてください)。

[opc@linux8 ~]$ cat /etc/tigervnc/vncserver.users
# TigerVNC User assignment
#
# This file assigns users to specific VNC display numbers.
# The syntax is <display>=<username>. E.g.:
#
# :2=andrew
# :3=lisa

:1=opc
[opc@linux8 ~]$

画面解像度をファイル「/etc/tigervnc/vncserver-config-defaults」に追加します。
geometry=1280x1024

編集後は、次のようになります(opcユーザーで編集する時、sudoを付けてください)。

[opc@linux8 ~]$ cat /etc/tigervnc/vncserver-config-defaults
## Default settings for VNC servers started by the vncserver service
#
# Any settings given here will override the builtin defaults, but can
# also be overriden by ~/.vnc/config and vncserver-config-mandatory.
#
# See HOWTO.md and the following manpages for more details:
#     vncsession(8) Xvnc(1)
#
# Several common settings are shown below. Uncomment and modify to your
# liking.

# session=gnome
# securitytypes=vncauth,tlsvnc
# geometry=2000x1200
# localhost
# alwaysshared

# Default to GNOME session
# Note: change this only when you know what are you doing
session=gnome
geometry=1280x1024
[opc@linux8 ~]$

VNCサービスの起動
コマンド:
sudo systemctl daemon-reload
sudo systemctl enable --now vncserver@:1.service

[opc@linux8 ~]$ sudo systemctl daemon-reload
[opc@linux8 ~]$ sudo systemctl enable --now vncserver@:1.service
Created symlink /etc/systemd/system/multi-user.target.wants/vncserver@:1.service → /usr/lib/systemd/system/vncserver@.service.
[opc@linux8 ~]$

VNCサービスのステータスを確認します。
コマンド: sudo systemctl status vncserver@:1.service

[opc@linux8 ~]$ sudo systemctl status vncserver@:1.service
● vncserver@:1.service - Remote desktop service (VNC)
   Loaded: loaded (/usr/lib/systemd/system/vncserver@.service; enabled; vendor preset: disabled)
   Active: active (running) since Mon 2022-05-30 04:36:48 GMT; 8s ago
  Process: 30049 ExecStart=/usr/libexec/vncsession-start :1 (code=exited, status=0/SUCCESS)
  Process: 30038 ExecStartPre=/usr/libexec/vncsession-restore :1 (code=exited, status=0/SUCCESS)
 Main PID: 30059 (vncsession)
    Tasks: 0 (limit: 100056)
   Memory: 1.0M
   CGroup: /system.slice/system-vncserver.slice/vncserver@:1.service
           ? 30059 /usr/sbin/vncsession opc :1

May 30 04:36:48 linux8 systemd[1]: Starting Remote desktop service (VNC)...
May 30 04:36:48 linux8 systemd[1]: Started Remote desktop service (VNC).
[opc@linux8 ~]$

3. SSHトンネルの作成

この例は、WindowsクライアントとOpenSSHを使用しています。
OpenSSHのインストール方法:PowerShellを起動して、以下のコマンドを実行する(管理者ユーザで実行)。

Get-WindowsCapability -Online | Where-Object Name -like 'OpenSSH*'

秘密キーをC:\Users\<username>\.sshの下に保存し、次のコマンドでSSHトンネルを作成します。
ssh -L 5901:localhost:5901 opc@<IP address or Hostname>

image.png

4. VNC接続の作成

TigerVNCを起動し、「localhost:5901」と入力して、「接続」ボタンをクリックします。

CMDから次のコマンドを実行して開始することもできます。
"C:\Program Files (x86)\TigerVNC\vncviewer.exe" localhost:5901

VNCパスワード(Step-2で作成)を入力し、OKを押します。

次のようなデスクトップが表示されます。
image.png

接続の問題

自動スクリーン・ロック

GNOMEデスクトップとVNCをインストールした後、しばらく経ってから初回ログインする場合、次のように画面ロックが表示されることがあります。

デフォルトでは、opcユーザに対しSSHキー認証を使用するため、パスワードはありません。この問題は2つの方法で回避できます。

  • インスタンスに SSH ログインし、コマンドsudo passwd opcを実行してopcユーザーのパスワードを作成します。 作成したパスワードを上記画面に入力し、「ロック解除」ボタンを押してください。
  • インスタンスを再起動し、すぐに再ログインする( opcのパスワードを作成したくない場合)。

ロック解除ができたら、GNOMEデスクトップに表示されます。必要に応じて、自動ロックを無効にすることができます。

自動ロックを無効にする方法:
Activities -> Show Applications -> Settings -> Privacy -> Screen Lock
image.png

認証が必要なプロンプト

私が下記のプロンプト画面に遭ったことがありますが、「キャンセル」をクリックしてスキップしました。

MOS(My Oracle Support) ドキュメントは、このようなプロンプトを回避する方法を提供しています。
Authentication Required Prompt When Connecting To A Server Via VNC (Doc ID 2358323.1)

以上です。


関連記事
オラクル・クラウド個人ブログ一覧
プライベート・サブネット内のOCI Computeインスタンスに接続する方法のまとめ
Oracle LinuxでSQL Developerを利用する方法

公式ドキュメント
Install the VNC Remote Access Server on Oracle Linux
5
3
0

Register as a new user and use Qiita more conveniently

  1. You get articles that match your needs
  2. You can efficiently read back useful information
  3. You can use dark theme
What you can do with signing up
5
3

Delete article

Deleted articles cannot be recovered.

Draft of this article would be also deleted.

Are you sure you want to delete this article?