現在プロジェクトを新たに生成する時、ConstraintLayoutが自動で作られました。
今回は開発の実用例によって説明します。
GuideLine
- 補助線の方向を設置する ログイン画面でよく使われたレイアウトです。
android:orientation="vertical"
layout_constraintGuide_begin 左側と上の距離
layout_constraintGuide_end 右側と下の距離
layout_constraintGuide_percent パーセント%で設定
<androidx.constraintlayout.widget.ConstraintLayout
xmlns:android="http://schemas.android.com/apk/res/android"
    xmlns:app="http://schemas.android.com/apk/res-auto"
    android:layout_width="match_parent"
    android:layout_height="match_parent">

    <androidx.constraintlayout.widget.Guideline
        android:id="@+id/guideline"
        android:layout_width="wrap_content"
        android:layout_height="wrap_content"
        android:orientation="vertical" //縦のラインを設定
        app:layout_constraintGuide_begin="120dp" //縦のラインを設定する場合は、左から120dp
        />

    <TextView
        android:id="@+id/tv_username"
        android:layout_width="wrap_content"
        android:layout_height="60dp"
        android:layout_marginTop="72dp"
        android:gravity="center_vertical"
        android:text="用户名"
        app:layout_constraintEnd_toStartOf="@+id/guideline"
        app:layout_constraintTop_toTopOf="parent" />

    <TextView
        android:id="@+id/tv_password"
        android:layout_width="wrap_content"
        android:layout_height="60dp"
        android:gravity="center_vertical"
        android:text="密码"
        app:layout_constraintEnd_toStartOf="@+id/guideline"
        app:layout_constraintTop_toBottomOf="@+id/tv_username" />

    <EditText
        android:id="@+id/et_username"
        android:layout_width="200dp"
        android:layout_height="wrap_content"
        app:layout_constraintBottom_toBottomOf="@+id/tv_username"
        app:layout_constraintStart_toStartOf="@+id/guideline" />

    <EditText
        android:layout_width="200dp"
        android:layout_height="wrap_content"
        app:layout_constraintBottom_toBottomOf="@+id/tv_password"
        app:layout_constraintStart_toEndOf="@+id/tv_password" />
</androidx.constraintlayout.widget.ConstraintLayout>
Group
1.constraint_referenced_idsの属性を通じて、レイアウトのネストを減らせます。
<androidx.constraintlayout.widget.ConstraintLayout xmlns:android="http://schemas.android.com/apk/res/android"
        xmlns:app="http://schemas.android.com/apk/res-auto"
        xmlns:tools="http://schemas.android.com/tools"
        android:layout_width="match_parent"
        android:layout_height="match_parent"
        tools:context="com.hencoder.Helpers">

    <Button
            app:layout_constraintStart_toStartOf="parent"
            app:layout_constraintTop_toTopOf="parent"
            android:id="@+id/button"
            android:text="group"
            android:layout_width="wrap_content"
            android:layout_height="wrap_content" />

    <androidx.constraintlayout.widget.Group
            android:id="@+id/group"
            android:layout_width="wrap_content"
            android:layout_height="wrap_content"
            //コントロールのグループに対してsetVisibilityを同一に設定できます
            app:constraint_referenced_ids="view,view1,view7,view8" />

    <ImageView
            android:id="@+id/view1"
            android:layout_width="wrap_content"
            android:layout_height="wrap_content"
            android:layout_marginTop="48dp"
            android:src="@mipmap/ic_launcher"
            app:layout_constraintStart_toStartOf="parent"
            app:layout_constraintTop_toTopOf="parent" />

    <ImageView
            android:id="@+id/view"
            android:layout_width="wrap_content"
            android:layout_height="wrap_content"
            android:src="@mipmap/ic_launcher"
            app:layout_constraintStart_toEndOf="@+id/view1"
            app:layout_constraintTop_toTopOf="@+id/view1" />

    <ImageView
            android:id="@+id/view7"
            android:layout_width="wrap_content"
            android:layout_height="wrap_content"
            android:layout_marginStart="80dp"
            android:layout_marginTop="72dp"
            android:src="@mipmap/ic_launcher"
            app:layout_constraintStart_toEndOf="@+id/view1"
            app:layout_constraintTop_toTopOf="@+id/view1" />

    <ImageView
            android:id="@+id/view8"
            android:layout_width="wrap_content"
            android:layout_height="wrap_content"
            android:layout_marginStart="8dp"
            android:layout_marginTop="72dp"
            android:src="@mipmap/ic_launcher"
            app:layout_constraintStart_toEndOf="@+id/view1"
            app:layout_constraintTop_toTopOf="@+id/view1" />

</androidx.constraintlayout.widget.ConstraintLayout>
ConstraintSet
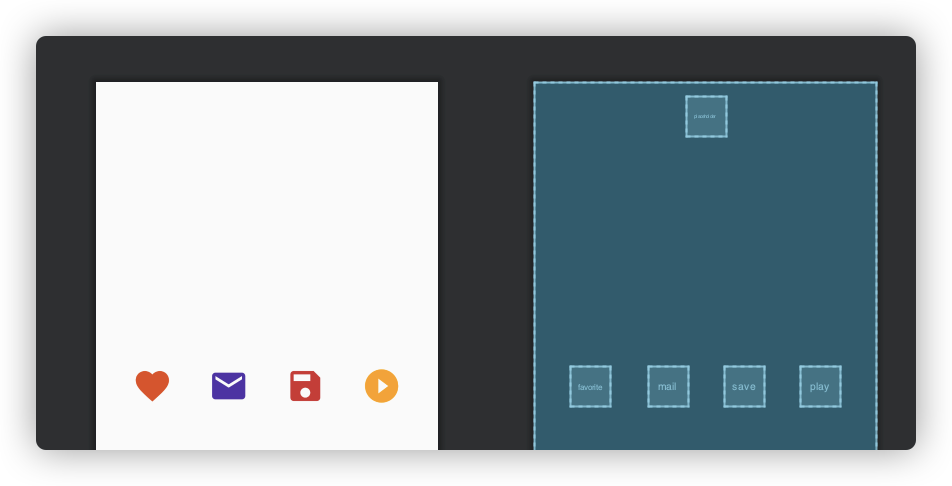
setContentIdを使用して、指定したコントロールをプレースホルダーの位置に配置します。
<androidx.constraintlayout.widget.ConstraintLayout xmlns:android="http://schemas.android.com/apk/res/android"
        xmlns:app="http://schemas.android.com/apk/res-auto"
        xmlns:tools="http://schemas.android.com/tools"
        android:id="@+id/constraintLayout"
        android:layout_width="match_parent"
        android:layout_height="match_parent"
        tools:context="com.hencoder.PlaceHolder">

    <androidx.constraintlayout.widget.Placeholder
        android:id="@+id/placeholder"
        android:layout_width="48dp"
        android:layout_height="48dp"
        android:layout_marginTop="16dp"
        app:layout_constraintEnd_toEndOf="parent"
        app:layout_constraintStart_toStartOf="parent"
        app:layout_constraintTop_toTopOf="parent" />

    <androidx.appcompat.widget.AppCompatImageView
            android:id="@+id/favorite"
            android:layout_width="48dp"
            android:layout_height="48dp"
            android:onClick="onClick"
            android:src="@drawable/ic_favorite_black_24dp"
            android:tint="#E64A19"
            app:layout_constraintBottom_toBottomOf="parent"
            app:layout_constraintEnd_toStartOf="@id/mail"
            app:layout_constraintStart_toStartOf="parent"
            app:layout_constraintTop_toTopOf="parent" />

    <androidx.appcompat.widget.AppCompatImageView
            android:id="@+id/mail"
            android:layout_width="48dp"
            android:layout_height="48dp"
            android:onClick="onClick"
            android:src="@drawable/ic_mail_black_24dp"
            android:tint="#512DA8"
            app:layout_constraintBottom_toBottomOf="parent"
            app:layout_constraintEnd_toStartOf="@id/save"
            app:layout_constraintStart_toEndOf="@id/favorite"
            app:layout_constraintTop_toTopOf="parent" />

    <androidx.appcompat.widget.AppCompatImageView
            android:id="@+id/save"
            android:layout_width="48dp"
            android:layout_height="48dp"
            android:onClick="onClick"
            android:src="@drawable/ic_save_black_24dp"
            android:tint="#D32F2F"
            app:layout_constraintBottom_toBottomOf="parent"
            app:layout_constraintEnd_toStartOf="@id/play"
            app:layout_constraintStart_toEndOf="@id/mail"
            app:layout_constraintTop_toTopOf="parent" />

    <androidx.appcompat.widget.AppCompatImageView
            android:id="@+id/play"
            android:layout_width="48dp"
            android:layout_height="48dp"
            android:onClick="onClick"
            android:src="@drawable/ic_play_circle_filled_black_24dp"
            android:tint="#FFA000"
            app:layout_constraintBottom_toBottomOf="parent"
            app:layout_constraintEnd_toEndOf="parent"
            app:layout_constraintStart_toEndOf="@+id/save"
            app:layout_constraintTop_toTopOf="parent" />

</androidx.constraintlayout.widget.ConstraintLayout>
画像を押すと位置を交換できます
class PlaceHolder : AppCompatActivity() {

    override fun onCreate(savedInstanceState: Bundle?) {
        super.onCreate(savedInstanceState)
        setContentView(R.layout.activity_place_holder)
    }

    fun onClick(view: View) {
        findViewById<Placeholder>(R.id.placeholder).setContentId(view.id)

    }
}
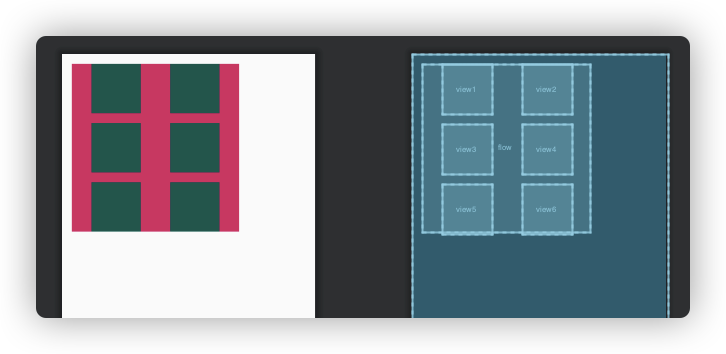
Flow
wrapMode
chain aligned none(デフォルト)

<androidx.constraintlayout.widget.ConstraintLayout xmlns:android="http://schemas.android.com/apk/res/android"
    xmlns:app="http://schemas.android.com/apk/res-auto"
    xmlns:tools="http://schemas.android.com/tools"
    android:layout_width="match_parent"
    android:layout_height="match_parent"
    tools:context="com.hencoder.FlowActivity">

    <androidx.constraintlayout.helper.widget.Flow
        android:id="@+id/flow"
        android:layout_width="0dp"
        android:layout_height="wrap_content"
        android:layout_marginStart="16dp"
        android:layout_marginTop="16dp"
        android:background="@color/colorAccent"
        android:orientation="horizontal"
        app:flow_wrapMode="chain" //モード
        app:flow_verticalGap="16dp"
        app:flow_horizontalGap="16dp"
        app:constraint_referenced_ids="view1,view2,view3,view4,view5,view6"
        app:layout_constraintStart_toStartOf="parent"
        app:layout_constraintTop_toTopOf="parent" />

    <View
        android:id="@+id/view1"
        android:layout_width="80dp"
        android:layout_height="80dp"
        android:background="@color/colorPrimaryDark" />

    <View
        android:id="@+id/view2"
        android:layout_width="80dp"
        android:layout_height="80dp"
        android:background="@color/colorPrimaryDark" />

    <View
        android:id="@+id/view3"
        android:layout_width="80dp"
        android:layout_height="80dp"
        android:layout_margin="8dp"
        android:background="@color/colorPrimaryDark" />

    <View
        android:id="@+id/view4"
        android:layout_width="80dp"
        android:layout_height="80dp"
        android:background="@color/colorPrimaryDark" />

    <View
        android:id="@+id/view5"
        android:layout_width="80dp"
        android:layout_height="80dp"
        android:background="@color/colorPrimaryDark" />

    <View
        android:id="@+id/view6"
        android:layout_width="80dp"
        android:layout_height="80dp"
        android:background="@color/colorPrimaryDark" />

</androidx.constraintlayout.widget.ConstraintLayout>
この開発する時よく使う四つ属性を紹介しました。実はどうやってこの属性を活用するのが大事だと思ってます。


