Django-allauth
Django-allauthは、簡単にアカウント作成やログイン機能をDjangoで実装できるパッケージです。
- 現場で使えるDjangoの教科書 <<実践編>>に詳しい内容が記載されています。
本記事では、django-allauthのテンプレートを見栄えの良い表示にし、テストの実行まで記載しています。
プロジェクトの始め方は、Djangoのプロジェクトを始めるを参考にしてください。
allauthのテンプレート
base.pyに設定した、templates/allauthの下に、pythonの仮想環境に関するパッケージがあるvenv/libから
venv/lib/python3.6/site-packages/allauth/account/templatesの中身をtemplates/allauthにコピーします。
TEMPLATES = [
    {
        'BACKEND': 'django.template.backends.django.DjangoTemplates',
        'DIRS': [
            os.path.join(BASE_DIR, 'templates', 'allauth'), #ログインテンプレート等などを置く場所
            os.path.join(BASE_DIR, 'templates'), #テンプレートを置く場所
        ],
django-allauthのurlに関して
django-allauthで定義されている認証に関するurlは、venv/lib/python3.6/site-packages/allauth/account/urls.py
に記載されている。
urlpatterns = [
    url(r"^signup/$", views.signup, name="account_signup"),
    url(r"^login/$", views.login, name="account_login"),
    url(r"^logout/$", views.logout, name="account_logout"),
    ...
]
もし、ヘッダー(HTML)でログアウトへのリンクを書く場合は、上記のurlpatternsに設定してある、nameを以下のように記載すれば良い。
<a class="dropdown-item" href="{% url 'account_logout' %}">ログアウト</a>
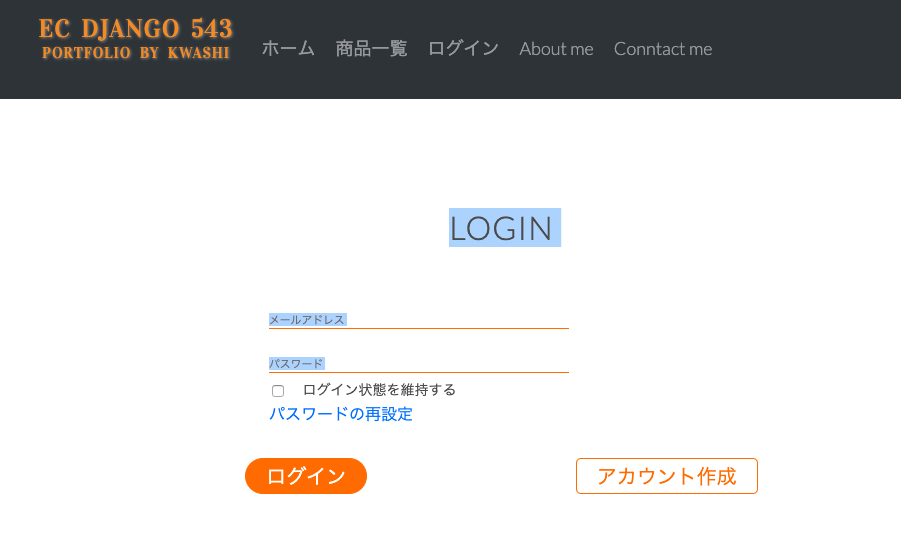
画面のデザイン
django-allauthの画面のhtmlを変更するとき、困ったことが、以下のように、テンプレート構文である{% for field in form %}のループでfieldが設定されるため、cssの設定方法が分かりづらいことでした。
{% for field in form%}
      <div class="account-form">
        <div class="account-filed">
            {% if forloop.last %}
            <span class="last-field">{{ field }}</span>
              <span class="login-maintain">ログイン状態を維持する</span>
            {% else %}
              <span class="non-last-field">{{ field }}</span>
            {% endif %}
        </div>

        <div class="account-helptext">
          {% if field.errors %}
            <p>{{ field.errors.0 }}</p>
          {% endif %}
        </div>
      </div>
    {% endfor%}
対処法としては、まず、初期状態で描画し、Googleの検証でどのような要素が含まれているか確認してみます。
そして、filedをspanやdivで囲み、その要素や新たな要素の変更・追加を行う必要があります。
例えば、上記のlogin.htmlにはinputが見て取れませんが、inputを含んだものになっています。
そのため、以下のように設定をすると、見た目が反映されます。
input {
    border:none;
    font-size: 60%;
    padding-top:25px;
    padding-bottom: 0px;
    border-bottom: 1px solid #ff7700;
    outline: none;
    font: 800;

}
ログイン画面の例は以下の通りです。
git : login.html
git : account-style.css
同様に、アカウント作成やパスワード変更の例もgitにあげています。
テスト
ここでは、アカウント作成、ログイン、ログアウト機能のテストを実装します。
まず、mainアプリにテストを行うフォルダを作成します。
mkdir ./main/tests
touch ./main/test/__init__.py
rm ./main/tests.py
test_allauth.pyにアカウント作成とログインに関するテストを書いた。
Djangoによるテストでは、test_*.pyというファイル形式とし、 ./manage.py test でテストを実行できる。
from django.test import TestCase
from django.core import mail
from allauth.account.forms import LoginForm, SignupForm
from allauth.utils import get_user_model
from django.contrib import auth
from django.urls import reverse
from unittest.mock import patch
from main import models

class TestSignUp(TestCase):
    def setUp(self):
        self.post_user_data = {
            "username": "username543",
            "email": "user@domain.com",
            "password1": "abcabcabc",
            "password2": "abcabcabc",
        }

    def test_user_signup_page_loads_correctly(self):
        response = self.client.get(reverse('account_signup'))
        self.assertEqual(response.status_code, 200)
        self.assertTemplateUsed(response, 'account/signup.html')
        self.assertContains(response, 'SIGN UP')
        self.assertIsInstance(
            response.context['form'], SignupForm
        )

    def test_user_signup_page_submission_works(self):
        post_data = self.post_user_data
        response = self.client.post(
            reverse("account_signup"), post_data
        )

        #homeへリダイレクト
        self.assertEqual(response.status_code, 302)

        #ユーザが追加されたか確認
        self.assertTrue(
            models.User.objects.filter(
                email=self.post_user_data['email']
            ).exists()
        )
        #ログイン状態か
        self.assertTrue(
            auth.get_user(self.client).is_authenticated
        )

    def test_user_login_page_loads_correctly(self):
        response = self.client.get(reverse('account_login'))
        self.assertEqual(response.status_code, 200)
        self.assertTemplateUsed(response, 'account/login.html')
        self.assertContains(response, 'LOGIN')
        self.assertIsInstance(
            response.context['form'], LoginForm
        )

    def test_user_login_page_submission_works(self):
        user1 = models.User.objects.create_user(
            self.post_user_data['username'],
            self.post_user_data['email'],
            self.post_user_data['password1']
        )
        user1.save()

        post_data = {
            'login':self.post_user_data['email'],
            'password':self.post_user_data['password1']
        }

        #ユーザが追加されたか確認
        self.assertTrue(
            models.User.objects.filter(
                email=self.post_user_data['email']
            ).exists()
        )

        response = self.client.post(
            reverse("account_login"), post_data
        )

        #ログイン状態か
        self.assertTrue(
            auth.get_user(self.client).is_authenticated
        )

        #homeへリダイレクト
        self.assertEqual(response.status_code, 302)
